
SELinuxは強制アクセス制御(MAC:Mandatory access control)とよばれる管理者による権限管理機能を提供する仕組みのひとつです。FISC(金融情報システムセンター)やNISC(内閣官房情報セキュリティセンター)などのガイドラインには強制アクセス制御に関する規定が存在し、もともとは政府の規定を満たすために作成されたのがSELinuxらしいです。
以上の説明やアットマークITのような経営者向けサイトを見ると、SELinuxは、いかにもコンサルタント様が導入を検討しそうな素晴らしい機能ですが、運用を行うのは至難の業です。
以下、私がSELinuxハンズオン – hbstudy #28に参加した時のメモを記します。何となく読んで頂きSELinuxの運用が如何に難しいかを悟って頂けると幸いです。なお、実務でのお役立ち度は期待しないでください。私がSELinuxを勉強して役にたったのはLIPC 303を受験した時くらいです。
当時勉強会で使用されたスライドは、以下を参照ください。
また、SELinuxハンズオン – hbstudy #28を開催頂いた、ishikawa84gさんのサイトは以下を参照ください。
SELinuxの無効化
多くの人は、SELinuxの無効化方法と設定確認ができれば充分かと思います。まずは、実務で必要になるレベルのお話をします。
SELinuxの無効化 – OS再起動ができる場合
SELinuxを無効にするには、/etc/sysconfig/selinux(実態は/etc/selinux/configへのシンボリックリンク)をエディタで開き、SELINUX=の部分を”enforcing”から”disabled”に変更します。
diff --git a/selinux/config b/selinux/config
index 29808ee..8237483 100644
--- a/selinux/config
+++ b/selinux/config
@@ -3,7 +3,7 @@
 #      enforcing - SELinux security policy is enforced.
 #      permissive - SELinux prints warnings instead of enforcing.
 #      disabled - SELinux is fully disabled.
-SELINUX=enforcing
+SELINUX=disabled
 # SELINUXTYPE= type of policy in use. Possible values are:
 #      targeted - Only targeted network daemons are protected.
 #      strict - Full SELinux protection.
設定を反映させるために、OSを再起動します。以上でSELinuxの無効化が完了しました。
# reboot
SELinuxの無効化 – OS再起動ができない場合
OS再起動はできないけど、SELinuxが有効になっていて困っている。そんな要望もあるかと思います。
結論から言えば「OS再起動なしにSELinuxを無効化する事はできない」ですが、SELinuxをpermissiveモードにする事で問題を回避できると思います。permissiveモードは、権限違反時に拒否を行わずログ出力のみを行うモードです。permissiveモードにしておけば、「権限不足であれが動かない」と言った悩みを解決できるはずです。
SELinuxの状態確認
想定する動作をしない場合、SELinuxが有効化どうかを確認します。注意して頂きたいのは、/etc/sysconfig/selinuxを見ても確認にはならない事です。SELinuxは設定反映には再起動が必要なので、設定ファイルを見ても確認作業, トラブルの切り分けにはなっていない事に注意して下さい。
今、SELinuxが有効であるかどうはgetenforceというコマンドを使用します。もし、Enforcingと表示されれば有効である事を意味し、”Disabled”と表示されれば無効である事を意味します。
[root@localhost ~]# getenforce
Enforcing
[root@localhost ~]#
SELinuxの設定
これ以降がSELinuxハンズオン – hbstudy#28参加時のメモです。勉強会当時はFedora16によるハンズオンでしたが、2014年10月にCentSO 6.5仕様になるよう一部加筆変更しております。
SELinux 設定ファイル
OSは起動時に”/etc/selinux/config”というファイルを読み込み、SELinuxのstate, typeを決定します。初期設定は以下の通りです。(初期設定はOSバージョンやディストリビューションによって異なります。また一部クラウド事業者はユーザビリティに配慮して、自動的にSELinuxを無効化してくれる事業者もあります。)
# This file controls the state of SELinux on the system.
# SELINUX= can take one of these three values:
#     enforcing - SELinux security policy is enforced.
#     permissive - SELinux prints warnings instead of enforcing.
#     disabled - No SELinux policy is loaded.
SELINUX=enforcing
# SELINUXTYPE= can take one of these two values:
#     targeted - Targeted processes are protected,
#     mls - Multi Level Security protection.
SELINUXTYPE=targeted
SELINUXはSELinux stateを決定するパラメータで、SELINUXTYPEはSELinux typeを決定するパラメータです。各パラメータに設定できる値は以下の通りです。
| SELINUX指定可能パラメタ | 意味 |
|---|---|
| enforcing | selinuxのポリシーに反する動作を全て拒否します |
| permissive | selinuxのポリシーに反する動作に対し警告のログを出力します |
| disabled | selinuxを無効化します |
| SELINUXTYPE指定可能パラメタ | 意味 |
|---|---|
| targeted | dhcpd, httpdなどの代表的なデーモンのみが制御対象となります |
| strict | 全てのデーモンが制御対象となります |
| MLS | 上記にRBAC(ロールベースアクセス制御)を追加し、strictよりも厳格な動作をします |
“/etc/selinux/config”を書き換える事でSELinux stateを変更できますが、setenforceコマンドを使用する事でも、OS再起動なしにSELinux stateを変更できます。引数にpermissive (または0), enforce (または1)を与える事でstateを指定する事ができます。
但し、setenforceコマンドでSELinux stateをdisableにする事はできません。disableに変更するためには”/etc/selinux/config”を書き換えた後に、OS再起動が必要になります。
実行例は以下の通りです。
[root@localhost ~]# setenforce 1
設定確認を行うにはgetenforce, sestatusなどのコマンドを使用します。
[root@localhost ~]# getenforce
Enforcing
[root@localhost ~]#
[root@localhost ~]#
[root@localhost ~]# sestatus
selinux status:                 enabled
SELinuxfs mount:                /sys/fs/selinux
Current mode:                   enforcing
Mode from config file:          enforcing
Policy version:                 26
Policy from config file:        targeted
[root@localhost ~]#
SELinuxの無効化
そもそも、SELinuxは政府機関や金融機関からの厳格なセキュリティ要求を満たすために開発された機能です。政府機関や金融機関からのよっぽどの強い要望がない限りは無効化をお勧めします殆どの場合は、守るべき情報資産の価値よりもメンテナンスコストの方が大きくなってしまいます。
SELinuxを無効にするためには、”/etc/selinux/config”のSELINUXパラメータをdisableに変更する事で対応できます。
# This file controls the state of SELinux on the system.
# SELINUX= can take one of these three values:
#     enforcing - SELinux security policy is enforced.
#     permissive - SELinux prints warnings instead of enforcing.
#     disabled - No SELinux policy is loaded.
SELINUX=disabled
# SELINUXTYPE= can take one of these two values:
#     targeted - Targeted processes are protected,
#     mls - Multi Level Security protection.
SELINUXTYPE=targeted
SELinuxの有効化
SELinuxを無効の状態から有効の状態に変更するには、注意が必要です。必ずpermissive modeにしてからOSを一度再起動する事をお勧めします。OS起動に必要な権限が与えられておらず、OS起動ができなくなってしまう恐れがあるからです。
permissive modeでOS再起動を行ったら、SELinuxのポリシー違反がない事を確認後にenforce modeに変更します。ポリシー違反は”/var/log/audit/audit.log”または”/var/log/messages”にdeniedと記載されます。ログファイルをdeniedでgrepする事で、ポリシー違反がない事を確認できます。
[root@localhost ~]# grep denied /var/log/audit/audit.log /var/log/messages
[root@localhost ~]#
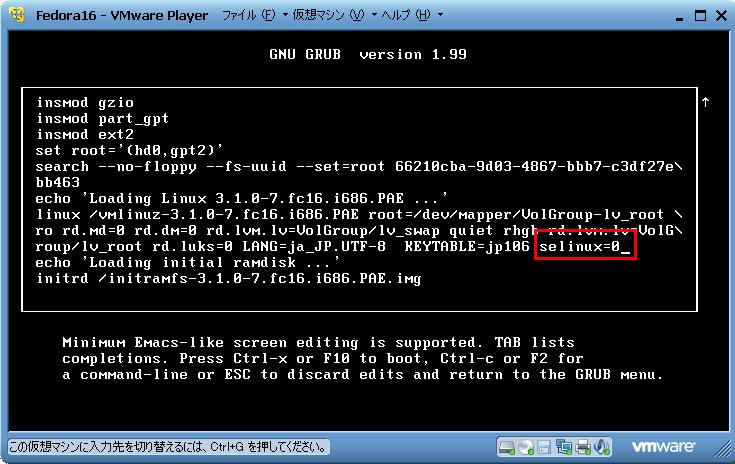
万が一、SELinuxによってOSが起動できなくなった場合は、以下のようにGRUBの画面で起動パラメータに”selinux=0″を与える事で、SELinuxが無効の状態で起動させる事ができます。
先ほど「必ずpermissiveモードにしてからOSを一度再起動する」事をお勧めしましたが、OSバージョンやディストリビューションによっては、permissiveモードのログ出力が機能しない事もあります。少なくとも、私が動作確認したCentOS 6.5 64bitのpermissiveモードでは、/var/log/messagesにも/var/log/audit/audit.logにもポリシー違反のログ出力は見当たりませんでした。
SELinux 動作概要
セキュリティポリシー
SELinuxはセキュリティポリシーで定義された動作のみを許可します。明示的に許可されていない動作は全て禁止されます (“ホワイトリスト指定”, “暗黙のdeny all”と同じ考え方です)。
セキュリティポリシーは、“誰が(Subject)” “何に(Object)” “何をできるか(Action)”の集合です。例えば、以下は”Webサーバが、HTML文書を、読み込める”というポリシーになります。
allow httpd_t http_sys_content_t : file { read } ;
実際のセキュリティーポリシーは、sesearchというコマンドで調べる事ができます。seseachはsetools-consoleというパッケージ内に含まれていますでの、yumなどでインストールして下さい。
# yum install setools-console
seseachの使用例は以下の通りです。なお、大かっこ ( “[“, “]” )で囲まれた部分はBooleanと呼ばれる値で、この値が真か偽かによってアクセス権を制御する変数です。
[root@localhost ~]# sesearch -A -C -s httpd_t -t httpd_sys_content_t -c file
Found 3 semantic av rules:
   allow httpd_t httpd_sys_content_t : file { ioctl read getattr lock open } ;
ET allow httpd_t httpd_sys_content_t : file { ioctl read getattr lock open } ; [ httpd_builtin_scripting ]
ET allow httpd_t httpdcontent : file { ioctl read write create getattr setattr lock append unlink link rename execute open } ; [ httpd_enable_cgi httpd_unified && httpd_builtin_scripting && ]

[root@localhost ~]#
セキュリティコンテキスト
SELinuxでは、ファイル・プロセス・ソケットなどあらゆるリソースに対してセキュリティコンテキストと呼ばれるアクセス可否を判断する属性が付与されています。このセキュリティコンテキストを確認するためには、ls, ps, idなどの一般的なコマンドに-Zオプションを付ける事で確認できます。
[root@localhost ~]# ps -Z
LABEL                             PID TTY          TIME CMD
unconfined_u:unconfined_r:unconfined_t:s0-s0:c0.c1023 1332 pts/1 00:00:00 bash
unconfined_u:unconfined_r:unconfined_t:s0-s0:c0.c1023 1346 pts/1 00:00:00 ps
[root@localhost ~]#
[root@localhost ~]#
[root@localhost ~]# ls -aZ
dr-xr-x---. root root system_u:object_r:admin_home_t:s0 .
dr-xr-xr-x. root root system_u:object_r:root_t:s0      ..
-rw-------. root root system_u:object_r:admin_home_t:s0 .bash_history
-rw-r--r--. root root system_u:object_r:admin_home_t:s0 .bash_logout
-rw-r--r--. root root system_u:object_r:admin_home_t:s0 .bash_profile
-rw-r--r--. root root system_u:object_r:admin_home_t:s0 .bashrc
-rw-r--r--. root root system_u:object_r:admin_home_t:s0 .cshrc
drwxr-----. root root system_u:object_r:admin_home_t:s0 .pki
drwx------. root root system_u:object_r:ssh_home_t:s0  .ssh
-rw-r--r--. root root system_u:object_r:admin_home_t:s0 .tcshrc
-rw-------. root root system_u:object_r:admin_home_t:s0 .viminfo
[root@localhost ~]#
[root@localhost ~]#
[root@localhost ~]# id -Z
unconfined_u:unconfined_r:unconfined_t:s0-s0:c0.c1023
[root@localhost ~]#
セキュリティコンテキストはセミコロン区切りで4つのフィールドに分かれます。各フィールドの意味は、右から順に以下の通りです。なお、この中で最もトラブル対応で役立つのは、”タイプ属性”です。初学者は、最低限”タイプ属性”だけは覚えておくようにすると良いと思います。
| 属性 | 例 | 意味 |
|---|---|---|
| ユーザ属性 | system_u | サブジェクトやオブジェクトに割り当てるSELinuxのユーザID |
| ロール属性 | object_r | ユーザに割り当てる権限の範囲を定義したもの。ロールが不要なオブジェクトにはダミーロール(object_r)が付与されます。 |
| タイプ属性 | admin_home_t | SELinuxがアクセス可否を判定する時に使用するセキュリティ属性 |
| 機密ラベル | s0 | 組織・役職などで分ける識別子 |
trouble shoot セキュリティコンテキストの再割当
以下、apacheがインストールされている前提で話を進めます。apache, iptablesなどの設定については、説明を省略します。
トラブル概要
以下の手順でindex1.htmlとindex2.htmlを公開します。
# echo 'It Works!' > /var/www/html/index1.html
# echo 'It Works!' > ~/index2.html
# mv ~/index2.html /var/www/html/index2.html
curl, wgetなどで動作確認を行うと、index1.htmlは正常に応答しますがindex2.htmlは403エラーを返します。この403エラーの原因についてトラブルシュートを行います。
[root@localhost ~]# curl -I http://localhost/index1.html
HTTP/1.1 200 OK
Date: Sun, 19 Oct 2014 06:28:50 GMT
Server: Apache/2.2.15 (CentOS)
Last-Modified: Sun, 19 Oct 2014 06:28:04 GMT
ETag: "e01d6-a-505c0b362053c"
Accept-Ranges: bytes
Content-Length: 10
Connection: close
Content-Type: text/html; charset=UTF-8

[root@localhost ~]#
[root@localhost ~]#
[root@localhost ~]# curl -I http://localhost/index2.html
HTTP/1.1 403 Forbidden
Date: Sun, 19 Oct 2014 06:28:57 GMT
Server: Apache/2.2.15 (CentOS)
Connection: close
Content-Type: text/html; charset=iso-8859-1

[root@localhost ~]#
切り分け
一番最初にやるべき切り分けは、SELinuxによる権限不足なのか、それ以外の問題なのかの切り分けです。permissiveモードに変更して想定通りの動作をするか否かで、SELinuxなのかそれ以外なのかを判別します。
[root@localhost ~]# setenforce permissive
[root@localhost ~]# getenforce
Permissive
[root@localhost ~]#
[root@localhost ~]#
[root@localhost ~]# curl -I http://localhost/index2.html
HTTP/1.1 200 OK
Date: Sun, 19 Oct 2014 06:38:04 GMT
Server: Apache/2.2.15 (CentOS)
Last-Modified: Sun, 19 Oct 2014 06:28:10 GMT
ETag: "180f37-a-505c0b3bd8704"
Accept-Ranges: bytes
Content-Length: 10
Connection: close
Content-Type: text/html; charset=UTF-8

[root@localhost ~]#
permissive modeにすると正常応答するので、SELinuxによってアクセスが拒否されている事が推測できます。
セキュリティコンテキスト 再割当
SELinuxのログを確認します。/var/www/html/index2.htmlに対して、getattr, readなどのシステムコールが許可されていない事が読み取れます。
さらに詳しくログを読み解きます。scontext, tcontextは、それぞれソース・ターゲットのセキュリティコンテキストを表します。つまり、”root:system_r:httpd_t:s0″が”root:object_r:user_home_t:s0″に対して、getattr, readできない旨を表しています。
[root@localhost ~]# grep denied /var/log/messages
Oct 19 15:46:46 skr145 kernel: type=1400 audit(1413701206.718:3): avc:  denied  { getattr } for  pid=1204 comm="httpd" path="/var/www/html/index2.html" dev=vda3 ino=1576759 scontext=unconfined_u:system_r:httpd_t:s0 tcontext=unconfined_u:object_r:admin_home_t:s0 tclass=file
Oct 19 15:46:46 skr145 kernel: type=1400 audit(1413701206.718:4): avc:  denied  { read } for  pid=1204 comm="httpd" name="index2.html" dev=vda3 ino=1576759 scontext=unconfined_u:system_r:httpd_t:s0 tcontext=unconfined_u:object_r:admin_home_t:s0 tclass=file
Oct 19 15:46:46 skr145 kernel: type=1400 audit(1413701206.718:5): avc:  denied  { open } for  pid=1204 comm="httpd" name="index2.html" dev=vda3 ino=1576759 scontext=unconfined_u:system_r:httpd_t:s0 tcontext=unconfined_u:object_r:admin_home_t:s0 tclass=file
[root@localhost ~]#
/var/www/html配下のファイルのセキュリティコンテキストを確認します。index1.htmlのユーザ属性はhttpd_sys_content_tなのでhttpdから読取可能ですが、index2.htmlのユーザ属性はuser_home_tなのでhttpdから読取不可である事が分かりました。
[root@localhost ~]# ls -lZ /var/www/html/
-rw-r--r--. root root unconfined_u:object_r:httpd_sys_content_t:s0 index1.html
-rw-r--r--. root root unconfined_u:object_r:admin_home_t:s0 index2.html
[root@localhost ~]#
セキュリティコンテキストは、どのディレクトリにファイルが作成されたかによって自動的に作成されます。ファイルを移動した場合は、セキュリティコンテキストの再割当をする事によって対応が可能です。restorecon コマンドを使用する事でセキュリティコンテキストの再割当ができます。
[root@localhost ~]# restorecon -RF /var/www/html
[root@localhost ~]# ls -lZ /var/www/html/
-rw-r--r--. root root system_u:object_r:httpd_sys_content_t:s0 index1.html
-rw-r--r--. root root system_u:object_r:httpd_sys_content_t:s0 index2.html
[root@localhost ~]#
SELinux有効後に、index2.htmlにアクセス可能になった事を確認します。
[root@localhost ~]# setenforce enforcing
[root@localhost ~]# curl -I http://localhost/index2.html
HTTP/1.1 200 OK
Date: Sun, 19 Oct 2014 07:01:43 GMT
Server: Apache/2.2.15 (CentOS)
Last-Modified: Sun, 19 Oct 2014 06:28:10 GMT
ETag: "180f37-a-505c0b3bd8704"
Accept-Ranges: bytes
Content-Length: 10
Connection: close
Content-Type: text/html; charset=UTF-8

[root@localhost ~]#
trouble shoot booleanの編集
トラブル概要
httpdにおいて、ユーザディレクトリを許可します。/etc/httpd/conf/httpd.confをエディタで開き、”UserDir disabled”をコメントアウトし、さらに”UserDir public_html”のコメントアウトを外します。
diff --git a/httpd/conf/httpd.conf b/httpd/conf/httpd.conf
index d87a326..6f9e052 100644
--- a/httpd/conf/httpd.conf
+++ b/httpd/conf/httpd.conf
@@ -363,14 +363,14 @@ DocumentRoot "/var/www/html"
     # of a username on the system (depending on home directory
     # permissions).
     #
-    UserDir disabled
+    #UserDir disabled

     #
     # To enable requests to /~user/ to serve the user's public_html
     # directory, remove the "UserDir disabled" line above, and uncomment
     # the following line instead:
     #
-    #UserDir public_html
+    UserDir public_html

 </IfModule>
設定反映のために、httpdの再起動を行います。
# /etc/init.d/httpd restart
sampleユーザを作成し、公開ディレクトリにindex.htmlを配布します。
[root@localhost ~]# useradd sample
[root@localhost ~]# su - sample
[sample@localhost ~]$ mkdir ~/public_html
[sample@localhost ~]$ echo 'It works!' > ~/public_html/index.html
[sample@localhost ~]$ chmod -R a+x /home/sample
しかし、index.htmlの取得を試みると、403エラーを返されます。このエラーの原因について考察します。
[sample@localhost ~]$ curl -I http://localhost/~sample/index.html
HTTP/1.1 403 Forbidden
Date: Sun, 19 Oct 2014 07:07:18 GMT
Server: Apache/2.2.15 (CentOS)
Connection: close
Content-Type: text/html; charset=iso-8859-1

[sample@localhost ~]$
切り分け
切り分けを行うために、一時的にpermissive modeに変更します。permissive modeでは正常応答を返す事から、SELinuxによってアクセスが拒否されている事が推測できます。
[root@localhost ~]# setenforce permissive
[root@localhost ~]# curl -I http://localhost/~sample/index.html
HTTP/1.1 200 OK
Date: Sun, 19 Oct 2014 07:08:58 GMT
Server: Apache/2.2.15 (CentOS)
Last-Modified: Sun, 19 Oct 2014 07:06:27 GMT
ETag: "2c000e-a-505c13ca04610"
Accept-Ranges: bytes
Content-Length: 10
Connection: close
Content-Type: text/html; charset=UTF-8

[root@localhost ~]#
エラー原因の確認
エラーの原因を確認するためenforcing modeに戻します。余計なログを排除するために一度”/var/log/messages”を消します。その後、curlコマンドを実行し、エラーログを出力させます。
[root@localhost ~]# setenforce enforcing
[root@localhost ~]# echo "" > /var/log/messages
[root@localhost ~]# curl -I http://localhost/~sample/index.html
HTTP/1.1 403 Forbidden
Date: Sun, 19 Oct 2014 07:33:44 GMT
Server: Apache/2.2.15 (CentOS)
Connection: close
Content-Type: text/html; charset=iso-8859-1

[root@localhost ~]#
ログを確認します。”system_r:httpd_t”が”user_home_dir_t”に対して、seach, getattrする権利がない事が分かりました。
[root@localhost ~]# grep denied /var/log/messages
Oct 19 16:33:44 localhost kernel: type=1400 audit(1413704024.639:25): avc:  denied  { search } for  pid=1354 comm="httpd" name="sample" dev=vda3 ino=2883593 scontext=unconfined_u:system_r:httpd_t:s0 tcontext=unconfined_u:object_r:user_home_dir_t:s0 tclass=dir
Oct 19 16:33:44 localhost kernel: type=1400 audit(1413704024.639:26): avc:  denied  { getattr } for  pid=1354 comm="httpd" path="/home/sample" dev=vda3 ino=2883593 scontext=unconfined_u:system_r:httpd_t:s0 tcontext=unconfined_u:object_r:user_home_dir_t:s0 tclass=dir
[root@localhost ~]#
“system_r:httpd_t”が”user_home_dir_t”に対して”何ができるか”を確認します。ポリシーを表示されるには、以下のようにsesearchコマンドを実行して下さい。実行結果から、search, getattrが認められるかどうかは、”httpd_enable_homedirs”, “httpd_read_user_content”のboolean次第である事が分かります。
[root@localhost ~]# sesearch -A -C -s httpd_t -t user_home_dir_t -c dir
Found 2 semantic av rules:
DT allow httpd_t user_home_dir_t : dir { ioctl read getattr lock search open } ; [ httpd_enable_homedirs ]
DT allow httpd_t user_home_dir_t : dir { ioctl read getattr lock search open } ; [ httpd_read_user_content httpd_builtin_scripting && ]

[root@localhost ~]#
boolean の変更
booleanの値を書きかえるには、setseboolというコマンドを使用します。boolean書き換え後、curlで200番応答が返る事を確認します。
なお、以下の設定はOS再起動時に消えてしまいます。OS再起動後も設定を反映させたい場合は、setseboolオプションに-Pオプションを付けて下さい。
[root@localhost ~]# setsebool httpd_enable_homedirs 1
[root@localhost ~]# setsebool httpd_read_user_content 1
[root@localhost ~]#
[root@localhost ~]#
[root@localhost ~]# curl -I http://localhost/~sample/index.html
HTTP/1.1 200 OK
Date: Sun, 19 Oct 2014 07:38:25 GMT
Server: Apache/2.2.15 (CentOS)
Last-Modified: Sun, 19 Oct 2014 07:06:27 GMT
ETag: "2c000e-a-505c13ca04610"
Accept-Ranges: bytes
Content-Length: 10
Connection: close
Content-Type: text/html; charset=UTF-8

[root@localhost ~]#
trouble shoot セキュリティポリシーの作成
トラブル概要
/wwwをDocumentRootとして公開し、index.htmlを作成します。まず、/etc/httpd/conf/httpd.confの設定を以下のように書き換えDocumentRootを変更します。
diff --git a/httpd/conf/httpd.conf b/httpd/conf/httpd.conf
index 6f9e052..510b2ec 100644
--- a/httpd/conf/httpd.conf
+++ b/httpd/conf/httpd.conf
@@ -289,7 +289,7 @@ UseCanonicalName Off
 # documents. By default, all requests are taken from this directory, but
 # symbolic links and aliases may be used to point to other locations.
 #
-DocumentRoot "/var/www/html"
+DocumentRoot "/www"

 #
 # Each directory to which Apache has access can be configured with respect
httpd再起動により設定を反映させます。
# /etc/init.d/httpd restart
DocumentRootである/wwwに、index.htmlを作成します。
[root@localhost ~]# mkdir /www
[root@localhost ~]# echo 'It works!' > /www/index.html
[root@localhost ~]# chmod -R 777 /www
この状態で、index.htmlの取得を試みると403エラーが返されます。この原因について考察します。
[root@localhost ~]# curl -I http://localhost/index.html
HTTP/1.1 403 Forbidden
Date: Sun, 19 Oct 2014 07:46:23 GMT
Server: Apache/2.2.15 (CentOS)
Connection: close
Content-Type: text/html; charset=iso-8859-1

[root@localhost ~]#
切り分け
切り分けを行うために、一時的にpermissive modeに変更します。permissive modeでは正常応答を返す事から、SELinuxによってアクセスが拒否されている事が推測できます。
[root@localhost ~]# setenforce permissive
[root@localhost ~]# curl -I http://localhost/index.html
HTTP/1.1 200 OK
Date: Sun, 19 Oct 2014 07:47:45 GMT
Server: Apache/2.2.15 (CentOS)
Last-Modified: Sun, 19 Oct 2014 07:46:01 GMT
ETag: "320002-a-505c1ca260a2e"
Accept-Ranges: bytes
Content-Length: 10
Connection: close
Content-Type: text/html; charset=UTF-8

[root@localhost ~]#
エラー原因の確認
エラーの原因を確認するためenforcing modeに戻します。その後、curlコマンドを実行し、エラーログを出力させます。
[root@localhost ~]# setenforce enforcing
[root@localhost ~]# echo "" > /var/log/messages
[root@localhost ~]# curl -I http://localhost/index.html
HTTP/1.1 403 Forbidden
Date: Sun, 19 Oct 2014 07:50:14 GMT
Server: Apache/2.2.15 (CentOS)
Connection: close
Content-Type: text/html; charset=iso-8859-1

[root@localhost ~]#
ログを確認します。”system_r:httpd_t”が”default_t”に対して、getattrする権利がない事が分かりました。ここで登場するタイプ”default_t”とは、特殊なタイプでマッチするポリシーが存在しない事を意味します。
[root@localhost ~]# grep denied /var/log/audit/audit.log
Oct 19 16:50:14 localhost kernel: type=1400 audit(1413705014.676:40): avc:  denied  { getattr } for  pid=1535 comm="httpd" path="/www/index.html" dev=vda3 ino=3276802 scontext=unconfined_u:system_r:httpd_t:s0 tcontext=unconfined_u:object_r:default_t:s0 tclass=file
Oct 19 16:50:14 localhost kernel: type=1400 audit(1413705014.676:41): avc:  denied  { getattr } for  pid=1535 comm="httpd" path="/www/index.html" dev=vda3 ino=3276802 scontext=unconfined_u:system_r:httpd_t:s0 tcontext=unconfined_u:object_r:default_t:s0 tclass=file
[root@localhost ~]#
ダメ押しの意味も込めて、sesearchコマンドでも該当するポリシーが存在しない事を確認します。
[root@localhost ~]# sesearch -A -C -s httpd_t -t default_t -c file

[root@localhost ~]#
セキュリティポリシーの作成
“http_d”は”httpd_sys_content_t”に対して、read, getattrする事ができます。従って、/www配下に作成されたファイルに対してユーザ属性”httpd_sys_content_t”を付与するようセキュリティポリシーを編集します。
セキュリティポリシーはsemanageコマンドを使用して編集します。semanageはpolicycoreutils-pythonパッケージに含まれていますので、以下の要領でpolicycoreutils-pythonをインストールして下さい。
# yum install policycoreutils-python
semanageコマンドを用いてセキュリティポリシーを作成します。その後、セキュリティコンテキストを再割当するためにrestoreconコマンドを実行します。curlで200番応答が返ってくる事を確認して下さい。
[root@localhost ~]# semanage fcontext -a -t httpd_sys_content_t "/www/.*"
[root@localhost ~]# restorecon -RF /www
[root@localhost ~]# curl -I http://localhost/index.html
HTTP/1.1 200 OK
Date: Sun, 19 Oct 2014 08:09:29 GMT
Server: Apache/2.2.15 (CentOS)
Last-Modified: Sun, 19 Oct 2014 07:46:01 GMT
ETag: "320002-a-505c1ca260a2e"
Accept-Ranges: bytes
Content-Length: 10
Connection: close
Content-Type: text/html; charset=UTF-8

[root@localhost ~]#
セキュリティポリシーの自動生成
設定削除
/var/log/audit/audit.logからセキュリティポリシーを作成するのが、非常に困難な場合もあります。そのような場合、最終手段として、audit.logからセキュリティポリシーを自動生成する手法もあります。(但し、許可してはいけないポリシーを許可してしまうリスクは非常に高い事を留意ください)
以前の手順で作成したセキュリティポリシーを自動生成する手法を紹介します。まず、以前の手順で投入したセキュリティポリシーを削除します。
[root@localhost ~]# semanage fcontext -d -t httpd_sys_content_t "/www/.*"
[root@localhost ~]# restorecon -RF v /www
ログの生成
不要なログを削除した後に、audit.logにエラーログを記録させます。
[root@localhost ~]# echo "" > /var/log/messages
[root@localhost ~]# curl -I http://localhost/index.html
HTTP/1.1 403 Forbidden
Date: Sun, 19 Oct 2014 08:14:07 GMT
Server: Apache/2.2.15 (CentOS)
Connection: close
Content-Type: text/html; charset=iso-8859-1

[root@localhost ~]#
[root@localhost ~]#
[root@localhost ~]# cat /var/log/messages

Oct 19 17:14:07 localhost kernel: type=1400 audit(1413706447.388:44): avc:  denied  { getattr } for  pid=1537 comm="httpd" path="/www/index.html" dev=vda3 ino=3276802 scontext=unconfined_u:system_r:httpd_t:s0 tcontext=system_u:object_r:default_t:s0 tclass=file
Oct 19 17:14:07 localhost kernel: type=1400 audit(1413706447.388:45): avc:  denied  { getattr } for  pid=1537 comm="httpd" path="/www/index.html" dev=vda3 ino=3276802 scontext=unconfined_u:system_r:httpd_t:s0 tcontext=system_u:object_r:default_t:s0 tclass=file
[root@localhost ~]#
セキュリティポリシーの生成
audit.logからセキュリティポリシーを生成するには、audit2allowコマンドを使用します。-mでポリシー名を指定しますが、ポリシー名は重複しない名前ならば特に指定はありません。生成されたポリシーは語尾が.teで終わるファイルに出力して下さい。その後、以下の要領でコンパイルし、local.ppというファイルが作成された事を確認します。
[root@localhost ~]# audit2allow -R -i /var/log/messages -m local > local.te
[root@localhost ~]# make -f /usr/share/selinux/devel/Makefile
Compiling targeted local module
/usr/bin/checkmodule:  loading policy configuration from tmp/local.tmp
/usr/bin/checkmodule:  policy configuration loaded
/usr/bin/checkmodule:  writing binary representation (version 10) to tmp/local.mod
Creating targeted local.pp policy package
rm tmp/local.mod.fc tmp/local.mod
[root@localhost ~]#
[root@localhost ~]#
[root@localhost ~]#
[root@localhost ~]# ls -l
total 72
-rw-r--r--. 1 root root     0 Oct 19 17:15 local.fc
-rw-r--r--. 1 root root    23 Oct 19 17:15 local.if
-rw-r--r--. 1 root root 60928 Oct 19 17:15 local.pp
-rw-r--r--. 1 root root   128 Oct 19 17:15 local.te
drwxr-xr-x. 2 root root  4096 Oct 19 17:15 tmp
[root@localhost ~]#
セキュリティポリシーの読込
セキュリティポリシーを読み込むにはsemoduleコマンドを用います。-iオプションがインストール、-lオプションが一覧表示、-Rオプションがリストアです。。
以下のようにコマンドを実行し、local.ppというファイルを元にセキュリティポリシーをインストールします。その後、”semodule -l”でインストールが完了している事を確認します。
[root@localhost ~]# semodule -i local.pp
[root@localhost ~]# semodule -l | grep local
local   1.0
[root@localhost ~]#
“semodule -R”でインストールしたセキュリティポリシーをリストアします。
[root@localhost ~]# semodule -R
最後に、curlコマンドを用いて200番応答が返る事を確認します。
[root@localhost ~]# curl -I http://localhost/index.html
HTTP/1.1 200 OK
Date: Sun, 19 Oct 2014 08:22:39 GMT
Server: Apache/2.2.15 (CentOS)
Last-Modified: Sun, 19 Oct 2014 07:46:01 GMT
ETag: "320002-a-505c1ca260a2e"
Accept-Ranges: bytes
Content-Length: 10
Connection: close
Content-Type: text/html; charset=UTF-8

[root@localhost ~]#
Tips
SELinuxのログ出力先
SELinuxのログ出力先は、OSバージョンやディストリビューションによって異なります。多くの場合は、/var/log/audit/audit.logか/var/log/messagesかのどちらかでしょう。
検証用途で扱いやすいCentOSですが、これは/var/log/messagesにログ出力されるため、SELinuxの勉強には向いていません。
/var/log/audit/audit.logにポリシー違反を出力してもらった方が、何かと読みやすいと思います。ですので、SELinuxの勉強をするならば/var/log/audit/audit.logにログ出力するFedoraをお勧めします。
動作確認環境
勉強会当時の動作確認環境は以下の通りです。勉強会で使用するSELinuxの機能が安定して動作するという事で、fedora16によるハンズオンを開催しております。
- 動作確認日 2011/12/09
- fedora 16
後日、CentOS 6.5による動作確認を行いましたが、ログ出力の挙動がFedora 16と異なる事が確認できました。CentOSのログ出力は扱いづらかったので、学習用途ならばCentOSよりもFedoraをお勧めします。
- 動作確認日 : 2014/10/19
- CentOS 6.5
