Azure アプリケーションゲートウェイ(Application Gateway)の基本操作をまとめます。Azureの負荷分散のマネージドサービスは「ロードバランサ」「アプリケーションゲートウェイ」などがあり、「アプリケーションゲートウェイ」はホストヘッダーやURLに基づいた比較的高度な負荷分散ルールを定義する事ができます。このページでは「URLに基づく負荷分散」「ホスト名に基づく負荷分散」の方法についてまとめます。
前提
公式ドキュメント
参考になる公式ドキュメントを以下に示します。
- クイック スタート:Azure Application Gateway による Web トラフィックの転送
- 複数のサイトをホストする – GUI
- 複数のサイトをホストする – CLI
- URLに基づいてルーティングする – GUI
- URLに基づいてルーティングする – CLI
事前設定
以下、リソースグループを作成します。
az group create --name MyResourceGroup --location japaneast
以下、仮想ネットワークを作成します。
az network vnet create \
  --resource-group MyResourceGroup \
  --name MyVnet \
  --address-prefix 172.16.0.0/16

az network vnet subnet create \
  --resource-group MyResourceGroup \
  --name Subnet01 \
  --vnet-name MyVnet \
  --address-prefixes 172.16.1.0/24

az network vnet subnet create \
  --resource-group MyResourceGroup \
  --name Subnet02 \
  --vnet-name MyVnet \
  --address-prefixes 172.16.2.0/24
以下、仮想マシンを作成します。
for i in 10 11 12 20 21 22; do
  az vm create \
    --resource-group MyResourceGroup \
    --name linux0${i} \
    --image UbuntuLTS \
    --size Standard_B1s \
    --admin-username azureuser \
    --ssh-key-values ~/.ssh/authorized_keys \
    --vnet-name MyVnet \
    --subnet subnet02 \
    --private-ip-address 172.16.2.${i} \
    --custom-data /dev/stdin << 'EOF'
#!/bin/bash
apt-get -y install nginx
echo "this is ${HOSTNAME}" > /var/www/html/index.html
mkdir /var/www/html/images
touch /var/www/html/images/sample.png
mkdir /var/www/html/video
touch /var/www/html/images/sample.mp4
EOF
done
アプリケーションゲートウェイの基本的な構成
構成
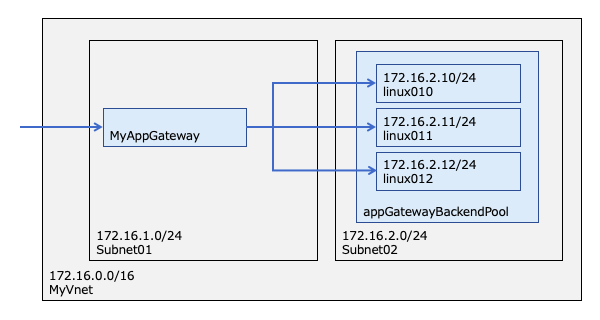
アプリケーションゲートウェイを介して3台の仮想マシンに負荷分散される構成を作成します。
パブリックIPアドレスの作成
アプリケーションゲートウェイに付与するパブリックIPアドレスを作成します。
az network public-ip create \
  --resource-group MyResourceGroup \
  --name MyPublicAddress \
  --sku Standard
アプリケーションゲートウェイの作成
アプリケーションゲートウェイを作成します。ポータル(GUI)で操作する場合は「バックエンドプール」「HTTP設定」などを明示指定しますが、CLI操作の場合は指定不可です。CLI操作の場合は、「バックエンドプール」「HTTP設定」がデフォルトの名前で自動的に作成されます。
az network application-gateway create \
  --name MyAppGateway \
  --resource-group MyResourceGroup \
  --capacity 2 \
  --sku Standard_v2 \
  --public-ip-address MyPublicAddress \
  --vnet-name MyVnet \
  --subnet Subnet01
バックエンドプールの編集
デフォルト設定として作成されるバックエンドプール名を確認します。以下の出力から、「appGatewayBackendPool」という名前のバックエンドプールが作成された事が分かります。
$ az network application-gateway address-pool list \
  --gateway-name MyAppGateway \
  --resource-group MyResourceGroup
[
  {
    "backendAddresses": [],
    "backendIpConfigurations": null,
    "etag": "W/\"4ed32791-8e00-41bc-b7d6-e11f6b10568b\"",
    "id": "/subscriptions/2e2f81a9-b030-410f-9784-c582580c932e/resourceGroups/MyResourceGroup/providers/Microsoft.Network/applicationGateways/MyAppGateway/backendAddressPools/appGatewayBackendPool",
    "name": "appGatewayBackendPool",
    "provisioningState": "Succeeded",
    "resourceGroup": "MyResourceGroup",
    "type": "Microsoft.Network/applicationGateways/backendAddressPools"
  }
]
バックエンドプールにサーバを追加します。引数serversには振り分け対象となるサーバのIPアドレスを指定してください。
仮想マシンのNICや仮想マシンスケールセットを追加する方法は後述の補足章を参照ください。
az network application-gateway address-pool update \
  --gateway-name MyAppGateway \
  --resource-group MyResourceGroup \
  --name appGatewayBackendPool \
  --servers 172.16.2.10 172.16.2.11 172.16.2.12
疎通確認
アプリケーションゲートウェイに紐づけられたパブリックIPアドレスを確認します。
$ az network public-ip show \
  --resource-group MyResourceGroup \
  --name MyPublicAddress \
  --query "ipAddress"
"20.222.123.87"
アプリケーションゲートウェイへhttpリクエストを送り、仮想マシン3台に負荷分散される事を確認します。
admin@mac19 ~ % curl 20.222.123.87
this is linux010
admin@mac19 ~ % curl 20.222.123.87
this is linux011
admin@mac19 ~ % curl 20.222.123.87
this is linux011
admin@mac19 ~ % curl 20.222.123.87
this is linux012
admin@mac19 ~ %
URLに基づく負荷分散
構成
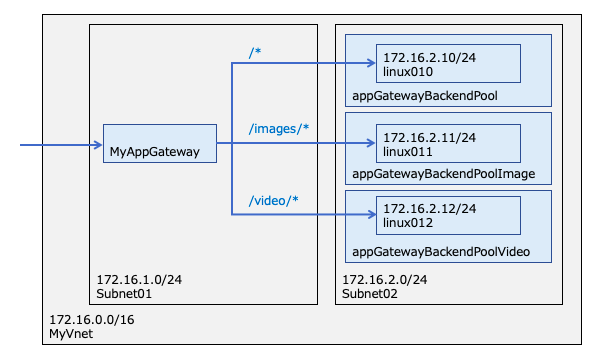
URL毎に異なるホストに振り分ける構成を作成します。
バックエンドプールの追加
イメージ用途、ビデオ用途のバックエンドプールを新規作成します。
az network application-gateway address-pool create \
  --gateway-name MyAppGateway \
  --resource-group MyResourceGroup \
  --name appGatewayBackendPoolImage \
  --servers 172.16.2.11

az network application-gateway address-pool create \
  --gateway-name MyAppGateway \
  --resource-group MyResourceGroup \
  --name appGatewayBackendPoolVideo \
  --servers 172.16.2.12
その他用途のバックエンドプールの振り分け対象をlinux010(172.16.2.10)のみに変更します。
az network application-gateway address-pool update \
  --gateway-name MyAppGateway \
  --resource-group MyResourceGroup \
  --name appGatewayBackendPool \
  --servers 172.16.2.10
HTTP設定の確認
デフォルト設定で作成される「HTTP設定」の名前を調査します。この名前は後続の操作でurl-path-mapを作成する時に必要になる情報です。
ポータル(GUI)で確認する場合は、すべてのサービスから、「ネットワーキング」「アプリケーションゲートウェイ」「アプリケーションゲートウェイ名(MyAppGateway)」「HTTP 設定」の順に画面遷移する事で確認できます。
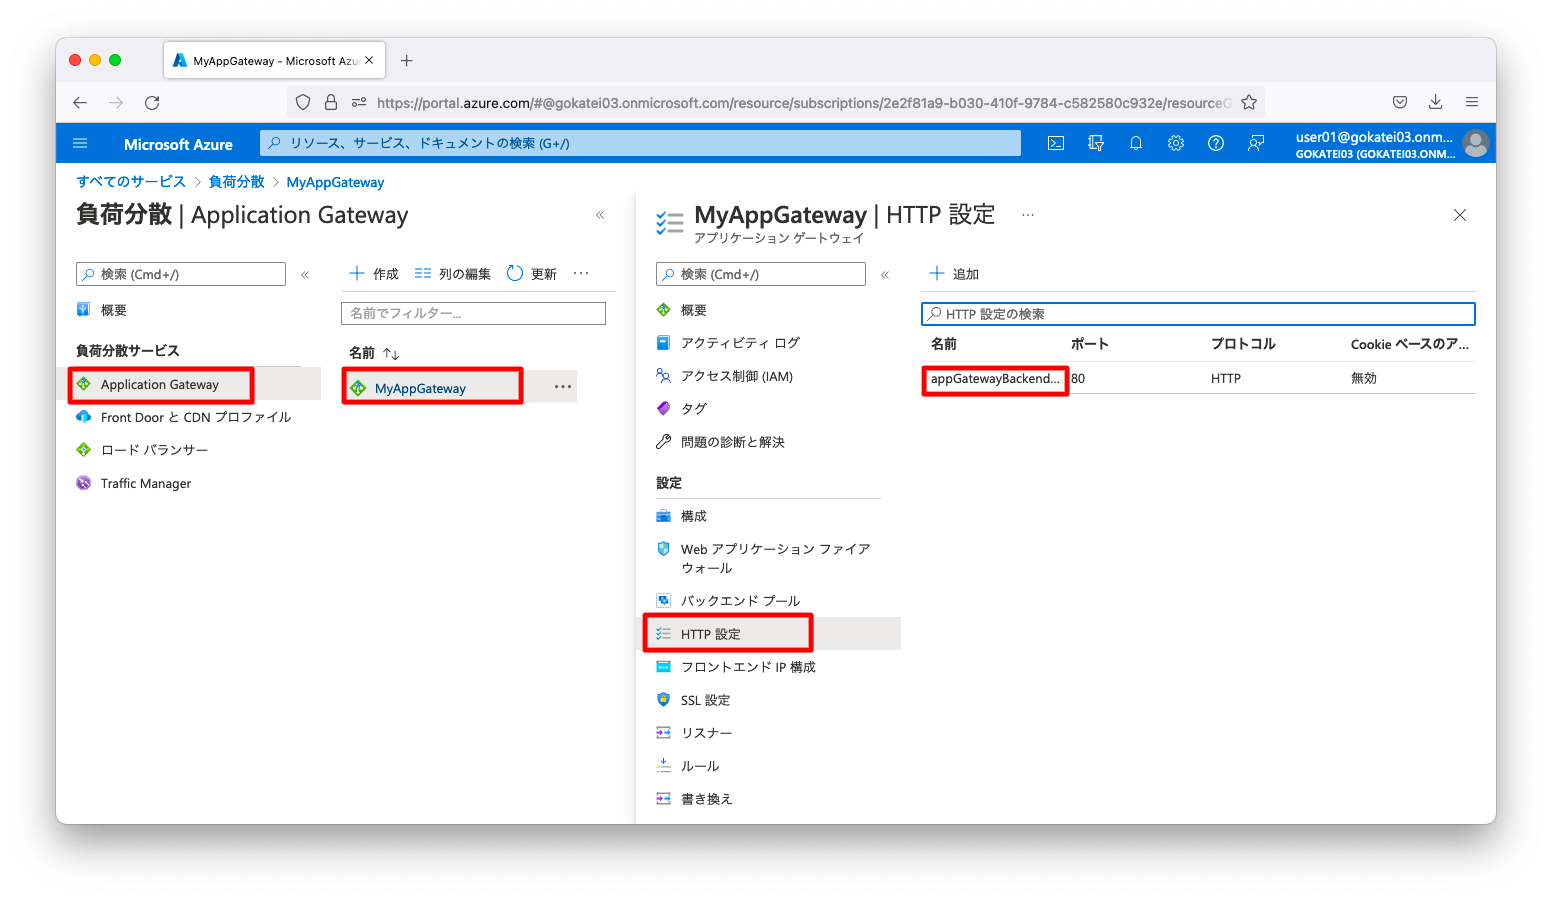
CLIで確認する場合は、以下のコマンドを使用します。
$ az network application-gateway http-settings list \
  --gateway-name MyAppGateway \
  --resource-group MyResourceGroup
[
  {
    "affinityCookieName": null,
    "authenticationCertificates": null,
    "connectionDraining": {
      "drainTimeoutInSec": 1,
      "enabled": false
    },
    "cookieBasedAffinity": "Disabled",
    "etag": "W/\"cd4512a7-c97b-485d-85db-1f5e3c817f76\"",
    "hostName": null,
    "id": "/subscriptions/2e2f81a9-b030-410f-9784-c582580c932e/resourceGroups/MyResourceGroup/providers/Microsoft.Network/applicationGateways/MyAppGateway/backendHttpSettingsCollection/appGatewayBackendHttpSettings",
    "name": "appGatewayBackendHttpSettings",
    "path": null,
    "pickHostNameFromBackendAddress": false,
    "port": 80,
    "probe": null,
    "probeEnabled": null,
    "protocol": "Http",
    "provisioningState": "Succeeded",
    "requestTimeout": 30,
    "resourceGroup": "MyResourceGroup",
    "trustedRootCertificates": null,
    "type": "Microsoft.Network/applicationGateways/backendHttpSettingsCollection"
  }
]
url-path-mapの作成
特定のURLを特定のサーバへ振り分けるurl-path-mapと呼ばれる設定を作成します。
az network application-gateway url-path-map create \
  --gateway-name MyAppGateway \
  --resource-group MyResourceGroup \
  --name MyPathMap \
  --default-address-pool appGatewayBackendPool \
  --default-http-settings appGatewayBackendHttpSettings \
  --paths '/images/*' \
  --address-pool appGatewayBackendPoolImage \
  --http-settings appGatewayBackendHttpSettings \
  --rule-name PathRuleImage

az network application-gateway url-path-map rule create \
  --gateway-name MyAppGateway \
  --resource-group MyResourceGroup \
  --name PathRuleVideo \
  --path-map-name MyPathMap \
  --paths '/video/*' \
  --address-pool appGatewayBackendPoolVideo \
  --http-settings appGatewayBackendHttpSettings
ルールへの紐付け
前述の操作で作成したurl-path-mapを「ルール」に紐づけます。CLIでアプリケーションゲートウェイを作成した場合はデフォルトで「ルール」が1つ作成されますので、そのルール名を調べます。
ポータル(GUI)で確認する場合は、すべてのサービスから、「ネットワーキング」「アプリケーションゲートウェイ」「アプリケーションゲートウェイ名(MyAppGateway)」「ルール」の順に画面遷移する事で確認できます。
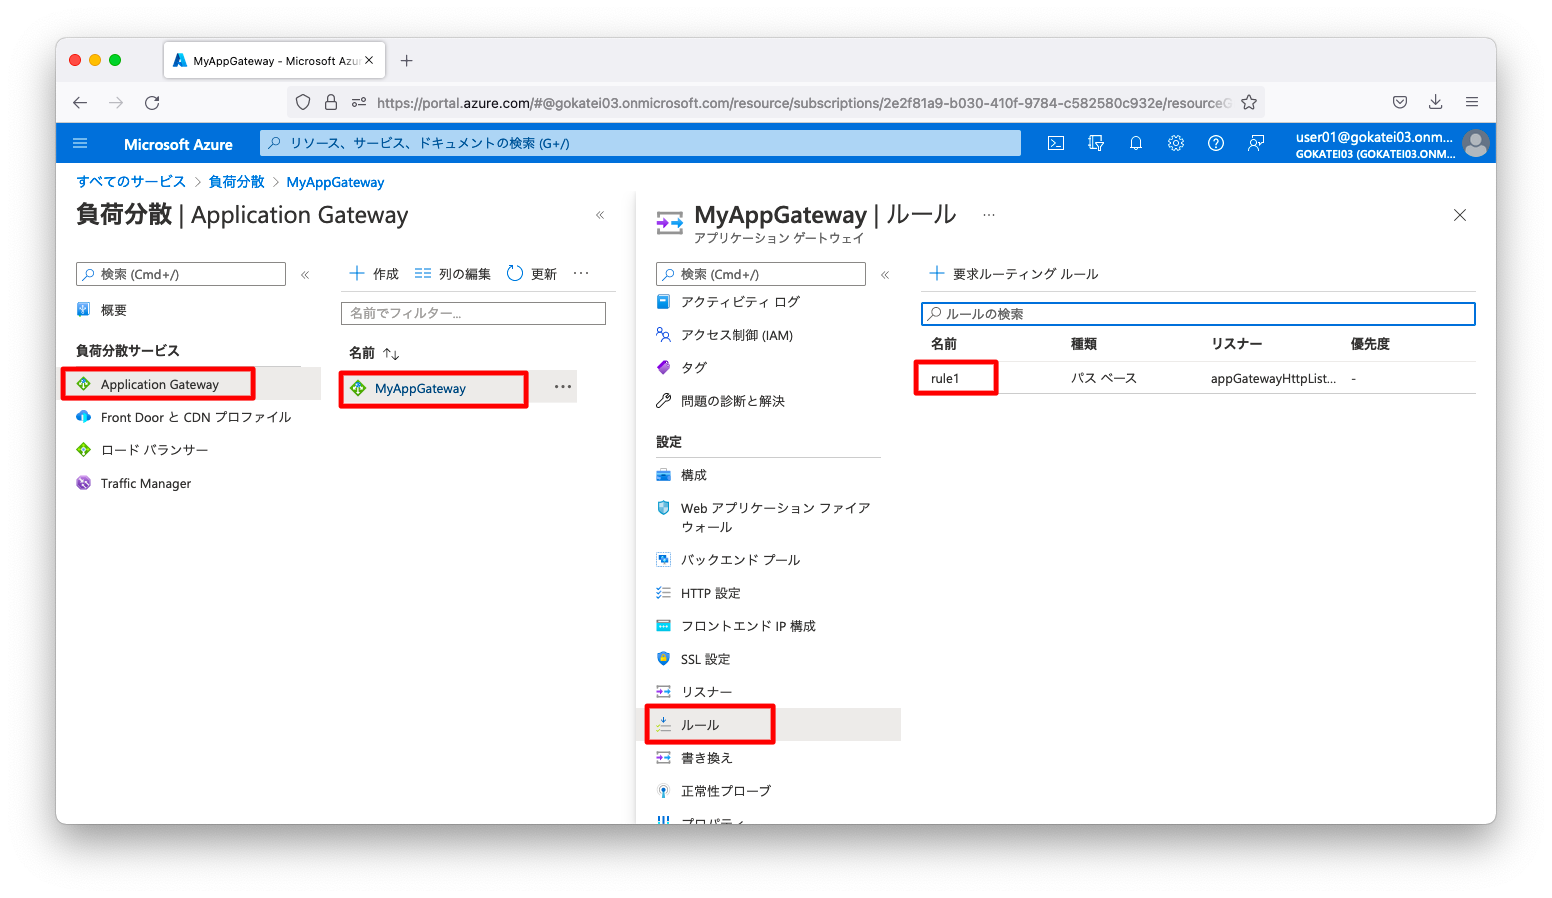
CLIで確認する場合は、以下のコマンドを使用します。
az network application-gateway rule list \
  --gateway-name MyAppGateway \
  --resource-group MyResourceGroup
[
  {
    "backendAddressPool": {
      "id": "/subscriptions/2e2f81a9-b030-410f-9784-c582580c932e/resourceGroups/MyResourceGroup/providers/Microsoft.Network/applicationGateways/MyAppGateway/backendAddressPools/appGatewayBackendPool",
      "resourceGroup": "MyResourceGroup"
    },
    "backendHttpSettings": {
      "id": "/subscriptions/2e2f81a9-b030-410f-9784-c582580c932e/resourceGroups/MyResourceGroup/providers/Microsoft.Network/applicationGateways/MyAppGateway/backendHttpSettingsCollection/appGatewayBackendHttpSettings",
      "resourceGroup": "MyResourceGroup"
    },
    "etag": "W/\"ca23ca71-ff30-4656-a79b-b7275f05e1e2\"",
    "httpListener": {
      "id": "/subscriptions/2e2f81a9-b030-410f-9784-c582580c932e/resourceGroups/MyResourceGroup/providers/Microsoft.Network/applicationGateways/MyAppGateway/httpListeners/appGatewayHttpListener",
      "resourceGroup": "MyResourceGroup"
    },
    "id": "/subscriptions/2e2f81a9-b030-410f-9784-c582580c932e/resourceGroups/MyResourceGroup/providers/Microsoft.Network/applicationGateways/MyAppGateway/requestRoutingRules/rule1",
    "loadDistributionPolicy": null,
    "name": "rule1",
    "priority": null,
    "provisioningState": "Succeeded",
    "redirectConfiguration": null,
    "resourceGroup": "MyResourceGroup",
    "rewriteRuleSet": null,
    "ruleType": "Basic",
    "type": "Microsoft.Network/applicationGateways/requestRoutingRules",
    "urlPathMap": null
  }
]
前述の操作で作成したurl-path-map(MyPathMap)を「ルール(rule1)」に紐づけます。また、rule-typeをPathBasedRoutingに変更します。
az network application-gateway rule update \
  --gateway-name MyAppGateway \
  --resource-group MyResourceGroup \
  --name rule1 \
  --rule-type PathBasedRouting \
  --url-path-map MyPathMap
疎通確認
「/images/sample.png」に対するHTTPリクエストを3回発生させます。
admin@mac19 ~ % curl http://20.222.123.87/images/sample.png
admin@mac19 ~ % curl http://20.222.123.87/images/sample.png
admin@mac19 ~ % curl -I http://20.222.123.87/images/sample.png
HTTP/1.1 200 OK
Date: Fri, 29 Apr 2022 07:59:20 GMT
Content-Type: image/png
Content-Length: 0
Connection: keep-alive
Server: nginx/1.14.0 (Ubuntu)
Last-Modified: Fri, 29 Apr 2022 06:19:37 GMT
ETag: "626b8379-0"
Accept-Ranges: bytes

admin@mac19 ~ %
linux011(172.16.2.11)へsshでログインし、HTTPリクエストがlinux011(172.16.2.11)のみに振り分けられている事を確認します。
azureuser@linux011:~$ tail -n5 /var/log/nginx/access.log
172.16.1.6 - - [29/Apr/2022:07:59:05 +0000] "GET / HTTP/1.1" 200 17 "-" "-"
172.16.1.7 - - [29/Apr/2022:07:59:12 +0000] "GET /images/sample.png HTTP/1.1" 200 0 "-" "curl/7.77.0"
172.16.1.6 - - [29/Apr/2022:07:59:16 +0000] "GET /images/sample.png HTTP/1.1" 200 0 "-" "curl/7.77.0"
172.16.1.7 - - [29/Apr/2022:07:59:20 +0000] "HEAD /images/sample.png HTTP/1.1" 200 0 "-" "curl/7.77.0"
172.16.1.7 - - [29/Apr/2022:07:59:35 +0000] "GET / HTTP/1.1" 200 17 "-" "-"
ホスト名に基づく負荷分散
構成
FQDNに異なるホストに振り分ける構成を作成します。
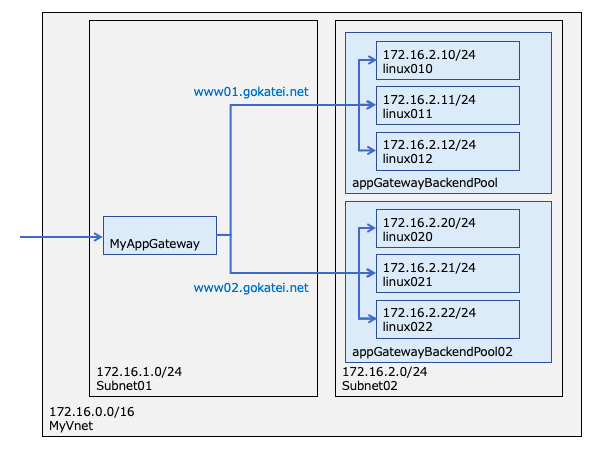
HTTPリスナーの作成
FQDNやパブリックIPアドレスの紐付けを定義する「HTTPリスナー」と呼ばれる設定を作成します。パブリックIPやポート番号はfrontend-ipやfrontend-portという定義体の名前で指定しますので、「HTTPリスナー」の作成の前に名前を調査する必要があります。
frontend-ipやfrontend-portはアプリケーションゲートウェイの作成と同時にデフォルトで1つ作成されます。調査方法は以下の通りです。
$ az network application-gateway frontend-ip list \
  --gateway-name MyAppGateway \
  --resource-group MyResourceGroup
[
  {
    "etag": "W/\"1ee0ae30-59c2-41e8-9cec-3e7a462ed769\"",
    "id": "/subscriptions/2e2f81a9-b030-410f-9784-c582580c932e/resourceGroups/MyResourceGroup/providers/Microsoft.Network/applicationGateways/MyAppGateway/frontendIPConfigurations/appGatewayFrontendIP",
    "name": "appGatewayFrontendIP",
    "privateIpAddress": null,
    "privateIpAllocationMethod": "Dynamic",
    "privateLinkConfiguration": null,
    "provisioningState": "Succeeded",
    "publicIpAddress": {
      "id": "/subscriptions/2e2f81a9-b030-410f-9784-c582580c932e/resourceGroups/MyResourceGroup/providers/Microsoft.Network/publicIPAddresses/MyPublicAddress",
      "resourceGroup": "MyResourceGroup"
    },
    "resourceGroup": "MyResourceGroup",
    "subnet": null,
    "type": "Microsoft.Network/applicationGateways/frontendIPConfigurations"
  }
]

$ az network application-gateway frontend-port list \
  --gateway-name MyAppGateway \
  --resource-group MyResourceGroup
[
  {
    "etag": "W/\"1ee0ae30-59c2-41e8-9cec-3e7a462ed769\"",
    "id": "/subscriptions/2e2f81a9-b030-410f-9784-c582580c932e/resourceGroups/MyResourceGroup/providers/Microsoft.Network/applicationGateways/MyAppGateway/frontendPorts/appGatewayFrontendPort",
    "name": "appGatewayFrontendPort",
    "port": 80,
    "provisioningState": "Succeeded",
    "resourceGroup": "MyResourceGroup",
    "type": "Microsoft.Network/applicationGateways/frontendPorts"
  }
]
この構成ではFQDNに基づく振り分けを実現しますので、FQDN毎にリスナーを作成します。
az network application-gateway http-listener create \
  --gateway-name MyAppGateway \
  --resource-group MyResourceGroup \
  --name ListenerWww01 \
  --frontend-ip appGatewayFrontendIP \
  --frontend-port appGatewayFrontendPort \
  --host-name www01.gokatei.net

az network application-gateway http-listener create \
  --gateway-name MyAppGateway \
  --resource-group MyResourceGroup \
  --name ListenerWww02 \
  --frontend-ip appGatewayFrontendIP \
  --frontend-port appGatewayFrontendPort \
  --host-name www02.gokatei.net
バックエンドプール
FQDN毎にバックエンドプールを定義します。
az network application-gateway address-pool update \
  --gateway-name MyAppGateway \
  --resource-group MyResourceGroup \
  --name appGatewayBackendPool \
  --servers 172.16.2.10 172.16.2.11 172.16.2.12

az network application-gateway address-pool create \
  --gateway-name MyAppGateway \
  --resource-group MyResourceGroup \
  --name appGatewayBackendPool02 \
  --servers 172.16.2.20 172.16.2.21 172.16.2.22
ルール
「HTTPリスナー」と「バックエンドプール」を紐づけるルールを作成します。また、デフォルト設定として作成されるルール「rule1」を削除します。
az network application-gateway rule create \
  --gateway-name MyAppGateway \
  --resource-group MyResourceGroup \
  --name RuleWww01 \
  --http-listener ListenerWww01 \
  --rule-type Basic \
  --address-pool appGatewayBackendPool

az network application-gateway rule create \
  --gateway-name MyAppGateway \
  --resource-group MyResourceGroup \
  --name RuleWww02 \
  --http-listener ListenerWww02 \
  --rule-type Basic \
  --address-pool appGatewayBackendPool02

az network application-gateway rule delete \
  --gateway-name MyAppGateway \
  --resource-group MyResourceGroup \
  --name rule1
疎通確認
www01.gokatei.netに対するHTTPリクエストを送ります。appGatewayBackendPoolとして定義したlinux010, linux011, linux012へ振り分けられる事を確認します。
admin@mac19 ~ % curl -H 'Host:www01.gokatei.net' http://20.222.123.87
this is linux010
admin@mac19 ~ % curl -H 'Host:www01.gokatei.net' http://20.222.123.87
this is linux010
admin@mac19 ~ % curl -H 'Host:www01.gokatei.net' http://20.222.123.87
this is linux011
admin@mac19 ~ % curl -H 'Host:www01.gokatei.net' http://20.222.123.87
this is linux011
admin@mac19 ~ % curl -H 'Host:www01.gokatei.net' http://20.222.123.87
this is linux012
admin@mac19 ~ % curl -H 'Host:www01.gokatei.net' http://20.222.123.87
this is linux012
admin@mac19 ~ %
www02.gokatei.netに対するHTTPリクエストを送ります。appGatewayBackendPool02として定義したlinux020, linux021, linux022へ振り分けられる事を確認します。
admin@mac19 ~ % curl -H 'Host:www02.gokatei.net' http://20.222.123.87
this is linux020
admin@mac19 ~ % curl -H 'Host:www02.gokatei.net' http://20.222.123.87
this is linux020
admin@mac19 ~ % curl -H 'Host:www02.gokatei.net' http://20.222.123.87
this is linux021
admin@mac19 ~ % curl -H 'Host:www02.gokatei.net' http://20.222.123.87
this is linux021
admin@mac19 ~ % curl -H 'Host:www02.gokatei.net' http://20.222.123.87
this is linux022
admin@mac19 ~ % curl -H 'Host:www02.gokatei.net' http://20.222.123.87
this is linux022
admin@mac19 ~ %
補足
仮想マシンをバックエンドプールに追加する
前述の方法はIPアドレスまたはDNS名を指定してバックエンドプールにメンバを追加していました。バックエンドプールには仮想マシンのNIC(ネットワークインターフェース)を指定して追加する事もできます。操作例は以下の通りです。
az network nic ip-config address-pool add \
  --resource-group MyResourceGroup \
  --nic-name linux011VMNic \
  --ip-config-name ipconfiglinux011 \
  --gateway-name MyAppGateway \
  --address-pool appGatewayBackendPool
仮想マシンスケールセットをバックエンドプールに追加する
仮想マシンスケールセットをアプリケーションゲートウェイの振り分け対象に追加するには、仮想マシンスケールセット作成時に引数app-gatewayとbackend-pool-nameを指定します。操作例は以下の通りです。
az vmss create \
  --resource-group MyResourceGroup \
  --name MyScaleSet01 \
  --image UbuntuLTS \
  --vm-sku Standard_B1s \
  --admin-username azureuser \
  --ssh-key-values ~/.ssh/authorized_keys \
  --vnet-name MyVnet \
  --subnet subnet02 \
  --app-gateway MyAppGateway \
  --backend-pool-name appGatewayBackendPool
ルールの優先度
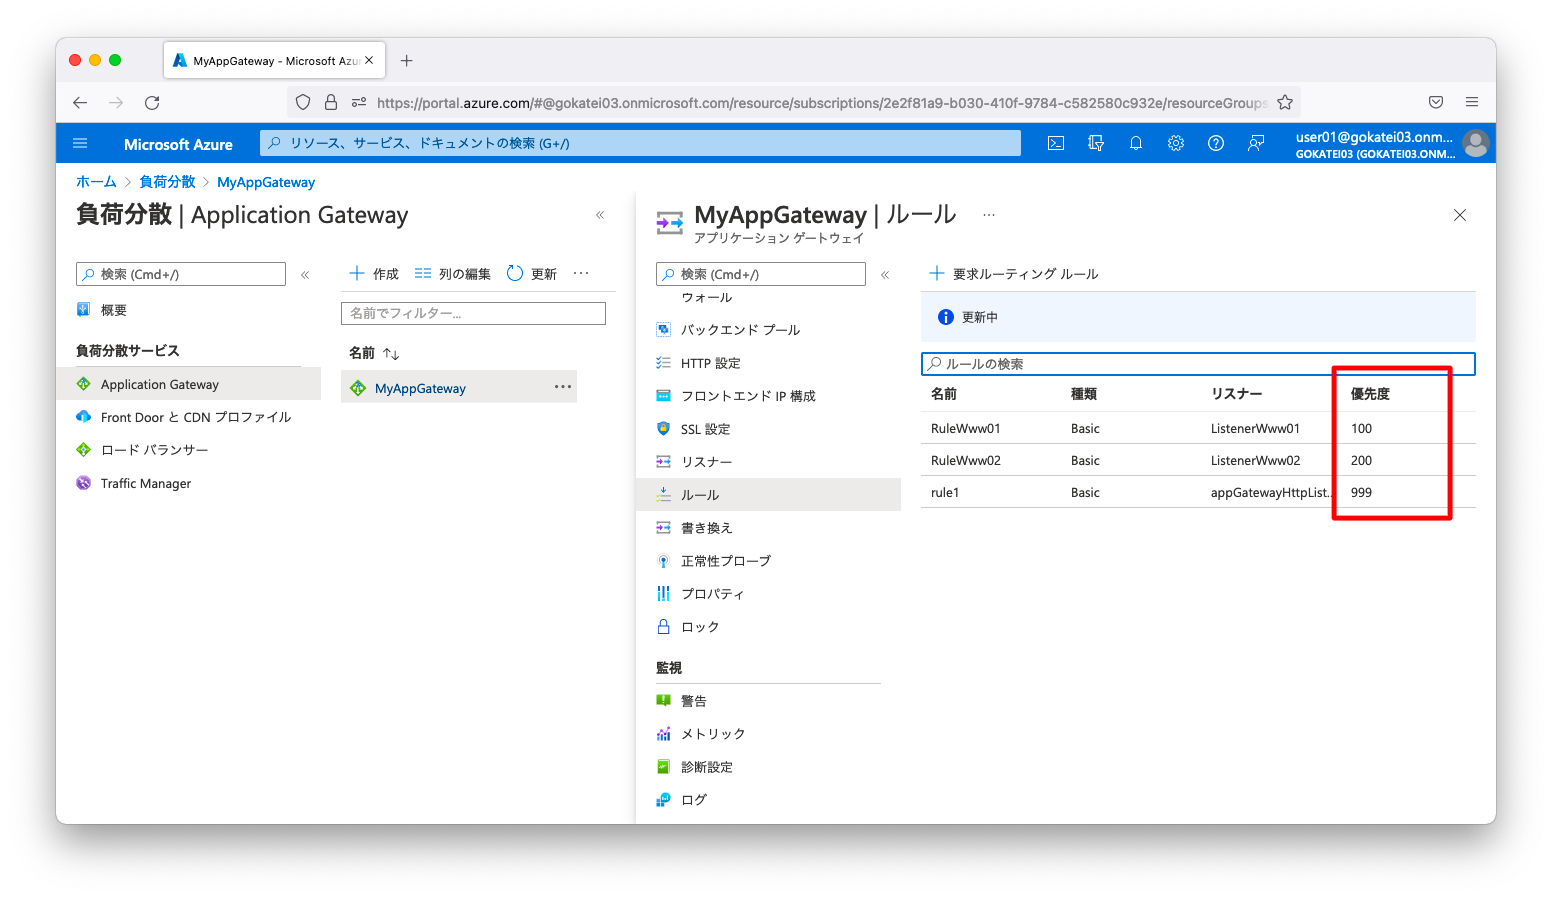
以下スクリーンショットのようにアプリケーションゲートウェイに複数のルールが存在する場合、ルール間で優先順位を定義したい事もあるかもしれません。
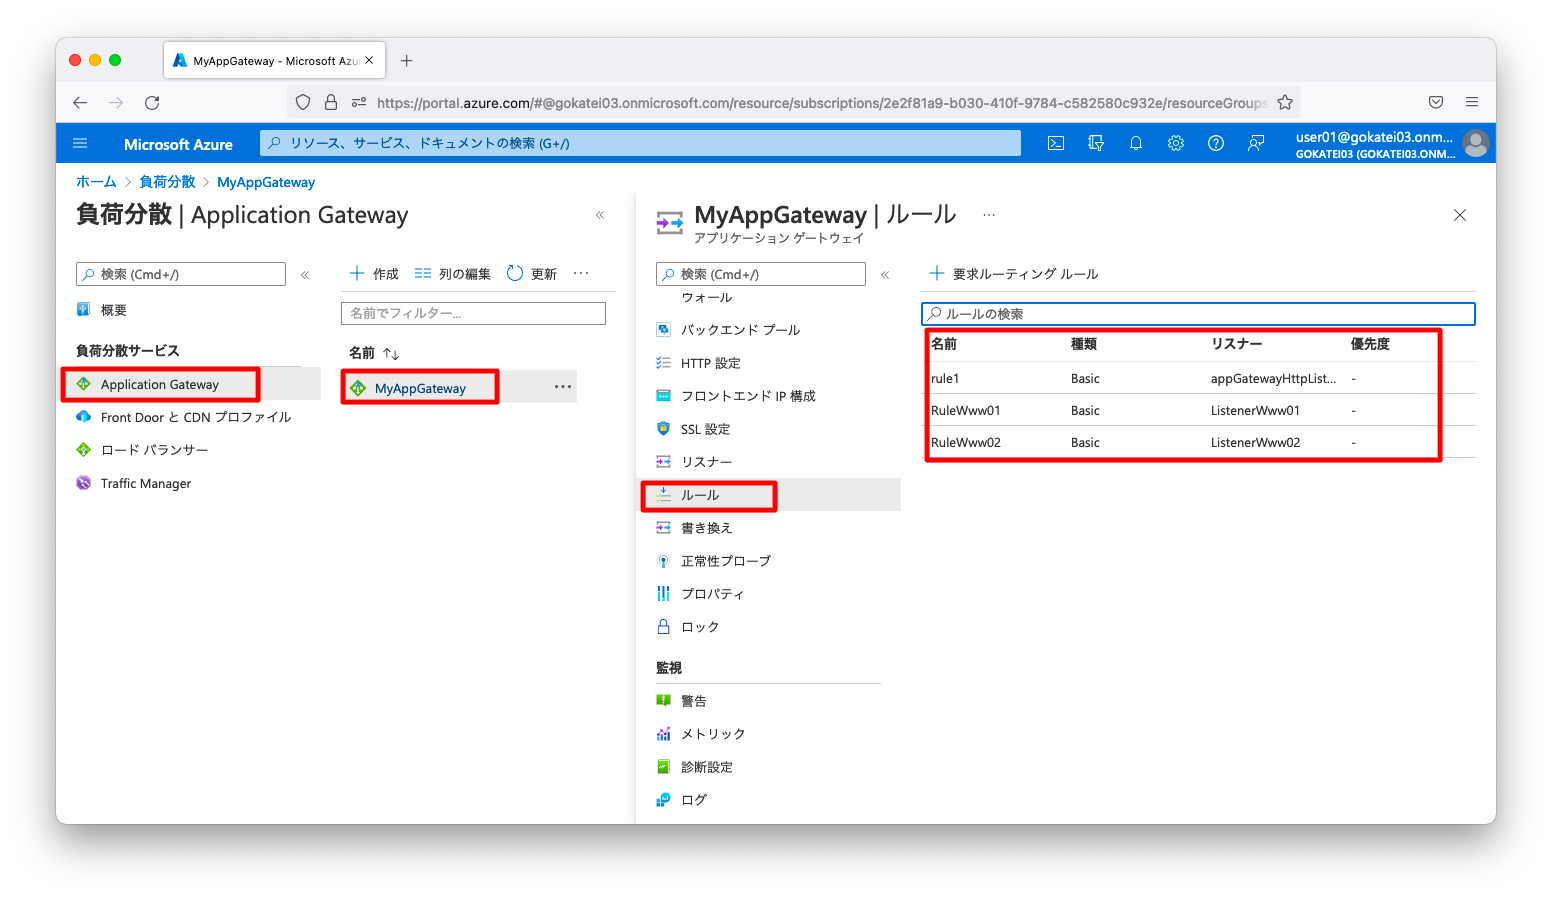
ルールはpriorityと呼ばれる優先順位を定義する事ができます。ただし、操作はやや手間です。priorityありのルールとpriorityなしのルールは共存できない仕様ですので、まずはルールが1つになるまでルールを削除する必要があります。例えば、ルールが3つならば、ルールを2つ削除します。
az network application-gateway rule delete \
  --gateway-name MyAppGateway \
  --resource-group MyResourceGroup \
  --name RuleWww01

az network application-gateway rule delete \
  --gateway-name MyAppGateway \
  --resource-group MyResourceGroup \
  --name RuleWww02
残った1つのルールに対してpriorityを定義し、先ほどの操作で削除したルールを再作成します。
az network application-gateway rule update \
  --gateway-name MyAppGateway \
  --resource-group MyResourceGroup \
  --name rule1 \
  --priority 999

az network application-gateway rule create \
  --gateway-name MyAppGateway \
  --resource-group MyResourceGroup \
  --name RuleWww01 \
  --http-listener ListenerWww01 \
  --rule-type Basic \
  --address-pool appGatewayBackendPool \
  --priority 100

az network application-gateway rule create \
  --gateway-name MyAppGateway \
  --resource-group MyResourceGroup \
  --name RuleWww02 \
  --http-listener ListenerWww02 \
  --rule-type Basic \
  --address-pool appGatewayBackendPool02 \
  --priority 200
操作後の状態をGUIで確認すると以下の通りです。
