MySQL インストール 概要
Redhat系LinuxであるCentOSに、MySQLのインストール方法についてまとめます。インストール、パスワード設定、ユーザ設定を行い、mysql clientを用いてログインできるようになるまでの設定を行います。なお、Windows環境の方は、MySQL インストール手順 Windowsの場合を参照ください。
なお、この手順は簡易的なMySQL打鍵環境構築を想定しており、セキュリティや運用上の難があるかもしれません。読者の方は、適宜自社環境に合わせて適宜手順を変更して下さい。
MySQL インストール
このサイトで紹介するインストール手法は以下2通りです。
- リポジトリ登録によるインストール方法
- RPMによるインストール方法
とりあえず最新版を使用したい場合はリポジトリを利用すると良いでしょう。一方、MySQLバージョンを厳密に管理したいならばRPMを使用すると良いと思います。
MySQL インストール – リポジトリ登録
MySQL インストール – リポジトリ登録 – ダウンロード
http://dev.mysql.comにアクセスし、MySQLリポジトリを登録する方法を調査します。トップページで、”Downloads”を押下します。 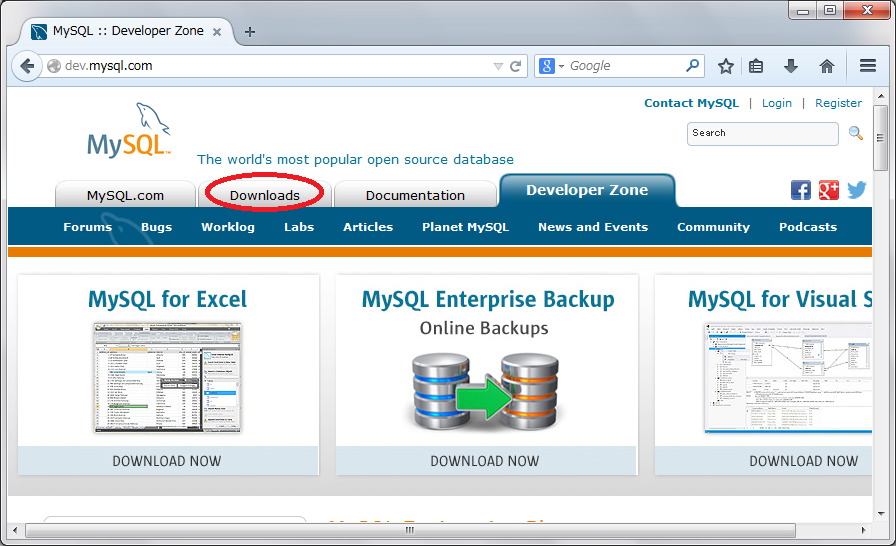 Redhat系OSならば”Yum Repository”を、Debian系OSならば”APR Repository”を押下します。
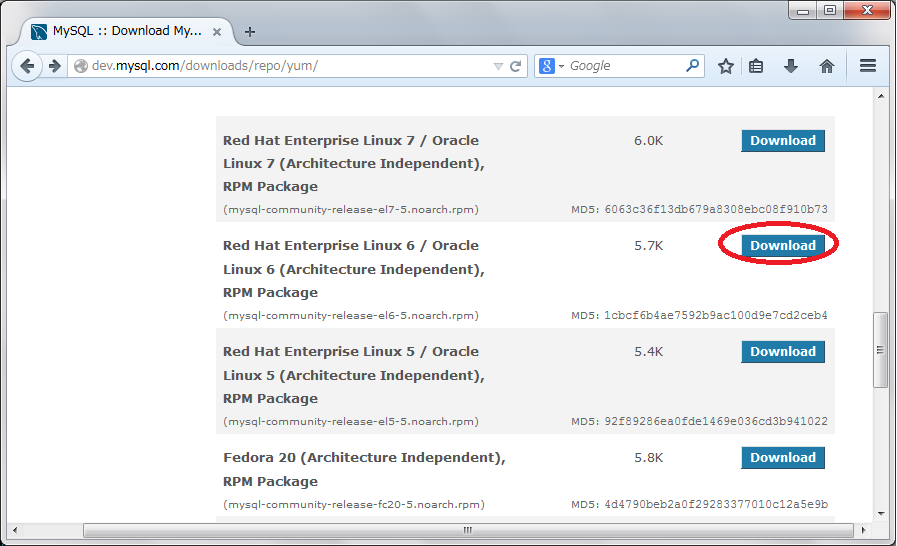
 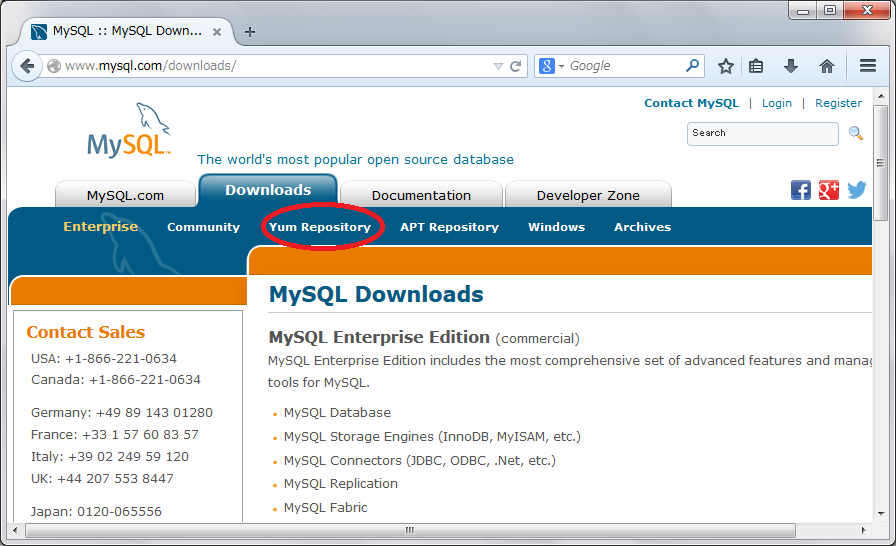 お使いのディストリビューションの”Download”ボタンを押下します。
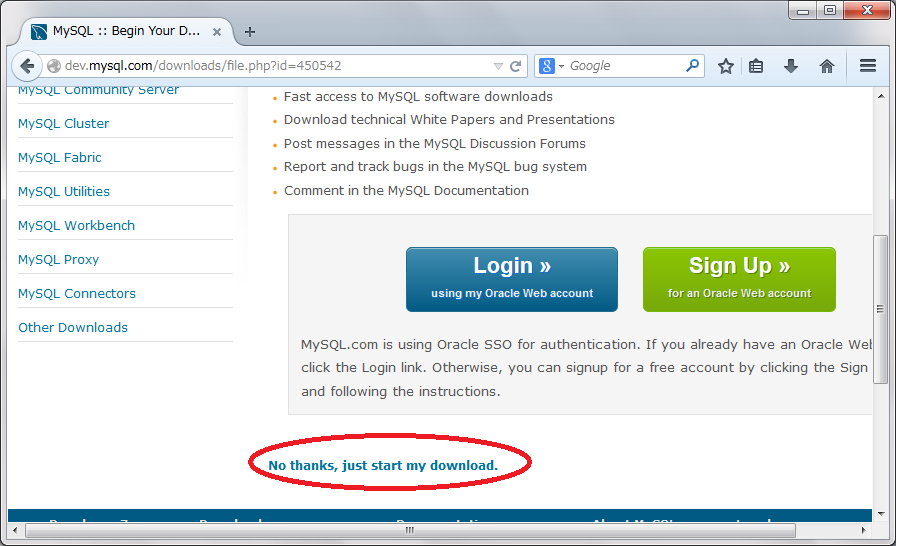
  Oracle様にSing Upしろと言われますが、丁重に”No thanks, just start my download”とお断りしましょう。”No thanks, just start my download”を押下すると、リポジトリ登録を行なうRPMをダウンロードできます。
  ダウンロードしたリポジトリ登録を行なうRPMをインストールします。
# rpm -ihv http://dev.mysql.com/get/mysql-community-release-el6-5.noarch.rpm
確かにリポジトリが登録されている事を確認します。
[root@localhost ~]# yum repolist
Loaded plugins: fastestmirror, security
Loading mirror speeds from cached hostfile
epel/metalink                                            | 5.4 kB     00:00
 * base: ftp.tsukuba.wide.ad.jp
 * epel: mirror.premi.st
 * extras: ftp.tsukuba.wide.ad.jp
 * updates: ftp.tsukuba.wide.ad.jp
base                                                     | 3.7 kB     00:00
epel                                                     | 4.4 kB     00:00
epel/primary_db                                          | 6.3 MB     00:01
extras                                                   | 3.4 kB     00:00
mysql-connectors-community                               | 2.5 kB     00:00
mysql-connectors-community/primary_db                    | 6.6 kB     00:00
mysql-tools-community                                    | 2.5 kB     00:00
mysql-tools-community/primary_db                         |  14 kB     00:00
mysql56-community                                        | 2.5 kB     00:00
mysql56-community/primary_db                             |  49 kB     00:00
updates                                                  | 3.4 kB     00:00
repo id                    repo name                                      status
base                       CentOS-6 - Base                                 6367
epel                       Extra Packages for Enterprise Linux 6 - x86_64 11104
extras                     CentOS-6 - Extras                                 14
mysql-connectors-community MySQL Connectors Community                         9
mysql-tools-community      MySQL Tools Community                             12
mysql56-community          MySQL 5.6 Community Server                        78
updates                    CentOS-6 - Updates                              1357
repolist: 18941
[root@localhost ~]#
MySQL インストール – リポジトリ登録 – インストール
“yum install mysql-server”コマンドでMySQLサーバをインストールします。mysql-libs, mysql-clientなどの関連するパッケージもインストールされます。 2013年頃はmysql-libsの依存関係のエラーを解消するための手間が必要でしたが、現時点(2014/08/17)ではyumでインストールすると自動的にmysql-libsのバージョンを置き換えてくれます。
# yum install mysql-server
perl, phpなどのプログラムがMySQLを利用する場合、mysql-develを使用します。恐らく多くの場合は、mysql-develが必要となりますので、MySQLインストールと同時にmysql-develも入れておくと良いでしょう。
# yum install mysql-devel
MySQL インストール – リポジトリ登録 – ユーザ作成
データベース初回起動と同時にMySQLデータベースが作成されます。
[root@localhost ~]# /etc/init.d/mysqld start
Initializing MySQL database:  2014-08-17 13:15:29 0 [Warning] TIMESTAMP with implicit DEFAULT value is deprecated. Please use --explicit_defaults_for_timestamp server option (see documentation for more details).
2014-08-17 13:15:29 5201 [Note] InnoDB: Using atomics to ref count buffer pool pages
2014-08-17 13:15:29 5201 [Note] InnoDB: The InnoDB memory heap is disabled
2014-08-17 13:15:29 5201 [Note] InnoDB: Mutexes and rw_locks use GCC atomic builtins
この過程で作成されるユーザ設定は、全てのホストからrootユーザでパスワードなしで接続できる状態となっています。
[root@localhost ~]# mysql -uroot
Welcome to the MySQL monitor.  Commands end with ; or \g.
Your MySQL connection id is 10902
Server version: 5.6.22 MySQL Community Server (GPL)

Copyright (c) 2000, 2014, Oracle and/or its affiliates. All rights reserved.

Oracle is a registered trademark of Oracle Corporation and/or its
affiliates. Other names may be trademarks of their respective
owners.

Type 'help;' or '\h' for help. Type '\c' to clear the current input statement.

mysql> select user,password,host from mysql.user ;
+------+----------+------------------------+
| user | password | host                   |
+------+----------+------------------------+
| root |          | localhost              |
| root |          | 127.0.0.1              |
| root |          | ::1                    |
|      |          | localhost              |
+------+----------+------------------------+
4 rows in set (0.00 sec)

mysql>
かなり利便性重視の設定になっていますので、必要に応じてセキュリティを強めると良いでしょう。localhost以外からの接続を禁止する設定例は以下の通りです。
mysql> delete from mysql.user where host <> 'localhost' OR user <> 'root' ;
Query OK, 3 rows affected (0.01 sec)

mysql> flush privileges ;
Query OK, 0 rows affected (0.00 sec)

mysql>
MySQL インストール – RPM使用
MySQL インストール – RPM使用 – ダウンロード
公式サイトhttp://dev.mysql.comからMySQLのRPMダウンロードは、やや手間です。実際にはミラーサイトからダウンロードした方が楽ですが、念のため正規の手順を説明します。正規の手順に興味のない方は、後述の”MySQL インストール – RPM使用 – インストール”からお読み下さい。 http://dev.mysql.comにアクセスし、MySQLのRPMをダウンロードします。 “Downloads”, “Community”, “MySQL Community Server”の順に押下します。 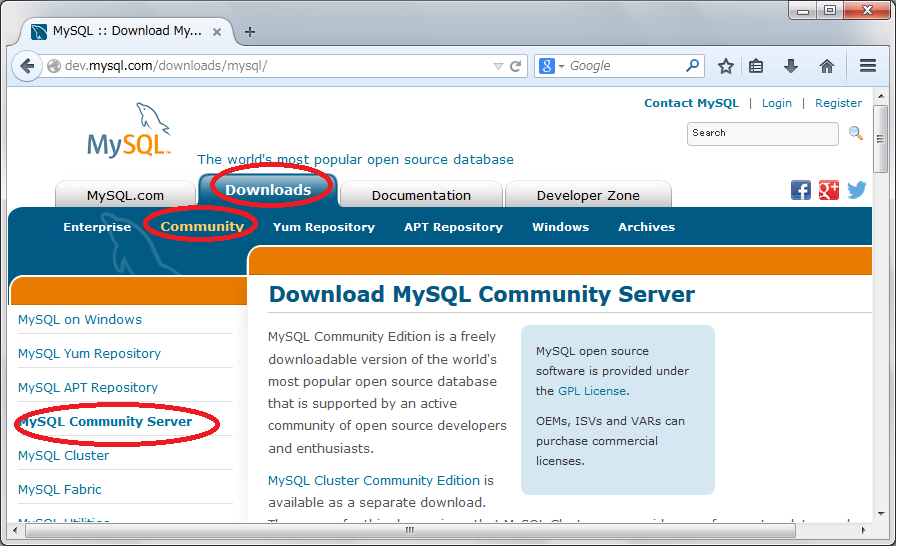 “Select Platform”欄でお使いのOSを選択します。
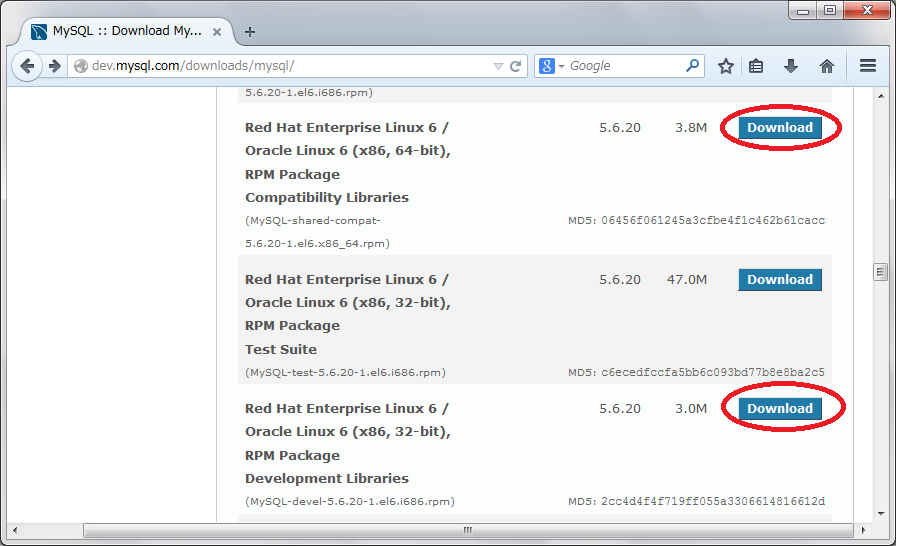
 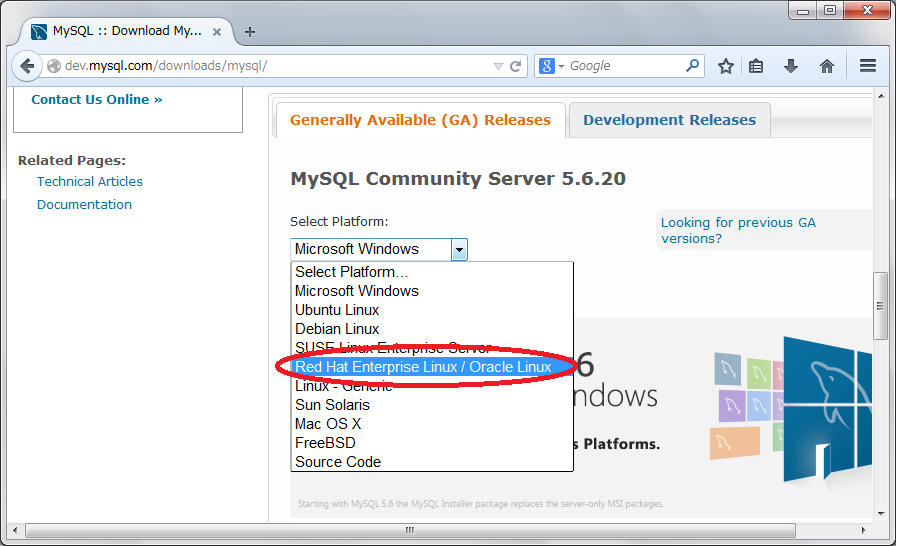 必要となるパッケージをひとつずつ”Download”ボタンを押下します。必要となるパッケージは以下の通りです。気の萎える作業ですが頑張りましょう。
- MySQL-client
- MySQL-devel (perl, php等のプログラムがMySQL接続する際に必要となります)
- MySQL-server
- MySQL-shared
- MySQL-shared-compat ( MySQLインストール時にmysql-libsの依存関係を解消してくれます )
 Oracle様にSing Upしろと言われますが、丁重に”No thanks, just start my download”とお断りしましょう。”No thanks, just start my download”を押下すると、リポジトリ登録を行なうRPMをダウンロードできます。
MySQL インストール – RPM使用 – インストール
rpmパッケージを用いてMySQLをインストールします。公式サイトからRPMをダウンロードしても良いですが、北陸先端科学技術大学院大学等のミラーを利用してインストールを行なっても良いでしょう。 なお、公式サイトでもミラーサイトでも最新の2バージョン前までしか公開されていないようですので、バージョン番号などは適宜変更をお願いします。
# yum install http://ftp.jaist.ac.jp/pub/mysql/Downloads/MySQL-5.6/MySQL-client-5.6.22-1.el6.x86_64.rpm \
   http://ftp.jaist.ac.jp/pub/mysql/Downloads/MySQL-5.6/MySQL-devel-5.6.22-1.el6.x86_64.rpm \
   http://ftp.jaist.ac.jp/pub/mysql/Downloads/MySQL-5.6/MySQL-server-5.6.22-1.el6.x86_64.rpm \
   http://ftp.jaist.ac.jp/pub/mysql/Downloads/MySQL-5.6/MySQL-shared-5.6.22-1.el6.x86_64.rpm \
   http://ftp.jaist.ac.jp/pub/mysql/Downloads/MySQL-5.6/MySQL-shared-compat-5.6.22-1.el6.x86_64.rpm
MySQL インストール – RPM使用 – ユーザ作成
MySQLを起動させます。
# /etc/init.d/mysql start
Starting MySQL. SUCCESS!
#
mysqlにログインします。初期パスワードは~/.mysql_secretに記載されています。
# cat ~/.mysql_secret
# The random password set for the root user at Wed Sep 25 20:37:20 2013 (local time): iWlrqre8

# mysql -uroot -p
Enter password:
Welcome to the MySQL monitor. Commands end with ; or \g.
Your MySQL connection id is 2
Server version: 5.6.14

Copyright (c) 2000, 2013, Oracle and/or its affiliates. All rights reserved.

Oracle is a registered trademark of Oracle Corporation and/or its
affiliates. Other names may be trademarks of their respective
owners.

Type 'help;' or '\h' for help. Type '\c' to clear the current input statement.

mysql>
“SET PASSWORD”コマンドでsystem passwordを定義します。 system passwordを定義しないと”ERROR 1193 (HY000): Unknown system variable ‘PASSWORD'”というエラーが出力され、あらゆる操作が禁止されています。
mysql> SET PASSWORD = PASSWORD('password');
セキュリティ上望ましくない事ですが、利便性重視でlocalhostからのrootユーザへの接続はパスワードなしで接続できるようにします。インストール直後のユーザ権限を確認します。localhostからのみ接続が許可された状態になっている事が確認できます。
mysql> use mysql ;
Reading table information for completion of table and column names
You can turn off this feature to get a quicker startup with -A

Database changed
mysql> SELECT Host, User, Password FROM user;
+-------------------------+------+-------------------------------------------+
| Host | User | Password |
+-------------------------+------+-------------------------------------------+
| localhost | root | *2470C0C06DEE42FD1618BB99005ADCA2EC9D1E19 |
| backend.changineer.info | root | *74013E501D32DC9F17A80AC809F5A0F2CFBF11FF |
| 127.0.0.1 | root | *74013E501D32DC9F17A80AC809F5A0F2CFBF11FF |
| ::1 | root | *74013E501D32DC9F17A80AC809F5A0F2CFBF11FF |
+-------------------------+------+-------------------------------------------+
4 rows in set (0.00 sec)

mysql>
私の個人的な意見ですが、”localhost”, “127.0.0.1”, “::1″(IPv6におけるローカルホスト)などのネットワークの観点では同じエントリが存在するのは混乱の元ですので、”127.0.0.1″以外のエントリを全て削除します。
mysql> DELETE FROM user WHERE Host <> 'localhost';
Query OK, 3 rows affected (0.02 sec)

mysql>
rootユーザのパスワードを空文字列にして、最後に”flush privileges”を入力します。
mysql> UPDATE user SET Password = PASSWORD('') WHERE user = 'root' ;
Query OK, 1 row affected (0.00 sec)
Rows matched: 1 Changed: 1 Warnings: 0

mysql> flush privileges;
Query OK, 0 rows affected (0.00 sec)

mysql>
パスワードなしでログインできる事を確認します。
# mysql -uroot
Welcome to the MySQL monitor. Commands end with ; or \g.
Your MySQL connection id is 6
Server version: 5.6.14 MySQL Community Server (GPL)

Copyright (c) 2000, 2013, Oracle and/or its affiliates. All rights reserved.

Oracle is a registered trademark of Oracle Corporation and/or its
affiliates. Other names may be trademarks of their respective
owners.

Type 'help;' or '\h' for help. Type '\c' to clear the current input statement.

mysql>
動作確認環境
動作確認環境は以下の通りです。
- 最終動作確認日 : 2014/12/23
- CentOS 6.6 ( Sakura VPS ), Redhat 6.5 ( AWS : Amazon Web Service )
- MySQL 5.6.22

