BIG-IPのRoute Domainは1つのBIG-IPを仮想的に複数に分割する機能です。ルータやファイアウォール機器のVRF相当の機能と思えば大きく違いはありません。
動作確認の構成
物理構成は以下の通りとします。
+-----------------+ +-----------------+ +-----------------+
|  (RockyLinux84) | |  (RockyLinux84) | |     (Vyatta)    |
|     Server10    | |     Server30    | |     Router50    |
|                 | |                 | |                 |
+--------+--------+ +--------+--------+ +--------+--------+
  ens192 |            ens192 |                   |
         |                   |                   |
         +-------------+     |     +-------------+
                       |     |     |
                    +--+-----+-----+--+
                    |                 |
                    |  layer2 switch  |
                    |                 |
                    +--------+--------+
                             |
                             |
                             | 1.1
                    +--------+--------+
                    |      BIG-IP     |
                    |     (bigip01)   |
                    |                 |
                    +-----------------+
Route Domainという機能を使用して以下のような論理構成を組み上げます。
                    +-----------------+
                .50 |     (Vyatta)    | .50
         +----------+     Router50    +----------+
         |     eth0 |                 | eth1     |
         |          +-----------------+          |
         |                                       |
         | 192.168.20.0/24       192.168.40.0/24 |
         | (vlan 20)                   (vlan 40) |
         |                                       |
         | .1                                    | .1
+--------+--------+                     +--------+--------+
|     bigip01     |                     |     bigip01     |
| RouteDomain 12  |                     | RouteDomain 34  |
|                 |                     |                 |
+--------+--------+                     +--------+--------+
         | .1                                    | .1
         |                                       |
         | 192.168.10.0/24       192.168.30.0/24 |
         | (vlan 10)                   (vlan 30) |
         |                                       |
         | .10                                   | .30
+--------+--------+                     +--------+--------+
|                 |                     |                 |
|     Server10    |                     |     Server30    |
|  (RockyLinux84) |                     |  (RockyLinux84) |
+-----------------+                     +-----------------+
RouteDomainの操作
VLAN 作成
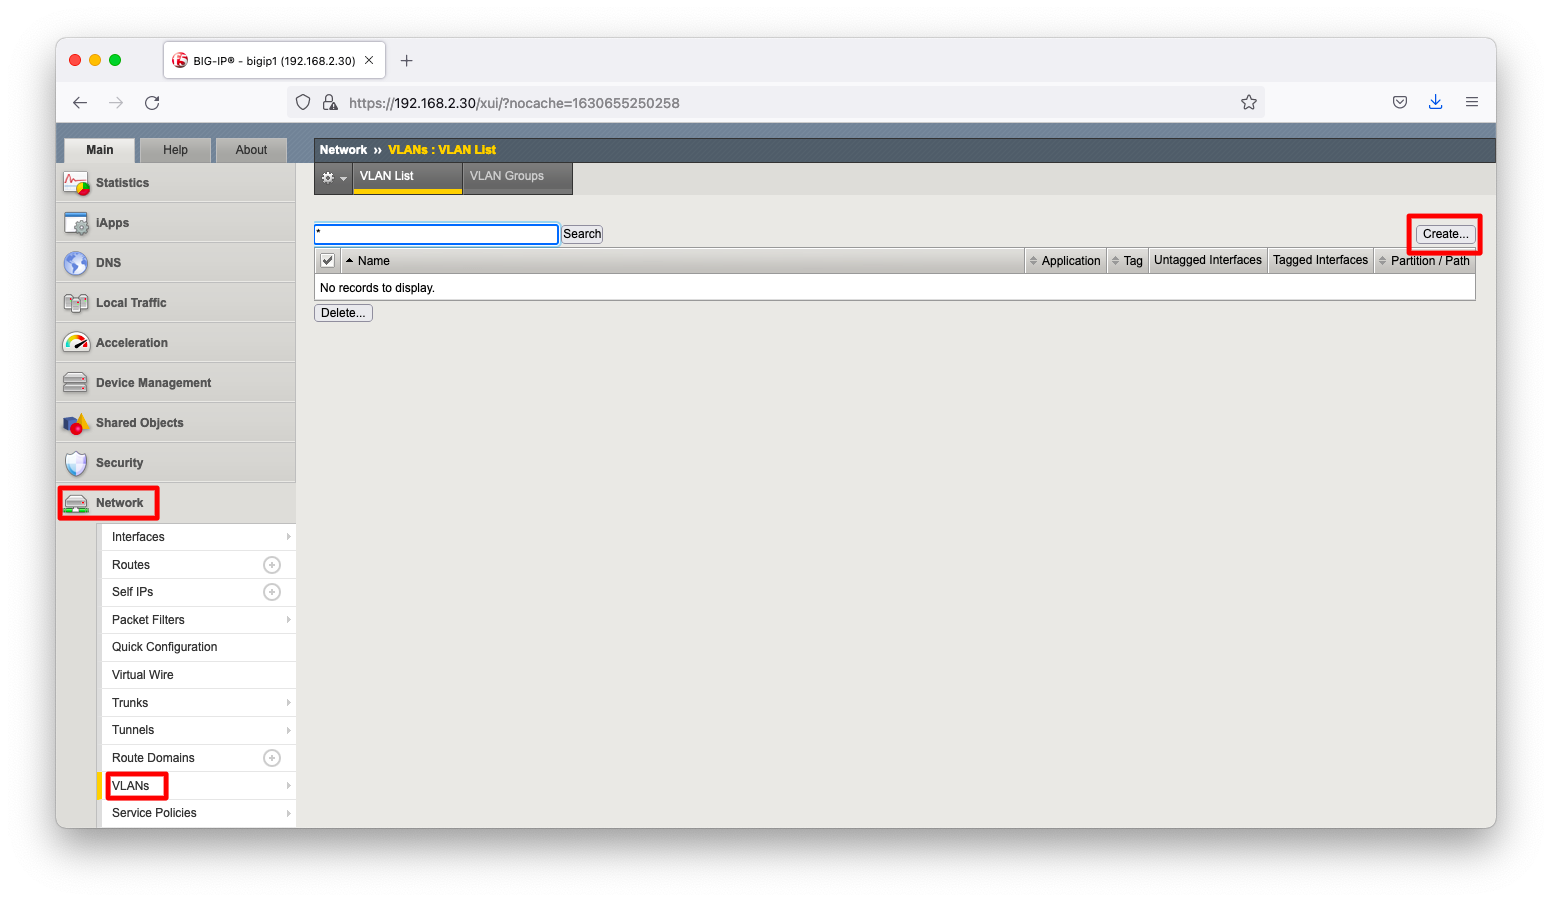
「Network」「VLANs」の順に画面遷移し、「Create」を押下します。
「Name」「Tag」「Interface」を指定し、「Add」を押下します。この操作を繰り返し、構成図の通りのVLANを計4つ作成します。
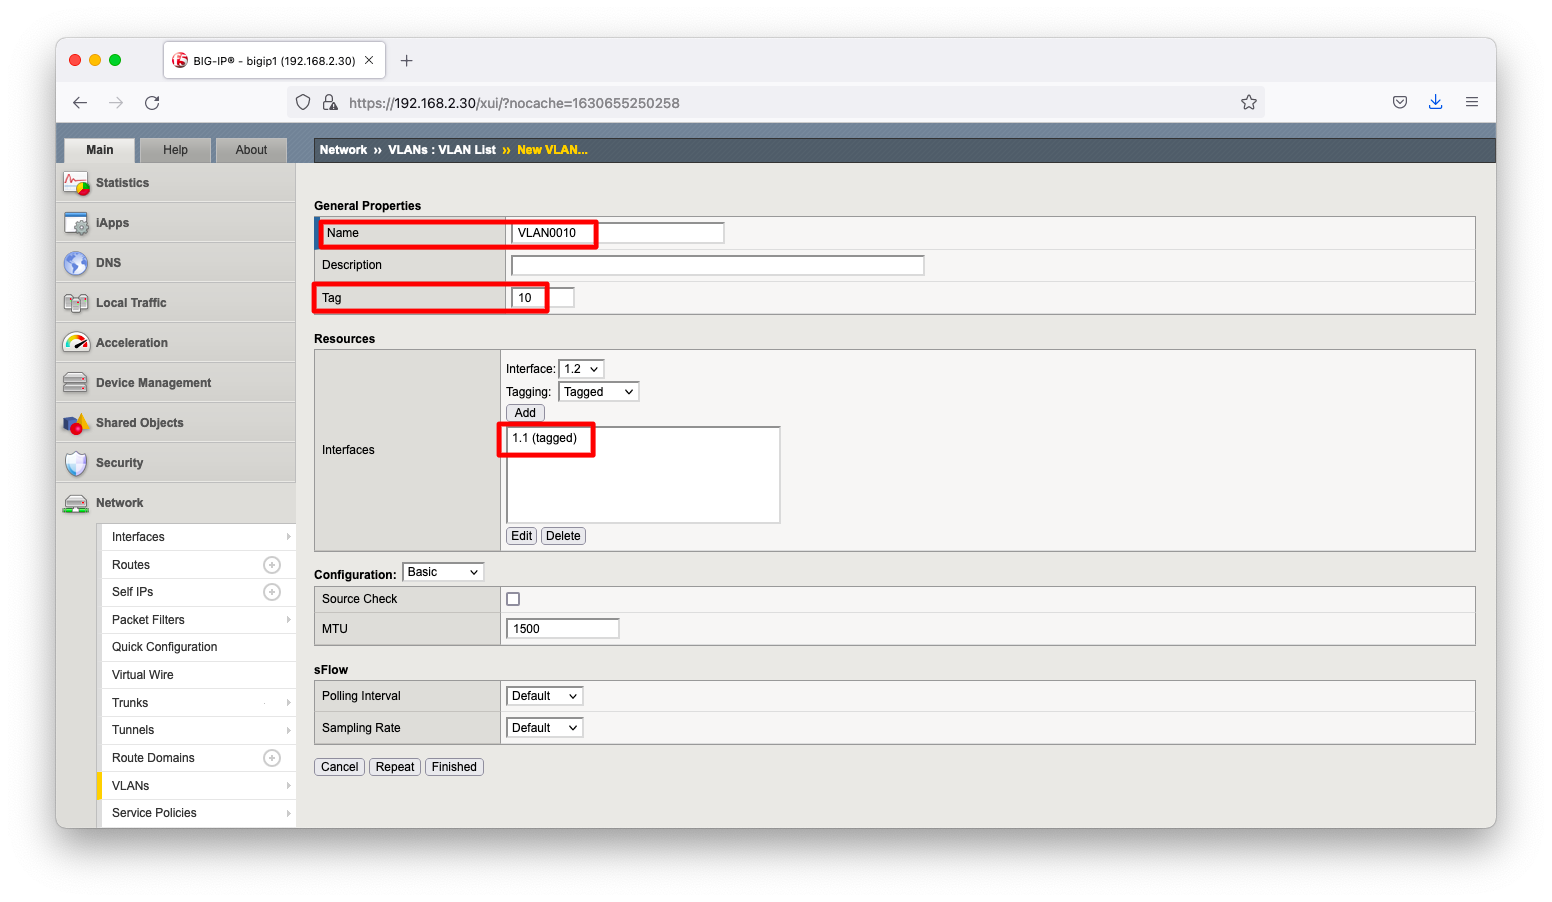
コマンドラインで操作する場合は以下の通りです。
create net vlan VLAN0010 interfaces replace-all-with { 1.1 { tagged } } tag 10
create net vlan VLAN0020 interfaces replace-all-with { 1.1 { tagged } } tag 20
create net vlan VLAN0030 interfaces replace-all-with { 1.1 { tagged } } tag 30
create net vlan VLAN0040 interfaces replace-all-with { 1.1 { tagged } } tag 40
Route Domain 作成
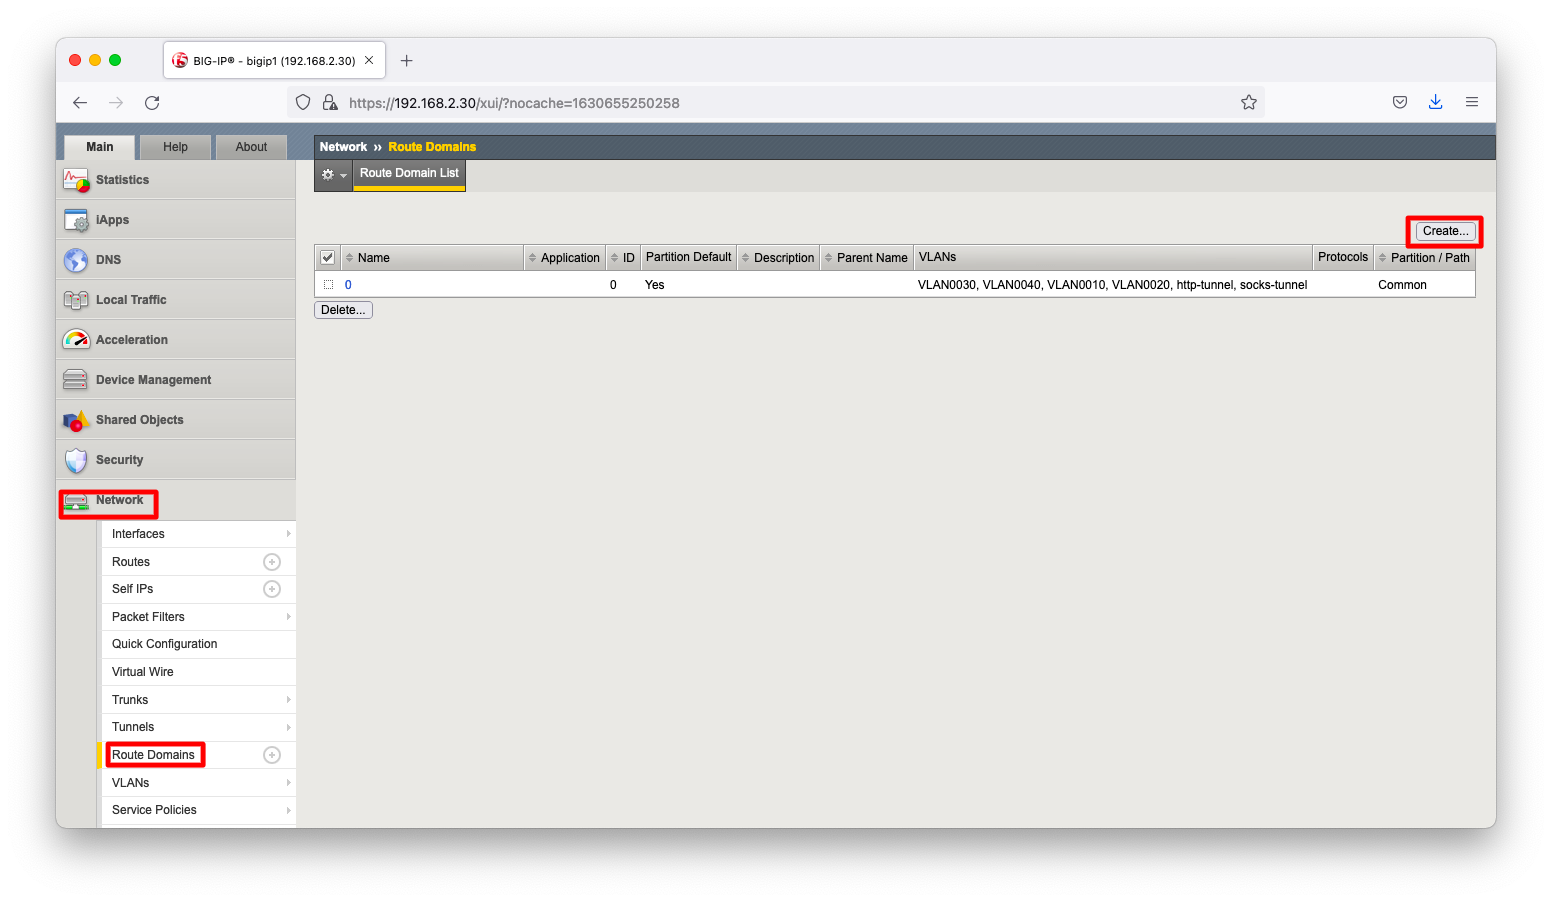
「Network」「Route Domains」の順に画面遷移し、「Create」を押下します。
「Name」は何か分かりやすい名前を入力します。「ID」は重複しない一意の値です。Route Domainが200個, 300個を超えるような環境ならば、設計段階で採番ルールを考えておきましょう。「VLANs」はRouteDomainに属するVLANを指定します。
以上の入力が完了したら「Finished」を押下します。この操作を繰り返し、構成図の通りのRouteDomainを計2つ作成します。
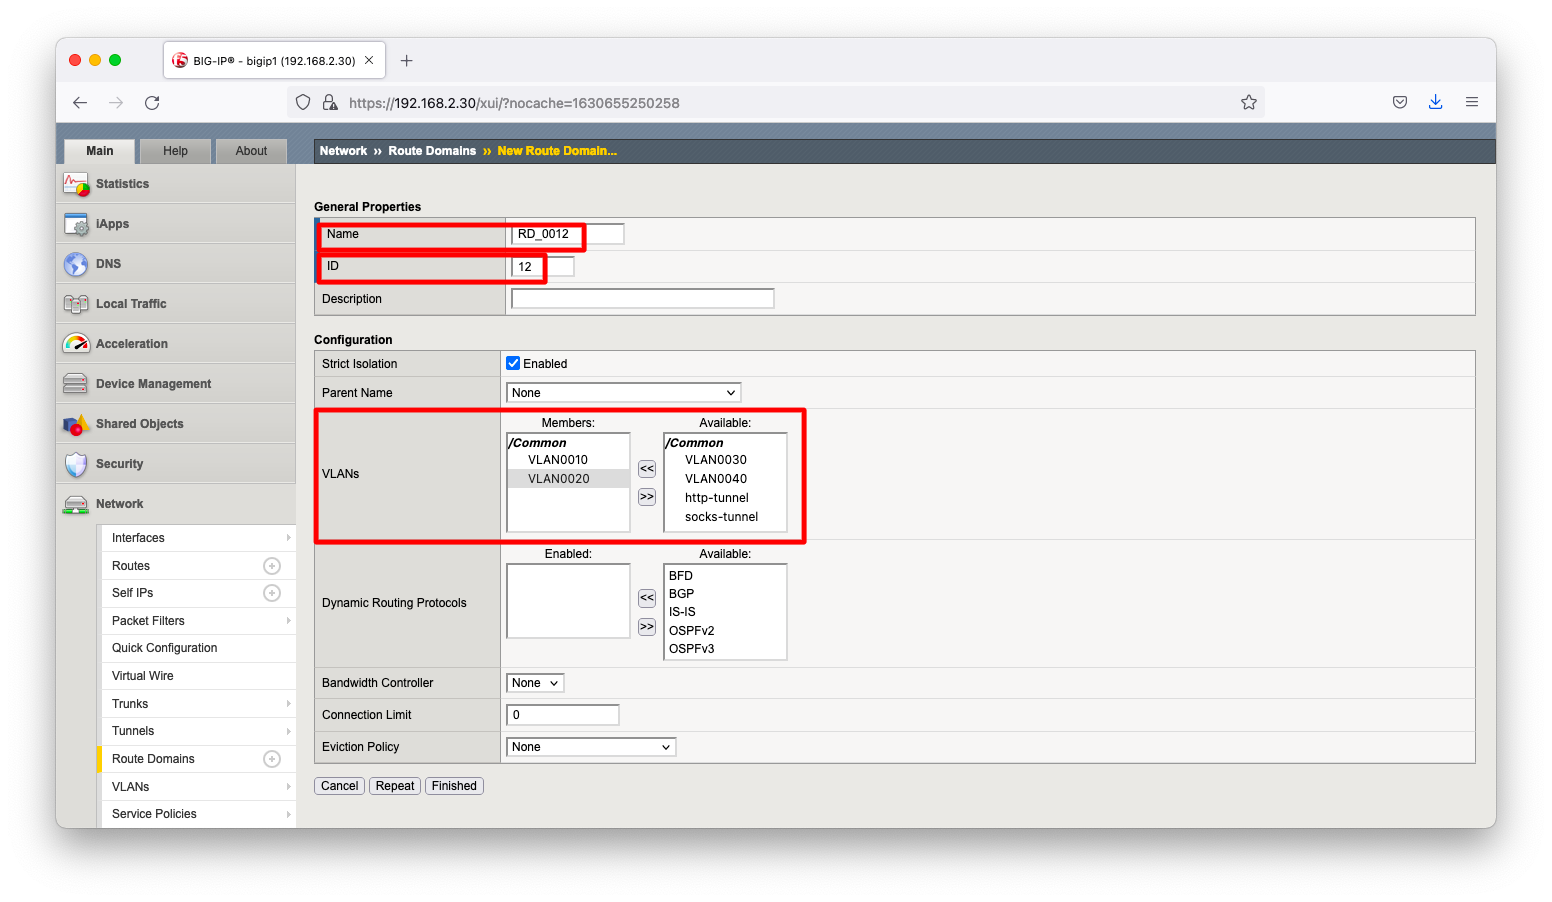
コマンドラインで操作する場合は以下の通りです。
create net route-domain RD_0012 id 12 vlans replace-all-with { VLAN0010 VLAN0020 }
create net route-domain RD_0034 id 34 vlans replace-all-with { VLAN0030 VLAN0040 }
Self IP 作成
「Network」「Self IPs」の順に画面遷移し、「Create」を押下します。
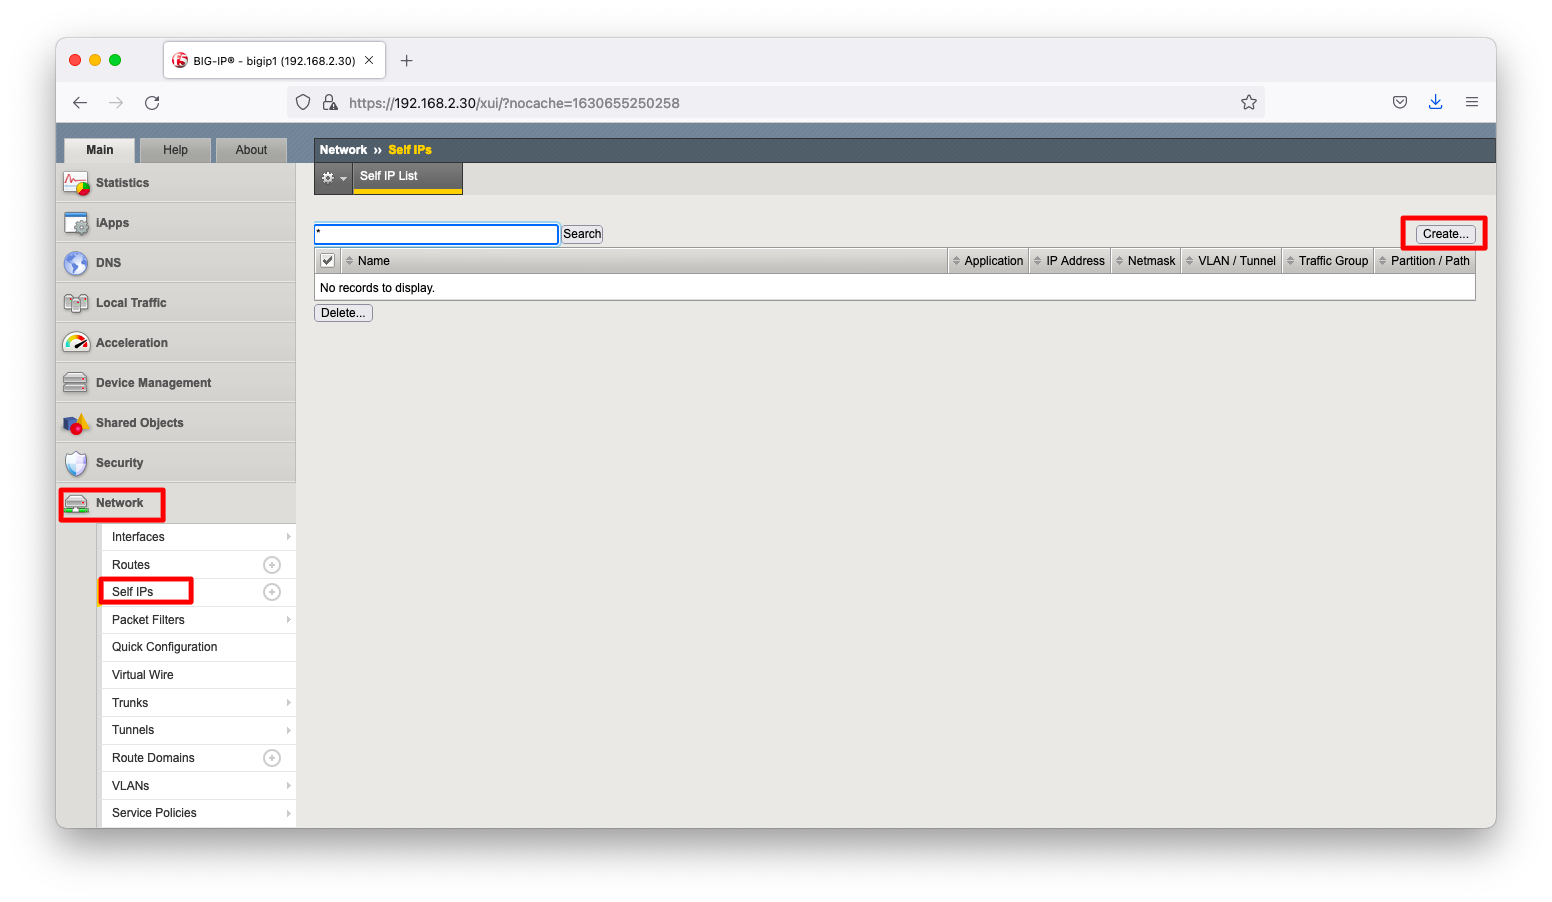
RouteDomainを使用する時は、「IP Address」の欄は「<IPアドレス>%<RD番号>」の書式で入力します。例えば、「192.168.10.1%12」のようになります。
「Name」「Netmask」「VLAN/Tunnel」は構成図の通りに入力します。以上の入力が完了したら「Finished」を押下します。この操作を繰り返し、構成図の通りのSelfIPを計4つ作成します。
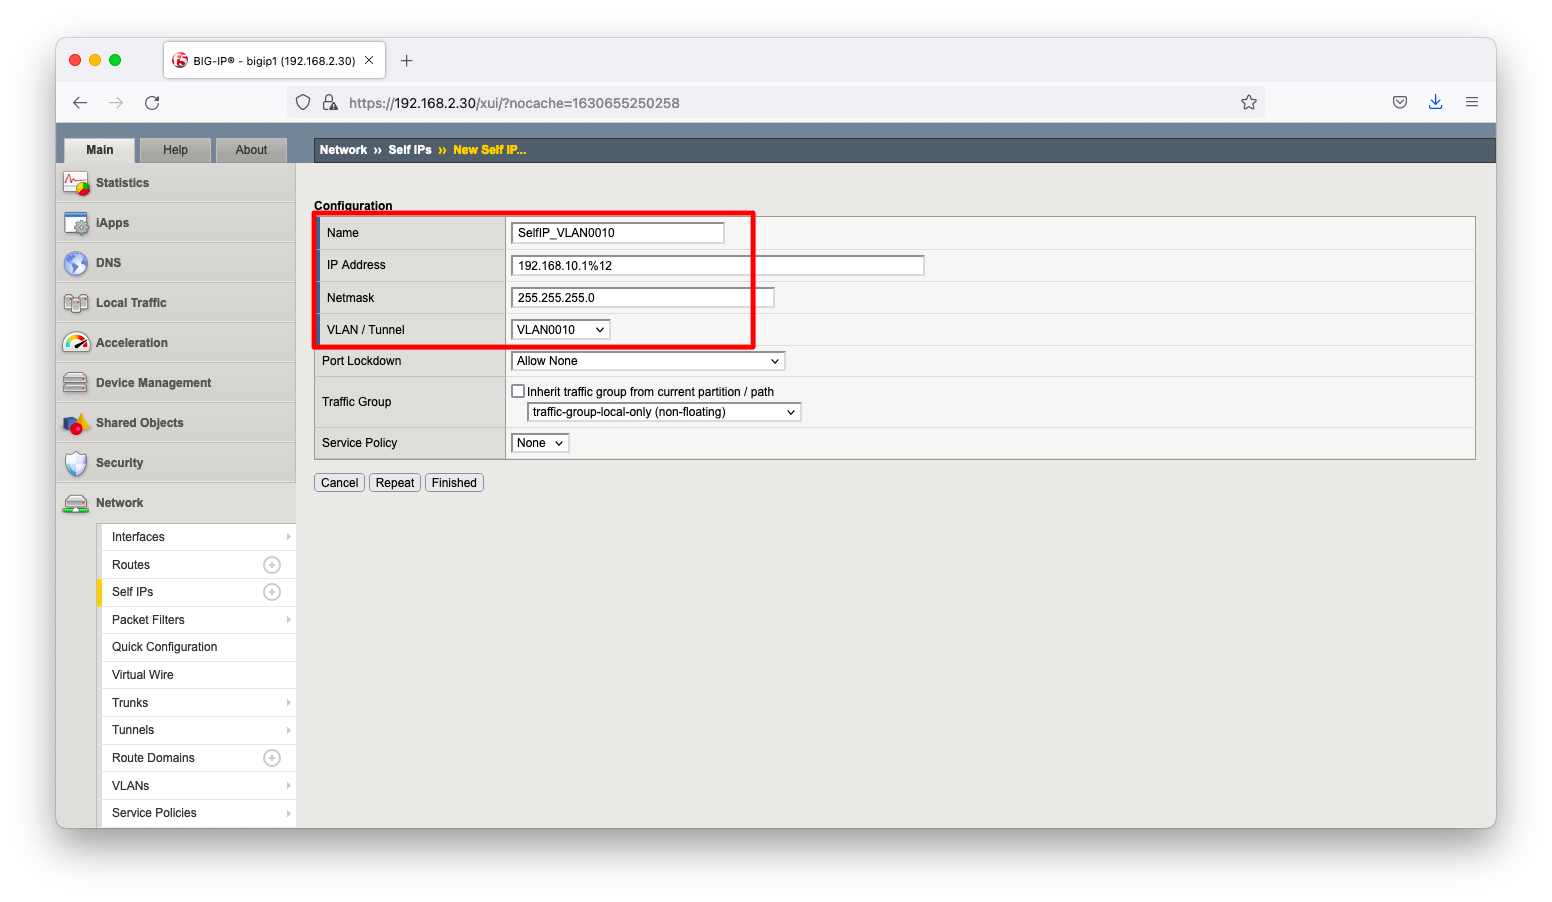
コマンドラインで操作する場合は以下の通りです。
create net self SelfIP_VLAN0010 address 192.168.10.1%12/24 traffic-group traffic-group-local-only vlan VLAN0010
create net self SelfIP_VLAN0020 address 192.168.20.1%12/24 traffic-group traffic-group-local-only vlan VLAN0020
create net self SelfIP_VLAN0030 address 192.168.30.1%34/24 traffic-group traffic-group-local-only vlan VLAN0030
create net self SelfIP_VLAN0040 address 192.168.40.1%34/24 traffic-group traffic-group-local-only vlan VLAN0040
Virtual Server 作成
Route Domainの機能はNetに限らず、LTMやAFMなどの様々なBIG-IPのモジュールと連動します。操作紹介かつ疎通確認の意味を込めて、Route Domain 12とRoute Domain 34を経由させるだけのvirtual serverを作ってみましょう。
「Local Traffic」「Virtual Server」の順に画面遷移し、「Create」を押下します。
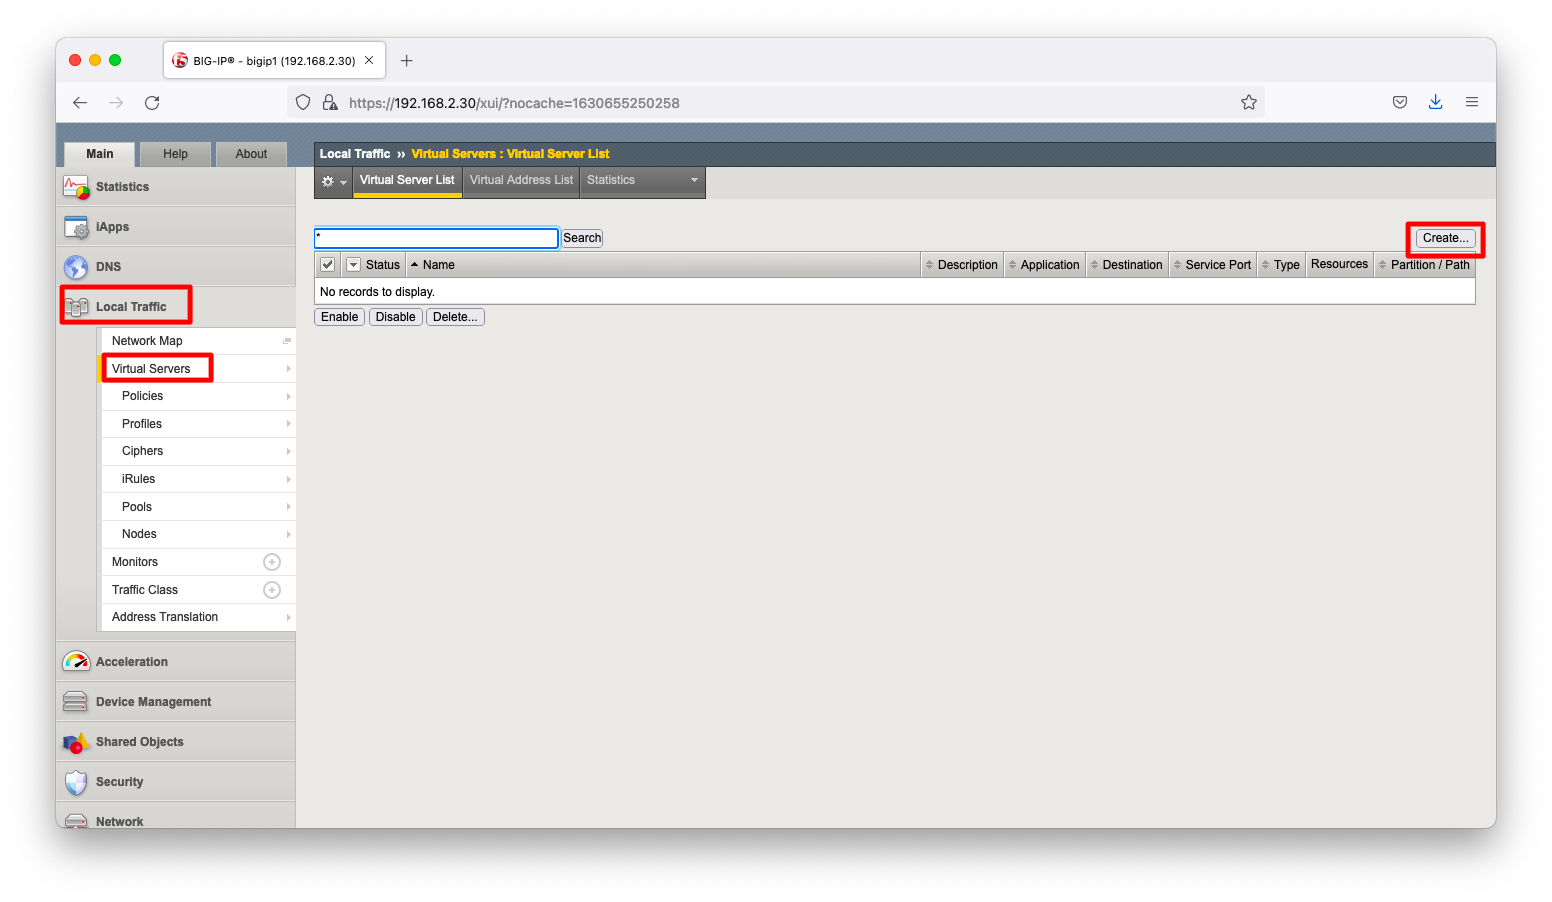
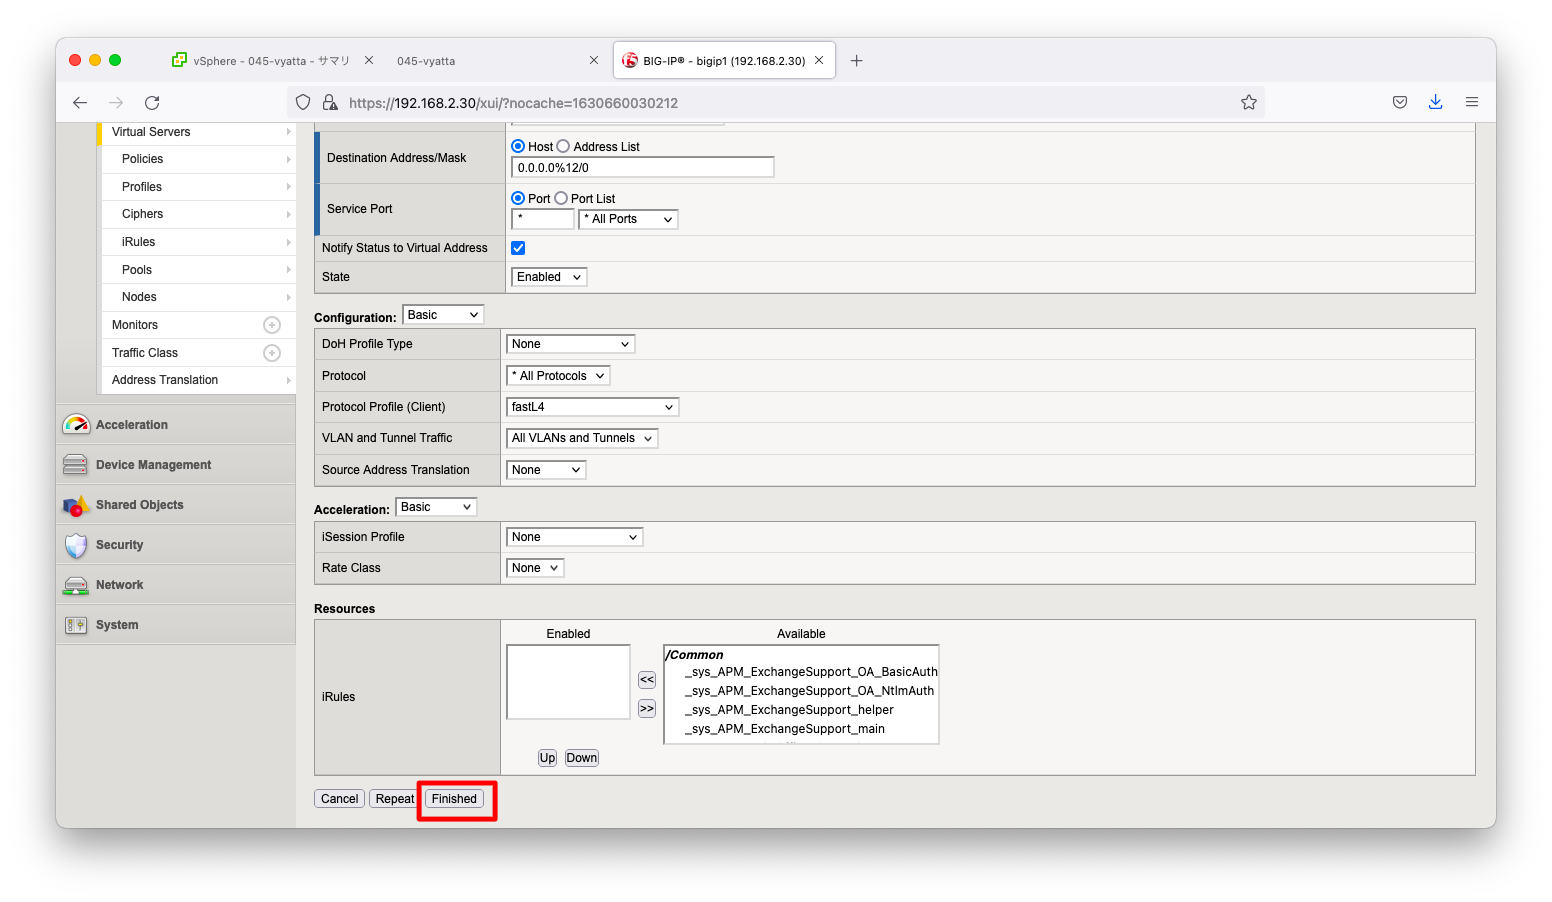
RouteDomainを使用する時は、「Destination Address/Mask」の欄は「<IPアドレス>%<RD番号>/<サブネットマスク>」の書式で入力します。例えば、「0.0.0.0%12/0」のようになります。
必須入力である「Name」「Type」「Service Port」に何らかの値を入力します。「Type」はルーティングだけの用途で使用するので、「Forwarding(IP)」で良いでしょう。
ICMPによる疎通確認しやすいよう「Protocol」欄はデフォルト設定の「TCP」から「All Protocols」に変更します。
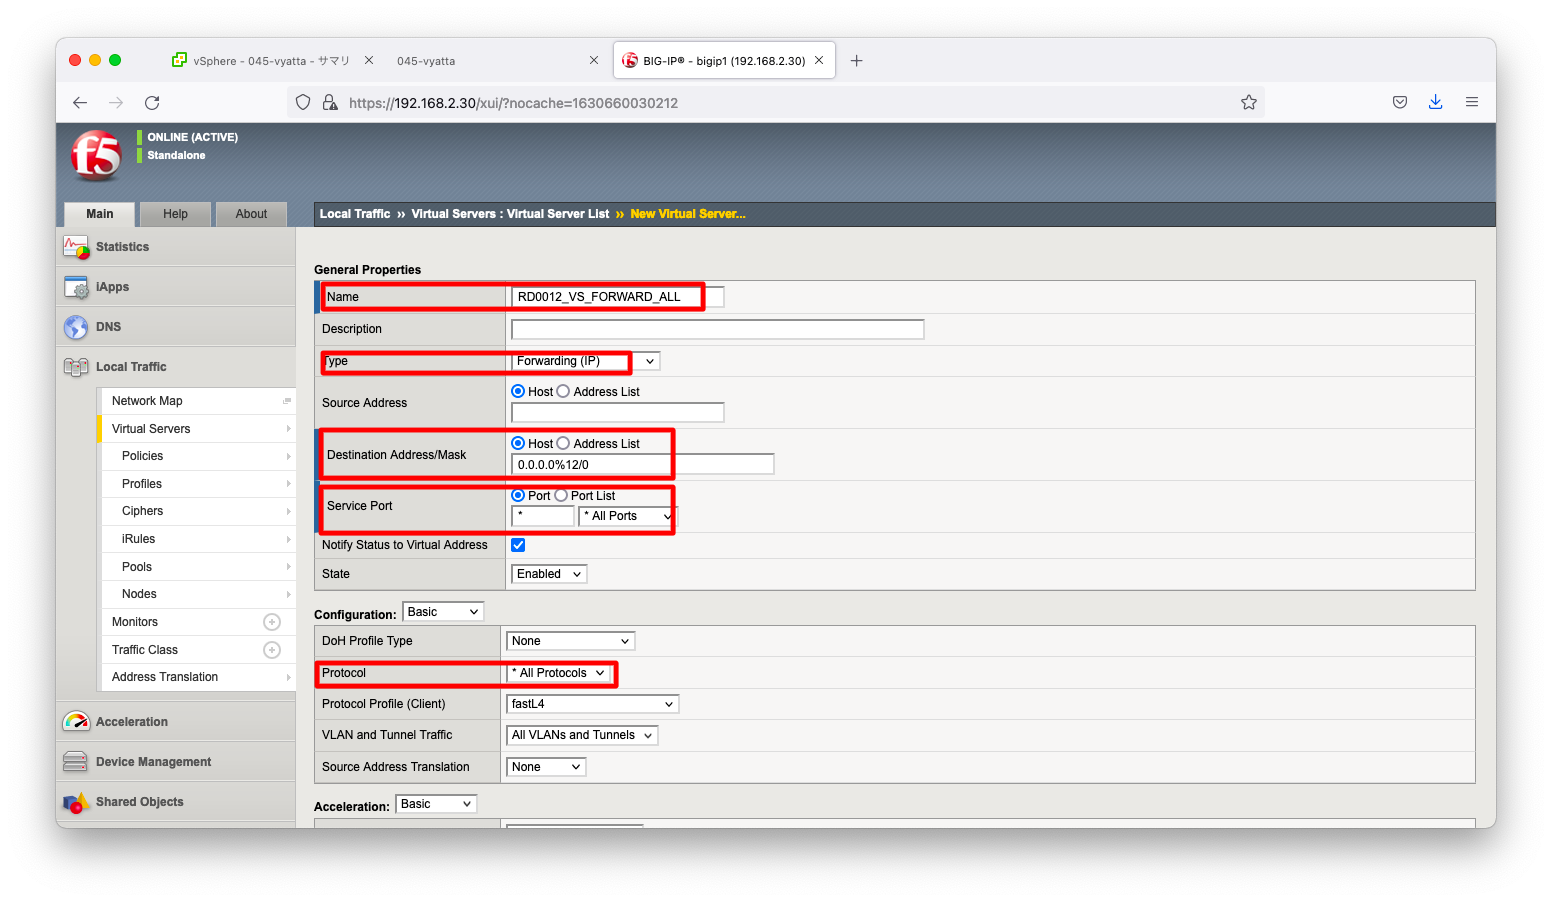
画面下の方へスクロールさせ、「Finished」を押下します。
コマンドラインで操作する場合は以下の通りです。
create ltm virtual RD0012_VS_FORWARD_ALL destination 0.0.0.0%12:any ip-forward
create ltm virtual RD0034_VS_FORWARD_ALL destination 0.0.0.0%34:any ip-forward
疎通確認
ルータからの疎通確認
Route50からServer10へ、Router50からServer30への疎通確認をします。
vyos@vy050:~$ ping 192.168.10.10 count 3
PING 192.168.10.10 (192.168.10.10) 56(84) bytes of data.
64 bytes from 192.168.10.10: icmp_seq=1 ttl=63 time=1.66 ms
64 bytes from 192.168.10.10: icmp_seq=2 ttl=63 time=0.851 ms
64 bytes from 192.168.10.10: icmp_seq=3 ttl=63 time=8.19 ms

--- 192.168.10.10 ping statistics ---
3 packets transmitted, 3 received, 0% packet loss, time 2002ms
rtt min/avg/max/mdev = 0.851/3.569/8.194/3.286 ms
vyos@vy050:~$
vyos@vy050:~$
vyos@vy050:~$ ping 192.168.30.30 count 3
PING 192.168.30.30 (192.168.30.30) 56(84) bytes of data.
64 bytes from 192.168.30.30: icmp_seq=1 ttl=63 time=0.760 ms
64 bytes from 192.168.30.30: icmp_seq=2 ttl=63 time=0.860 ms
64 bytes from 192.168.30.30: icmp_seq=3 ttl=63 time=0.839 ms

--- 192.168.30.30 ping statistics ---
3 packets transmitted, 3 received, 0% packet loss, time 2011ms
rtt min/avg/max/mdev = 0.760/0.819/0.860/0.043 ms
vyos@vy050:~$
RD番号を指定した疎通確認
RouteDomainから疎通確認をしたい場合は、宛先IPアドレスを「<IPアドレス>%<RD番号>」のように指定して疎通確認をします。
[root@localhost:Active:Standalone] config # ping -c 3 192.168.20.50%12
PING 192.168.20.50%12 (192.168.20.50%12) 56(84) bytes of data.
64 bytes from 192.168.20.50%12: icmp_seq=1 ttl=64 time=0.581 ms
64 bytes from 192.168.20.50%12: icmp_seq=2 ttl=64 time=0.534 ms
64 bytes from 192.168.20.50%12: icmp_seq=3 ttl=64 time=0.520 ms

--- 192.168.20.50%12 ping statistics ---
3 packets transmitted, 3 received, 0% packet loss, time 1999ms
rtt min/avg/max/mdev = 0.520/0.545/0.581/0.026 ms
[root@localhost:Active:Standalone] config #
[root@localhost:Active:Standalone] config #
[root@localhost:Active:Standalone] config #
[root@localhost:Active:Standalone] config # ping -c 3 192.168.40.50%34
PING 192.168.40.50%34 (192.168.40.50%34) 56(84) bytes of data.
64 bytes from 192.168.40.50%34: icmp_seq=1 ttl=64 time=1.14 ms
64 bytes from 192.168.40.50%34: icmp_seq=2 ttl=64 time=0.625 ms
64 bytes from 192.168.40.50%34: icmp_seq=3 ttl=64 time=0.652 ms

--- 192.168.40.50%34 ping statistics ---
3 packets transmitted, 3 received, 0% packet loss, time 2000ms
rtt min/avg/max/mdev = 0.625/0.808/1.148/0.241 ms
[root@localhost:Active:Standalone] config #
rdsh
rdshと呼ばれるツールを使用すると、RouteDomainの移動が可能になります。まずはデフォルトの状態での挙動を確認しましょう。デフォルトの状態ではVLAN0010などのRouteDomainに対して作成したIPアドレスは見えない状態になっています。
[root@localhost:Active:Standalone] config # ifconfig
eth0: flags=4163<UP,BROADCAST,RUNNING,MULTICAST>  mtu 1500
        inet6 fe80::250:56ff:fe90:3dc7  prefixlen 64  scopeid 0x20<link>
        ether 00:50:56:90:3d:c7  txqueuelen 1000  (Ethernet)
        RX packets 48464  bytes 7547509 (7.1 MiB)
        RX errors 0  dropped 0  overruns 0  frame 0
        TX packets 34446  bytes 33488866 (31.9 MiB)
        TX errors 0  dropped 0 overruns 0  carrier 0  collisions 0

lo: flags=73<UP,LOOPBACK,RUNNING>  mtu 65536
        inet 127.0.0.1  netmask 255.255.255.0
        inet6 ::1  prefixlen 128  scopeid 0x10<host>
        loop  txqueuelen 1000  (Local Loopback)
        RX packets 1535063  bytes 127702015 (121.7 MiB)
        RX errors 0  dropped 0  overruns 0  frame 0
        TX packets 1535063  bytes 127702015 (121.7 MiB)
        TX errors 0  dropped 0 overruns 0  carrier 0  collisions 0

lo:1: flags=73<UP,LOOPBACK,RUNNING>  mtu 65536
        inet 127.2.0.2  netmask 255.255.255.0
        loop  txqueuelen 1000  (Local Loopback)

mgmt: flags=4163<UP,BROADCAST,RUNNING,MULTICAST>  mtu 1500
        inet 192.168.2.30  netmask 255.255.255.0  broadcast 192.168.2.255
        inet6 fe80::250:56ff:fe90:3dc7  prefixlen 64  scopeid 0x20<link>
        ether 00:50:56:90:3d:c7  txqueuelen 1000  (Ethernet)
        RX packets 47589  bytes 6781388 (6.4 MiB)
        RX errors 0  dropped 0  overruns 0  frame 0
        TX packets 34481  bytes 33493956 (31.9 MiB)
        TX errors 0  dropped 0 overruns 0  carrier 0  collisions 0

tmm: flags=4163<UP,BROADCAST,RUNNING,MULTICAST>  mtu 1500
        inet 127.1.1.254  netmask 255.255.255.0  broadcast 127.1.1.255
        inet6 fe80::298:76ff:fe54:3210  prefixlen 64  scopeid 0x20<link>
        inet6 fc00:f5::1  prefixlen 64  scopeid 0x0<global>
        ether 00:98:76:54:32:10  txqueuelen 1000  (Ethernet)
        RX packets 70479  bytes 3872515 (3.6 MiB)
        RX errors 0  dropped 0  overruns 0  frame 0
        TX packets 73777  bytes 15476713 (14.7 MiB)
        TX errors 0  dropped 0 overruns 0  carrier 0  collisions 0

tmm_bp: flags=4163<UP,BROADCAST,RUNNING,MULTICAST>  mtu 4096
        inet 127.20.0.254  netmask 255.255.0.0  broadcast 127.20.255.255
        inet6 fe80::1:23ff:fe45:fe  prefixlen 64  scopeid 0x20<link>
        ether 02:01:23:45:00:fe  txqueuelen 1000  (Ethernet)
        RX packets 0  bytes 0 (0.0 B)
        RX errors 0  dropped 0  overruns 0  frame 0
        TX packets 4  bytes 360 (360.0 B)
        TX errors 0  dropped 0 overruns 0  carrier 0  collisions 0

[root@localhost:Active:Standalone] config #
RouteDomain12が属しているサブネットにpingを実行しても、疎通応答なしです。
[root@localhost:Active:Standalone] config # ping -c 3 192.168.20.50
PING 192.168.20.50 (192.168.20.50) 56(84) bytes of data.

--- 192.168.20.50 ping statistics ---
3 packets transmitted, 0 received, 100% packet loss, time 1999ms

[root@localhost:Active:Standalone] config #
この状態から、rdshと呼ばれるツールの引数にRD番号を指定します。全くプロンプトが変わらないので、見た目は分かりづらいのですが(よくオペミスを誘発するのですが)、このコマンドの実行によりRouteDomain12からの操作が可能になります。
[root@localhost:Active:Standalone] config # rdsh 12
[root@localhost:Active:Standalone] config #
rdshコマンド実行後は、VLAN0010などのRouteDomainに対して作成したインターフェースが見えるようになります。
[root@localhost:Active:Standalone] config # ifconfig
VLAN0010: flags=4163<UP,BROADCAST,RUNNING,MULTICAST>  mtu 1500
        inet 192.168.10.1  netmask 255.255.255.0  broadcast 192.168.10.255
        inet6 fe80::250:56ff:fe90:d6de  prefixlen 64  scopeid 0x20<link>
        ether 00:50:56:90:d6:de  txqueuelen 1000  (Ethernet)
        RX packets 3  bytes 180 (180.0 B)
        RX errors 0  dropped 0  overruns 0  frame 0
        TX packets 8  bytes 648 (648.0 B)
        TX errors 0  dropped 0 overruns 0  carrier 0  collisions 0

VLAN0020: flags=4163<UP,BROADCAST,RUNNING,MULTICAST>  mtu 1500
        inet 192.168.20.1  netmask 255.255.255.0  broadcast 192.168.20.255
        inet6 fe80::250:56ff:fe90:d6de  prefixlen 64  scopeid 0x20<link>
        ether 00:50:56:90:d6:de  txqueuelen 1000  (Ethernet)
        RX packets 10  bytes 924 (924.0 B)
        RX errors 0  dropped 0  overruns 0  frame 0
        TX packets 18  bytes 1572 (1.5 KiB)
        TX errors 0  dropped 0 overruns 0  carrier 0  collisions 0

lo: flags=73<UP,LOOPBACK,RUNNING>  mtu 65536
        inet 127.0.0.1  netmask 255.255.255.0
        inet6 ::1  prefixlen 128  scopeid 0x10<host>
        loop  txqueuelen 1000  (Local Loopback)
        RX packets 0  bytes 0 (0.0 B)
        RX errors 0  dropped 0  overruns 0  frame 0
        TX packets 0  bytes 0 (0.0 B)
        TX errors 0  dropped 0 overruns 0  carrier 0  collisions 0

tmm: flags=4163<UP,BROADCAST,RUNNING,MULTICAST>  mtu 1500
        inet 127.1.1.254  netmask 255.255.255.0  broadcast 127.1.1.255
        inet6 fe80::298:76ff:fe54:3210  prefixlen 64  scopeid 0x20<link>
        inet6 fc00:f5::1  prefixlen 64  scopeid 0x0<global>
        ether 00:98:76:54:32:10  txqueuelen 1000  (Ethernet)
        RX packets 0  bytes 0 (0.0 B)
        RX errors 0  dropped 0  overruns 0  frame 0
        TX packets 9  bytes 806 (806.0 B)
        TX errors 0  dropped 0 overruns 0  carrier 0  collisions 0
RD番号の指定なしにpingの実行が可能になります。
[root@localhost:Active:Standalone] config # ping -c 3 192.168.20.50
PING 192.168.20.50 (192.168.20.50) 56(84) bytes of data.
64 bytes from 192.168.20.50: icmp_seq=1 ttl=64 time=1.96 ms
64 bytes from 192.168.20.50: icmp_seq=2 ttl=64 time=0.494 ms
64 bytes from 192.168.20.50: icmp_seq=3 ttl=64 time=0.757 ms

--- 192.168.20.50 ping statistics ---
3 packets transmitted, 3 received, 0% packet loss, time 2000ms
rtt min/avg/max/mdev = 0.494/1.073/1.969/0.642 ms
[root@localhost:Active:Standalone] config #

