
BIG-IPでOSPFを設定する方法を説明します。
動作確認の構成
構成図
「BIG-IP パーティションによる分割」の動作確認が終了した時点の構成を用いて動作確認をします。この構成で、Server10とServer30が互いに疎通できる設定を考察します。
                    +-----------------+
                .50 |     (Vyatta)    | .50
         +----------+     Router50    +----------+
         |     eth0 |                 | eth1     |
         |          +-----------------+          |
         |                                       |
         | 192.168.20.0/24       192.168.40.0/24 |
         | (vlan 20)                   (vlan 40) |
         |                                       |
         | .1                                    | .1
+--------+--------+                     +--------+--------+
|     bigip01     |                     |     bigip01     |
| RouteDomain 12  |                     | RouteDomain 34  |
|                 |                     |                 |
+--------+--------+                     +--------+--------+
         | .1                                    | .1
         |                                       |
         | 192.168.10.0/24       192.168.30.0/24 |
         | (vlan 10)                   (vlan 30) |
         |                                       |
         | .10                                   | .30
+--------+--------+                     +--------+--------+
|                 |                     |                 |
|     Server10    |                     |     Server30    |
|  (RockyLinux84) |                     |  (RockyLinux84) |
+-----------------+                     +-----------------+
初期設定
BIG-IPの初期設定は以下の通りとします。Router50にはOSPF設定済とします。
動作確認
ZebOSの起動
BIG-IPはZebOSと呼ばれるソフトウェアを使用してOSPFを実現します。デフォルトの状態ではZebOSは起動していませんので、まずはZebOSを起動します。
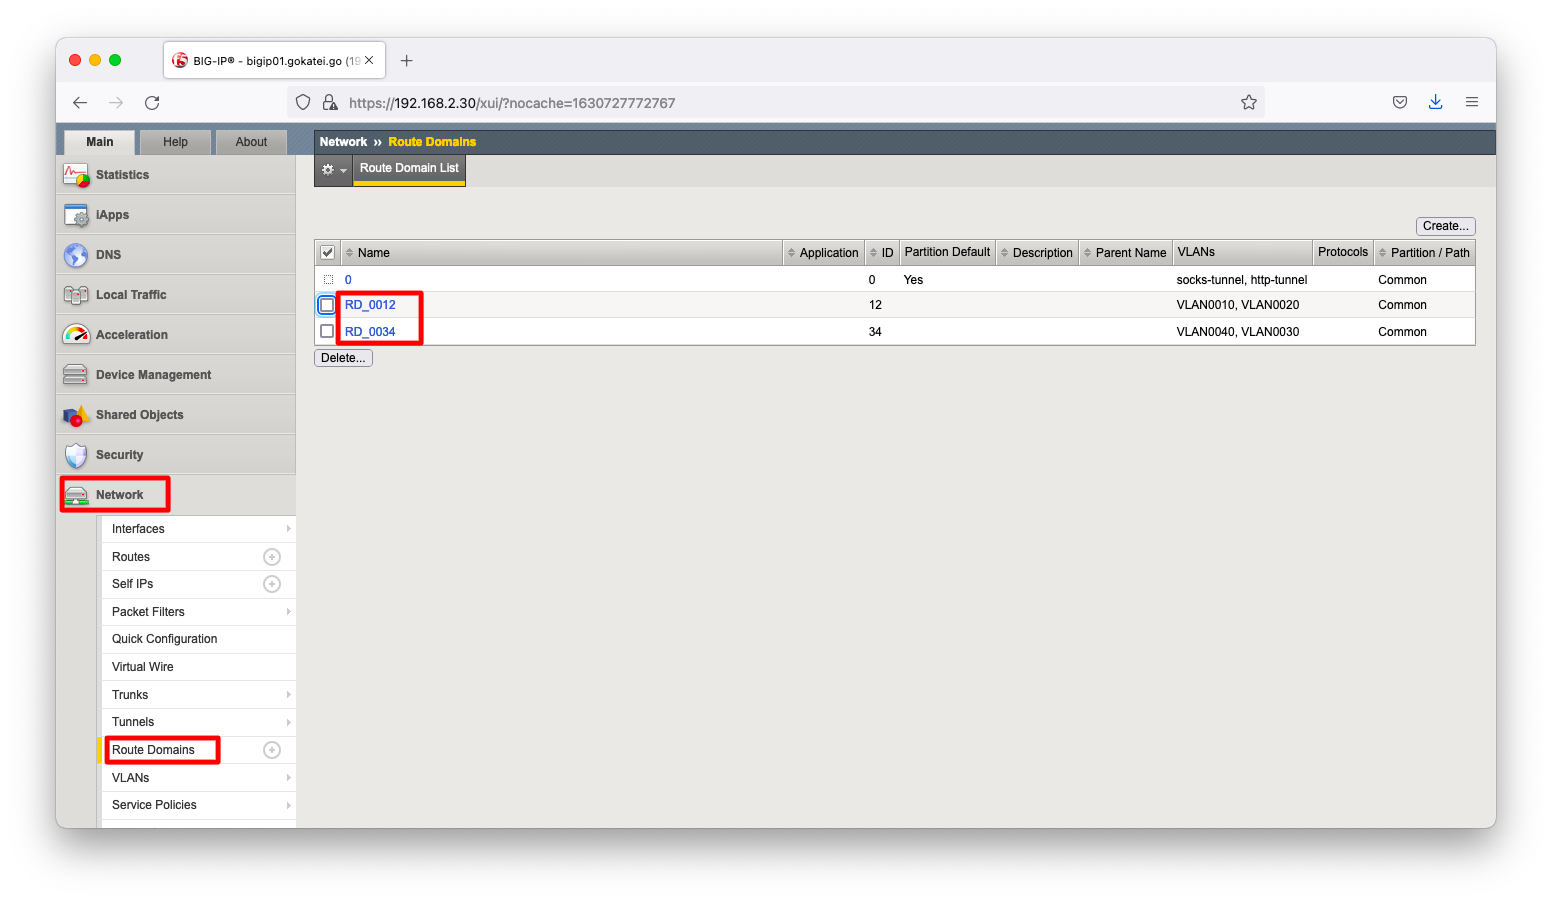
「Network」「Route Domains」の順に画面遷移し、「ルートドメイン名」を押下します。
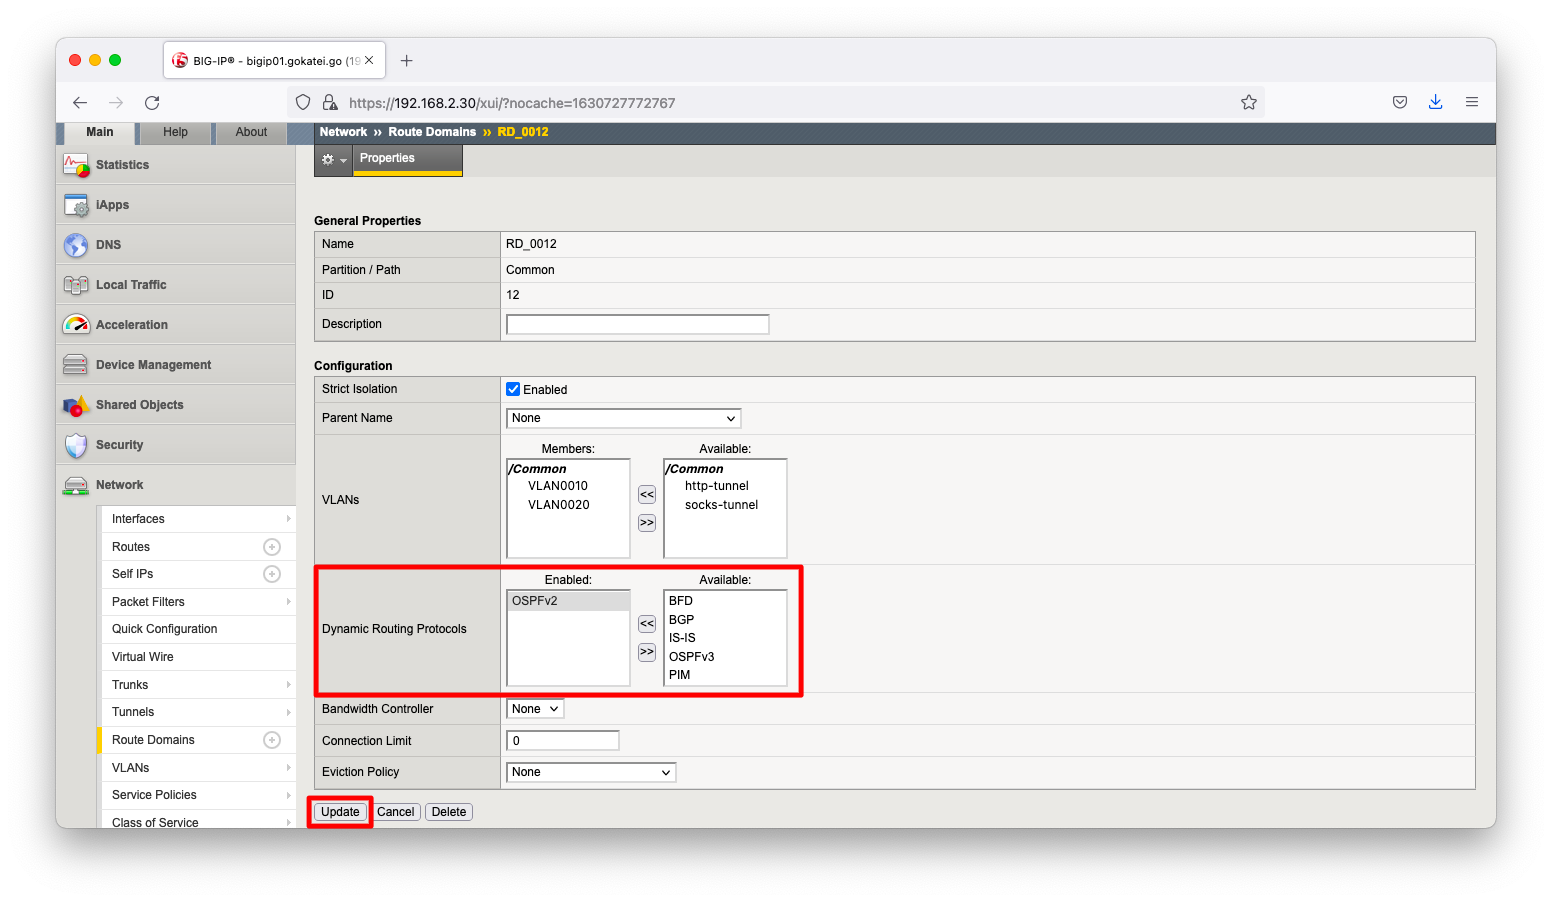
「Dynamic Routing Protocols」欄を設定し、「OSPFv2」を有効にします。
コマンドラインで操作する場合は以下の通りです。
modify net route-domain RD_0012 routing-protocol replace-all-with { OSPFv2 }
modify net route-domain RD_0034 routing-protocol replace-all-with { OSPFv2 }
ZebOSが有効になっているかどうか不安な場合は、以下のようにzebosコマンドを使用すると起動有無を確認できます。
[bigip01:BIG-IP 16.1.0]
[root@bigip01:Active:Standalone] config # zebos -a check
=== route domain: 0 ===

=== route domain: 12 ===
nsm is running [12705]
imi is running [12704]
ospfd   is running [12706]

=== route domain: 34 ===
nsm is running [12756]
imi is running [12755]
ospfd   is running [12757]

[root@bigip01:Active:Standalone] config #
OSPFの設定
ZebOSを操作するには、imishと呼ばれるコマンドラインツールを使用します。書式は以下の通りです。
imish -r <RD番号>
操作例は以下の通りです。Cisco IOSとほぼ同等の操作感です。
[root@bigip01:Active:Standalone] config # imish -r 12
bigip01.gokatei.go[12]>en
bigip01.gokatei.go[12]#conf t
Enter configuration commands, one per line.  End with CNTL/Z.
bigip01.gokatei.go[12](config)#router ospf 1
bigip01.gokatei.go[12](config-router)# passive-interface VLAN0010
bigip01.gokatei.go[12](config-router)# network 192.168.10.0/24 area 0
bigip01.gokatei.go[12](config-router)# network 192.168.20.0/24 area 0
bigip01.gokatei.go[12](config-router)#end
bigip01.gokatei.go[12]#exit
[root@bigip01:Active:Standalone] config #
[root@bigip01:Active:Standalone] config #
[root@bigip01:Active:Standalone] config # imish -r 34
bigip01.gokatei.go[34]>en
bigip01.gokatei.go[34]#conf t
Enter configuration commands, one per line.  End with CNTL/Z.
bigip01.gokatei.go[34](config)#router ospf 1
bigip01.gokatei.go[34](config-router)# passive-interface VLAN0030
bigip01.gokatei.go[34](config-router)# network 192.168.30.0/24 area 0
bigip01.gokatei.go[34](config-router)# network 192.168.40.0/24 area 0
bigip01.gokatei.go[34](config-router)#end
bigip01.gokatei.go[34]#exit
[root@bigip01:Active:Standalone] config #
OSPFの確認
imishコマンドを使用すれば、Cisco IOSのようなOSPFの確認が可能です。
[bigip01:BIG-IP 16.1.0]
[root@bigip01:Active:Standalone] config # imish -r 12
bigip01.gokatei.go[12]>show ip ospf neighbor

OSPF process 1:
Neighbor ID     Pri   State            Dead Time   Address         Interface
192.168.40.50     1   Full/DR          00:00:34    192.168.20.50   VLAN0020

bigip01.gokatei.go[12]>
bigip01.gokatei.go[12]>
bigip01.gokatei.go[12]>show ip route
Codes: K - kernel, C - connected, S - static, R - RIP, B - BGP
       O - OSPF, IA - OSPF inter area
       N1 - OSPF NSSA external type 1, N2 - OSPF NSSA external type 2
       E1 - OSPF external type 1, E2 - OSPF external type 2
       i - IS-IS, L1 - IS-IS level-1, L2 - IS-IS level-2, ia - IS-IS inter area
       * - candidate default

C       127.0.0.1/32 is directly connected, lo
C       127.1.1.254/32 is directly connected, tmm
C       192.168.10.0/24 is directly connected, VLAN0010
C       192.168.20.0/24 is directly connected, VLAN0020
O       192.168.30.0/24 [110/21] via 192.168.20.50, VLAN0020, 00:02:43
O       192.168.40.0/24 [110/11] via 192.168.20.50, VLAN0020, 00:02:43

Gateway of last resort is not set
bigip01.gokatei.go[12]>
rdsh入力後に、ip routeコマンド等でも確認可能です。
[bigip01:BIG-IP 16.1.0]
[root@bigip01:Active:Standalone] config # rdsh 12
[root@bigip01:Active:Standalone] config # ip route
127.1.1.0/24 dev if3  proto kernel  scope link  src 127.1.1.254
192.168.10.0/24 dev if5  proto kernel  scope link  src 192.168.10.1
192.168.20.0/24 dev if7  proto kernel  scope link  src 192.168.20.1
192.168.30.0/24 via 192.168.20.50 dev if7  proto zebra
192.168.40.0/24 via 192.168.20.50 dev if7  proto zebra
[root@bigip01:Active:Standalone] config #
疎通確認
server10からserver30へ疎通可能である事を確認します。
[server10:RockyLinux8.4]
[root@server010 ~]# traceroute -n 192.168.30.30
traceroute to 192.168.30.30 (192.168.30.30), 30 hops max, 60 byte packets
 1  192.168.10.1  0.952 ms  0.839 ms  0.806 ms
 2  192.168.20.50  1.486 ms  1.294 ms  1.239 ms
 3  192.168.40.1  1.425 ms  1.307 ms  1.289 ms
 4  * * 192.168.30.30  3.867 ms
[root@server010 ~]#
[root@server010 ~]#
[root@server010 ~]# ping -c 3 192.168.30.30
PING 192.168.30.30 (192.168.30.30) 56(84) bytes of data.
64 bytes from 192.168.30.30: icmp_seq=1 ttl=61 time=1.72 ms
64 bytes from 192.168.30.30: icmp_seq=2 ttl=61 time=1.74 ms
64 bytes from 192.168.30.30: icmp_seq=3 ttl=61 time=1.82 ms

--- 192.168.30.30 ping statistics ---
3 packets transmitted, 3 received, 0% packet loss, time 2004ms
rtt min/avg/max/mdev = 1.720/1.759/1.821/0.044 ms
[root@server010 ~]#