Ansible TowerまたはAWXでダイナミックインベントリを使用する方法を説明します。Ansbile TowerはGUIやAPIで操作対象のホストを定義する事もできますが、Ansible Tower外部のシステムと連携して動的にインベントリを変化させる事もできます。
Git管理のインベントリファイル、vCenter、AWSなどを連携させる事もできます。このページではvCenterと連携させる方法をまとめます。
様々な運用形態に対応できるようGUI, CLI, APIの3通りの設定手順をまとめます。
認証情報の定義
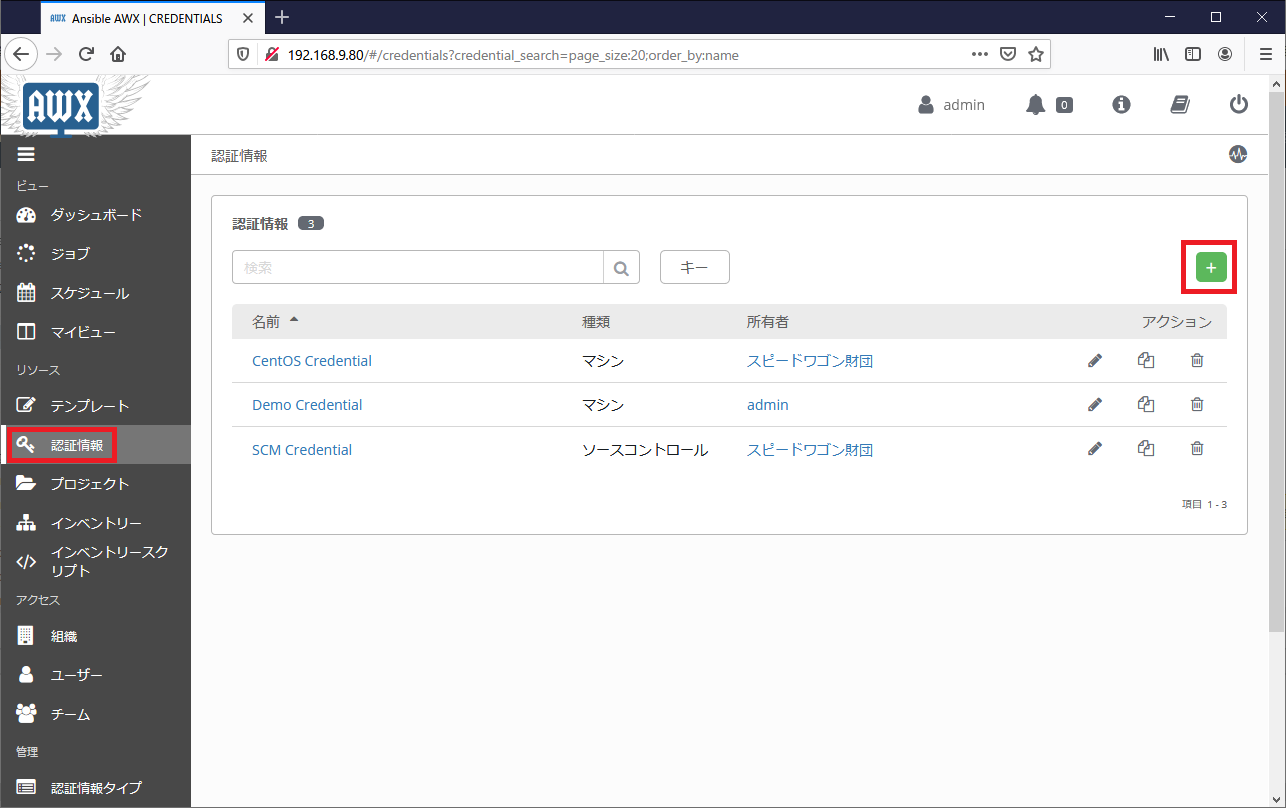
vCenterと接続するための認証情報を定義します。「認証情報」の設定画面に遷移し、「+(追加)」ボタンを押下します。
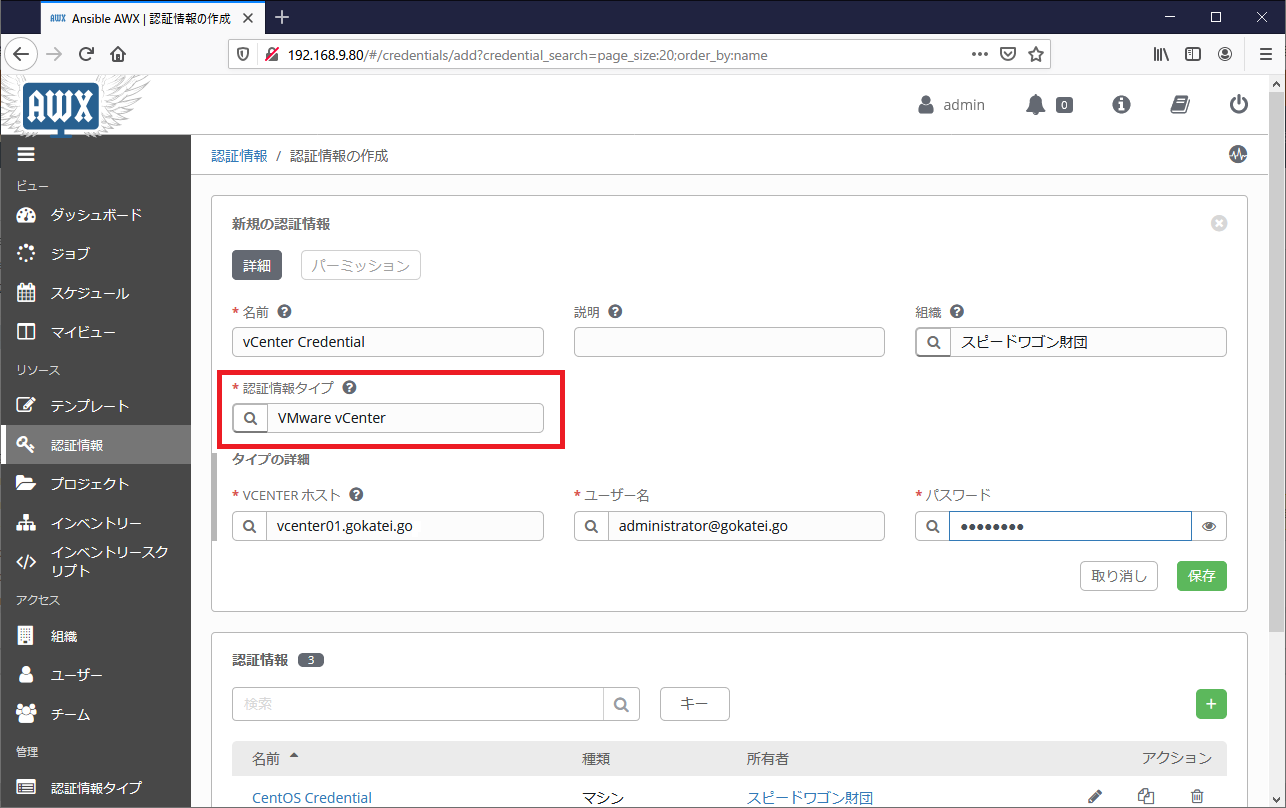
必要な情報を入力し「保存」を押下します。vCenterと連動させる場合は、「ソース」は「VMware vCenter」を選びます。
CLIまたはAPIで操作する例は以下の通りです。organization_id, credential_type_idは環境に応じて適宜変更ください。
CLI操作
awx credentials create \
  --name "vCenter Credential" \
  --description "" \
  --organization "スピードワゴン財団" \
  --credential_type "VMware vCenter" \
  --inputs "{ \
        "host": "vcenter01.gokatei.go", \
        "password": "P@ssw0rd", \
        "username": "administrator@gokatei.go" \
     }"
API操作
ORGANIZATION_ID=$(curl -u admin:P@ssw0rd \
  http://localhost/api/v2/organizations/ | \
  jq  '.results[] | select(.name == "スピードワゴン財団")' | jq ".id")

CREDENTIAL_TYPE_ID=$(curl -u admin:P@ssw0rd \
  http://localhost/api/v2/credential_types/  | \
  jq  '.results[] | select(.name == "VMware vCenter")' | jq ".id")

curl -XPOST -u admin:P@ssw0rd \
  --header "Content-Type: application/json" \
  -d @- http://localhost/api/v2/credentials/ << EOF
{
  "name":"vCenter Credential",
  "description":"",
  "organization":${ORGANIZATION_ID},
  "credential_type":${CREDENTIAL_TYPE_ID},
  "inputs": {
        "host": "vcenter01.gokatei.go",
        "password": "P@ssw0rd",
        "username": "administrator@gokatei.go"
     }
}
EOF
インベントリソースの定義
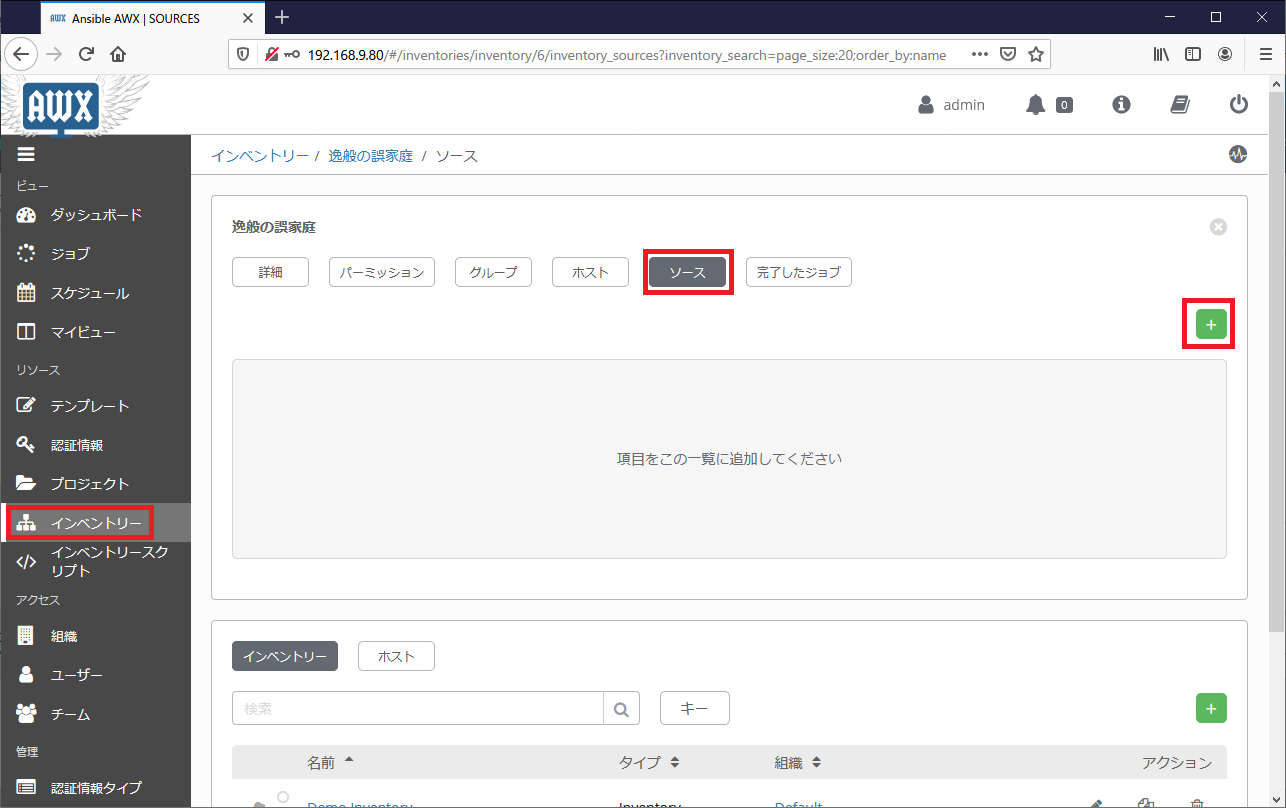
インベントリの「ソース」の設定画面に遷移し、「+(追加)」ボタンを押下します。
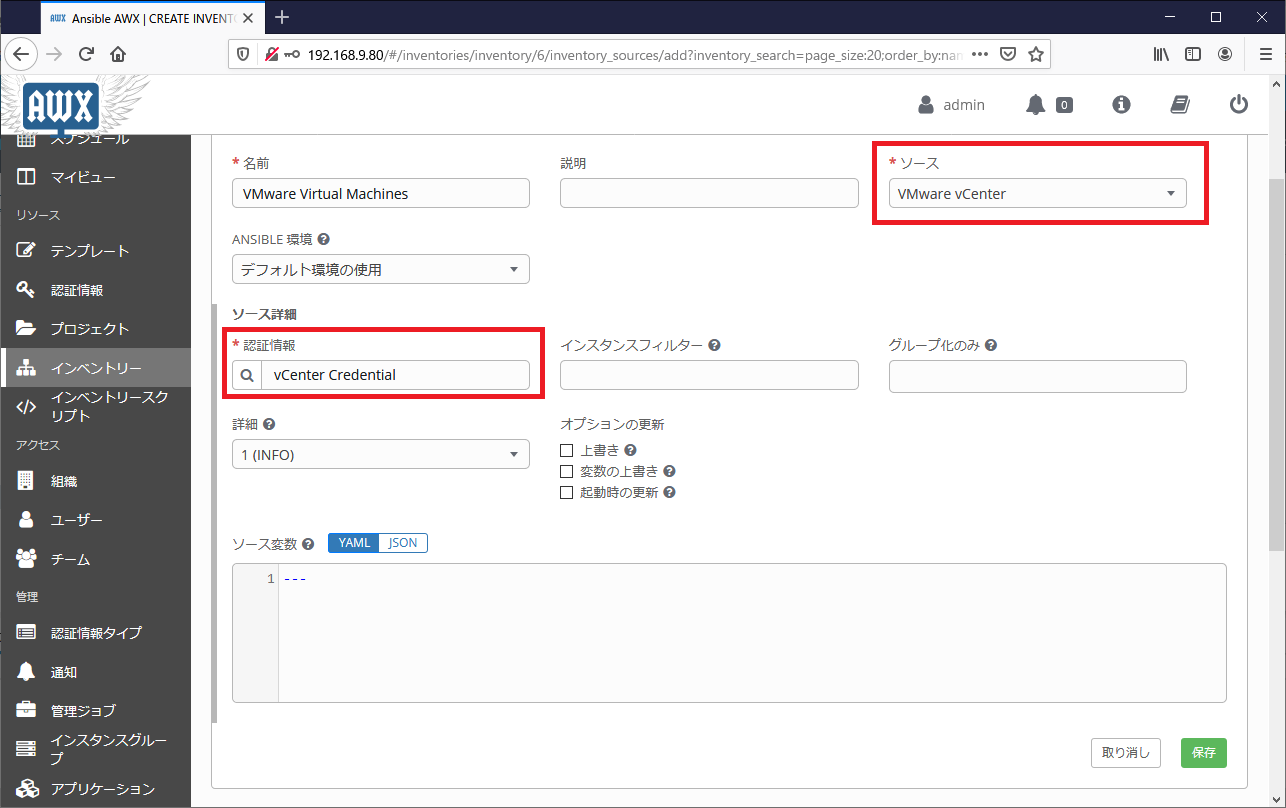
必要な情報を入力し「保存」を押下します。VMware vCenterの情報を読み込む場合は、「ソース」は「VMware vCenter」を選びます。
CLIで操作する場合は以下の通りです。awxのCLIは殆どの場合はidではなく名前による指定が可能ですが、例外的に認証情報はid(数字)で指定する必要があります。
名前で指定できないのは意図した挙動ではなく、将来的に改善される可能性もあります。
CLI操作
CREDENTIAL_ID=$(awx credentials list -f jq \
  --filter '.results[] | select(.name == "vCenter Credential")' | jq ".id")

awx inventory_sources create \
  --name "VMware Virtual Machines" \
  --description "" \
  --source "vmware" \
  --credential ${CREDENTIAL_ID} \
  --inventory "逸般の誤家庭"
APIで操作する場合は以下の通りです。
API操作
INVENTORY_ID=$(curl -u admin:P@ssw0rd \
  http://localhost/api/v2/inventories/ | \
  jq  '.results[] | select(.name == "逸般の誤家庭")' | jq ".id")

CREDENTIAL_ID=$(curl -u admin:P@ssw0rd \
  http://localhost/api/v2/credentials/ | \
  jq  '.results[] | select(.name == "vCenter Credential")' | jq ".id")

curl -XPOST -u admin:P@ssw0rd \
  --header "Content-Type: application/json" \
  -d @- http://localhost/api/v2/inventory_sources/ << EOF
{
  "name": "VMware Virtual Machines",
  "description": "",
  "source": "vmware",
  "credential": "${CREDENTIAL_ID}",
  "inventory": "${INVENTORY_ID}"
}
EOF
インベントの同期
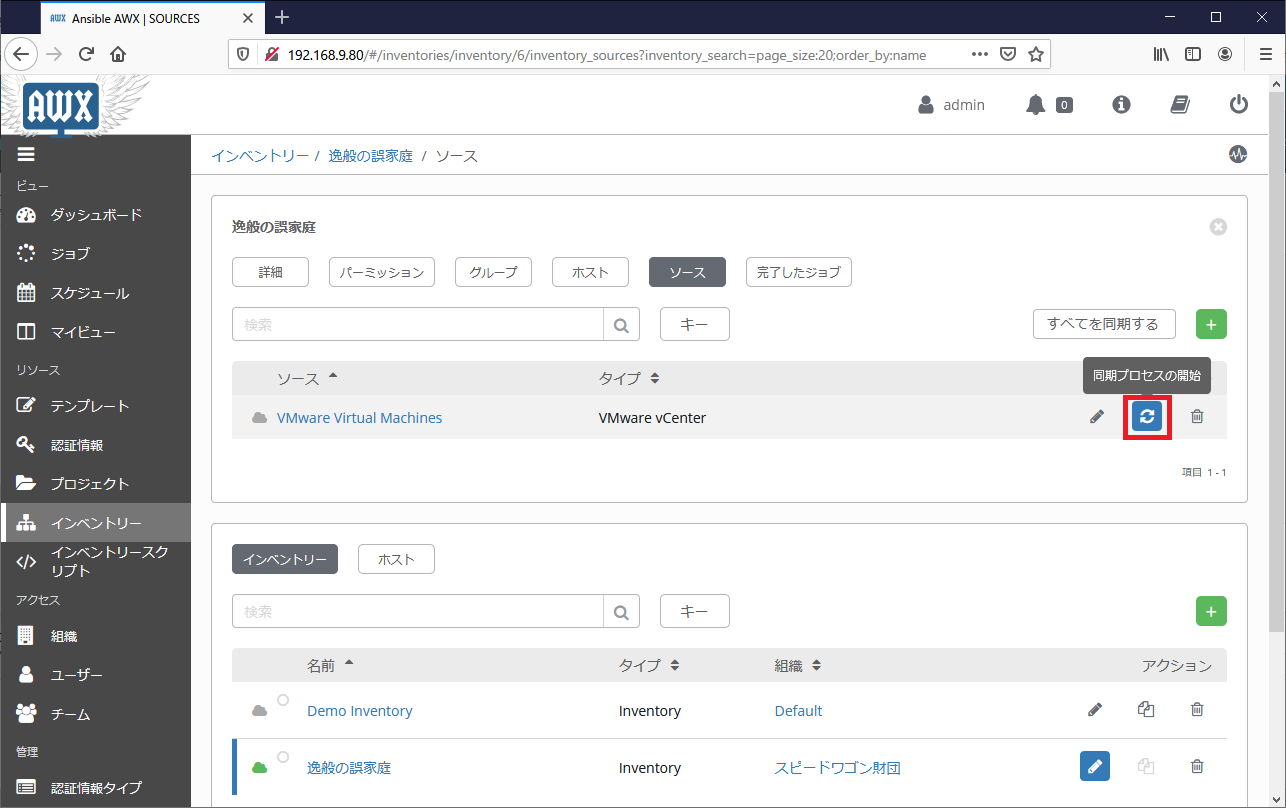
インベントリファイルの設定が終わったら、インベントリの「ソース」の設定画面に戻ります。設定直後に自動的に同期されるわけではありませんので、「同期」ボタンを押下しインベントリ情報を同期させます。
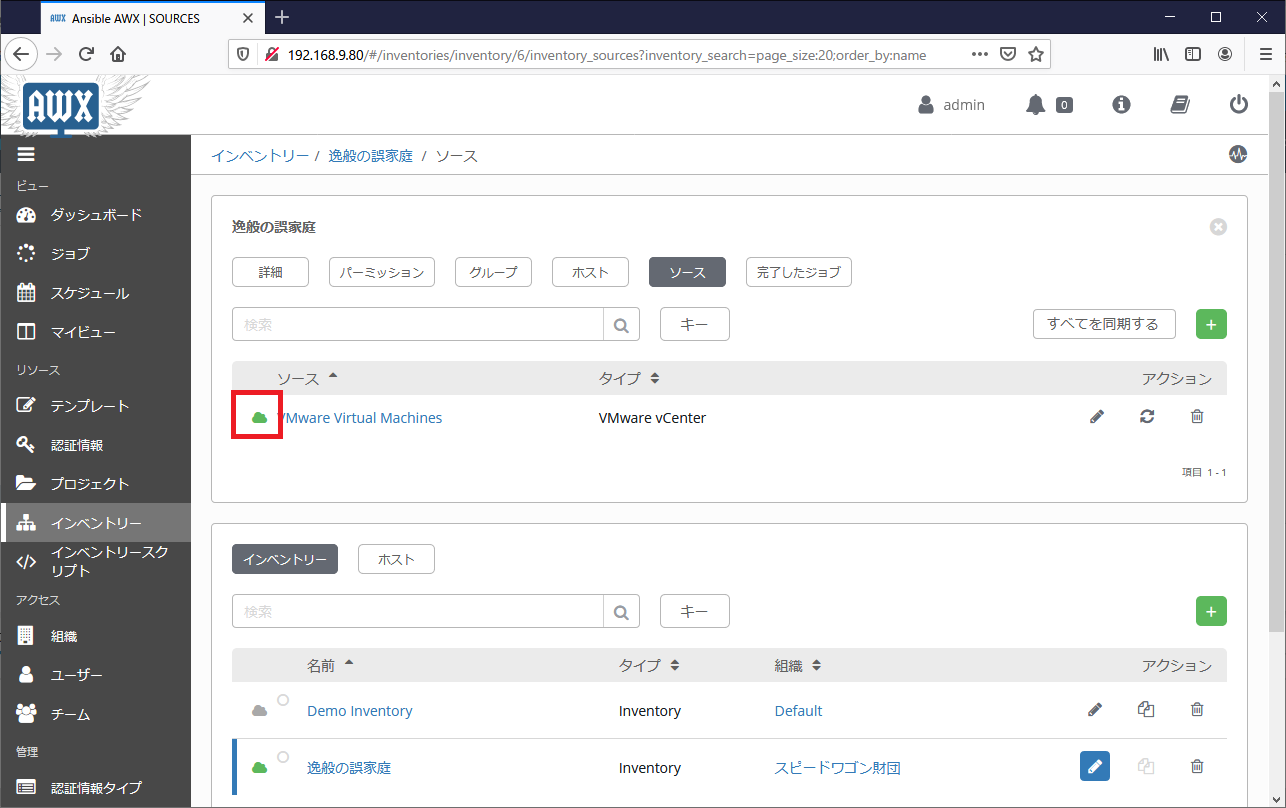
同期に成功した場合は、「雲(クラウド)」のアイコンが緑に変わります。
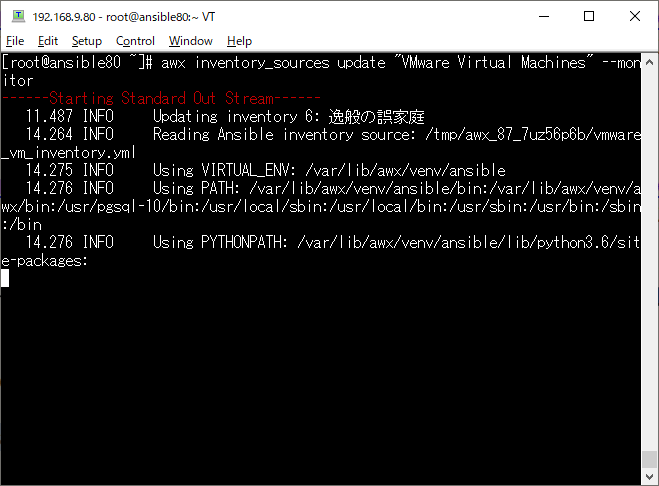
CLIで操作する場合は以下の通りです。また、–monitorオプションを付与すると同期の様子をリアルタイムで観察する事もできます。
CLI操作
awx inventory_sources update "VMware Virtual Machines" --monitor
APIで操作する場合は以下の通りです。同期の前後でstatusが”never updated”から”successful”に変わった事を確認できます。
API操作
INVENTORY_SOURCE_ID=$(curl -u admin:P@ssw0rd \
  http://localhost/api/v2/inventory_sources/ | \
  jq  '.results[] | select(.name == "VMware Virtual Machines")' | jq ".id")

# statusが"never updated"である事の確認
curl -u admin:P@ssw0rd \
  http://localhost/api/v2/inventory_sources/${INVENTORY_SOURCE_ID}/ | jq "."

 <omitted>

  "last_job_run": null,
  "last_job_failed": false,
  "next_job_run": null,
  "status": "never updated",

 <omitted>

# インベントリを同期します
curl -XPOST -u admin:P@ssw0rd \
   http://localhost/api/v2/inventory_sources/${INVENTORY_SOURCE_ID}/update/

# statusが"successful"である事の確認
curl -u admin:P@ssw0rd \
  http://localhost/api/v2/inventory_sources/${INVENTORY_SOURCE_ID}/update/

 <omitted>

  "last_job_run": "2020-08-21T10:04:27.055053Z",
  "last_job_failed": false,
  "next_job_run": null,
  "status": "successful",

 <omitted>
ホストの確認
インベントリのグループまたはホストの設定画面に、Gitリポジトリから読み込んだ設定が存在する事を確認します。グループやホストの設定画面を確認します。
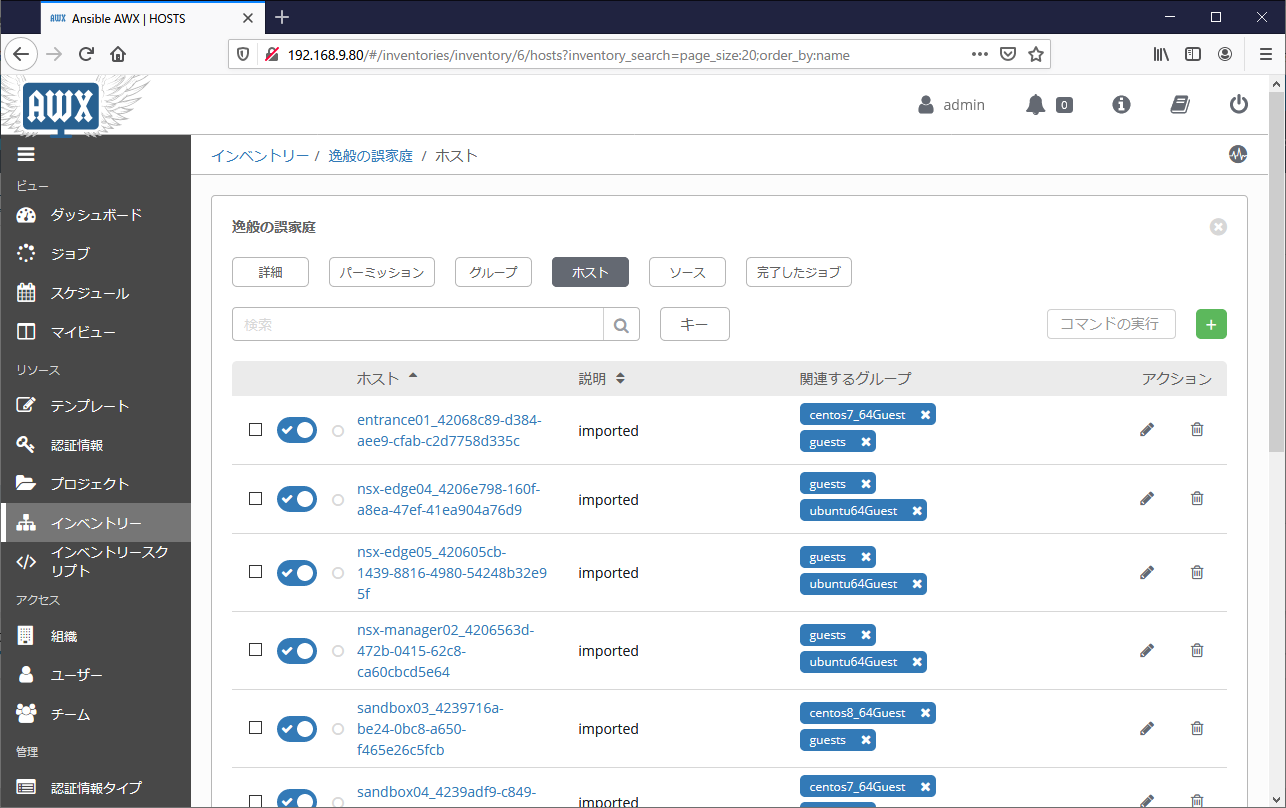
変数もインベントリファイルからインポートされている事も確認します。
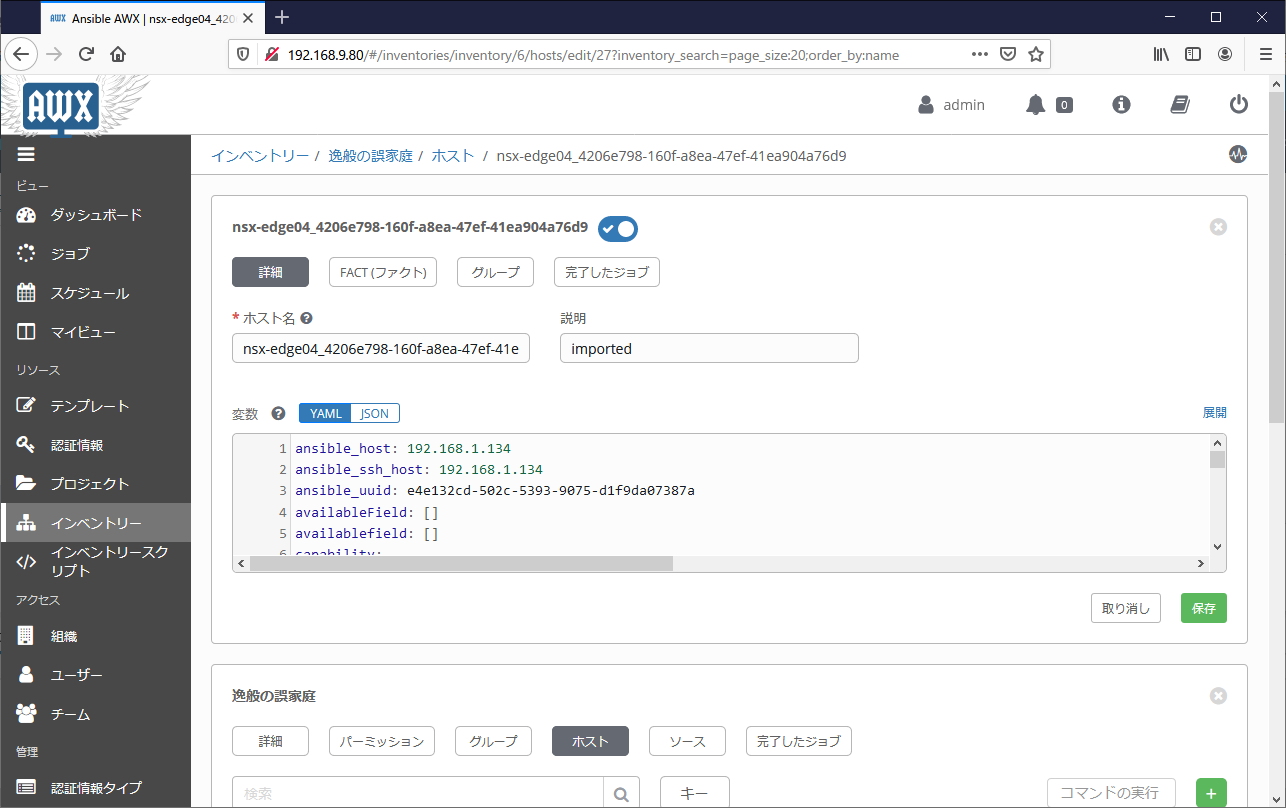
CLIまたはAPIで、インポートされたグループやホストを確認する操作は以下の通りです。
CLI操作
# awx hosts list -f jq --filter '.results[] | {id,name}'
{"id": 26, "name": "entrance01_42068c89-d384-aee9-cfab-c2d7758d335c"}
{"id": 1, "name": "localhost"}
{"id": 27, "name": "nsx-edge04_4206e798-160f-a8ea-47ef-41ea904a76d9"}
{"id": 28, "name": "nsx-edge05_420605cb-1439-8816-4980-54248b32e95f"}
{"id": 29, "name": "nsx-manager02_4206563d-472b-0415-62c8-ca60cbcd5e64"}
{"id": 30, "name": "sandbox03_4239716a-be24-0bc8-a650-f465e26c5fcb"}
{"id": 31, "name": "sandbox04_4239adf9-c849-e6b9-2ba6-4c70142620c6"}
{"id": 32, "name": "sandbox05_423903a0-da80-08e0-0981-1919c03143f1"}
{"id": 33, "name": "vcenter01_564d6096-c526-0c90-7d6c-6192dd0af412"}

# awx groups list -f jq --filter '.results[] | {id,name}'
{"id": 17, "name": "centos7_64Guest"}
{"id": 18, "name": "centos8_64Guest"}
{"id": 19, "name": "guests"}
{"id": 20, "name": "other3xLinux64Guest"}
{"id": 21, "name": "ubuntu64Guest"}
{"id": 22, "name": "windows9Server64Guest"}
API操作
INVENTORY_SOURCE_ID=$(curl -u admin:P@ssw0rd \
  http://localhost/api/v2/inventory_sources/ | \
  jq  '.results[] | select(.name == "VMware Virtual Machines")' | jq ".id")

curl -u admin:P@ssw0rd \
  http://localhost/api/v2/inventory_sources/${INVENTORY_SOURCE_ID}/hosts/ | \
  jq  -c '.results[] | {id,name}'
{"id":26,"name":"entrance01_42068c89-d384-aee9-cfab-c2d7758d335c"}
{"id":27,"name":"nsx-edge04_4206e798-160f-a8ea-47ef-41ea904a76d9"}
{"id":28,"name":"nsx-edge05_420605cb-1439-8816-4980-54248b32e95f"}
{"id":29,"name":"nsx-manager02_4206563d-472b-0415-62c8-ca60cbcd5e64"}
{"id":30,"name":"sandbox03_4239716a-be24-0bc8-a650-f465e26c5fcb"}
{"id":31,"name":"sandbox04_4239adf9-c849-e6b9-2ba6-4c70142620c6"}
{"id":32,"name":"sandbox05_423903a0-da80-08e0-0981-1919c03143f1"}
{"id":33,"name":"vcenter01_564d6096-c526-0c90-7d6c-6192dd0af412"}

curl -u admin:P@ssw0rd \
  http://localhost/api/v2/inventory_sources/${INVENTORY_SOURCE_ID}/groups/ | \
    jq  -c '.results[] | {id,name}'
{"id":17,"name":"centos7_64Guest"}
{"id":18,"name":"centos8_64Guest"}
{"id":19,"name":"guests"}
{"id":20,"name":"other3xLinux64Guest"}
{"id":21,"name":"ubuntu64Guest"}
{"id":22,"name":"windows9Server64Guest"}


