
Azure ロードバランサでインバウンドNAT規則を設定する方法を説明します。インバウンドNAT規則を使用すると、負荷分散されるのではなく1台1台の仮想マシンに対してアクセスをする事ができます。例えば、複数台サーバのうち1台だけが管理機能を備えるような場合、その管理機能へアクセスするような手段として有効です。
前提
公式ドキュメント
参考になる公式ドキュメントを以下に示します。
- チュートリアル: Azure portal を使用して単一の仮想マシンのインバウンド NAT 規則を作成する
- チュートリアル: Azure portal を使用して複数の仮想マシンのインバウンド NAT 規則を作成する
事前設定
以下、リソースグループを作成します。
az group create --name MyResourceGroup --location japaneast
以下、仮想ネットワークを作成します。
az network vnet create \
  --resource-group MyResourceGroup \
  --name MyVnet \
  --address-prefix 172.16.0.0/16

az network vnet subnet create \
  --resource-group MyResourceGroup \
  --name MySubnet \
  --vnet-name MyVnet \
  --address-prefixes 172.16.1.0/24
以下のロードバランサを作成します。各パラメタの意味は「Azure ロードバランサの基本操作」を参照ください。
az network public-ip create \
  --resource-group MyResourceGroup \
  --name MyPublicIp \
  --sku Standard \
  --zone 1 2 3

az network lb create \
  --resource-group MyResourceGroup \
  --name MyLoadBalancer \
  --sku Standard \
  --public-ip-address MyPublicIp \
  --frontend-ip-name MyFrontEnd
動作確認用の仮想マシンを作成します。tcp22(ssh)とtcp80(http)でアクセス可能な状態にします。
az network nsg create \
  --resource-group MyResourceGroup \
  --name MyNsg

az network nsg rule create \
  --resource-group MyResourceGroup \
  --nsg-name MyNsg \
  --name tcp22 \
  --priority 100 \
  --destination-port-ranges 22 \
  --access Allow \
  --protocol Tcp

az network nsg rule create \
  --resource-group MyResourceGroup \
  --nsg-name MyNsg \
  --name tcp80 \
  --priority 110 \
  --destination-port-ranges 80 \
  --access Allow \
  --protocol Tcp

for i in `seq 10 12`; do
  az vm create \
    --resource-group MyResourceGroup \
    --name linux0${i} \
    --image UbuntuLTS \
    --size Standard_B1s \
    --admin-username azureuser \
    --ssh-key-values ~/.ssh/authorized_keys \
    --vnet-name MyVnet \
    --subnet MySubnet \
    --public-ip-address '' \
    --nsg MyNsg \
    --custom-data /dev/stdin << 'EOF'
#!/bin/bash
apt-get -y install nginx
echo "this is ${HOSTNAME}" > /var/www/html/index.html
EOF
done
インバウンドNAT規則
複数VMに対する規則
インバウンドNAT規則の設定
負荷分散ではなく1台1台のサーバへアクセスできるようにパケットを転送したい要件もあるでしょう。例えば、パブリックIPアドレスは1つしかないもののサーバへのsshアクセスを提供したい場合などの要件があります。このような場合はインバウンドNAT規則を設定します。
まずはバックエンドプールを作成します。
az network lb address-pool create \
  --resource-group MyResourceGroup \
  --lb-name MyLoadBalancer \
  --name MyBackEndPool
バックエンドプールに仮想マシンを追加します。
array=(linux010 linux011 linux012)
for h in "${array[@]}"
do
  az network nic ip-config address-pool add \
    --address-pool MyBackendPool \
    --ip-config-name ipconfig${h} \
    --nic-name ${h}VMNic \
    --resource-group MyResourceGroup \
    --lb-name MyLoadBalancer
done
インバンウドNAT規則を定義します。以下のコマンドで、ポート番号20000から20099の範囲で受け付けたパケットをtcp22(ssh)に変換して仮想マシンへ転送する事ができます。
az network lb inbound-nat-rule create \
  --resource-group MyResourceGroup \
  --lb-name MyLoadBalancer \
  --name MyInboundRuleSsh \
  --backend-port 22 \
  --protocol tcp \
  --frontend-ip-name MyFrontEnd \
  --backend-pool-name MyBackEndPool \
  --idle-timeout 15 \
  --enable-tcp-reset true \
  --frontend-port-range-start 20000 \
  --frontend-port-range-end 20099
インバウンドNAT規則の疎通確認
ロードバランサに付与されたパブリックIPアドレスを確認します。
$ az network public-ip show \
  --resource-group MyResourceGroup \
  --name MyPublicIp \
  --query "ipAddress"
"20.222.184.12"
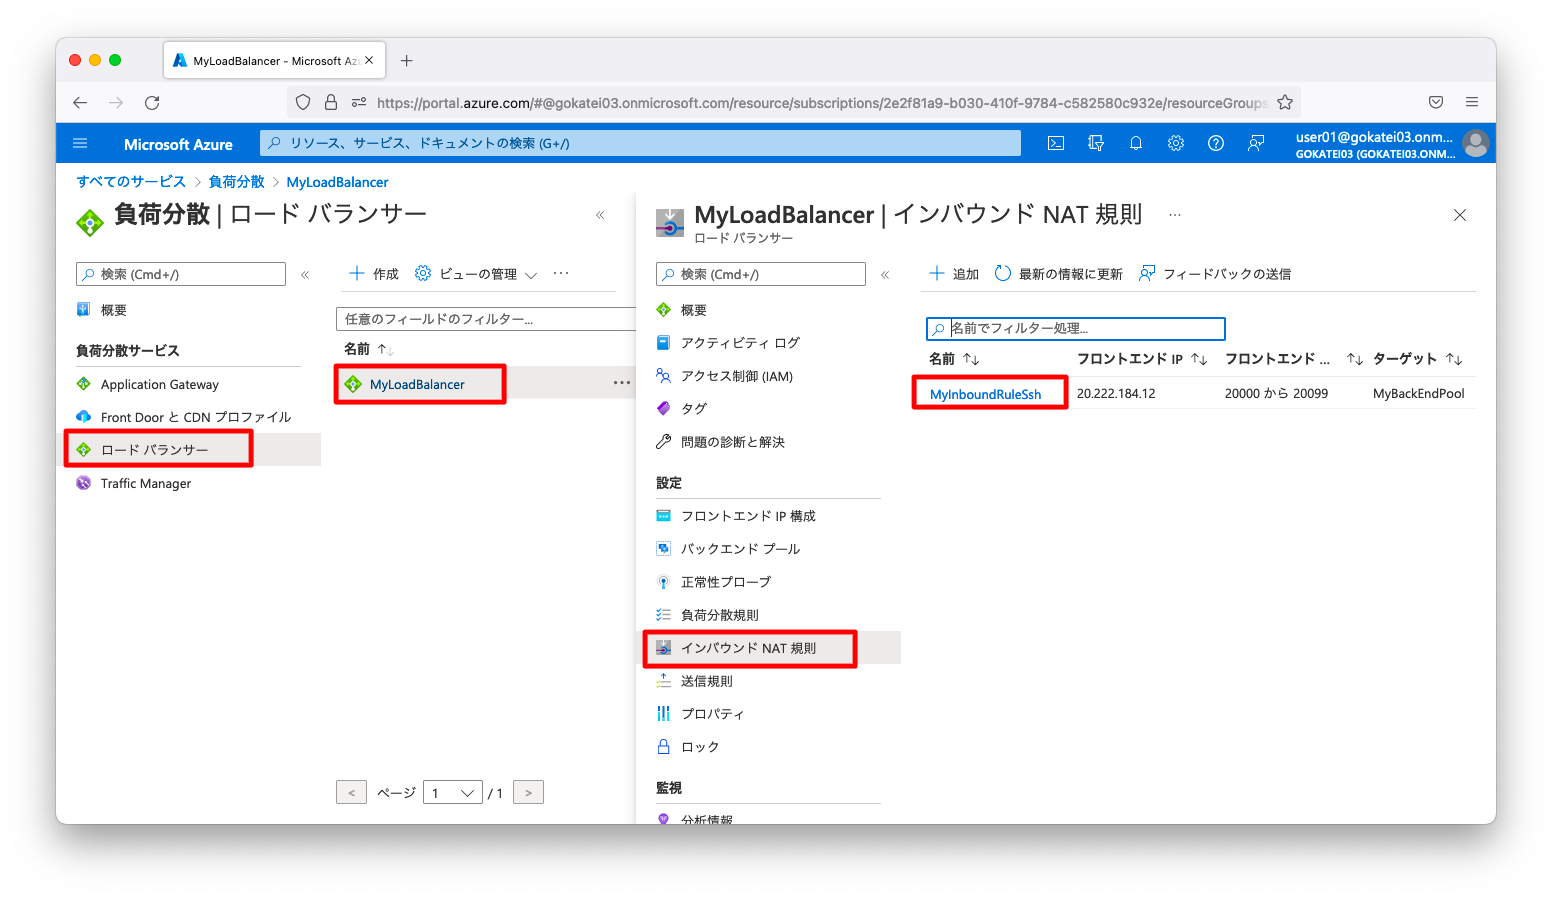
どの仮想マシンにどのようなポート番号が割り当てられたかは、ポータル(GUI)で確認した方が早いでしょう。すべてのサービスからすべてのサービスから、「ネットワーキング」「ロードバランサー」「ロードバランサー名(MyLoadBalancer)」「インバンドNAT規則」「インバンドNAT規則名(MyInboundRuleSsh)」の順に画面遷移します。
画面下へスクロールさせると、ポート番号のマッピング関係を確認する事ができます。
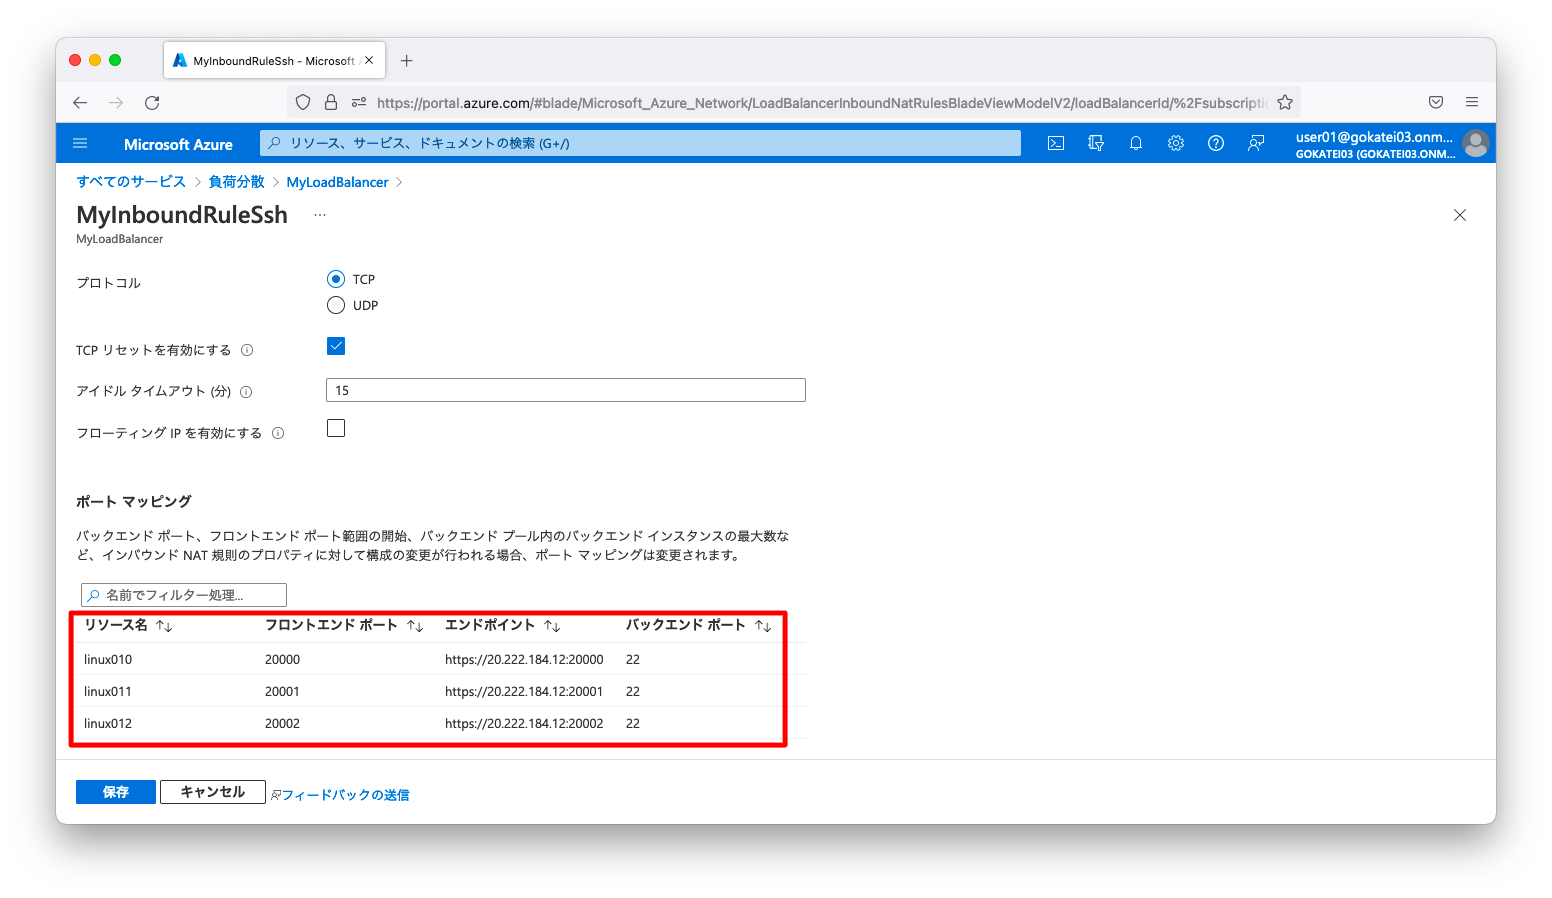
tcp20000でsshによる接続が可能である事を確認します。
admin@mac19 ~ % ssh azureuser@20.222.184.12 -p 20000

 <omitted>

azureuser@linux010:~$
単一VMに対する規則
インバウンドNAT規則の設定
以下のコマンドでインバウンドNAT規則を定義します。複数VMに対する設定と異なり、frontend-portは範囲指定ではなく1つのポート番号を指定します。また、backend-pool-nameを紐づけません。
az network lb inbound-nat-rule create \
  --resource-group MyResourceGroup \
  --lb-name MyLoadBalancer \
  --name MyInboundRuleHttp \
  --frontend-port 80 \
  --backend-port 80 \
  --protocol tcp \
  --frontend-ip-name MyFrontEnd \
  --idle-timeout 15 \
  --enable-tcp-reset true
インバウンドNAT規則名(MyInboundRuleHttp)に対し、ネットワークインターフェースを紐づけます。
az network nic ip-config inbound-nat-rule add \
  --resource-group MyResourceGroup \
  --lb-name MyLoadBalancer \
  --inbound-nat-rule MyInboundRuleHttp \
  --ip-config-name ipconfiglinux010 \
  --nic-name linux010VMNic
インバウンドNAT規則の疎通確認
httpによる疎通を試み、想定通り(linux010)の仮想マシンへ転送される事を確認します。
admin@mac19 ~ % curl 20.222.184.12
this is linux010
admin@mac19 ~ %