AnsibleでCisco NXOS(Nexus)を操作する方法を説明します。showコマンドの出力を得たい時はnxos_commandを使用し、複数の設定を投入したい時はnxos_configを使います。その他、冪等性を担保しつつ慎重な設定を行うnxos_ntp, nxos_systemなどのモジュールもあります。
Cisco NXOSへの接続方法が分からない方は「Ansible操作例 – Cisco NXOSへの接続方法の説明」を参照ください。
showコマンドの実行
プレイブック作成
以下のようなプレイブックを作成します。
着目して欲しいのはregister句です。Ansibleは実行結果を変数に格納する事ができ、その変数名を定義するのがregister句です。以下のプレイブックは、「show version」の実行結果を変数「nxos_result」に格納し、変数「nxos_result」をdebugで出力する例です。
cat << EOF > cisco_nxos_show_version.yml
---
- hosts: cisco_nxos
  gather_facts: no

  tasks:
    - name: send show version
      nxos_command:
        commands: "show version"
      register: nxos_results
    - name: display show version
      debug:
        var: nxos_results
EOF
戻り値の一覧
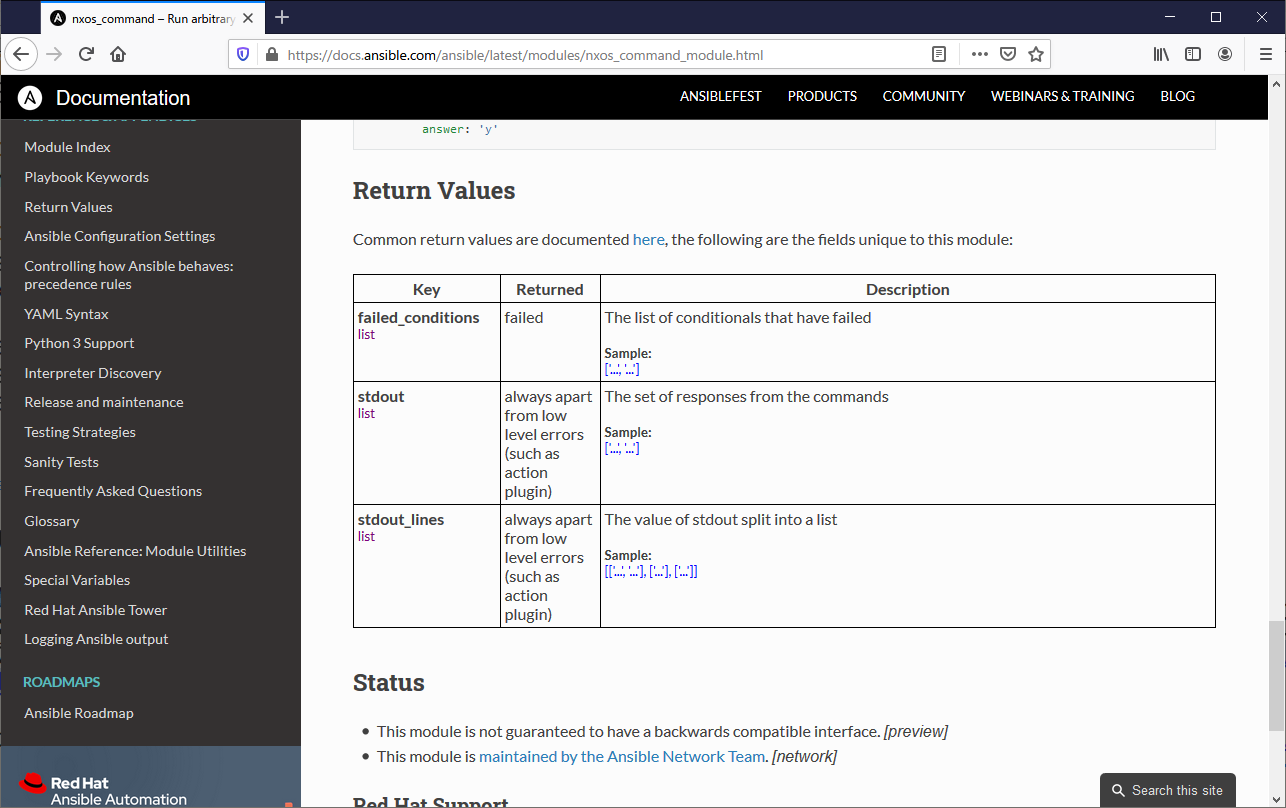
Ansibleは実行結果を変数に格納する事ができます。この実行結果をプログラミングの文脈では「戻り値」と呼ぶ事が多く、公式ドキュメントでは「Return Value」との表現を使っています。実行結果にどのような値が格納されているかは、公式ドキュメントをマニュアルを参照ください。この場合ならば、「nxos command モジュール」に記載されています。

実行結果
実行結果は以下のようになります。
# ansible-playbook -i inventory.ini cisco_nxos_show_version.yml

PLAY [cisco_nxos] **************************************************************

TASK [send show version] *******************************************************
ok: [cisco62]

TASK [display show version] ****************************************************
ok: [cisco62] => {
    "nxos_results": {
        "ansible_facts": {
            "discovered_interpreter_python": "/usr/libexec/platform-python"
        },
        "changed": false,
        "failed": false,
        "stdout": [
            "Cisco Nexus Operating System (NX-OS) Software\nTAC support: http://www.cisco.com/tac\nDocuments: http://www.cisco.com/en/US/products/ps9372/tsd_products_support_series_home.html\nCopyright (c) 2002-2016, Cisco Systems, Inc. All rights reserved.\nThe copyrights to certain works contained herein are owned by\nother third parties and are used and distributed under license.\nSome parts of this software are covered under the GNU Public\nLicense. A copy of the license is available at\nhttp://www.gnu.org/licenses/gpl.html.\n\nNX-OSv is a demo version of the Nexus Operating System\n\nSoftware\n  loader:    version N/A\n  kickstart: version 7.3(0)D1(1)\n  system:    version 7.3(0)D1(1)\n  kickstart image file is: bootflash:///titanium-d1-kickstart.7.3.0.D1.1.bin\n  kickstart compile time:  1/11/2016 16:00:00 [02/11/2016 10:30:12]\n  system image file is:    bootflash:///titanium-d1.7.3.0.D1.1.bin\n  system compile time:     1/11/2016 16:00:00 [02/11/2016 13:08:11]\n\n\nHardware\n  cisco NX-OSv Chassis (\"NX-OSv Supervisor Module\")\n  Intel(R) Core(TM) i5-4200U C with 3064872 kB of memory.\n  Processor Board ID TM001F6848B\n\n  Device name: R62\n  bootflash:    3184776 kB\n\nKernel uptime is 0 day(s), 1 hour(s), 25 minute(s), 23 second(s)\n\n\nplugin\n  Core Plugin, Ethernet Plugin\n\nActive Package(s)"
        ],
        "stdout_lines": [
            [
                "Cisco Nexus Operating System (NX-OS) Software",
                "TAC support: http://www.cisco.com/tac",
                "Documents: http://www.cisco.com/en/US/products/ps9372/tsd_products_support_series_home.html",
                "Copyright (c) 2002-2016, Cisco Systems, Inc. All rights reserved.",
                "The copyrights to certain works contained herein are owned by",
                "other third parties and are used and distributed under license.",
                "Some parts of this software are covered under the GNU Public",
                "License. A copy of the license is available at",
                "http://www.gnu.org/licenses/gpl.html.",
                "",
                "NX-OSv is a demo version of the Nexus Operating System",
                "",
                "Software",
                "  loader:    version N/A",
                "  kickstart: version 7.3(0)D1(1)",
                "  system:    version 7.3(0)D1(1)",
                "  kickstart image file is: bootflash:///titanium-d1-kickstart.7.3.0.D1.1.bin",
                "  kickstart compile time:  1/11/2016 16:00:00 [02/11/2016 10:30:12]",
                "  system image file is:    bootflash:///titanium-d1.7.3.0.D1.1.bin",
                "  system compile time:     1/11/2016 16:00:00 [02/11/2016 13:08:11]",
                "",
                "",
                "Hardware",
                "  cisco NX-OSv Chassis (\"NX-OSv Supervisor Module\")",
                "  Intel(R) Core(TM) i5-4200U C with 3064872 kB of memory.",
                "  Processor Board ID TM001F6848B",
                "",
                "  Device name: R62",
                "  bootflash:    3184776 kB",
                "",
                "Kernel uptime is 0 day(s), 1 hour(s), 25 minute(s), 23 second(s)",
                "",
                "",
                "plugin",
                "  Core Plugin, Ethernet Plugin",
                "",
                "Active Package(s)"
            ]
        ]
    }
}

PLAY RECAP *********************************************************************
cisco62                    : ok=2    changed=0    unreachable=0    failed=0    skipped=0    rescued=0    ignored=0
複数コマンドの実行
プレイブック作成
複数のコマンドを同時に投入したい時はnxos_configモジュールを使用すると便利です。以下は5エントリのACLを作成する例です。
cat << EOF > cisco_nxos_add_acl_entry.yml
---
- hosts: cisco_nxos
  gather_facts: no

  tasks:
    - name: load new acl into device
      nxos_config:
        lines:
          - 10 permit ip host 192.0.2.1 any log
          - 20 permit ip host 192.0.2.2 any log
          - 30 permit ip host 192.0.2.3 any log
          - 40 permit ip host 192.0.2.4 any log
          - 50 permit ip host 192.0.2.5 any log
        parents: ip access-list test
        before: no ip access-list test
        match: exact
EOF
プレイブック実行
プレイブックを実行すると以下のように出力されます。
# ansible-playbook -i inventory.ini cisco_nxos_add_acl_entry.yml

PLAY [cisco_nxos] **************************************************************

TASK [load new acl into device] ************************************************
changed: [cisco62]

PLAY RECAP *********************************************************************
cisco62                    : ok=1    changed=1    unreachable=0    failed=0    skipped=0    rescued=0    ignored=0
プレイブック確認
確かにプレイブックで記載された設定が投入されている事を確認します。
R62# show ip access-lists test

IP access list test
        10 permit ip 192.0.2.1/32 any log
        20 permit ip 192.0.2.2/32 any log
        30 permit ip 192.0.2.3/32 any log
        40 permit ip 192.0.2.4/32 any log
        50 permit ip 192.0.2.5/32 any log
テンプレートの利用
テンプレートの作成
Ansibleはテンプレートを作成し、そのテンプレートに記載されたconfigを流し込む事ができます。
以下にテンプレートの例を紹介します。ここで記載したテンプレートは静的なものですが、Ansibleが内部的に使うJinja2と呼ばれるテンプレートエンジンは変数読み込みや繰り返し処理も実装する事ができます。説明は省略しますが、JavaやRubyの実装経験がある人ならばJSP, ERBなどとほぼ同等機能と思って差支えございません。
cat << EOF > nxos_template.j2
vlan 10
!
interface Ethernet2/1
  switchport
  switchport mode trunk
  switchport trunk allowed vlan 10
  no shutdown
EOF
プレイブックの作成
テンプレートを流し込むプレイブックの例を紹介します。backupをyesとすると設定流し込み前の設定をバックアップする事もできます。
cat << EOF > cisco_nxos_add_vlan.yml
---
- hosts: cisco_nxos
  gather_facts: no

  tasks:
    - name: add vlan
      nxos_config:
        backup: yes
        src: nxos_template.j2
EOF
テンプレート実行
プレイブックを実行すると以下のように出力されます。
# ansible-playbook -i inventory.ini cisco_nxos_add_vlan.yml

PLAY [cisco_nxos] **************************************************************

TASK [add vlan] ****************************************************************
changed: [cisco62]

PLAY RECAP *********************************************************************
cisco62                    : ok=1    changed=1    unreachable=0    failed=0    skipped=0    rescued=0    ignored=0
プレイブック確認
確かにプレイブックで記載された設定が投入されている事を確認します。
R62# show running-config interface Ethernet 2/1

!Command: show running-config interface Ethernet2/1
!Time: Sat Aug 29 07:03:19 2020

version 7.3(0)D1(1)

interface Ethernet2/1
  switchport
  switchport mode trunk
  switchport trunk allowed vlan 10
  no shutdown
バックアップファイルの確認
Ansible実行前の設定がバックアップされている事を確認します。
# ls -l backup/
total 32
-rw------- 1 root root 13854 Aug 30 00:58 cisco62_config.2020-08-30@00:58:24
-rw------- 1 root root 13854 Aug 30 01:00 cisco62_config.2020-08-30@01:00:54
手堅い設定投入
概要
Ansibleは、前述のnxos_command, nxos_config以外のモジュールを使用する事を推奨しています。nxos_ntp, nxos_systemなどのモジュールが該当し、これらは「冪等性」が担保されたモジュールです。
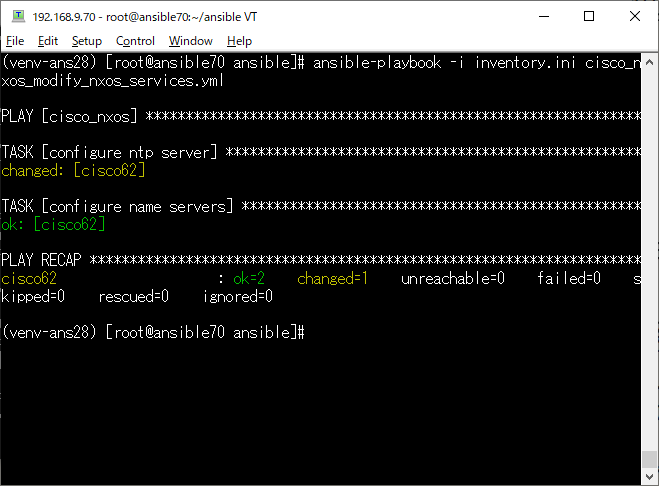
「冪等性」とは「再実行しても得られる結果が同じ」という意味ですが、私個人の見解としては、「一般的な意味の冪等性」と「Ansibleの文脈での冪等性」はニュアンスが異なると理解しています。前述のnxos_configは何度実行しても「changed」と表示されますが、nxos_ntp, nxos_systemなどのモジュールは設定変更が発生してない場合は「ok」のみが表示されます。Ansibleの文脈での「冪等性」とは、プレイブックを何度も実行するような運用において、changeなのかokなのかが目視チェックしやすい仕組みと理解した方が良いでしょう。
例えば、以下スクリーンショットならば、NTPは設定変更されたもののDNSはそのままである事が一目瞭然です。

プレイブック作成
NTPサーバとDNSサーバを設定する例を紹介します。
cat << EOF > cisco_nxos_modify_nxos_services.yml
---
- hosts: cisco_nxos
  gather_facts: no

  tasks:
    - name: configure ntp server
      nxos_ntp:
        server: 10.0.255.10
        source_int: Loopback0
        state: present
    - name: configure name servers
      nxos_system:
        name_servers:
          - 8.8.8.8
          - 8.8.4.4
EOF
プレイブック実行
プレイブックを実行すると以下のように出力されます。
# ansible-playbook -i inventory.ini cisco_nxos_modify_nxos_services.yml

PLAY [cisco_nxos] **************************************************************

TASK [configure ntp server] ****************************************************
changed: [cisco62]

TASK [configure name servers] **************************************************
changed: [cisco62]

PLAY RECAP *********************************************************************
cisco62                    : ok=2    changed=2    unreachable=0    failed=0    skipped=0    rescued=0    ignored=0
プレイブック確認
確かにプレイブックで記載された設定が投入されている事を確認します。
R62# show ntp peers
--------------------------------------------------
  Peer IP Address               Serv/Peer
--------------------------------------------------
  10.0.255.10                   Server (configured)
R62#
R62# show running-config | include "ip name"
ip name-server 8.8.8.8 8.8.4.4
R62#

