NEC UNIVERGE IX ルータにおけるGRE tunnelの設定方法を紹介します。GREはGeneric Routing Encapsulationの略称で、文字通りGeneric(一般的な, 汎用的な)トンネル設定で多くの局面に対応できます。IPsecと異なり平文で通信するため一時期は使用頻度が少なくなりつつありました。しかし、近年はZscalerのようなCloud Security Gatewayの登場もあり、少しでも暗号化のようなオーバーヘッドを軽減するトンネル技術が再注目されつつあります。
設定まとめ
コマンド一覧
GREに関連するコマンド一覧は以下の通りです。
Router(config)# router bgp <own_as>
Router(config-bgp)# neighbor <remote_addr> remote <remote_as>
Router(config-bgp)# neighbor <remote_addr> password <passwd>
Router(config-bgp)# neighbor <remote_addr> route-reflector-client
Router(config-bgp)# neighbor <remote_addr> update-source <passwd>
GRE 設定方法 トンネルインターフェースの作成
GREを作成するには、まずinterfaceコマンドでトンネルインタフェースを作成します。デバイス番号は任意の数で差支えありませんが、サブインターフェース番号は必ず0番を指定してください。
Router(config)# interface TunnelX.0
GRE 設定方法 トンネルモードの指定
“tunnel mode gre ip”コマンドでトンネルモードをGREとして指定します。他のルータと同様に、NEC UNIVERGE IXルータはGRE, 6to4などの複数のトンネルをサポートします。
Router(config)# interface TunnelX.0
Router(config-TunnelX.0)# tunnel mode gre ip
GRE 設定方法 送信元 宛先の指定
トンネルの送信元と宛先を指定します。送信元の指定はIPアドレスでもインターフェースでもどちらの指定でも差支えございません。
Router(config)# interface TunnelX.0
Router(config-TunnelX.0)# tunnel source [{ <source_addr> | <source_interface> }]
Router(config-TunnelX.0)# tunnel destination <destination_interface>
GRE 設定方法 IPアドレス指定
トンネルインターフェースのIPアドレスを設定します。実IPアドレスを指定する事もできますし、他インターフェースのIPアドレスを共用するunnumbered指定も可能です。unnumberedはIPアドレスを節約できるメリットがあるものの、ルーティング設定がやや複雑になるデメリットがあります。ルーティング等のLayer3ネットワーク設定に自信が持てない人はunnumbered指定はやめた方が無難です。
Router(config)# interface TunnelX.0
Router(config-TunnelX.0)# ip address [{ <address> | unnumbered <interface> }]
動作確認
動作確認の構成
以下の環境で動作確認を行います。
        |
        | 192.168.3.0/24
        |
   G1.0 | .3
+-------+----------+
|    NEC IX 2015   |
|        R3        |
+-------+----------+
   G0.0 | .3
        |
        | 192.168.23.0/24
        |
   eth1 | .2
+-------+----------+
|    VyOS 1.4      |
|        R2        |
+-------+----------+
   eth0 | .2
        |
        | 192.168.12.0/24
        |
   G0.0 | .1
+-------+----------+
|    NEC IX 2015   |
|        R1        |
+-------+----------+
   G1.0 | .1
        |
        | 192.168.1.0/24
        |
初期設定
初期設定はIPアドレスのみとします。NATの設定は入れていません。
動作確認 (1) GRE tunnel
設定投入
R1, R3間でGRE tunnelを設定します。
[R1:IX2015]
interface Tunnel0.0
  tunnel mode gre ip
  tunnel destination 192.168.23.3
  tunnel source GigaEthernet0.0
  ip address 169.254.0.1/24
  no shutdown
[R3:IX2015]
interface Tunnel0.0
  tunnel mode gre ip
  tunnel destination 192.168.12.1
  tunnel source GigaEthernet0.0
  ip address 169.254.0.3/24
  no shutdown
疎通確認
トンネル間の疎通可能を確認します。
[R1:IX2015]
R1(config)# ping 169.254.0.3 count 3
PING 169.254.0.1 > 169.254.0.3 56 data bytes
64 bytes from 169.254.0.3: icmp_seq=0 ttl=64 time=0.830 ms
64 bytes from 169.254.0.3: icmp_seq=1 ttl=64 time=0.696 ms
64 bytes from 169.254.0.3: icmp_seq=2 ttl=64 time=0.661 ms

--- 169.254.0.3 ping statistics ---
3 packets transmitted, 3 packets received, 0% packet loss
round-trip (ms)  min/avg/max = 0.661/0.729/0.830
R1(config)#
動作確認 (2) 6to4 tunnel
設定投入
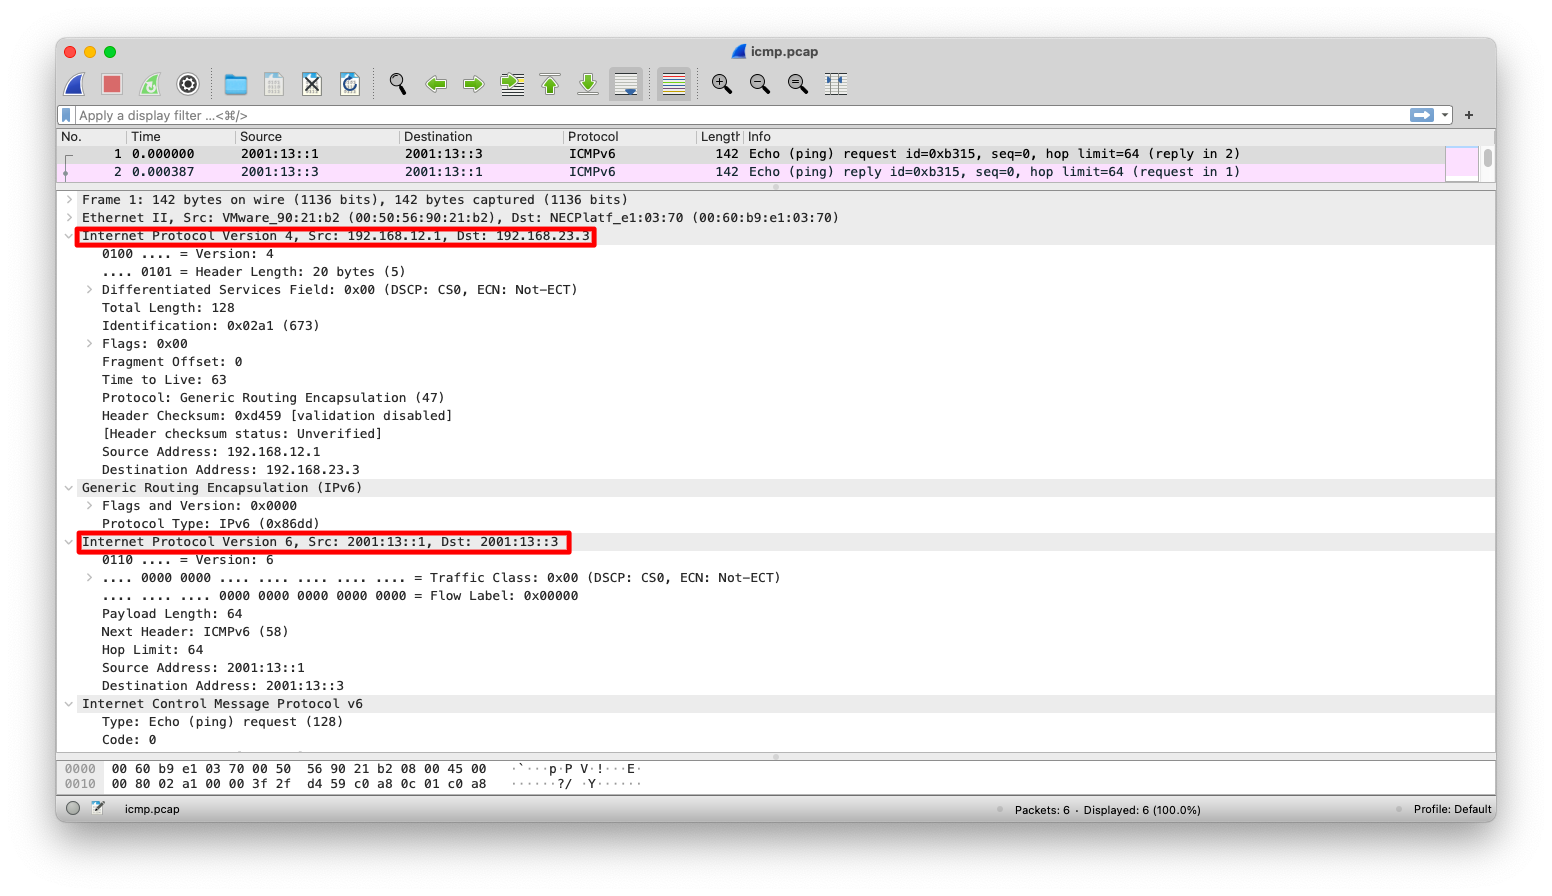
GREはIPv4以外のパケットをカプセル化する事もできます。例えば、以下設定のようにtunnel interfaceに対してIPv6アドレスを付与すれば、IPv6をIPv4でカプセル化する事ができます。
[R1:IX2015]
interface Tunnel0.0
  ipv6 address 2001:13::1/64
[R3:IX2015]
interface Tunnel0.0
  ipv6 address 2001:13::3/64
疎通確認
IPv6でも疎通可能である事を確認します。
[R1:IX2015]
R1(config)# ping6 2001:13::3 count 3
PING 2001:13::1 > 2001:13::3 56 data bytes
64 bytes from 2001:13::3 icmp_seq=0 hlim=64 time=0.902 ms
64 bytes from 2001:13::3 icmp_seq=1 hlim=64 time=0.895 ms
64 bytes from 2001:13::3 icmp_seq=2 hlim=64 time=0.904 ms

--- 2001:13::3 ping statistics ---
3 packets transmitted, 3 packets received, 0% packet loss
round-trip (ms)  min/avg/max = 0.895/0.900/0.904
R1(config)#
上記疎通確認をパケットキャプチャし、その結果をwire sharkで閲覧するとIPv6がIPv4でカプセル化されている事が分かります。


