
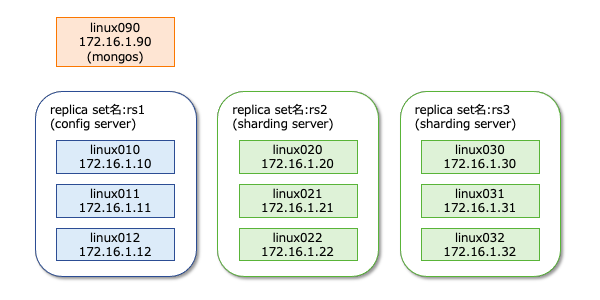
MongoDBのシャーディング設定についてまとめます。シャーディングは、sharding server, config server, mongosの3つのコンポーネントで構成されます。sharding serverはデータそのものを格納するサーバで、config serverはシャーディングに関する設定を保存するサーバです。mongosはアプリケーションへのインターフェースを提供する仕組みで、config serverに問い合わせた結果を元にsharding serverへデータの照会・更新を行います。
前提
公式ドキュメント
参考になる公式ドキュメントを以下に示します。
- Deploy a Sharded Cluster
- mongos
- configureCollectionBalancing
- Modify Chunk Size in a Sharded Cluster
- sh.enableSharding()
動作確認済環境
- Rocky Linux 8.6
- MongoDB Server 6.0.2
構成図
以下の構成で動作確認をします。
シャーディングに必要なサーバ群の構築
Config Server Replica Setの構築
configサーバとは、シャーディングの設定を保存しどのサーバにどんなデータが格納されているかを管理するサーバ群です。それではconfigサーバを構築しましょう。
configサーバの設定は通常のreplica setとほぼ同じです。以下に/etc/mongod.confの設定抜粋を記します。通常のreplica setと異なり、sharding.clusterRoleをconfigsvrと指定しなければならない事に注意ください。
# network interfaces
net:
  port: 27017
  bindIp: 0.0.0.0

#replication:
replication:
  replSetName: rs1

#sharding:
sharding:
  clusterRole: configsvr
mongodを再起動し設定を反映させます。
systemctl restart mongod.service
レプリケーションを開始します。通常のレプリケーションの操作と全く同じです。
rs.initiate(
  {
    _id: "rs1",
    configsvr: true,
    members: [
      { _id : 0, host : "172.16.1.10:27017", priority : 4 },
      { _id : 1, host : "172.16.1.11:27017", priority : 2 },
      { _id : 2, host : "172.16.1.12:27017", priority : 1 }
    ]
  }
)
Shard Replica Setsの構築
データを格納するreplica setを作成します。Shardingによって負荷分散させますので、最低でも2組以上のreplica setが必要です。このページでは、2組のレプリカセットの作成方法を示します。
Sharding用のreplica setの設定は通常のreplica setとほぼ同じです。以下に/etc/mongod.confの設定抜粋を記します。通常のreplica setと異なり、sharding.clusterRoleをconfigsvrと指定しなければならない事に注意ください。また、レプリカセット名は前述のconfigサーバとは異なる名前を設定します。
# network interfaces
net:
  port: 27017
  bindIp: 0.0.0.0

#replication:
replication:
  replSetName: rs2

#sharding:
sharding:
  clusterRole: shardsvr
# network interfaces
net:
  port: 27017
  bindIp: 0.0.0.0

#replication:
replication:
  replSetName: rs3

#sharding:
sharding:
  clusterRole: shardsvr
mongodを再起動し設定を反映させます。
systemctl restart mongod.service
レプリケーションを開始します。通常のレプリケーションの操作と全く同じです。
  rs.initiate(
    {
      _id : "rs2",
      members: [
        { _id : 0, host : "172.16.1.20:27017" , priority : 4 },
        { _id : 1, host : "172.16.1.21:27017" , priority : 2 },
        { _id : 2, host : "172.16.1.22:27017" , priority : 1 }
      ]
    }
  )
rs.initiate(
  {
    _id : "rs3",
    members: [
      { _id : 0, host : "172.16.1.30:27017" , priority : 4 },
      { _id : 1, host : "172.16.1.31:27017" , priority : 2 },
      { _id : 2, host : "172.16.1.32:27017" , priority : 1 }
    ]
  }
)
mongosの構築
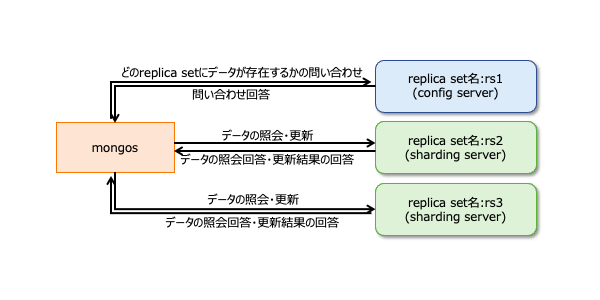
mongosはシャーディング構成のMongoDBクラスタに対する接続を提供するインターフェースです。RPMパッケージmongodb-orgをインストールすると、MongoDBだけではなくmongosも同時にインストールされれます。mongosに関するデータの流れを図示すると以下のようになります。
まずはmongos用の設定ファイルを作成します。最小限の設定は以下の通りです。sharding.configDBにはconfigDBのreplica set名とIPアドレスを指定します。
cat << 'EOF' > /etc/mongos.conf
net:
  bindIp: 127.0.0.1

sharding:
  configDB: rs1/172.16.1.10:27017,172.16.1.11:27017,172.16.1.12:27017
EOF
説明が前後しますが、sharding.configDBに指定するパラメタの書式は以下の通りです。
<replica set名>/<configサーバ1 IPアドレス>:<configサーバ1 ポート番号>,<configサーバ2 IPアドレス>:<configサーバ2 ポート番号>,...
デフォルト設定の場合は、MongoDB(mongod)もmongosもtcp27017でListenします。ポート番号が競合しないように、もし、MongoDB(mongod)が起動中の場合は、MongoDB(mongod)を停止するように注意してください。
systemctl disable mongod.service --now
以下のようなコマンドでmongosを起動します。しばらく待ってもmongosが停止しないようならば起動に成功します。しばらく経ってmongosが停止するようならば、何らかのエラーがあると思ってください。
ありがちなエラーはmongodとmongosのリソースの競合です。ログファイルやTCPポートなどが競合しないように注意ください。
以下操作例はログが標準出力されていますが、ログファイルを明示指定した場合はファイルにログが追記されます。
[root@linux090 ~]# mongos --config /etc/mongos.conf
{"t":{"$date":"2022-10-25T22:15:06.006+09:00"},"s":"I",  "c":"NETWORK",  "id":4915701, "ctx":"-","msg":"Initialized wire specification","attr":{"spec":{"incomingExternalClient":{"minWireVersion":0,"maxWireVersion":17},"incomingInternalClient":{"minWireVersion":0,"maxWireVersion":17},"outgoing":{"minWireVersion":17,"maxWireVersion":17},"isInternalClient":true}}}
{"t":{"$date":"2022-10-25T22:15:06.011+09:00"},"s":"I",  "c":"CONTROL",  "id":23285,   "ctx":"main","msg":"Automatically disabling TLS 1.0, to force-enable TLS 1.0 specify --sslDisabledProtocols 'none'"}
{"t":{"$date":"2022-10-25T22:15:06.016+09:00"},"s":"I",  "c":"NETWORK",  "id":4648601, "ctx":"main","msg":"Implicit TCP FastOpen unavailable. If TCP FastOpen is required, set tcpFastOpenServer, tcpFastOpenClient, and tcpFastOpenQueueSize."}
{"t":{"$date":"2022-10-25T22:15:06.016+09:00"},"s":"I",  "c":"HEALTH",   "id":5936503, "ctx":"main","msg":"Fault manager changed state ","attr":{"state":"StartupCheck"}}
{"t":{"$date":"2022-10-25T22:15:06.016+09:00"},"s":"W",  "c":"CONTROL",  "id":22120,   "ctx":"main","msg":"Access control is not enabled for the database. Read and write access to data and configuration is unrestricted","tags":["startupWarnings"]}
{"t":{"$date":"2022-10-25T22:15:06.017+09:00"},"s":"W",  "c":"CONTROL",  "id":22138,   "ctx":"main","msg":"You are running this process as the root user, which is not recommended","tags":["startupWarnings"]}

  <omitted>
mongosを停止する場合は、Ctrl+Cを押下します。すると、signalを受信した旨のログが表示され、20秒後くらいには停止が完了します。
^C{"t":{"$date":"2022-10-25T22:17:33.165+09:00"},"s":"I",  "c":"CONTROL",  "id":23377,   "ctx":"SignalHandler","msg":"Received signal","attr":{"signal":2,"error":"Interrupt"}}
{"t":{"$date":"2022-10-25T22:17:33.165+09:00"},"s":"I",  "c":"CONTROL",  "id":23380,   "ctx":"SignalHandler","msg":"Signal was sent by the kernel"}
{"t":{"$date":"2022-10-25T22:17:33.165+09:00"},"s":"I",  "c":"CONTROL",  "id":23381,   "ctx":"SignalHandler","msg":"will terminate after current cmd ends"}
{"t":{"$date":"2022-10-25T22:17:33.165+09:00"},"s":"I",  "c":"COMMAND",  "id":4695701, "ctx":"SignalHandler","msg":"Entering quiesce mode for mongos shutdown","attr":{"quiesceTimeMillis":15000}}
{"t":{"$date":"2022-10-25T22:17:48.166+09:00"},"s":"I",  "c":"COMMAND",  "id":4695702, "ctx":"SignalHandler","msg":"Exiting quiesce mode for mongos shutdown"}
{"t":{"$date":"2022-10-25T22:17:48.166+09:00"},"s":"I",  "c":"NETWORK",  "id":22843,   "ctx":"SignalHandler","msg":"shutdown: going to close all sockets..."}
{"t":{"$date":"2022-10-25T22:17:48.166+09:00"},"s":"I",  "c":"NETWORK",  "id":23017,   "ctx":"listener","msg":"removing socket file","attr":{"path":"/tmp/mongodb-27017.sock"}}
{"t":{"$date":"2022-10-25T22:17:48.167+09:00"},"s":"I",  "c":"NETWORK",  "id":4333209, "ctx":"SignalHandler","msg":"Closing Replica Set Monitor","attr":{"replicaSet":"rs1"}}
{"t":{"$date":"2022-10-25T22:17:48.167+09:00"},"s":"I",  "c":"NETWORK",  "id":4333210, "ctx":"SignalHandler","msg":"Done closing Replica Set Monitor","attr":{"replicaSet":"rs1"}}
{"t":{"$date":"2022-10-25T22:17:48.167+09:00"},"s":"I",  "c":"CONNPOOL", "id":22566,   "ctx":"ReplicaSetMonitor-TaskExecutor","msg":"Ending connection due to bad connection status","attr":{"hostAndPort":"172.16.1.11:27017","error":"CallbackCanceled: Callback was canceled","numOpenConns":1}}
{"t":{"$date":"2022-10-25T22:17:48.168+09:00"},"s":"I",  "c":"CONNPOOL", "id":22566,   "ctx":"ReplicaSetMonitor-TaskExecutor","msg":"Ending connection due to bad connection status","attr":{"hostAndPort":"172.16.1.10:27017","error":"CallbackCanceled: Callback was canceled","numOpenConns":1}}
{"t":{"$date":"2022-10-25T22:17:48.168+09:00"},"s":"I",  "c":"CONNPOOL", "id":22566,   "ctx":"ReplicaSetMonitor-TaskExecutor","msg":"Ending connection due to bad connection status","attr":{"hostAndPort":"172.16.1.12:27017","error":"CallbackCanceled: Callback was canceled","numOpenConns":1}}
{"t":{"$date":"2022-10-25T22:17:48.168+09:00"},"s":"I",  "c":"ASIO",     "id":22582,   "ctx":"ReplicaSetMonitor-TaskExecutor","msg":"Killing all outstanding egress activity."}
{"t":{"$date":"2022-10-25T22:17:48.168+09:00"},"s":"I",  "c":"CONNPOOL", "id":22572,   "ctx":"ReplicaSetMonitor-TaskExecutor","msg":"Dropping all pooled connections","attr":{"hostAndPort":"172.16.1.11:27017","error":"ShutdownInProgress: Shutting down the connection pool"}}
{"t":{"$date":"2022-10-25T22:17:48.168+09:00"},"s":"I",  "c":"CONNPOOL", "id":22572,   "ctx":"ReplicaSetMonitor-TaskExecutor","msg":"Dropping all pooled connections","attr":{"hostAndPort":"172.16.1.12:27017","error":"ShutdownInProgress: Shutting down the connection pool"}}
{"t":{"$date":"2022-10-25T22:17:48.168+09:00"},"s":"I",  "c":"CONNPOOL", "id":22572,   "ctx":"ReplicaSetMonitor-TaskExecutor","msg":"Dropping all pooled connections","attr":{"hostAndPort":"172.16.1.10:27017","error":"ShutdownInProgress: Shutting down the connection pool"}}
{"t":{"$date":"2022-10-25T22:17:48.169+09:00"},"s":"I",  "c":"-",        "id":4695300, "ctx":"SignalHandler","msg":"Interrupted all currently running operations","attr":{"opsKilled":3}}
{"t":{"$date":"2022-10-25T22:17:51.169+09:00"},"s":"I",  "c":"ASIO",     "id":22582,   "ctx":"ShardRegistry","msg":"Killing all outstanding egress activity."}
{"t":{"$date":"2022-10-25T22:17:51.169+09:00"},"s":"I",  "c":"CONNPOOL", "id":22572,   "ctx":"ShardRegistry","msg":"Dropping all pooled connections","attr":{"hostAndPort":"172.16.1.11:27017","error":"ShutdownInProgress: Shutting down the connection pool"}}
{"t":{"$date":"2022-10-25T22:17:51.169+09:00"},"s":"I",  "c":"CONNPOOL", "id":22572,   "ctx":"ShardRegistry","msg":"Dropping all pooled connections","attr":{"hostAndPort":"172.16.1.12:27017","error":"ShutdownInProgress: Shutting down the connection pool"}}
{"t":{"$date":"2022-10-25T22:17:51.169+09:00"},"s":"I",  "c":"CONNPOOL", "id":22572,   "ctx":"ShardRegistry","msg":"Dropping all pooled connections","attr":{"hostAndPort":"172.16.1.10:27017","error":"ShutdownInProgress: Shutting down the connection pool"}}
{"t":{"$date":"2022-10-25T22:17:51.170+09:00"},"s":"I",  "c":"ASIO",     "id":22582,   "ctx":"TaskExecutorPool-0","msg":"Killing all outstanding egress activity."}
{"t":{"$date":"2022-10-25T22:17:51.170+09:00"},"s":"I",  "c":"ASIO",     "id":22582,   "ctx":"ShardRegistryUpdater","msg":"Killing all outstanding egress activity."}
{"t":{"$date":"2022-10-25T22:17:51.170+09:00"},"s":"I",  "c":"ASIO",     "id":22582,   "ctx":"SignalHandler","msg":"Killing all outstanding egress activity."}
{"t":{"$date":"2022-10-25T22:17:51.173+09:00"},"s":"I",  "c":"FTDC",     "id":20626,   "ctx":"SignalHandler","msg":"Shutting down full-time diagnostic data capture"}
{"t":{"$date":"2022-10-25T22:17:51.173+09:00"},"s":"I",  "c":"CONTROL",  "id":23138,   "ctx":"SignalHandler","msg":"Shutting down","attr":{"exitCode":0}}
[root@linux090 ~]#
起動が問題ないようならば、再度、mongosを実行します。
[root@linux090 ~]# mongos --config /etc/mongos.conf
{"t":{"$date":"2022-10-25T22:15:06.006+09:00"},"s":"I",  "c":"NETWORK",  "id":4915701, "ctx":"-","msg":"Initialized wire specification","attr":{"spec":{"incomingExternalClient":{"minWireVersion":0,"maxWireVersion":17},"incomingInternalClient":{"minWireVersion":0,"maxWireVersion":17},"outgoing":{"minWireVersion":17,"maxWireVersion":17},"isInternalClient":true}}}
{"t":{"$date":"2022-10-25T22:15:06.011+09:00"},"s":"I",  "c":"CONTROL",  "id":23285,   "ctx":"main","msg":"Automatically disabling TLS 1.0, to force-enable TLS 1.0 specify --sslDisabledProtocols 'none'"}

  <omitted>
別のターミナルソフトを起動し、mongosへ接続します。その後、mongoshコマンドを実行し、以下のように表示されれば接続に成功した事を意味します。
[root@linux090 ~]# mongosh
Current Mongosh Log ID: 6357a82f42fbfb7e7a84369b
Connecting to:    mongodb://127.0.0.1:27017/?directConnection=true&serverSelectionTimeoutMS=2000&appName=mongosh+1.6.0
Using MongoDB:    6.0.2
Using Mongosh:    1.6.0

For mongosh info see: https://docs.mongodb.com/mongodb-shell/

------
   The server generated these startup warnings when booting
   2022-10-25T18:08:39.147+09:00: Access control is not enabled for the database. Read and write access to data and configuration is unrestricted
------

[direct: mongos] test>
クラスタへのシャード追加
mongosをインストールしたサーバで、mongoshコマンドを実行します。
[root@linux090 ~]# mongosh
Current Mongosh Log ID: 6357a82f42fbfb7e7a84369b
Connecting to:    mongodb://127.0.0.1:27017/?directConnection=true&serverSelectionTimeoutMS=2000&appName=mongosh+1.6.0
Using MongoDB:    6.0.2
Using Mongosh:    1.6.0

For mongosh info see: https://docs.mongodb.com/mongodb-shell/

------
   The server generated these startup warnings when booting
   2022-10-25T18:08:39.147+09:00: Access control is not enabled for the database. Read and write access to data and configuration is unrestricted
------

[direct: mongos] test>
クラスタにシャードを追加するまでにデフォルトの状態を確認しましょう。sh.status()メソッドでシャードの状態を確認できます。デフォルトの状態ではshardsが空配列である事が分かります。
[direct: mongos highlight="10,11"] test> sh.status()
shardingVersion
{
  _id: 1,
  minCompatibleVersion: 5,
  currentVersion: 6,
  clusterId: ObjectId("6357d762351bc8d687baf057")
}
---
shards
[]
---
active mongoses
[]
---
autosplit
{ 'Currently enabled': 'yes' }
---
balancer
{
  'Currently enabled': 'yes',
  'Failed balancer rounds in last 5 attempts': 0,
  'Currently running': 'no',
  'Migration Results for the last 24 hours': 'No recent migrations'
}
---
databases
[
  {
    database: { _id: 'config', primary: 'config', partitioned: true },
    collections: {}
  }
]
sh.addShardメソッドを使用する事で、クラスタにシャードを追加できます。このメソッドに与える引数の書式は以下の通りです。
<replica set名>/<shardサーバ1 IPアドレス>:<shardサーバ1 ポート番号>,<shardサーバ2 IPアドレス>:<shardサーバ2 ポート番号>,...
実際の操作例は以下のようになります。
sh.addShard("rs2/172.16.1.20:27017,172.16.1.21:27017,172.16.1.22:27017")
sh.addShard("rs3/172.16.1.30:27017,172.16.1.31:27017,172.16.1.32:27017")
sh.statusメソッドでクラスタにシャードが追加された事を確認できます。
[direct: mongos] test> sh.status()
shardingVersion
{
  _id: 1,
  minCompatibleVersion: 5,
  currentVersion: 6,
  clusterId: ObjectId("6357d762351bc8d687baf057")
}
---
shards
[
  {
    _id: 'rs2',
    host: 'rs2/172.16.1.20:27017,172.16.1.21:27017,172.16.1.22:27017',
    state: 1,
    topologyTime: Timestamp({ t: 1666701821, i: 6 })
  },
  {
    _id: 'rs3',
    host: 'rs3/172.16.1.30:27017,172.16.1.31:27017,172.16.1.32:27017',
    state: 1,
    topologyTime: Timestamp({ t: 1666701825, i: 5 })
  }
]
---
active mongoses
[ { '6.0.2': 1 } ]
---
autosplit
{ 'Currently enabled': 'yes' }
---
balancer
{
  'Currently enabled': 'yes',
  'Currently running': 'no',
  'Failed balancer rounds in last 5 attempts': 0,
  'Migration Results for the last 24 hours': 'No recent migrations'
}
---
databases
[
  {
    database: { _id: 'config', primary: 'config', partitioned: true },
    collections: {}
  }
]
シャーディングの有効化 (MongoDB 6.0 未満の場合のみ)
MongoDB 6.0以上の場合は、すべてのデータベースでShardingが有効になっています(参照「sh.enableSharding()」)。
もし、MongoDB 6.0未満を使用する場合は、以下のコマンドでシャーディングを有効にするデータベースの明示指定が必要です。
sh.enableSharding(<database_name>)
シャーディングの動作確認
Ranged Sharding vs Hash Sharding
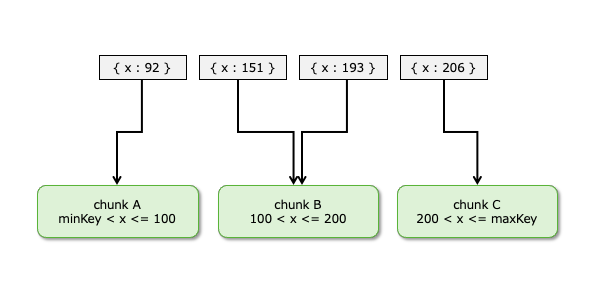
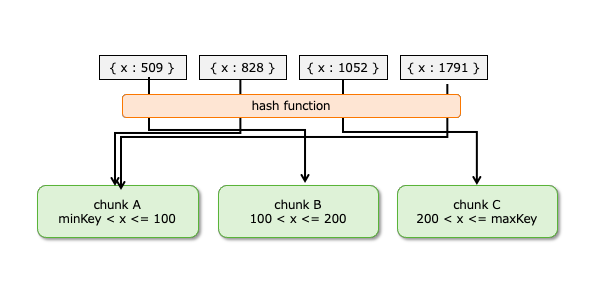
シャーディングはchunkと呼ばれるデータの塊に分割され、そのchunkが各々のシャード(replica set)に格納されます。chunkの分割の方法は「Ranged Sharding」と「Hash Sharding」から選ぶ事ができます。
「Randed Sharding」は文字通り、範囲でchunkを分割する方法です。例えば、最小値から100までがchunk A、101から200までがchunk Bのように指定できます。イメージ図では以下の通りです。
しかし、このようなchunkの分割には弱点があります。例えば、以下の図に示すようにデータが増えていく場合ならば、chunk Cのみが肥大化します。
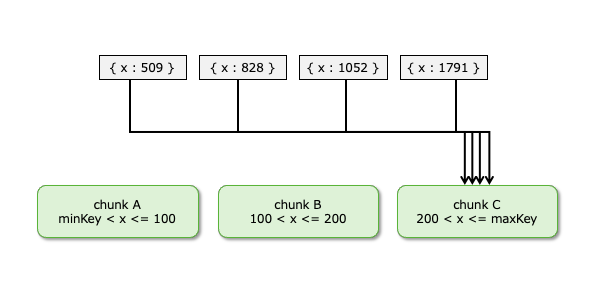
このような場合に活躍するのがHash Shardingです。Hash ShardingはHash値に基づいてchunkの格納先を決めるため、chunk毎にデータが偏る可能性を少なくする事ができます。
Ranged Sharding – 手動chunk分割
それではRanged Sharingの動作確認をしましょう。sh.shardCollectionメソッド使用する事でシャーディングが可能です。メソッドの引数にはどのcollectionのどんなキーを使ってchunkするかを指定します。書式は以下の通りです。
sh.shardCollection(
  "<データベース名>.<コレクション名>",
  { <フィールド1> : 1, <フィールド2> : 1, <フィールド3> : 1, ... }
)
フィールド_idを使って分割するならば、以下のように指定します。
sh.shardCollection("test.logSample" , { _id : 1})
chunkの区切れ目は以下のようなsh.splitAtメソッドを使う事で定義できます。以下の操作によって、_idが100,200,300を境にchunkが分割されます。
sh.splitAt( "test.logSample", { "_id": 100 } )
sh.splitAt( "test.logSample", { "_id": 200 } )
sh.splitAt( "test.logSample", { "_id": 300 } )
sh.status()を実行すると、確かに100,200,300を境に4つのchunkに分割された事が分かります。例えば、_idが100から200までならば、rs2に格納されます。
[direct: mongos] test> sh.status()

  <omitted>

databases
[
  {
    database: { _id: 'config', primary: 'config', partitioned: true },
    collections: {
      'config.system.sessions': {
        shardKey: { _id: 1 },
        unique: false,
        balancing: true,
        chunkMetadata: [
          { shard: 'rs2', nChunks: 512 },
          { shard: 'rs3', nChunks: 512 }
        ],
        chunks: [
          'too many chunks to print, use verbose if you want to force print'
        ],
        tags: []
      }
    }
  },
  {
    database: {
      _id: 'test',
      primary: 'rs3',
      partitioned: false,
      version: {
        uuid: new UUID("ce7013ed-5ee4-4ec1-961c-f6793ba8b9e5"),
        timestamp: Timestamp({ t: 1666718338, i: 1 }),
        lastMod: 1
      }
    },
    collections: {
      'test.logSample': {
        shardKey: { _id: 1 },
        unique: false,
        balancing: true,
        chunkMetadata: [ { shard: 'rs2', nChunks: 2 }, { shard: 'rs3', nChunks: 2 } ],
        chunks: [
          { min: { _id: MinKey() }, max: { _id: 100 }, 'on shard': 'rs2', 'last modified': Timestamp({ t: 2, i: 0 }) },
          { min: { _id: 100 }, max: { _id: 200 }, 'on shard': 'rs2', 'last modified': Timestamp({ t: 3, i: 0 }) },
          { min: { _id: 200 }, max: { _id: 300 }, 'on shard': 'rs3', 'last modified': Timestamp({ t: 3, i: 1 }) },
          { min: { _id: 300 }, max: { _id: MaxKey() }, 'on shard': 'rs3', 'last modified': Timestamp({ t: 1, i: 6 }) }
        ],
        tags: []
      }
    }
  }
]
テスト用に1,000件のデータをInsertします。
for (var seq = 0; seq <= 1000; seq++){
  db.logSample.insertOne({_id: seq, text: "this is test data.", createdAt: new Date()})
}
実行計画を観察すると、_id:150はrs2に格納され、_id:350はrs3に格納されている事が分かります。
[direct: mongos] test> db.logSample.find({_id:150}).explain().queryPlanner.winningPlan
{
  stage: 'SINGLE_SHARD',
  shards: [
    {
      shardName: 'rs2',
      connectionString: 'rs2/172.16.1.20:27017,172.16.1.21:27017,172.16.1.22:27017',
      serverInfo: {
        host: 'linux020.gokatei.go',
        port: 27017,
        version: '6.0.2',
        gitVersion: '94fb7dfc8b974f1f5343e7ea394d0d9deedba50e'
      },
      namespace: 'test.logSample',
      indexFilterSet: false,
      parsedQuery: { _id: { '$eq': 150 } },
      queryHash: '740C02B0',
      planCacheKey: 'E351FFEC',
      maxIndexedOrSolutionsReached: false,
      maxIndexedAndSolutionsReached: false,
      maxScansToExplodeReached: false,
      winningPlan: { stage: 'IDHACK' },
      rejectedPlans: []
    }
  ]
}
[direct: mongos] test> db.logSample.find({_id:350}).explain().queryPlanner.winningPlan
{
  stage: 'SINGLE_SHARD',
  shards: [
    {
      shardName: 'rs3',
      connectionString: 'rs3/172.16.1.30:27017,172.16.1.31:27017,172.16.1.32:27017',
      serverInfo: {
        host: 'linux030.gokatei.go',
        port: 27017,
        version: '6.0.2',
        gitVersion: '94fb7dfc8b974f1f5343e7ea394d0d9deedba50e'
      },
      namespace: 'test.logSample',
      indexFilterSet: false,
      parsedQuery: { _id: { '$eq': 350 } },
      queryHash: '740C02B0',
      planCacheKey: 'E351FFEC',
      maxIndexedOrSolutionsReached: false,
      maxIndexedAndSolutionsReached: false,
      maxScansToExplodeReached: false,
      winningPlan: { stage: 'IDHACK' },
      rejectedPlans: []
    }
  ]
}
[direct: mongos] test>
Ranged Sharding – 自動chunk分割
それではRanged Sharingの動作確認をしましょう。
それでは明治的に指定したchunkの境目ではなく、自動的にchunkに分割される挙動を観察してみましょう。前述のテストデータを削除するために、dropDatabase()します。
db.dropDatabase()
フィールド_idを使って分割するよう以下のように指定します。
sh.shardCollection("test.logSample" , { _id : 1})
MongoDBのchunk sizeはデフォルトで128Mbyteです。128Mbyteのテストデータを生成するのは手間なので、chunk sizeを変更しましょう。以下のような操作をすると、コレクション単位でchunk sizeを変更する事ができます。
以下はコレクションlogSampleのchunk sizeを1Mbyteに変更する操作です。
db.adminCommand(
   {
     configureCollectionBalancing: "test.logSample",
     chunkSize: 1
   }
)
1Mbyteを超えるようなデータを作成します。以下は”This is test data. “を100回繰り返した文字列を生成し、その文字列を格納したレコードを10,000件登録するJavaScriptのサンプルコードです。
cat << 'EOF' > sample.data
var logString = ""

for (var i = 0; i < 100; i++){
  logString += "This is test data. "
}

for (var seq = 0; seq <= 10000; seq++){
  db.logSample.insertOne({_id: seq, text: logString, createdAt: new Date()})
}
EOF
mongoshはJavaScriptを以下のような構文で実行できます。
mongosh <データベース名> <JavaScriptのファイル>
操作例は以下の通りです。
mongosh test sample.data
sh.status()を実行すると、複数のchunkに分割された事が分かります。例えば、_idが1から863まではrs3に格納される事が分かります。
[direct: mongos] test> sh.status()

  <omitted>

---
databases
[
  {
    database: { _id: 'config', primary: 'config', partitioned: true },
    collections: {
      'config.system.sessions': {
        shardKey: { _id: 1 },
        unique: false,
        balancing: true,
        chunkMetadata: [
          { shard: 'rs2', nChunks: 512 },
          { shard: 'rs3', nChunks: 512 }
        ],
        chunks: [
          'too many chunks to print, use verbose if you want to force print'
        ],
        tags: []
      }
    }
  },
  {
    database: {
      _id: 'test',
      primary: 'rs3',
      partitioned: false,
      version: {
        uuid: new UUID("eef36ded-1071-4462-a847-f356c83e329e"),
        timestamp: Timestamp({ t: 1666717503, i: 1 }),
        lastMod: 1
      }
    },
    collections: {
      'test.logSample': {
        shardKey: { _id: 1 },
        unique: false,
        balancing: true,
        chunkMetadata: [ { shard: 'rs2', nChunks: 13 }, { shard: 'rs3', nChunks: 1 } ],
        chunks: [
          { min: { _id: MinKey() }, max: { _id: 1 }, 'on shard': 'rs2', 'last modified': Timestamp({ t: 2, i: 0 }) },
          { min: { _id: 1 }, max: { _id: 863 }, 'on shard': 'rs3', 'last modified': Timestamp({ t: 3, i: 1 }) },
          { min: { _id: 863 }, max: { _id: 1618 }, 'on shard': 'rs2', 'last modified': Timestamp({ t: 3, i: 2 }) },
          { min: { _id: 1618 }, max: { _id: 2375 }, 'on shard': 'rs2', 'last modified': Timestamp({ t: 3, i: 4 }) },
          { min: { _id: 2375 }, max: { _id: 3099 }, 'on shard': 'rs2', 'last modified': Timestamp({ t: 3, i: 6 }) },
          { min: { _id: 3099 }, max: { _id: 3988 }, 'on shard': 'rs2', 'last modified': Timestamp({ t: 3, i: 8 }) },
          { min: { _id: 3988 }, max: { _id: 4745 }, 'on shard': 'rs2', 'last modified': Timestamp({ t: 3, i: 10 }) },
          { min: { _id: 4745 }, max: { _id: 5566 }, 'on shard': 'rs2', 'last modified': Timestamp({ t: 3, i: 12 }) },
          { min: { _id: 5566 }, max: { _id: 6502 }, 'on shard': 'rs2', 'last modified': Timestamp({ t: 3, i: 14 }) },
          { min: { _id: 6502 }, max: { _id: 7258 }, 'on shard': 'rs2', 'last modified': Timestamp({ t: 3, i: 16 }) },
          { min: { _id: 7258 }, max: { _id: 8079 }, 'on shard': 'rs2', 'last modified': Timestamp({ t: 3, i: 18 }) },
          { min: { _id: 8079 }, max: { _id: 8992 }, 'on shard': 'rs2', 'last modified': Timestamp({ t: 3, i: 20 }) },
          { min: { _id: 8992 }, max: { _id: 9748 }, 'on shard': 'rs2', 'last modified': Timestamp({ t: 3, i: 22 }) },
          { min: { _id: 9748 }, max: { _id: MaxKey() }, 'on shard': 'rs2', 'last modified': Timestamp({ t: 3, i: 23 }) }
        ],
        tags: []
      }
    }
  }
]
実行計画を観察すると、_id:500はrs3に格納され、_id:1000はrs2に格納されている事が分かります。確かに、_idによって異なるシャードに格納されているようです。
[direct: mongos] test> db.logSample.find({_id:500}).explain().queryPlanner.winningPlan
{
  stage: 'SINGLE_SHARD',
  shards: [
    {
      shardName: 'rs3',
      connectionString: 'rs3/172.16.1.30:27017,172.16.1.31:27017,172.16.1.32:27017',
      serverInfo: {
        host: 'linux030.gokatei.go',
        port: 27017,
        version: '6.0.2',
        gitVersion: '94fb7dfc8b974f1f5343e7ea394d0d9deedba50e'
      },
      namespace: 'test.logSample',
      indexFilterSet: false,
      parsedQuery: { _id: { '$eq': 500 } },
      queryHash: '740C02B0',
      planCacheKey: 'E351FFEC',
      maxIndexedOrSolutionsReached: false,
      maxIndexedAndSolutionsReached: false,
      maxScansToExplodeReached: false,
      winningPlan: { stage: 'IDHACK' },
      rejectedPlans: []
    }
  ]
}
[direct: mongos] test> db.logSample.find({_id:1000}).explain().queryPlanner.winningPlan
{
  stage: 'SINGLE_SHARD',
  shards: [
    {
      shardName: 'rs2',
      connectionString: 'rs2/172.16.1.20:27017,172.16.1.21:27017,172.16.1.22:27017',
      serverInfo: {
        host: 'linux020.gokatei.go',
        port: 27017,
        version: '6.0.2',
        gitVersion: '94fb7dfc8b974f1f5343e7ea394d0d9deedba50e'
      },
      namespace: 'test.logSample',
      indexFilterSet: false,
      parsedQuery: { _id: { '$eq': 1000 } },
      queryHash: '740C02B0',
      planCacheKey: 'E351FFEC',
      maxIndexedOrSolutionsReached: false,
      maxIndexedAndSolutionsReached: false,
      maxScansToExplodeReached: false,
      winningPlan: { stage: 'IDHACK' },
      rejectedPlans: []
    }
  ]
}
[direct: mongos] test>
Hash Sharding
それではHash Sharingの動作確認をしましょう。前述のテストデータを削除するために、dropDatabase()します。
db.dropDatabase()
フィールドitemのhash値に基づいて分割する場合は、以下のように指定します。
sh.shardCollection("test.inventory" , { item : "hashed"})
この時、自動的にinventoryのitemフィールドに対してHash Indexが作成されます。db.inventory.getIndexes()を実行すると、自動的に作成されたIndexを確認できます。もし、自動的にIndexが作成されるのを嫌う場合は、sh.shardCollection実行前にcreateIndex操作をしても差し支えございません。
[direct: mongos] test> db.inventory.getIndexes()
[
  { v: 2, key: { _id: 1 }, name: '_id_' },
  { v: 2, key: { item: 'hashed' }, name: 'item_hashed' }
]
[direct: mongos] test>
テストデータを生成します。
db.inventory.insertMany([
   { item: "journal", qty: 25, size: { h: 14, w: 21, uom: "cm" }, status: "A" },
   { item: "notebook", qty: 50, size: { h: 8.5, w: 11, uom: "in" }, status: "A" },
   { item: "paper", qty: 100, size: { h: 8.5, w: 11, uom: "in" }, status: "D" },
   { item: "planner", qty: 75, size: { h: 22.85, w: 30, uom: "cm" }, status: "D" },
   { item: "postcard", qty: 45, size: { h: 10, w: 15.25, uom: "cm" }, status: "A" }
]);
sh.status()を観察すると、hash値に基づくchunkで分割されている事が分かります。正確な説明をすれば、MongoDBはあらゆる値を64bitの整数に変換するハッシュ化の処理をします。sh.status()で表示される区切れ目の数字4611686018427387902は、ちょうど2の62乗にあたる値です。
[direct: mongos] test> sh.status();

  <omitted>

databases
[
  {
    database: { _id: 'config', primary: 'config', partitioned: true },
    collections: {
      'config.system.sessions': {
        shardKey: { _id: 1 },
        unique: false,
        balancing: true,
        chunkMetadata: [
          { shard: 'rs2', nChunks: 512 },
          { shard: 'rs3', nChunks: 512 }
        ],
        chunks: [
          'too many chunks to print, use verbose if you want to force print'
        ],
        tags: []
      }
    }
  },
  {
    database: {
      _id: 'test',
      primary: 'rs3',
      partitioned: false,
      version: {
        uuid: new UUID("79c5e3ff-5dac-46ed-99a5-b51d091db378"),
        timestamp: Timestamp({ t: 1666719427, i: 1 }),
        lastMod: 1
      }
    },
    collections: {
      'test.inventory': {
        shardKey: { item: 'hashed' },
        unique: false,
        balancing: true,
        chunkMetadata: [ { shard: 'rs2', nChunks: 2 }, { shard: 'rs3', nChunks: 2 } ],
        chunks: [
          { min: { item: MinKey() }, max: { item: Long("-4611686018427387902") }, 'on shard': 'rs2', 'last modified': Timestamp({ t: 1, i: 0 }) },
          { min: { item: Long("-4611686018427387902") }, max: { item: Long("0") }, 'on shard': 'rs2', 'last modified': Timestamp({ t: 1, i: 1 }) },
          { min: { item: Long("0") }, max: { item: Long("4611686018427387902") }, 'on shard': 'rs3', 'last modified': Timestamp({ t: 1, i: 2 }) },
          { min: { item: Long("4611686018427387902") }, max: { item: MaxKey() }, 'on shard': 'rs3', 'last modified': Timestamp({ t: 1, i: 3 }) }
        ],
        tags: []
      }
    }
  }
]
実行計画を観察すると、journalはrs3に格納され、notebookはrs2に格納されている事が分かります。
[direct: mongos] test> db.inventory.find({item:"journal"}).explain().queryPlanner.winningPlan
{
  stage: 'SINGLE_SHARD',
  shards: [
    {
      shardName: 'rs3',
      connectionString: 'rs3/172.16.1.30:27017,172.16.1.31:27017,172.16.1.32:27017',
      serverInfo: {
        host: 'linux030.gokatei.go',
        port: 27017,
        version: '6.0.2',
        gitVersion: '94fb7dfc8b974f1f5343e7ea394d0d9deedba50e'
      },
      namespace: 'test.inventory',
      indexFilterSet: false,
      parsedQuery: { item: { '$eq': 'journal' } },
      queryHash: '8545567D',
      planCacheKey: '42BAD16E',
      maxIndexedOrSolutionsReached: false,
      maxIndexedAndSolutionsReached: false,
      maxScansToExplodeReached: false,
      winningPlan: {
        stage: 'FETCH',
        filter: { item: { '$eq': 'journal' } },
        inputStage: {
          stage: 'IXSCAN',
          keyPattern: { item: 'hashed' },
          indexName: 'item_hashed',
          isMultiKey: false,
          isUnique: false,
          isSparse: false,
          isPartial: false,
          indexVersion: 2,
          direction: 'forward',
          indexBounds: { item: [ '[5643570574010195245, 5643570574010195245]' ] }
        }
      },
      rejectedPlans: []
    }
  ]
}
[direct: mongos] test> db.inventory.find({item:"notebook"}).explain().queryPlanner.winningPlan
{
  stage: 'SINGLE_SHARD',
  shards: [
    {
      shardName: 'rs2',
      connectionString: 'rs2/172.16.1.20:27017,172.16.1.21:27017,172.16.1.22:27017',
      serverInfo: {
        host: 'linux020.gokatei.go',
        port: 27017,
        version: '6.0.2',
        gitVersion: '94fb7dfc8b974f1f5343e7ea394d0d9deedba50e'
      },
      namespace: 'test.inventory',
      indexFilterSet: false,
      parsedQuery: { item: { '$eq': 'notebook' } },
      queryHash: '8545567D',
      planCacheKey: '42BAD16E',
      maxIndexedOrSolutionsReached: false,
      maxIndexedAndSolutionsReached: false,
      maxScansToExplodeReached: false,
      winningPlan: {
        stage: 'FETCH',
        filter: { item: { '$eq': 'notebook' } },
        inputStage: {
          stage: 'IXSCAN',
          keyPattern: { item: 'hashed' },
          indexName: 'item_hashed',
          isMultiKey: false,
          isUnique: false,
          isSparse: false,
          isPartial: false,
          indexVersion: 2,
          direction: 'forward',
          indexBounds: { item: [ '[-2435290168398566661, -2435290168398566661]' ] }
        }
      },
      rejectedPlans: []
    }
  ]
}
[direct: mongos] test>
補足
systemdによるmongosの起動
前述の操作例ではコマンドラインでmongosを起動/停止していました。これは実運用では難がある操作です。操作しやすいようにsystemdによる起動方法を考えてみましょう。
MongDB(mongod)とmongosの設定ファイル群は似ているので、MongDB(mongod)をコピーする事でmongosのsystemdに必要なファイル群を生成する操作を省略します。
まずは設定ファイルをコピーします。
cp -p /etc/mongod.conf /etc/mongos.conf
cp -p /usr/lib/systemd/system/mongod.service /usr/lib/systemd/system/mongos.service
mongos.confを編集します。編集の要所は以下の通りです。
- ログ出力先をmongod.logからmongos.logに変更する
- storageに関するパラメタを削除する
- PIDファイルをmongod.pidからmongos.pidに変更する
- bindIpを適宜編集する
- sharding.configDBにconfigサーバを指定する
mongod.confとmongos.confの差分は以下の通りです。
[root@linux090 ~]# diff -u /etc/mongod.conf /etc/mongos.conf
--- /etc/mongod.conf  2022-09-29 11:47:20.000000000 +0900
+++ /etc/mongos.conf  2022-10-25 17:58:51.834824301 +0900
@@ -7,26 +7,20 @@
 systemLog:
   destination: file
   logAppend: true
-  path: /var/log/mongodb/mongod.log
+  path: /var/log/mongodb/mongos.log

 # Where and how to store data.
-storage:
-  dbPath: /var/lib/mongo
-  journal:
-    enabled: true
-#  engine:
-#  wiredTiger:

 # how the process runs
 processManagement:
   fork: true  # fork and run in background
-  pidFilePath: /var/run/mongodb/mongod.pid  # location of pidfile
+  pidFilePath: /var/run/mongodb/mongos.pid  # location of pidfile
   timeZoneInfo: /usr/share/zoneinfo

 # network interfaces
 net:
   port: 27017
-  bindIp: 127.0.0.1  # Enter 0.0.0.0,:: to bind to all IPv4 and IPv6 addresses or, alternatively, use the net.bindIpAll setting.
+  bindIp: 0.0.0.0


 #security:
@@ -36,6 +30,8 @@
 #replication:

 #sharding:
+sharding:
+  configDB: rs1/172.16.1.10:27017,172.16.1.11:27017,172.16.1.12:27017

 ## Enterprise-Only Options
mongos.serviceを編集します。編集の要所は以下の通りです。
- Descriptionを適宜編集します。
- Environmentに指定する設定ファイル名をmongod.confからmongos.confに変更します。
- 使用は必須ではないですが、お作法としてEnvironmentFileをmongodからmongosに変更します。
- ExecStartをmongodからmongosに変更します。
- PIDFileに指定するファイルをmongod.pidからmongos.pidに変更します。
mongod.serviceとmongos.serviceの差分は以下の通りです。
[root@linux090 ~]# diff -u /usr/lib/systemd/system/mongod.service /usr/lib/systemd/system/mongos.service
--- /usr/lib/systemd/system/mongod.service  2022-09-29 11:47:20.000000000 +0900
+++ /usr/lib/systemd/system/mongos.service  2022-10-25 18:06:51.976105570 +0900
@@ -1,5 +1,5 @@
 [Unit]
-Description=MongoDB Database Server
+Description=mongos
 Documentation=https://docs.mongodb.org/manual
 After=network-online.target
 Wants=network-online.target
@@ -7,14 +7,14 @@
 [Service]
 User=mongod
 Group=mongod
-Environment="OPTIONS=-f /etc/mongod.conf"
-EnvironmentFile=-/etc/sysconfig/mongod
-ExecStart=/usr/bin/mongod $OPTIONS
+Environment="OPTIONS=-f /etc/mongos.conf"
+EnvironmentFile=-/etc/sysconfig/mongos
+ExecStart=/usr/bin/mongos $OPTIONS
 ExecStartPre=/usr/bin/mkdir -p /var/run/mongodb
 ExecStartPre=/usr/bin/chown mongod:mongod /var/run/mongodb
 ExecStartPre=/usr/bin/chmod 0755 /var/run/mongodb
 PermissionsStartOnly=true
-PIDFile=/var/run/mongodb/mongod.pid
+PIDFile=/var/run/mongodb/mongos.pid
 Type=forking
 # file size
 LimitFSIZE=infinity
chunk sizeの変更
Collection単位でchunk sizeを変更するには、以下のような操作をします。
db.adminCommand(
   {
     configureCollectionBalancing: "<データベース名>.<コレクション名>",
     chunkSize: <チャンクサイズ(MByte指定)>
   }
)
シャード全体のchunk sizeを変更するには、以下のような操作をします。
db.settings.updateOne(
   { _id: "chunksize" },
   { $set: { _id: "chunksize", value: <チャンクサイズ(MByte指定)> } },
   { upsert: true }
)
Primary Shardの明示指定
MogoDB 6.0以降では、sh.enableSharding()メソッドを使用して明示的にシャーディングを有効にする必要がなくなりました。しかし、sh.enableSharding()メソッドが全く使用するユースケースが完全になくなったわけではありません。sh.enableSharding()の第2引数はprimary shardを指定できますので、どのshardをprimaryとして使用するかを明示指定したい時に有用です。
例えば、以下のように操作すると、testデータベースはrs2をprimary shardとして使用するようになります。
[direct: mongos] test> sh.enableSharding('test','rs2')
{
  ok: 1,
  '$clusterTime': {
    clusterTime: Timestamp({ t: 1667626849, i: 3 }),
    signature: {
      hash: Binary(Buffer.from("0000000000000000000000000000000000000000", "hex"), 0),
      keyId: Long("0")
    }
  },
  operationTime: Timestamp({ t: 1667626849, i: 2 })
}
sh.status()を使用すると、確かにtestデータベースはrs2をprimary shardとして使用している事が確認できます。
[direct: mongos] test> sh.status()

  <omitted>

  {
    database: {
      _id: 'test',
      primary: 'rs2',
      partitioned: false,
      version: {
        uuid: new UUID("0a7640ec-bb14-4251-b01b-f0c1cebfbe06"),
        timestamp: Timestamp({ t: 1667626849, i: 1 }),
        lastMod: 1
      }
    },
    collections: {}
  }
]