自宅で検証できそうなスペックに合わせたNSX-Tのインストール手順を紹介します。NSX Manager 3台, NSX Edge 2台, ESXi 2台, vCenter 1台の構成で、このページではNSX用のESXiサーバの構築方法を説明します。
このページでは廉価構成を想定していますので、ベアメタルにESXiをインストールするのではなく、ESXiの中にESXiを構築する「Nested ESXi」と呼ばれる構成の構築例を紹介します。
構築範囲
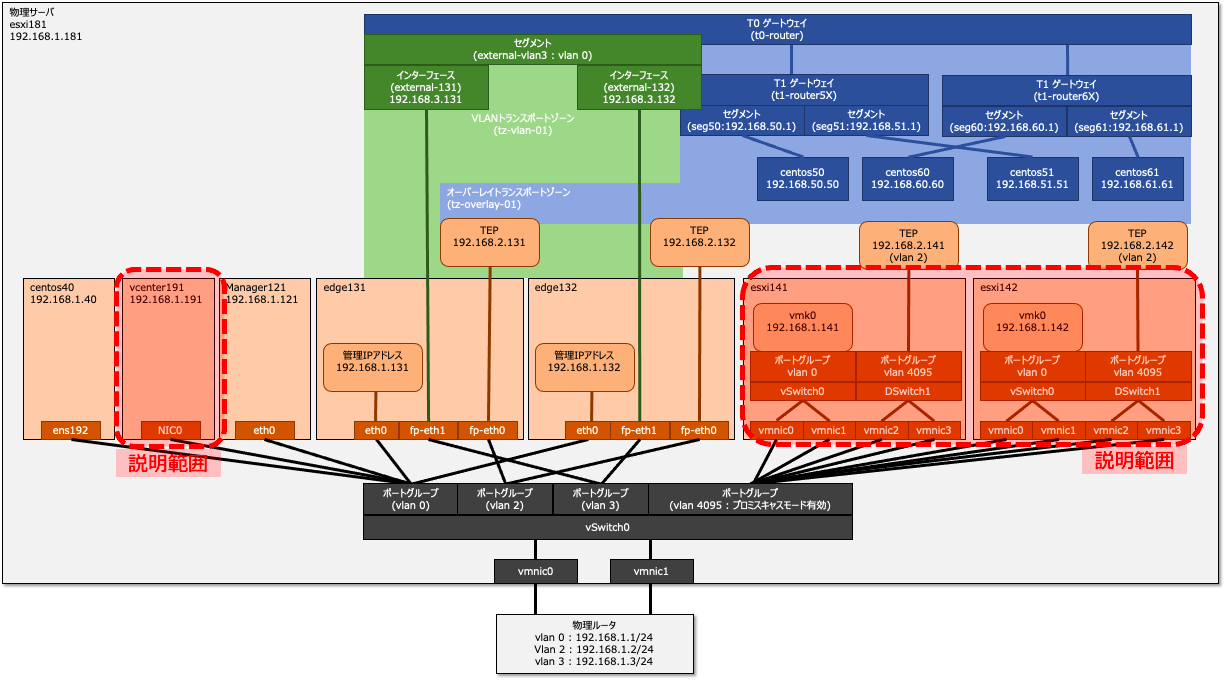
このページでは、NSX-T向けのESXiを構築し、これをNSX-T Managerに登録する方法を説明します。構築範囲を図示すると以下の範囲です。
ESXiの構築
ホストOS側のポートグループ設定
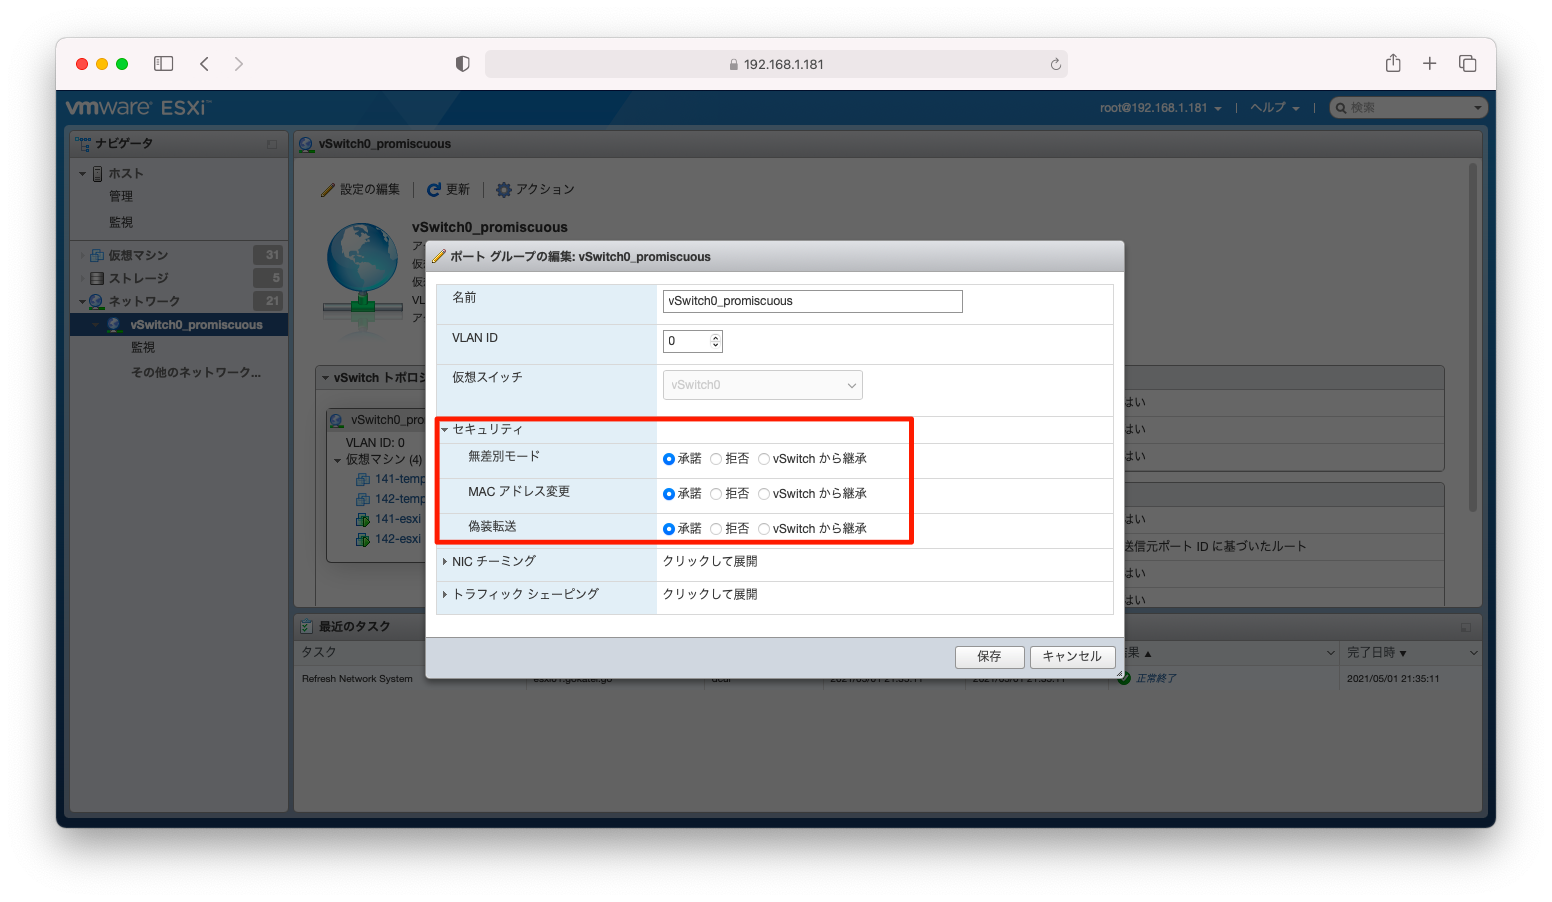
Nested ESXiの構成を採用するためには、ホストOS(親OS)側で「無差別モード(プロミスキャスモード)」「MACアドレス変更」「偽装転送」を許可したポートグループを作成し、それをNested ESXi(子OS)に割り当てる必要があります。
設定方法は「Nested ESXiに必要なセキュリティ緩和設定(無差別モードの許可)」などを参照ください。
Nested ESXiの構築
Nested ESXiを構築します。構築方法は「Nested ESXiの構築方法」などを参照ください。
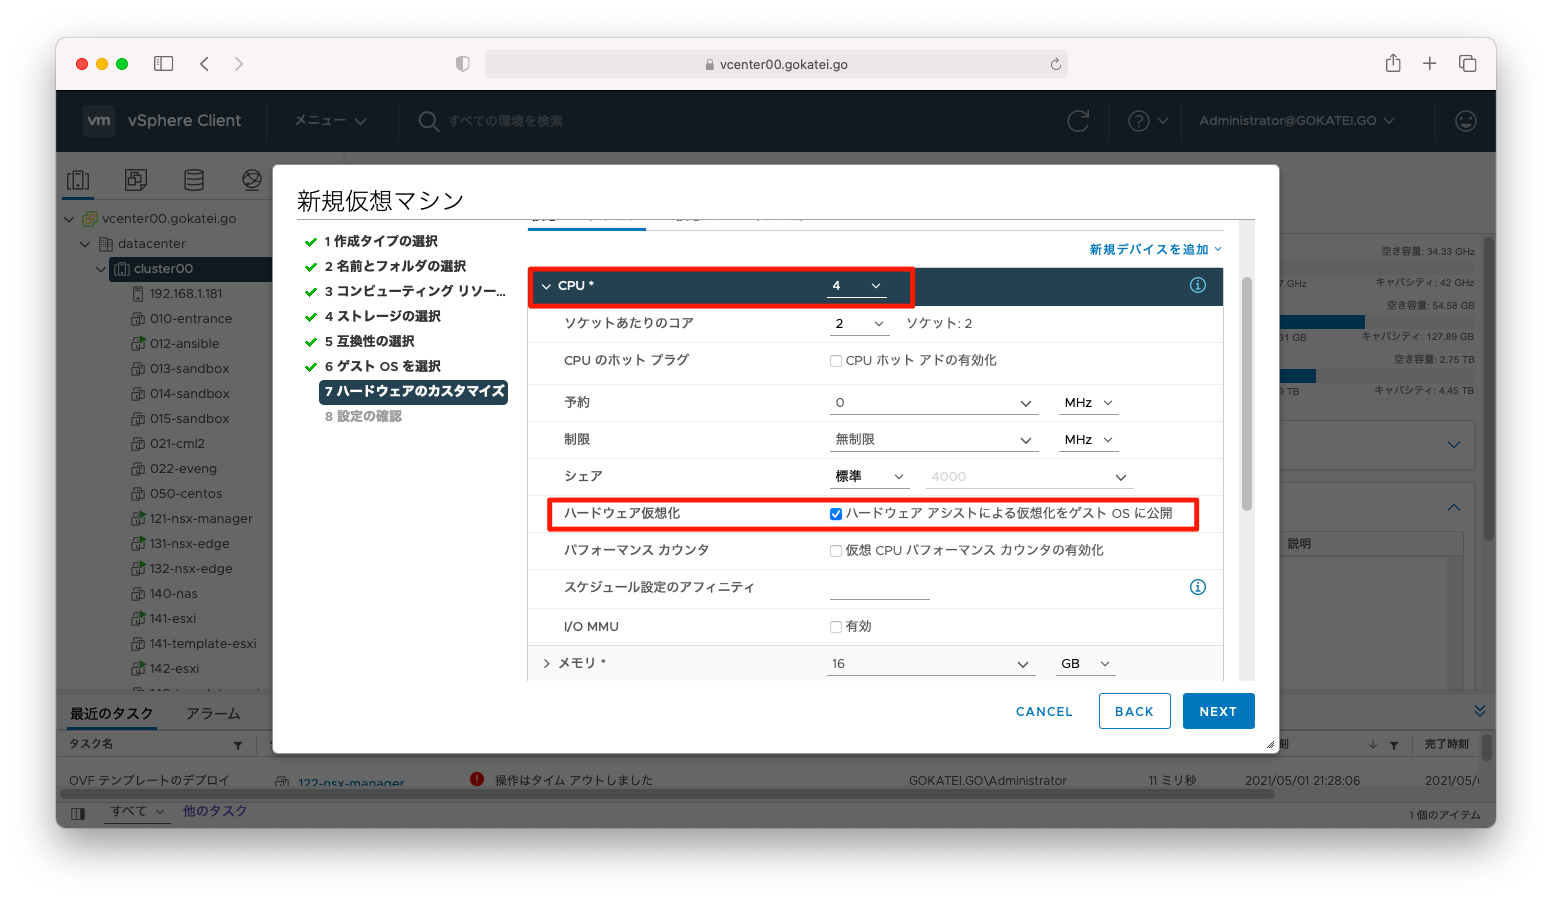
CPUの設定にて、「ハードウェアアシストによる仮想化をゲストにOSに公開」のチェックを入れてください。
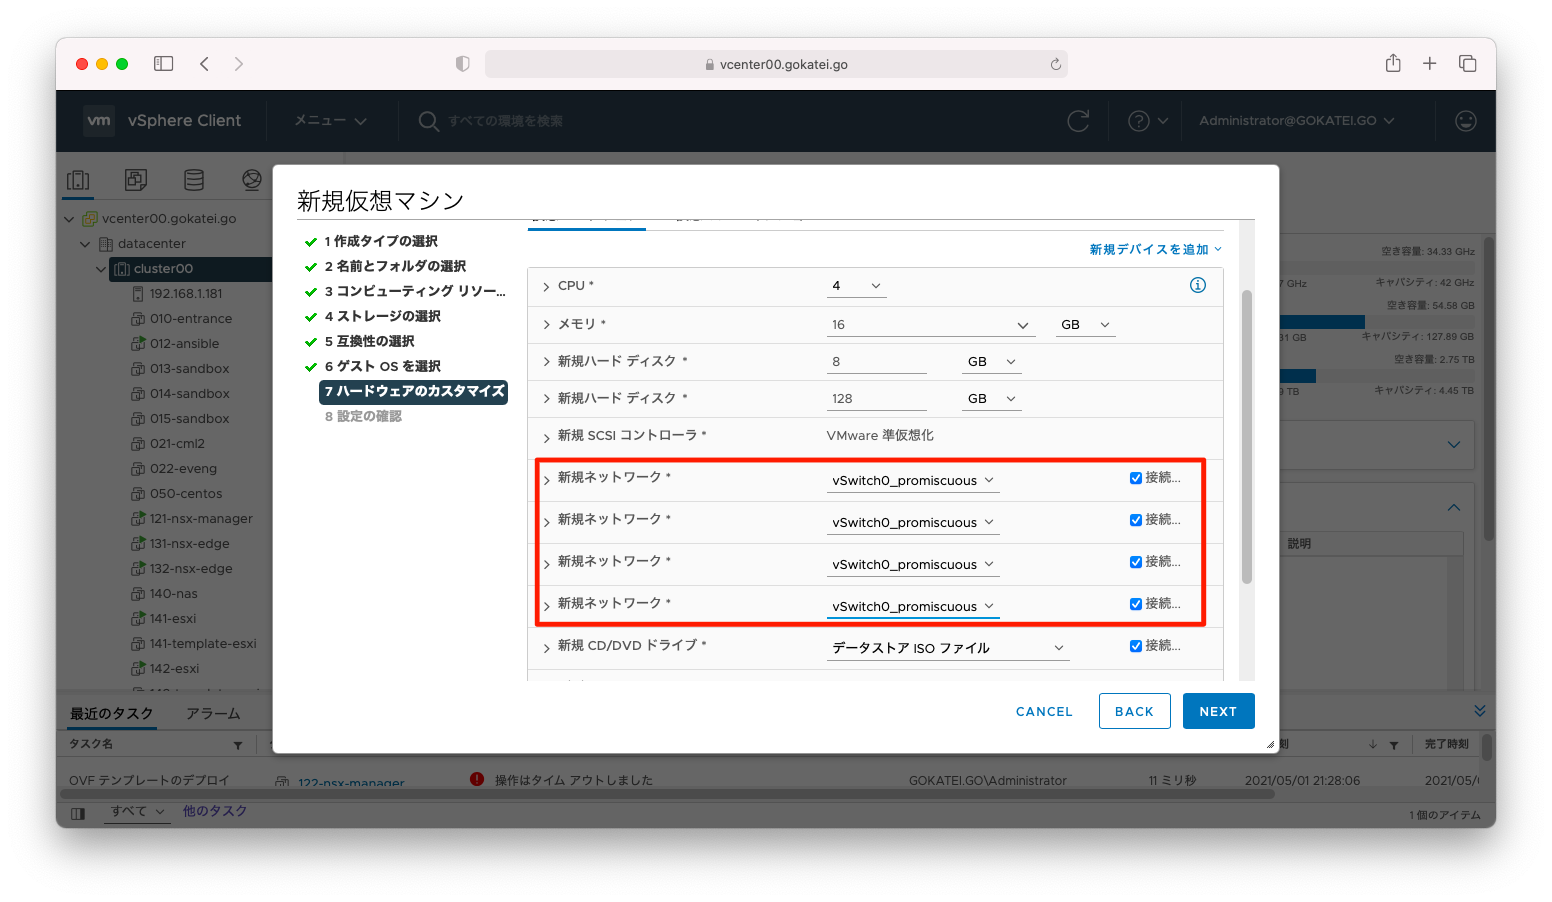
後続の検証シナリオの都合上、プロミスキャスモードを有効にしたポートグループを4つ以上のvNICに割り当ててください。
vCenter設定
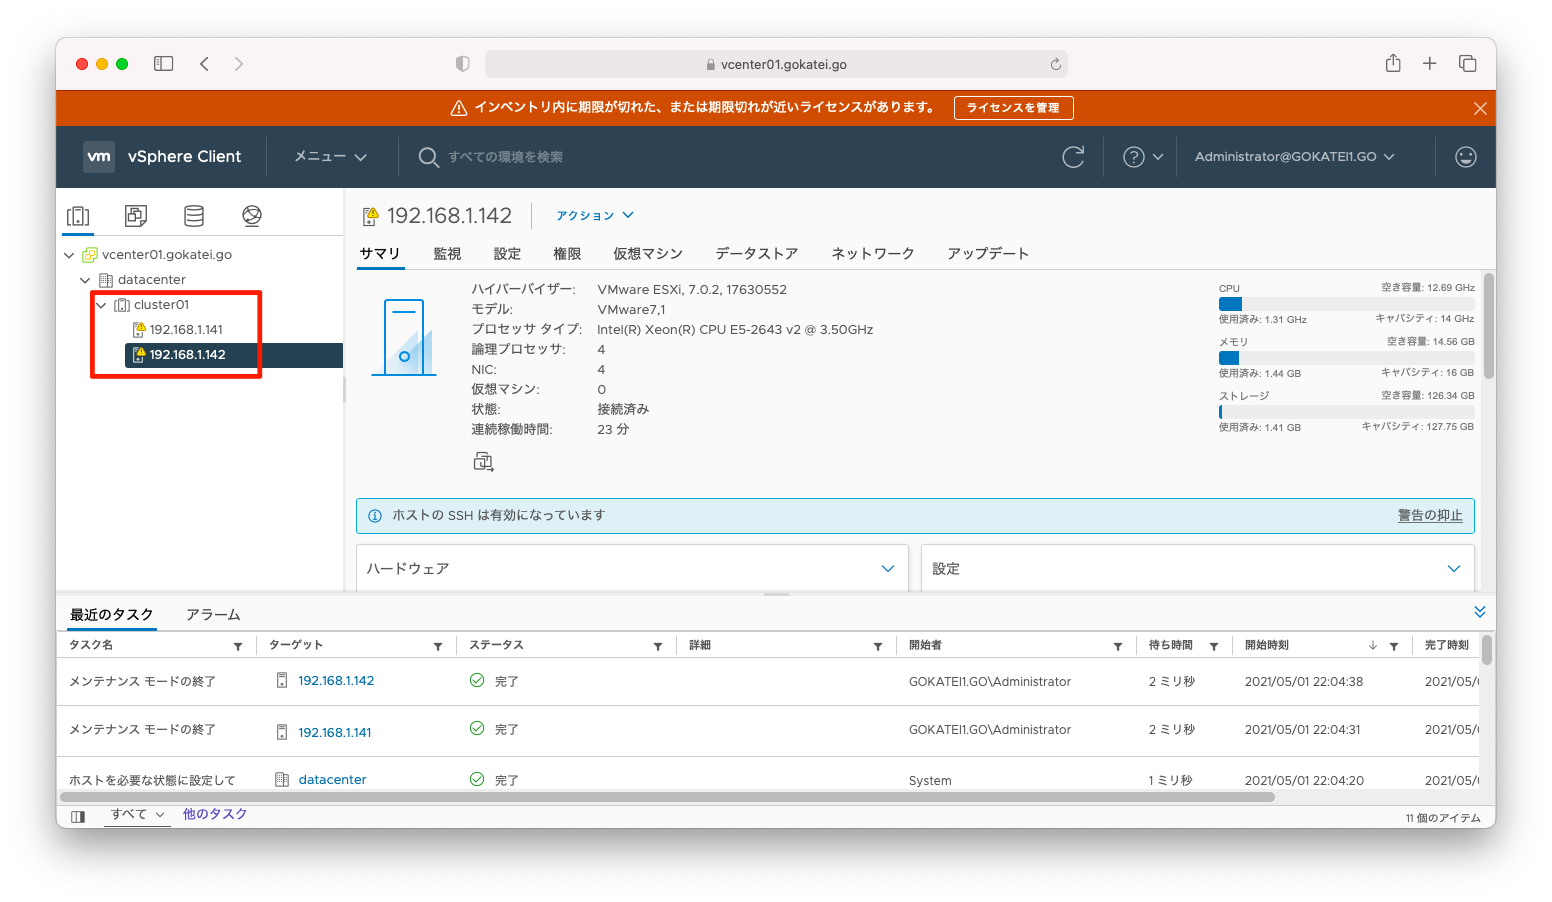
vCenterにESXiを登録します。NSX-Tの仕様上、クラスタ内にESXiを登録した方が設定の小回りが効きます。
なお、クラスタのDRSやvSphere HAの要件は必須ではありません。また、共有ストレージも必須ではありません。
NSX-T コンピュートマネージャーの登録
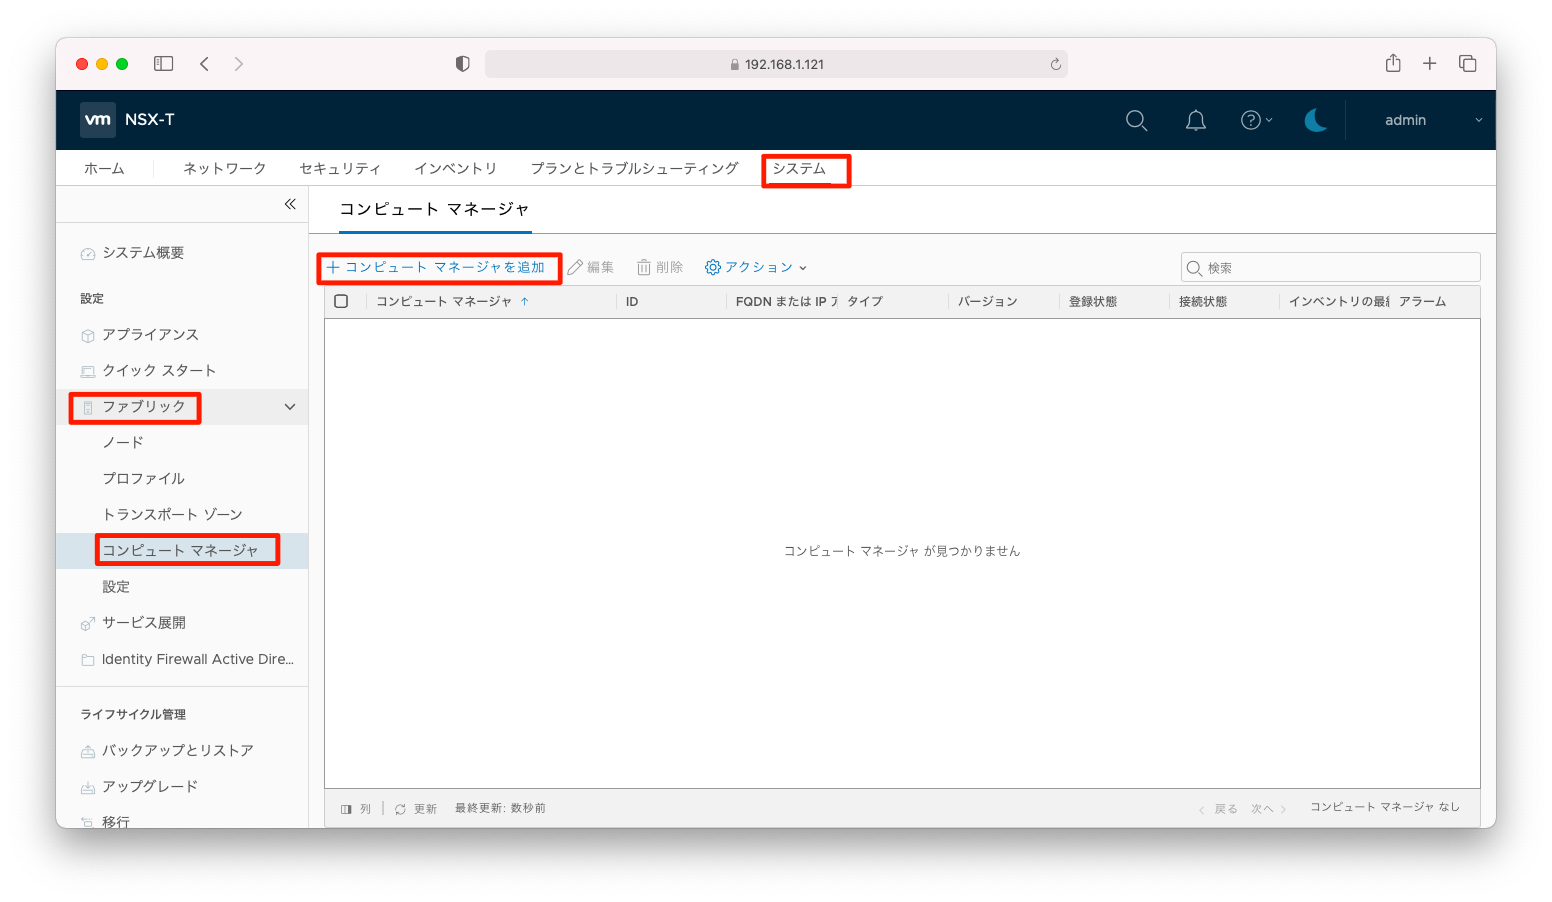
NSX-TにvCenterを登録します。NSX-TではvCenterを「コンピュートマネージャ」と呼んでます。
おそらくKVM ManagerなどvCenter以外の統合管理製品とも連携できる拡張を見越して、「コンピュートマネージャ」と命名したものと思われます。
「システム」「ファブリック」「コンピュートマネージャ」「コンピュートマネージャを追加」の順に押下します。
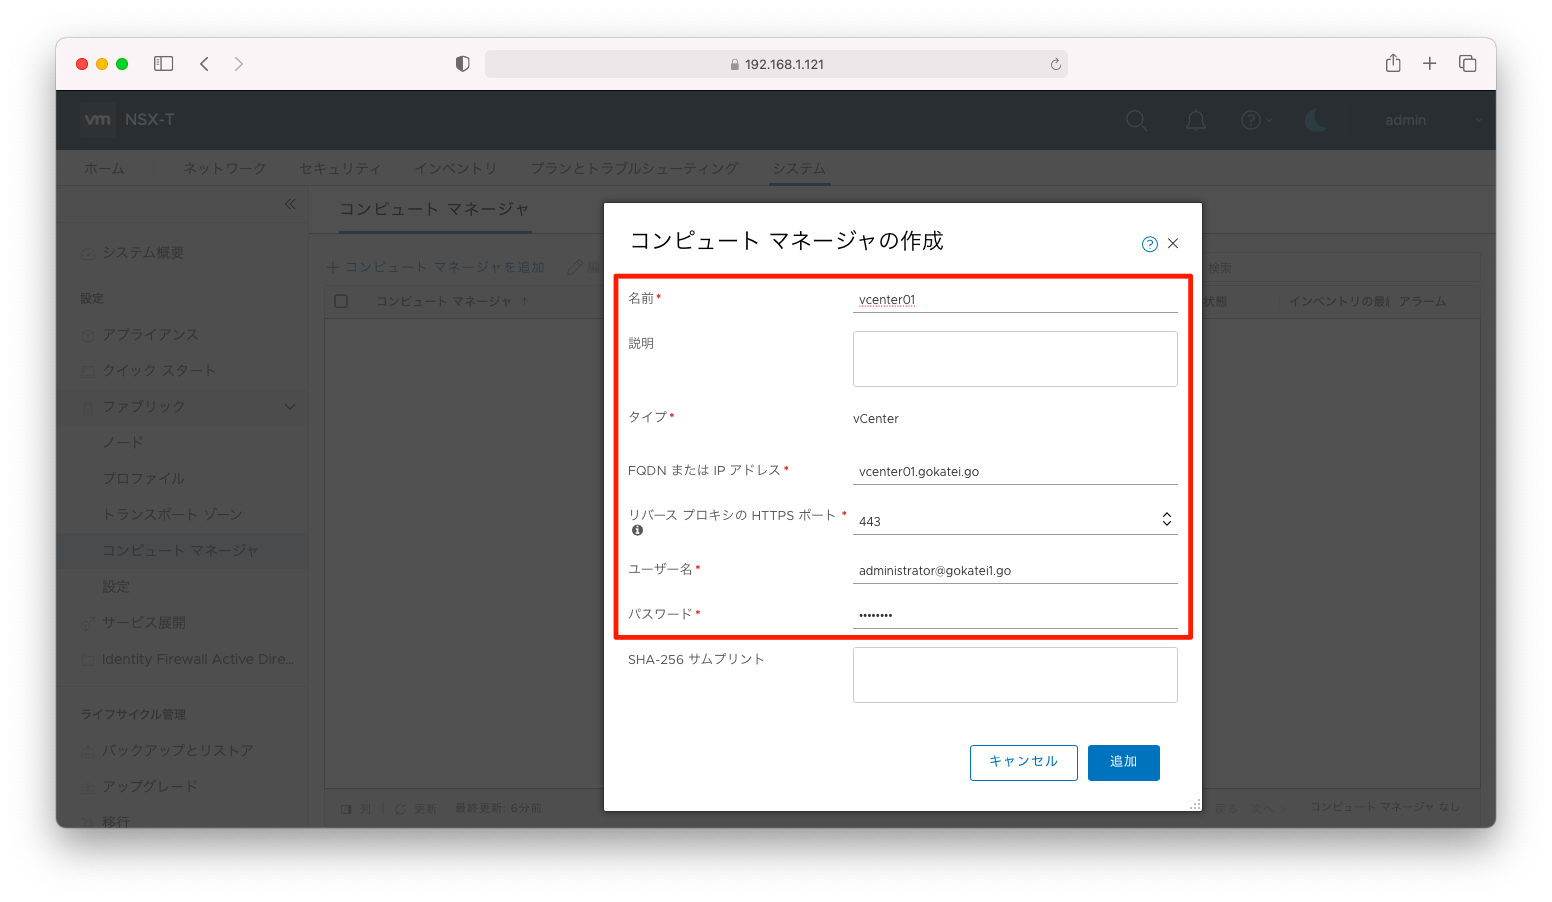
サムプリント以外のvCenterへの接続情報を入力し、「追加」を押下します。
サムプリントの確認を求められます。「追加」を押下します。

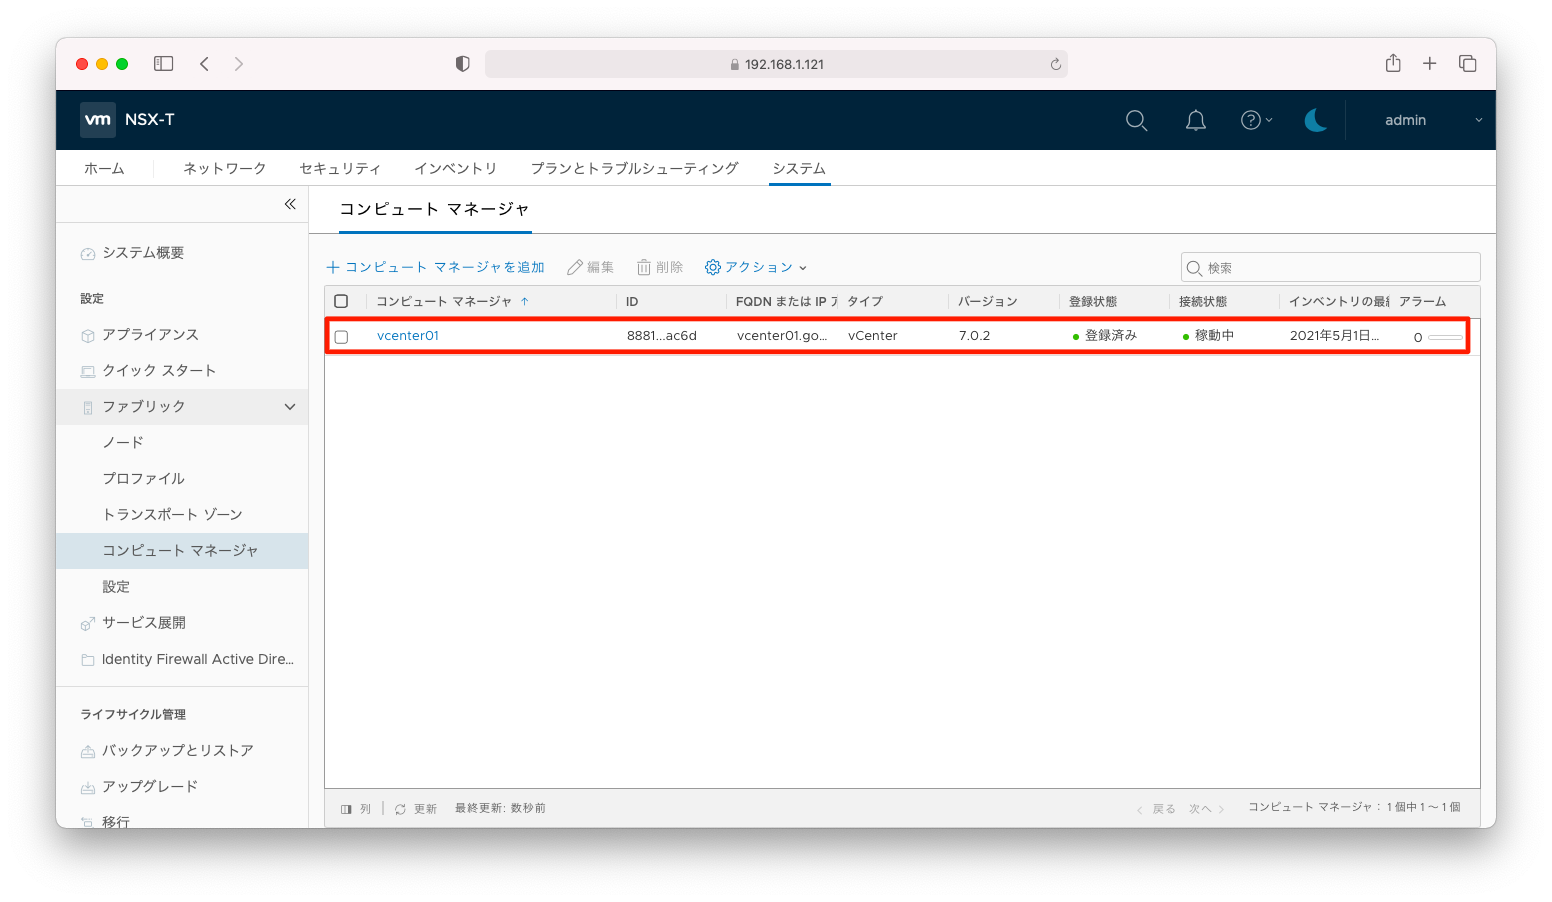
「登録済」「稼働中」の表示に変わるまで待ちます。
NSX-T ホストトランスポートノードの確認
前述のコンピュートマネージャ(vCenter)の登録により、ESXiがホストトランスポートノードとして登録されたことを確認します。NSX-Tは仮想マシンのトラフィック転送を司るマシンを「ホストトランスポートノード」と呼んでいます(この定義は正確な定義ではなく、初心者のイメージしやすさを優先した表現です)。
「ESXi」ではなく「ホストトランスポートノード」という汎用的な名前にしたのは、ESXi以外のハイパーバイザにも対応しているためです。ESXiだけでなくKVMもホストトランスポートノードとして設定することができます。また、ハイパーバイザだけでなく、RedhatやWindowsのベアメタルマシンもホストトランスポートノードとしての設定が可能で、NSX-Tと連携させることもできます。
「システム」「ファブリック」「ノード」「ホストトランスポートノード」の順に押下し、プルダウンで「vCenter名」を選びます。
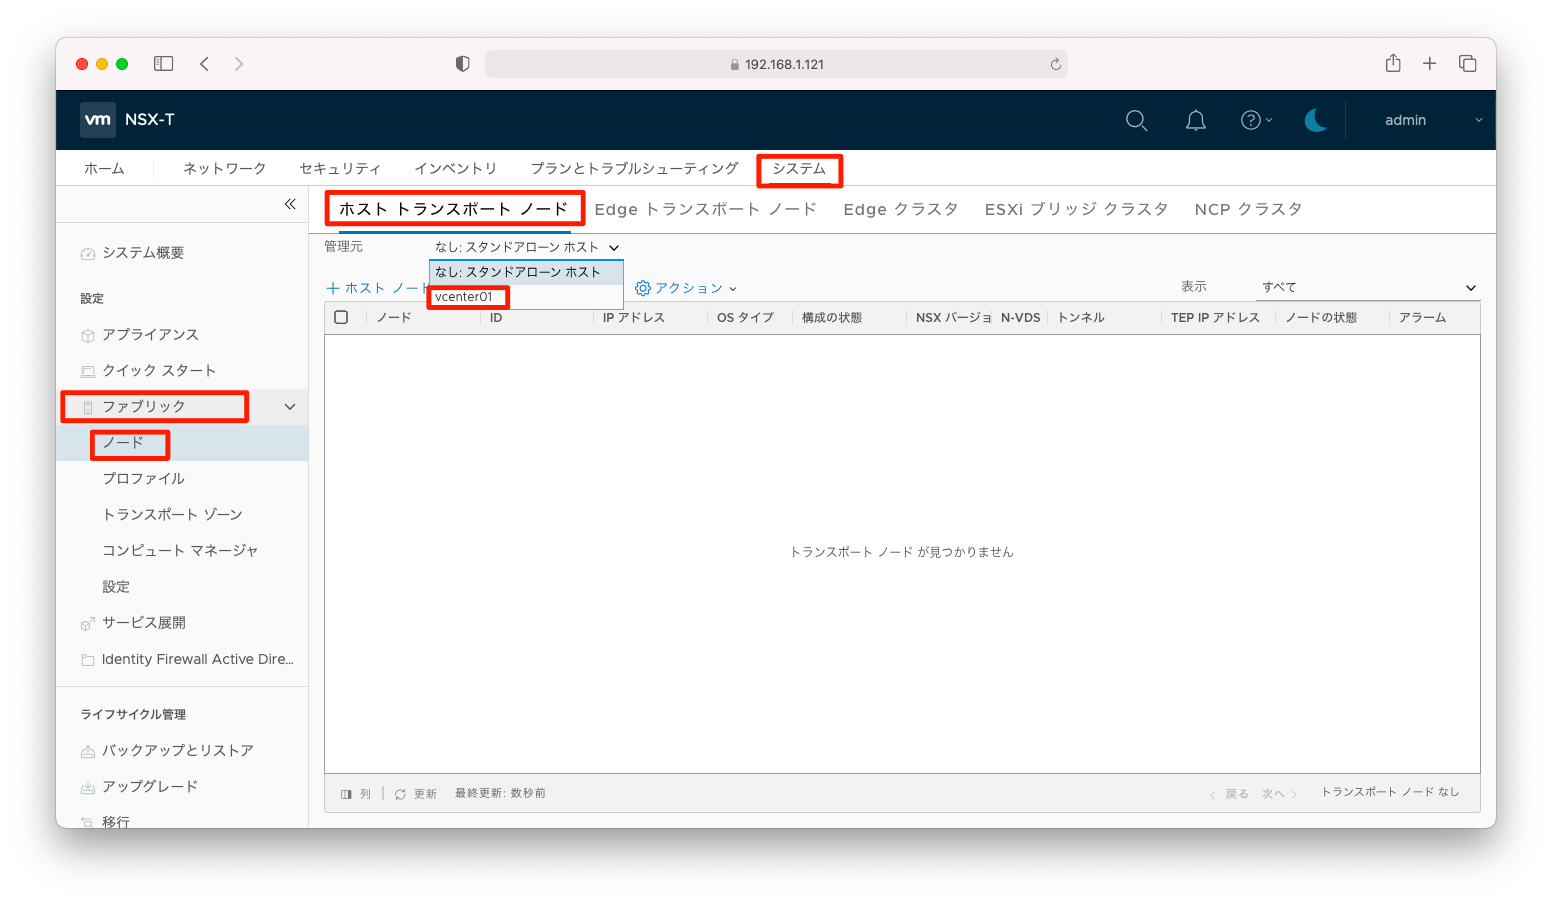
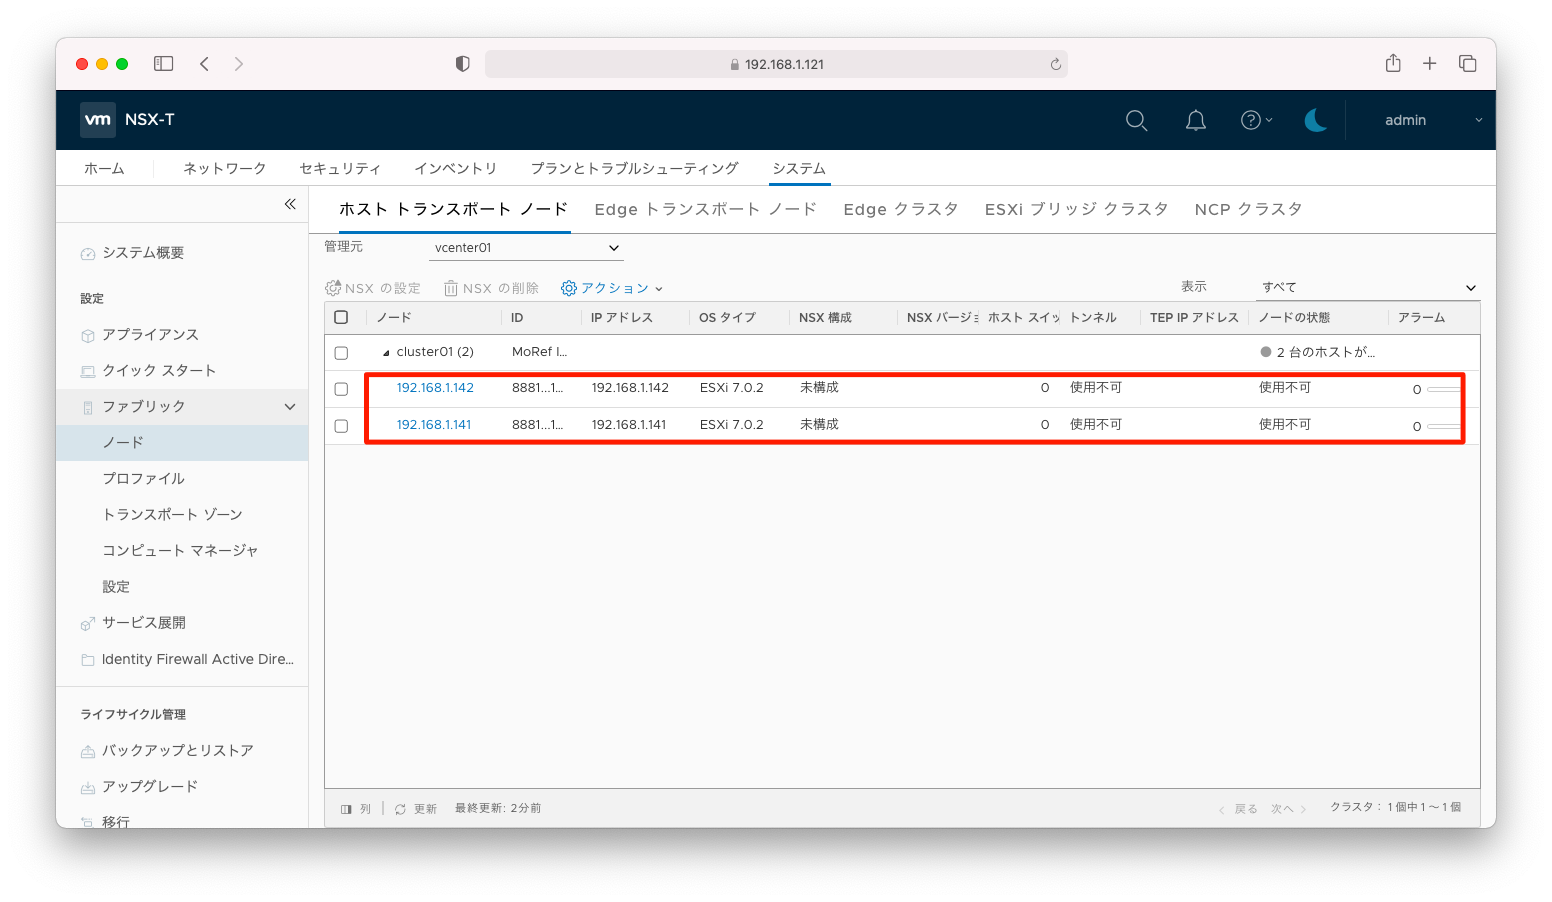
ESXiが登録されていることを確認します。現時点では「未構成」「使用不可」となっていますが、問題ありません。この「未構成」「使用不可」は後続手順で解消されます。
補足説明
VIB(VMware Infrastructure Bundle)
インストール
ESXiはVIB(VMware Infrastructure Bundle)と呼ばれるパッケージをインストールすることで機能を拡張することができます。これらパッケージ群はESXiの管理画面で「管理」「パッケージ」の順に押下すると確認できます。例えば、NSX-Tのホストトランスポートノードとして機能するESXiならば、以下スクリーンショットのようなパッケージが「ホストトランスポートノード 登録」の操作時に自動的にインストールされます。
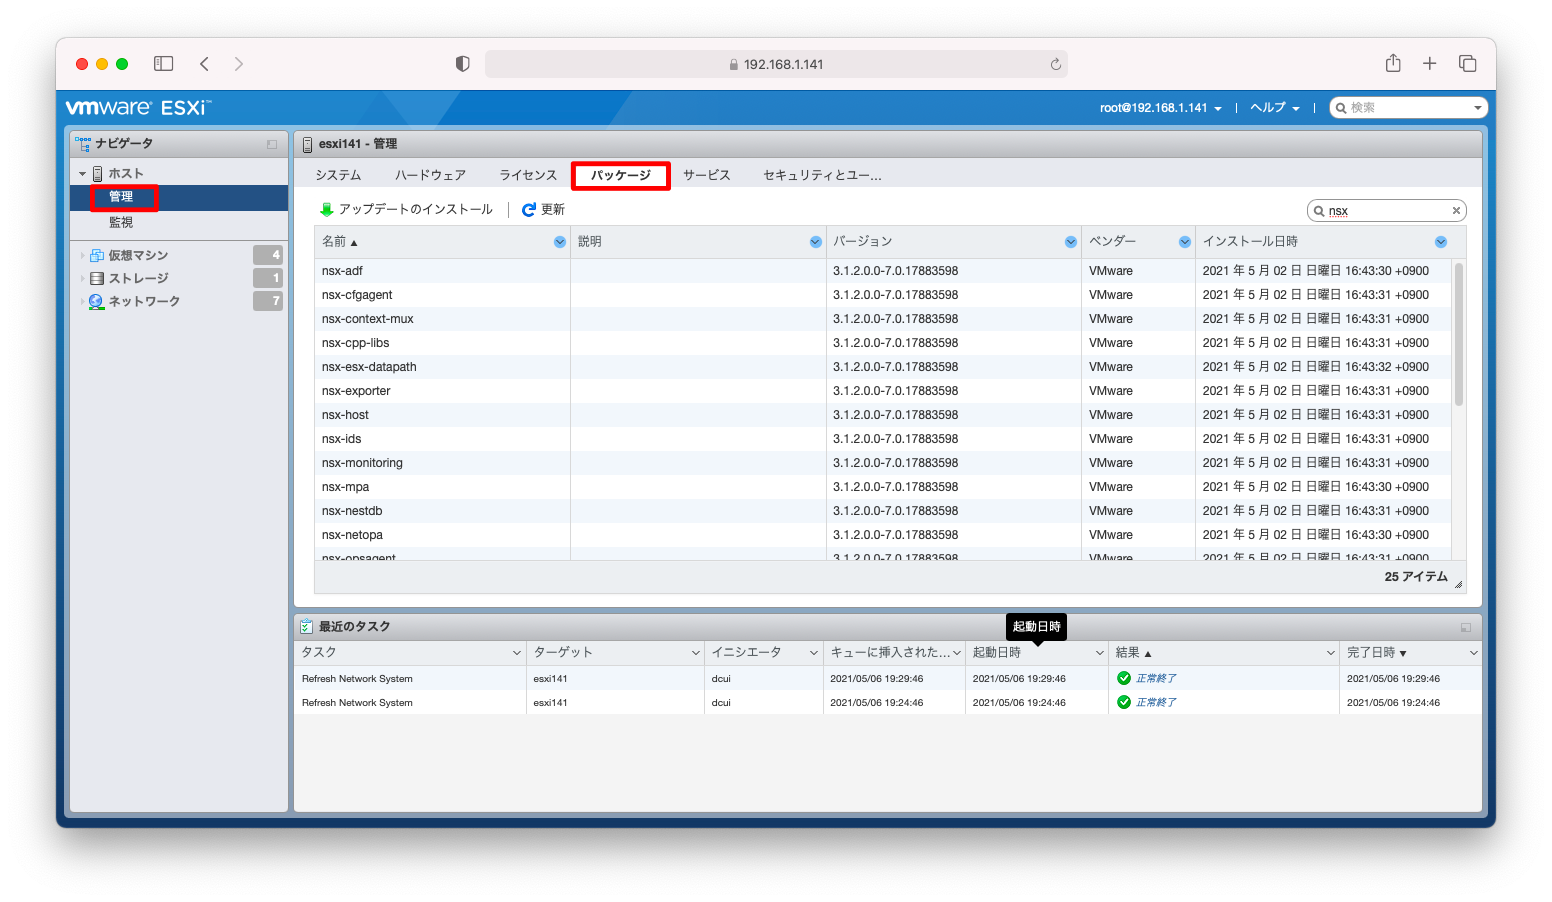
パッケージをCLIで確認するならば、以下のようにesxcliコマンドを使用します。
[root@esxi141:~] esxcli software vib list | grep -E 'nsx|vsipfwlib'
nsx-adf                        3.1.2.0.0-7.0.17883598               VMware  VMwareCertified   2021-05-02
nsx-cfgagent                   3.1.2.0.0-7.0.17883598               VMware  VMwareCertified   2021-05-02
nsx-context-mux                3.1.2.0.0-7.0.17883598               VMware  VMwareCertified   2021-05-02
nsx-cpp-libs                   3.1.2.0.0-7.0.17883598               VMware  VMwareCertified   2021-05-02
nsx-esx-datapath               3.1.2.0.0-7.0.17883598               VMware  VMwareCertified   2021-05-02
nsx-exporter                   3.1.2.0.0-7.0.17883598               VMware  VMwareCertified   2021-05-02
nsx-host                       3.1.2.0.0-7.0.17883598               VMware  VMwareCertified   2021-05-02
nsx-ids                        3.1.2.0.0-7.0.17883598               VMware  VMwareCertified   2021-05-02
nsx-monitoring                 3.1.2.0.0-7.0.17883598               VMware  VMwareCertified   2021-05-02
nsx-mpa                        3.1.2.0.0-7.0.17883598               VMware  VMwareCertified   2021-05-02
nsx-nestdb                     3.1.2.0.0-7.0.17883598               VMware  VMwareCertified   2021-05-02
nsx-netopa                     3.1.2.0.0-7.0.17883598               VMware  VMwareCertified   2021-05-02
nsx-opsagent                   3.1.2.0.0-7.0.17883598               VMware  VMwareCertified   2021-05-02
nsx-platform-client            3.1.2.0.0-7.0.17883598               VMware  VMwareCertified   2021-05-02
nsx-proto2-libs                3.1.2.0.0-7.0.17883598               VMware  VMwareCertified   2021-05-02
nsx-proxy                      3.1.2.0.0-7.0.17883598               VMware  VMwareCertified   2021-05-02
nsx-python-gevent              1.1.0-15366959                       VMware  VMwareCertified   2021-05-02
nsx-python-greenlet            0.4.14-16723199                      VMware  VMwareCertified   2021-05-02
nsx-python-logging             3.1.2.0.0-7.0.17883598               VMware  VMwareCertified   2021-05-02
nsx-python-protobuf            2.6.1-16723197                       VMware  VMwareCertified   2021-05-02
nsx-python-utils               3.1.2.0.0-7.0.17883598               VMware  VMwareCertified   2021-05-02
nsx-sfhc                       3.1.2.0.0-7.0.17883598               VMware  VMwareCertified   2021-05-02
nsx-shared-libs                3.1.2.0.0-7.0.17883598               VMware  VMwareCertified   2021-05-02
nsx-vdpi                       3.1.2.0.0-7.0.17883598               VMware  VMwareCertified   2021-05-02
nsxcli                         3.1.2.0.0-7.0.17883598               VMware  VMwareCertified   2021-05-02
vsipfwlib                      3.1.2.0.0-7.0.17883598               VMware  VMwareCertified   2021-05-02
NSX-Tのインストール/アンインストール時には自動的にVIBが追加/削除されますが、強制アンインストールをするとVIBが残ってしまいます。完全に自動化されているわけではなく、時には手動による復旧も必要です。仕様理解のために一度は手作業でVIBをインストール/アンインストールしてみましょう。
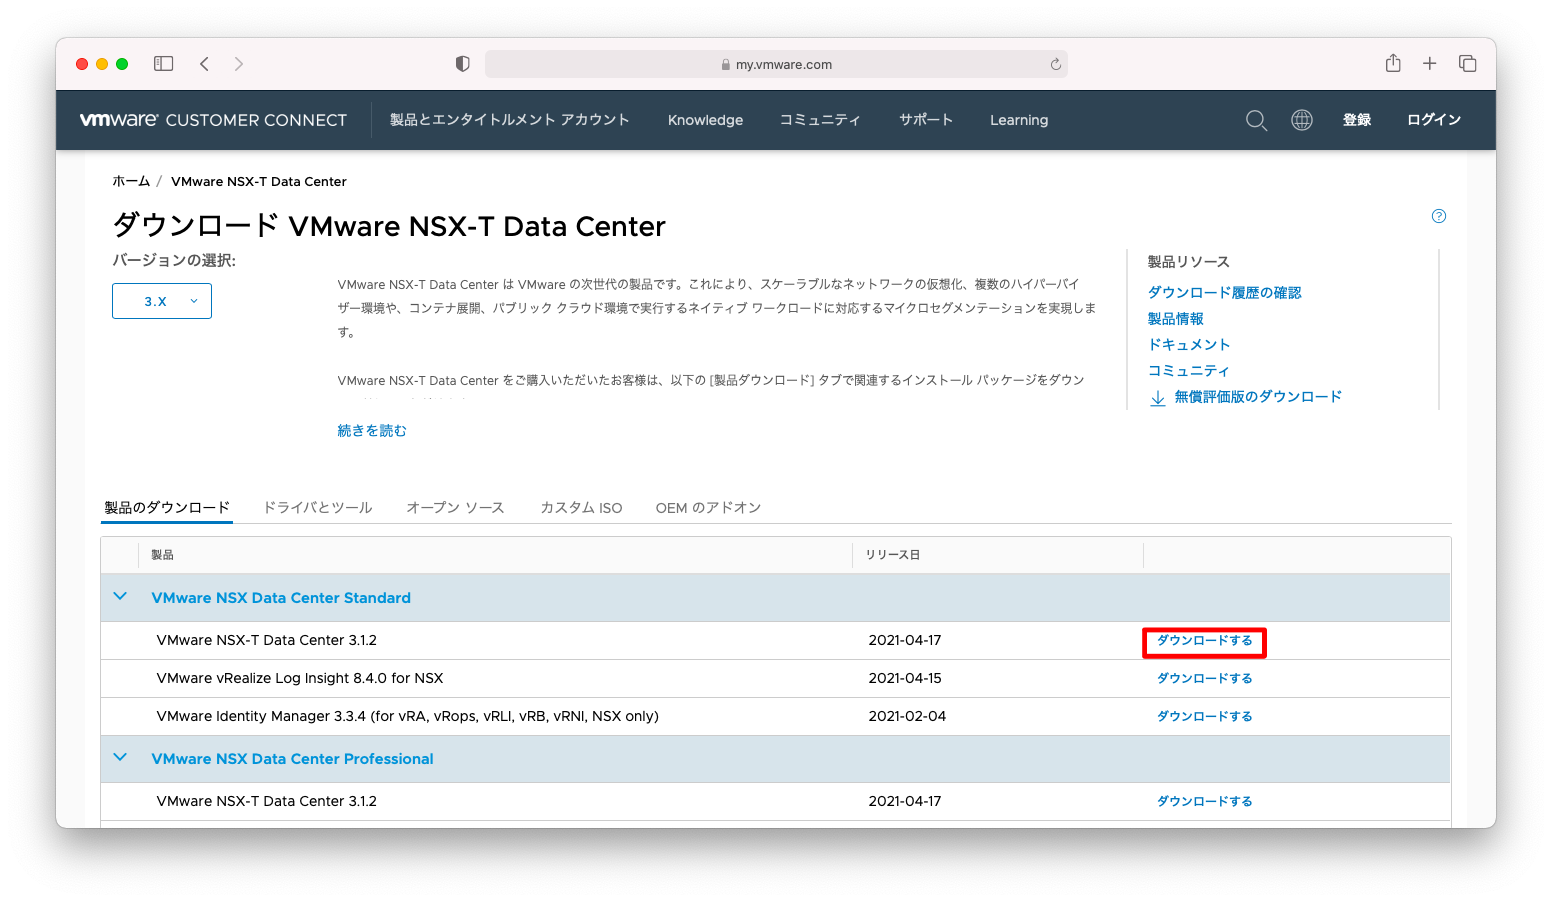
まずはVIBをダウンロードします。「My VMwareのNSX-T ダウンロードページ」へアクセスします。「VMware NSX-T Data Center 3.1.2」の「ダウンロードする」を押下します。
ESXiのバージョンに応じたVIBをダウンロードします。
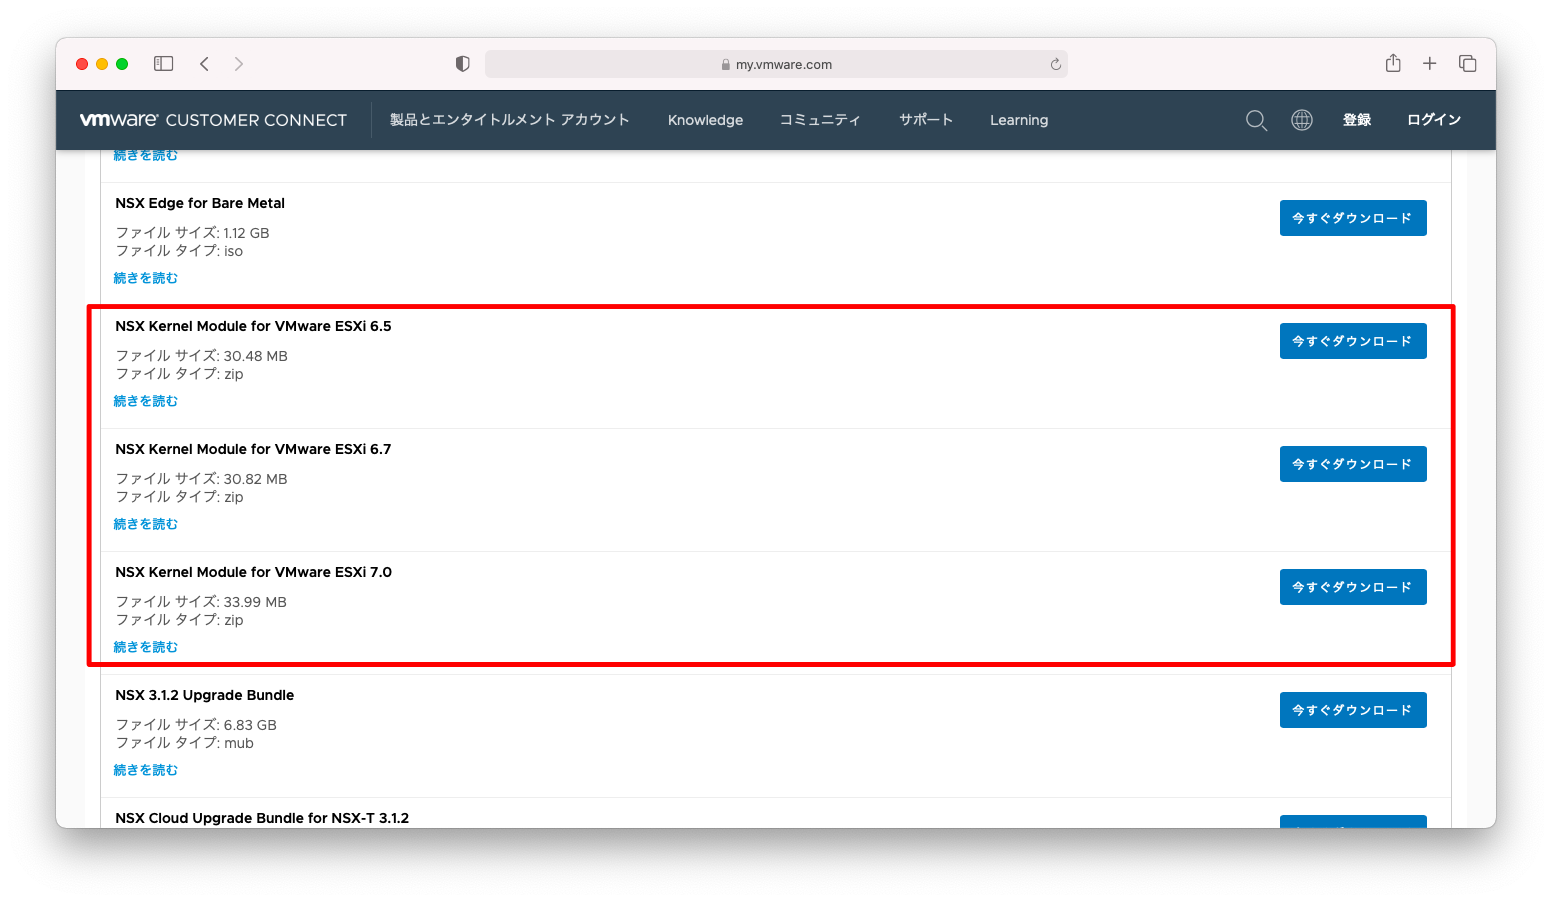
ダウンロードしたzipファイルをESXiへ転送します。転送後、esxcliコマンドでVIBをインストールします。
[root@esxi143:~] esxcli software vib install -d /tmp/nsx-lcp-3.1.2.0.0.17883598-esx70.zip
Installation Result
   Message: Operation finished successfully.
   Reboot Required: false
   VIBs Installed: VMware_bootbank_nsx-adf_3.1.2.0.0-7.0.17883598, VMware_bootbank_nsx-cfgagent_3.1.2.0.0-7.0.17883598, VMware_bootbank_nsx-context-mux_3.1.2.0.0-7.0.17883598, VMware_bootbank_nsx-cpp-libs_3.1.2.0.0-7.0.17883598, VMware_bootbank_nsx-esx-datapath_3.1.2.0.0-7.0.17883598, VMware_bootbank_nsx-exporter_3.1.2.0.0-7.0.17883598, VMware_bootbank_nsx-host_3.1.2.0.0-7.0.17883598, VMware_bootbank_nsx-ids_3.1.2.0.0-7.0.17883598, VMware_bootbank_nsx-monitoring_3.1.2.0.0-7.0.17883598, VMware_bootbank_nsx-mpa_3.1.2.0.0-7.0.17883598, VMware_bootbank_nsx-nestdb_3.1.2.0.0-7.0.17883598, VMware_bootbank_nsx-netopa_3.1.2.0.0-7.0.17883598, VMware_bootbank_nsx-opsagent_3.1.2.0.0-7.0.17883598, VMware_bootbank_nsx-platform-client_3.1.2.0.0-7.0.17883598, VMware_bootbank_nsx-proto2-libs_3.1.2.0.0-7.0.17883598, VMware_bootbank_nsx-proxy_3.1.2.0.0-7.0.17883598, VMware_bootbank_nsx-python-gevent_1.1.0-15366959, VMware_bootbank_nsx-python-greenlet_0.4.14-16723199, VMware_bootbank_nsx-python-logging_3.1.2.0.0-7.0.17883598, VMware_bootbank_nsx-python-protobuf_2.6.1-16723197, VMware_bootbank_nsx-python-utils_3.1.2.0.0-7.0.17883598, VMware_bootbank_nsx-sfhc_3.1.2.0.0-7.0.17883598, VMware_bootbank_nsx-shared-libs_3.1.2.0.0-7.0.17883598, VMware_bootbank_nsx-vdpi_3.1.2.0.0-7.0.17883598, VMware_bootbank_nsxcli_3.1.2.0.0-7.0.17883598, VMware_bootbank_vsipfwlib_3.1.2.0.0-7.0.17883598
   VIBs Removed:
   VIBs Skipped:
強制アンインストール
NSX-Tの停止中に操作を行うなど何らかの不整合が起きるような操作をすると、NSX-Tをアンインストールできなくなってしまうことがあります。このようなときは強制アンインストールをしますが、VIBは残存するため、VIB削除は手作業で行う必要があります。
以下操作はVIBの理解を深めるためのハンズオン目的のものです。NSX-Tのアンインストール方法は「vSphere クラスタからの NSX-T Data Center のアンインストール」という公式推奨手順がありますので、実務では公式のものを使用しましょう。
NSX-Tをアンインストールには、ホストトランスポートノードの一覧画面にて、対象のホストトランスポートノードにチェックを入れ「NSXの削除」を押下します。
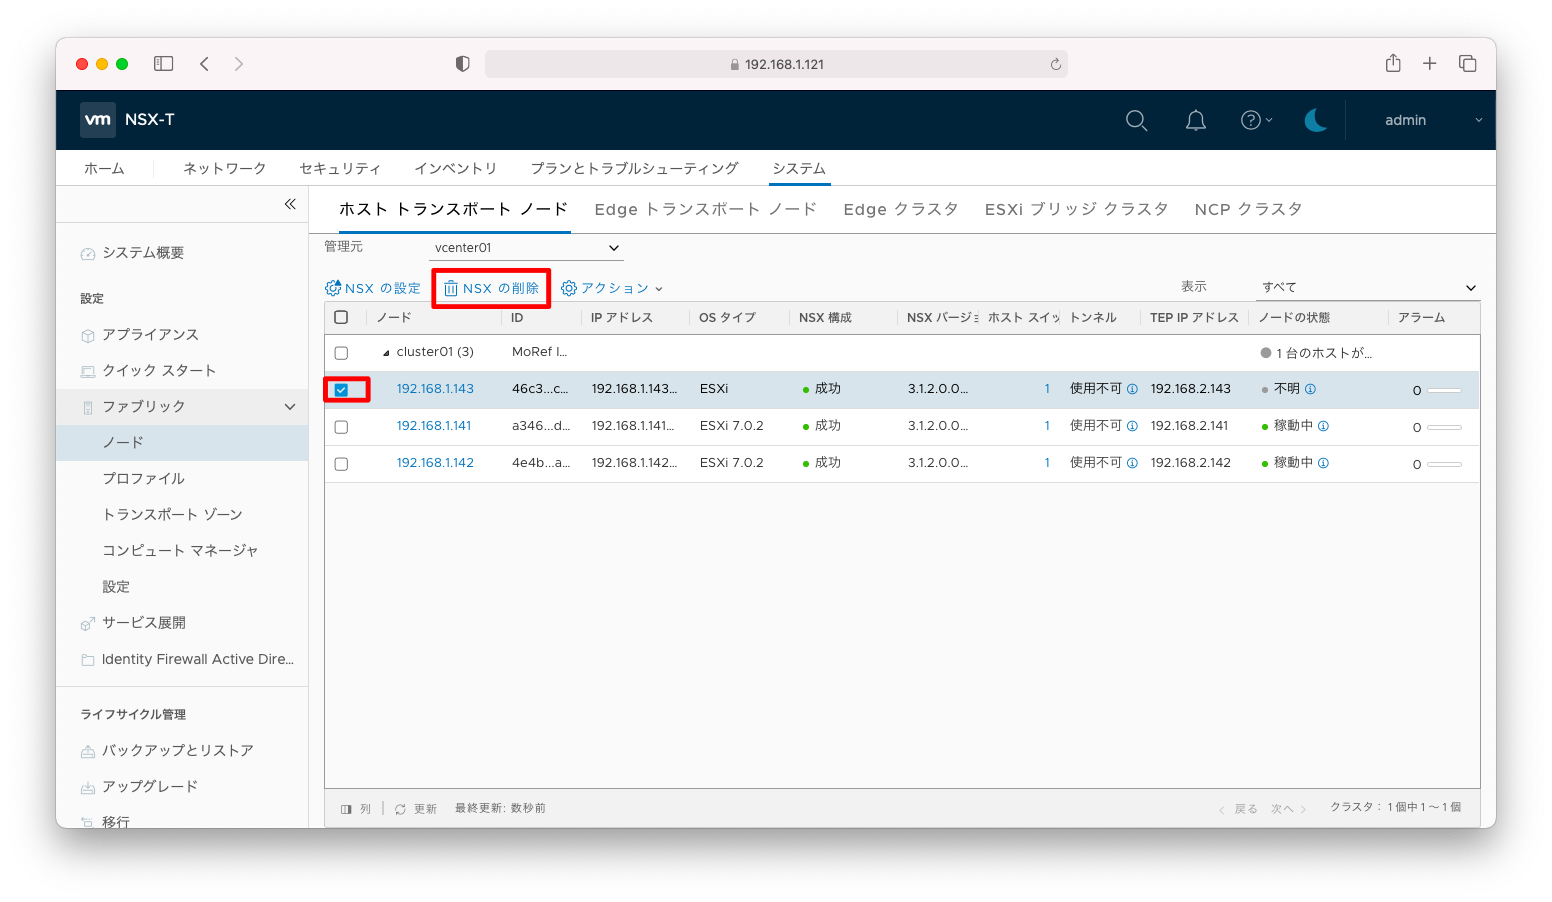
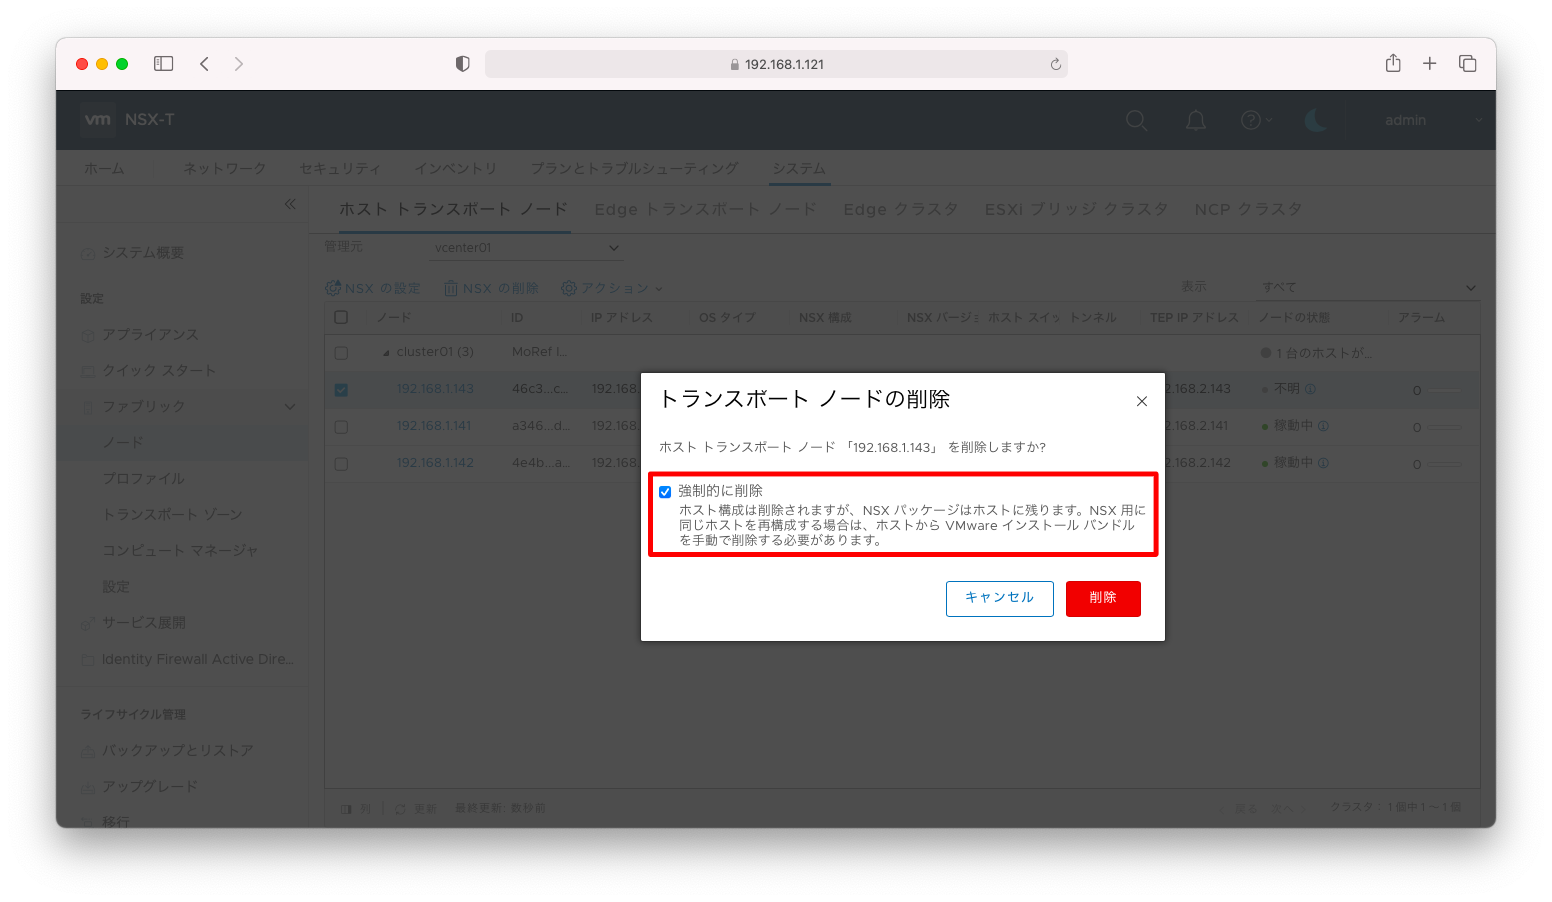
アンインストールに失敗する場合は、「強制的に削除」にチェックを入れて、強制アンインストールを試みることもできます。ただし、この場合はVIBが残ってしまいます。
パッケージを削除するには「esxcli software vib remove」というコマンドを使用します。パッケージ間で依存関係があり複数を同時に削除しなければならないときは、複数のパッケージを同時に指定します。
esxcli software vib remove -n <パッケージ名1> -n <パッケージ名2> ...
NSX-Tに関するパッケージを複数同時削除する操作例(ワンライナー)は以下の通りです。
esxcli software vib remove \
  $(esxcli software vib list | \
  grep -E 'nsx|vsipfwlib' | \
  awk '{ printf " -n "$1 }')
削除に成功すると、「Operation finished successfully」と表示されます。
[root@esxi143:~] esxcli software vib remove \
>   $(esxcli software vib list | \
>   grep -E 'nsx|vsipfwlib' | \
>   awk '{ printf " -n "$1 }')
Removal Result
   Message: Operation finished successfully.
   Reboot Required: false
   VIBs Installed:
   VIBs Removed: VMware_bootbank_nsx-adf_3.1.2.0.0-7.0.17883598, VMware_bootbank_nsx-cfgagent_3.1.2.0.0-7.0.17883598, VMware_bootbank_nsx-context-mux_3.1.2.0.0-7.0.17883598, VMware_bootbank_nsx-cpp-libs_3.1.2.0.0-7.0.17883598, VMware_bootbank_nsx-esx-datapath_3.1.2.0.0-7.0.17883598, VMware_bootbank_nsx-exporter_3.1.2.0.0-7.0.17883598, VMware_bootbank_nsx-host_3.1.2.0.0-7.0.17883598, VMware_bootbank_nsx-ids_3.1.2.0.0-7.0.17883598, VMware_bootbank_nsx-monitoring_3.1.2.0.0-7.0.17883598, VMware_bootbank_nsx-mpa_3.1.2.0.0-7.0.17883598, VMware_bootbank_nsx-nestdb_3.1.2.0.0-7.0.17883598, VMware_bootbank_nsx-netopa_3.1.2.0.0-7.0.17883598, VMware_bootbank_nsx-opsagent_3.1.2.0.0-7.0.17883598, VMware_bootbank_nsx-platform-client_3.1.2.0.0-7.0.17883598, VMware_bootbank_nsx-proto2-libs_3.1.2.0.0-7.0.17883598, VMware_bootbank_nsx-proxy_3.1.2.0.0-7.0.17883598, VMware_bootbank_nsx-python-gevent_1.1.0-15366959, VMware_bootbank_nsx-python-greenlet_0.4.14-16723199, VMware_bootbank_nsx-python-logging_3.1.2.0.0-7.0.17883598, VMware_bootbank_nsx-python-protobuf_2.6.1-16723197, VMware_bootbank_nsx-python-utils_3.1.2.0.0-7.0.17883598, VMware_bootbank_nsx-sfhc_3.1.2.0.0-7.0.17883598, VMware_bootbank_nsx-shared-libs_3.1.2.0.0-7.0.17883598, VMware_bootbank_nsx-vdpi_3.1.2.0.0-7.0.17883598, VMware_bootbank_nsxcli_3.1.2.0.0-7.0.17883598, VMware_bootbank_vsipfwlib_3.1.2.0.0-7.0.17883598
   VIBs Skipped:
強制アンインストール 最後の手段
上記のesxcli software vib removeコマンドでアンインストールできない場合の最後の手段を紹介します。「vSphere クラスタからの NSX-T Data Center のアンインストール」という公式推奨手順でも、「最後の手段」と明記されている、他にアンインストールの方法が見つからない場合の手段です。
「nsxcli -c del nsx」コマンドを実行し、アンインストールを試みます。コマンド実行時のログは/scratch/log/nsxcli.logまたは/var/log/nsxcli.logに出力されます。
[root@esxi182:~] nsxcli -c del nsx


*************** STOP STOP STOP STOP STOP ***************


Carefully read the requirements and limitations of this command:


1. Read NSX-T documentation for 'Remove a Host from NSX-T Data Center or Uninstall NSX-T Data Center Completely'.

2. Deletion of this Transport Node from the NSX-T UI or API failed, and this is the last resort.

3. If this is an ESXi host:

  a. The host must be in maintenance mode.

  b. All resources attached to NSXPGs must be moved out.

If the above conditions for ESXi hosts are not met, the command WILL fail.

4. If this is a Linux host:

  a. If KVM is managing VM tenants then shut them down before running this command.

  b. This command should be run from the host console and may fail if run from an SSH client
     or any other network based shell client.
  c. The 'nsxcli -c del nsx' form of this command is not supported

5. For command progress check /scratch/log/nsxcli.log on ESXi host or /var/log/nsxcli.log on non-ESXi host.


Are you sure you want to remove NSX-T on this host? (yes/no)
アンインストールを続行するか否かを問われますので、yesと返答します。
Are you sure you want to remove NSX-T on this host? (yes/no) yes
もし、アンインストールに失敗した場合は以下のようにエラーメッセージが表示されます。
Are you sure you want to remove NSX-T on this host? (yes/no) yes
Mon Aug 23 2021 UTC 03:35:56.825
% Exception when deleting nsx from host: ' error code: 4 stdout: delete_nsx_instance_from_host.sh: INFO: NSX reset script called with argument fabric_node on nsx-esx delete_nsx_instance_from_host.sh: INFO: Run transport_node reset on ESX node % Failed to remove all host switches or logical switches delete_nsx_instance_from_host.sh: ERROR: Failed to reset nsxa app of nsx-opsagent. Please check ospagent logs for more details. , stderr: Mon Aug 23 2021 UTC 03:36:04.327 ERROR: Failed to reset nsxa app of nsx-opsagent. Please check ospagent logs for more details.'
[root@esxi182:~]
エラーメッセージを見ても原因究明出来ない場合はログを参照します。/scratch/log/nsxcli.logまたは/var/log/nsxcli.logを読みます。エラーの原因は様々ですが、以下のような出力の場合は、メンテナンスモードにする事で対応できる事が分かります。
これは「vSphere クラスタからの NSX-T Data Center のアンインストール」という公式推奨手順の前提条件操作漏れの対応です。手順内では前提条件としてメンテナンスモードにする事が明記されています。
[root@esxi182:~] less /var/log/nsxcli.log

 <omitted>

2021-08-23T03:36:04.331Z 2202713 vmware.runcommand INFO runcommand called with: args = '['/opt/vmware/nsx-cli/bin/nsx-appctl', '-t', '/var/run/vmware/nsx-opsagent/opsagent-cli', 'nsxa/reset']', outfile = 'None', returnoutput = 'True', timeout = '0.0'.
2021-08-23T03:36:04.627Z 2202713 cli.commands.lcp_common.opsagent.client ERROR Failed to invoke opsAgent CLI command, rc: 2, err: ValidateHostForDelNsx() failed: [The host is not and must be in maintenance mode when running NSXCLI 'del nsx'.Please put the host into maintenance mode and retry the NSXCLI command.]; nsx-appctl: /var/run/vmware/nsx-opsagent/opsagent-cli: server returned an error
2021-08-23T03:36:04.630Z 2202713 cli.audit INFO CMD: set service nsx-opsagent nsxa reset (duration: 0.303s), Operation status: CMD_EXECUTED
2021-08-23T03:36:04.631Z 2202713 cli INFO NSX CLI stopped for user: root
2021-08-23T03:36:04.729Z 2202598 cli.commands.host_shared.register WARNING Error in 'nsx environment delete'. error code: 4 stdout: delete_nsx_instance_from_host.sh: INFO: NSX reset script called with argument fabric_node on nsx-esx delete_nsx_instance_from_host.sh: INFO: Run transport_node reset on ESX node % Failed to remove all host switches or logical switches delete_nsx_instance_from_host.sh: ERROR: Failed to reset nsxa app of nsx-opsagent. Please check ospagent logs for more details.  stderr: Mon Aug 23 2021 UTC 03:36:04.327 ERROR: Failed to reset nsxa app of nsx-opsagent. Please check ospagent logs
 for more details.
2021-08-23T03:36:04.733Z 2202598 cli.audit INFO CMD: del nsx (duration: 7.908s), Operation status: CMD_EXECUTED
2021-08-23T03:36:04.735Z 2202598 cli INFO NSX CLI stopped for user: root
[root@esxi182:~]
ESXiホストをメンテナンスモードにします。
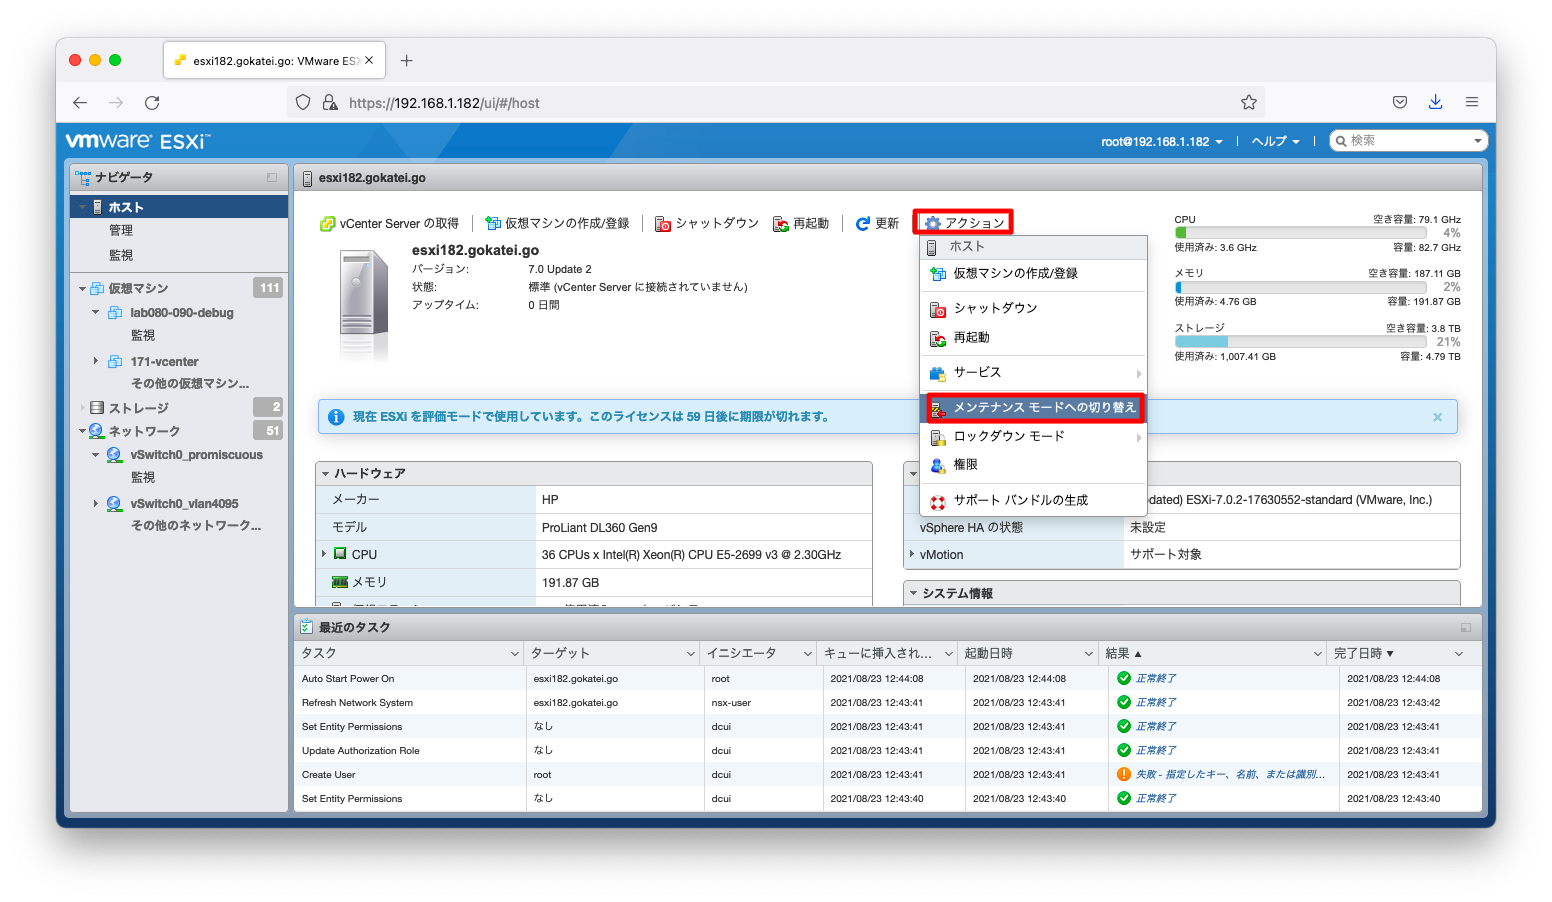
「nsxcli -c del nsx」コマンドの実行を再度試みます。アンインストールに成功した場合はTerminatedと表示されます。
[root@esxi182:~] nsxcli -c del nsx

  <omitted>

Are you sure you want to remove NSX-T on this host? (yes/no) yes
Terminated
[root@esxi182:~]
念の為、NSX-T vibも削除されている事を確認します。
[root@esxi182:~] esxcli software vib list | grep -E 'nsx|vsipfwlib'
[root@esxi182:~]
自動化
vCenter登録
コンピュートマネージャを登録するRest API操作は以下の通りです
curl --request POST -d @- \
  -u admin:P@ssw0rdP@ssw0rd \
  --header "Content-Type:application/json" \
  -k https://192.168.1.121/api/v1/fabric/compute-managers << EOF
{
  "server": "vcenter01.gokatei.go",
  "origin_type": "vCenter",
  "display_name": "vcenter01",
  "credential" : {
    "credential_type" : "UsernamePasswordLoginCredential",
    "username": "administrator@gokatei1.go",
    "password": "P@ssw0rd",
    "thumbprint": "74:6F:8C:6C:E9:96:A8:D1:2A:05:74:81:7D:45:0B:15:FB:B9:85:5E:5C:DE:0E:CF:E4:08:29:09:66:63:9D:27"
  }
}
EOF
vCenterのthumbprintが分からない場合は、thumbprintを指定せずにAPIリスエストを送ると、エラメッセージとしてthumbprintを教えてもらうことができます。
[root@ansible012 ~]# curl --request POST -d @- \
>   -u admin:P@ssw0rdP@ssw0rd \
>   --header "Content-Type:application/json" \
>   -k https://192.168.1.121/api/v1/fabric/compute-managers << EOF
> {
>   "server": "vcenter01.gokatei.go",
>   "origin_type": "vCenter",
>   "credential" : {
>     "credential_type" : "UsernamePasswordLoginCredential",
>     "username": "administrator@gokatei1.go",
>     "password": "P@ssw0rd"
>   }
> }
> EOF
{
  "httpStatus" : "BAD_REQUEST",
  "error_code" : 7057,
  "module_name" : "inventory-mgmt",
  "error_message" : "Compute manager server vcenter01.gokatei.go thumbprint input empty is not valid. Current retrieved compute manager server thumbprint is 74:6F:8C:6C:E9:96:A8:D1:2A:05:74:81:7D:45:0B:15:FB:B9:85:5E:5C:DE:0E:CF:E4:08:29:09:66:63:9D:27 . If correct, please re-submit with this thumbprint",
  "error_data" : {
    "ValidCmThumbPrint" : "74:6F:8C:6C:E9:96:A8:D1:2A:05:74:81:7D:45:0B:15:FB:B9:85:5E:5C:DE:0E:CF:E4:08:29:09:66:63:9D:27"
  }
}[root@ansible012 ~]#
thumbprintとvCenter登録を同時に行う実装例は以下の通りです。
冪等性なし再実行不可です。エラーハンドリングが必要な方は加筆ください。
WORK_FILE=/tmp/nsx_api_work_$$

curl --request POST -d @- \
  -u admin:P@ssw0rdP@ssw0rd \
  --header "Content-Type:application/json" \
  -k https://192.168.1.121/api/v1/fabric/compute-managers \
  << EOF > ${WORK_FILE}
{
  "server": "vcenter01.gokatei.go",
  "origin_type": "vCenter",
  "credential" : {
    "credential_type" : "UsernamePasswordLoginCredential",
    "username": "administrator@gokatei1.go",
    "password": "P@ssw0rd"
  }
}
EOF

VCENTER_THUMB_PRINT=$(cat ${WORK_FILE} | jq -r ".error_data.ValidCmThumbPrint")

curl --request POST -d @- \
  -u admin:P@ssw0rdP@ssw0rd \
  --header "Content-Type:application/json" \
  -k https://192.168.1.121/api/v1/fabric/compute-managers << EOF
{
  "server": "vcenter01.gokatei.go",
  "origin_type": "vCenter",
  "display_name": "vcenter01",
  "credential" : {
    "credential_type" : "UsernamePasswordLoginCredential",
    "username": "administrator@gokatei1.go",
    "password": "P@ssw0rd",
    "thumbprint": "${VCENTER_THUMB_PRINT}"
  }
}
EOF

