NSX-Tの負荷分散構成について考察します。このページではヴイエムウェア社が非推奨としているmLAGを使用したホストトランスポートノードとNSX Edgeとの間の冗長構成について説明します。mLAGを使用するためには一定価格帯以上のネットワーク機器を購入する必要があるものの、mLAGを使用することでNSX-Tの設定を非常に簡単にすることができます。
「Physical Network Design Decisions」によると、「No EtherChannel (LAG/vPC) configuration for ESXi host uplinks」と書かれています。
構成図
「NSX-T アップリンクの負荷分散(mLAGあり)」「NSX-T オーバーレイの負荷分散(mLAGあり)」の併せて2記事で以下のような構成を組み上げます。mLAGなしの場合と比較すると、かなり単純な構成です。
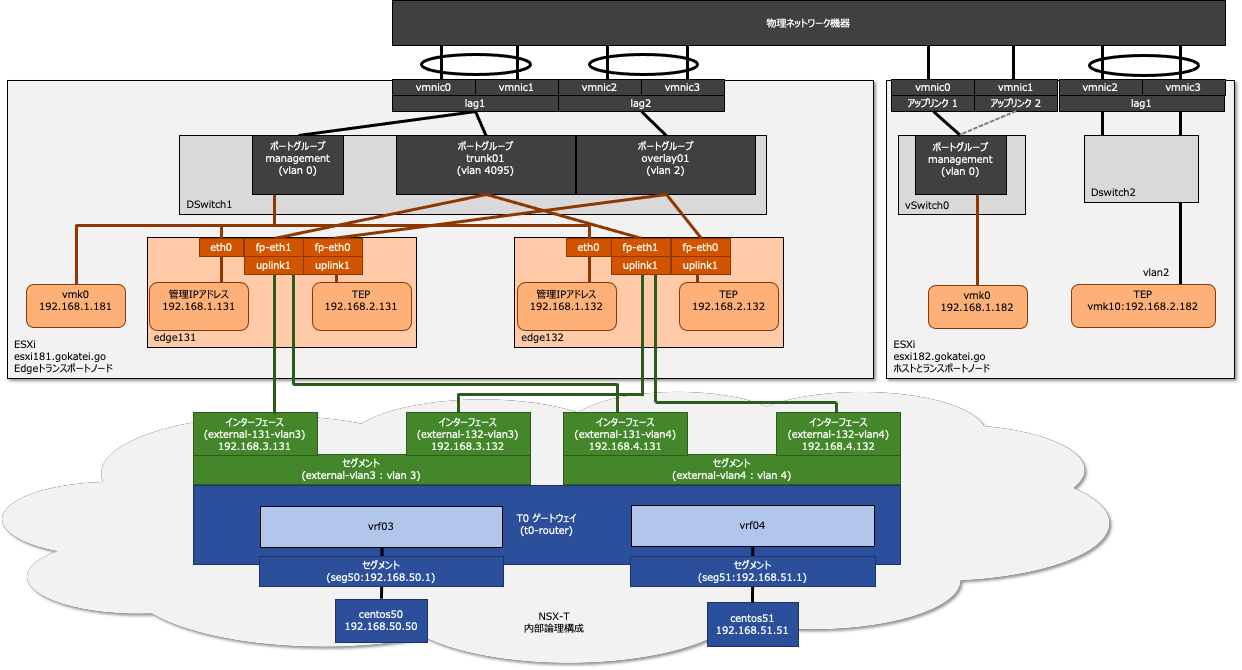
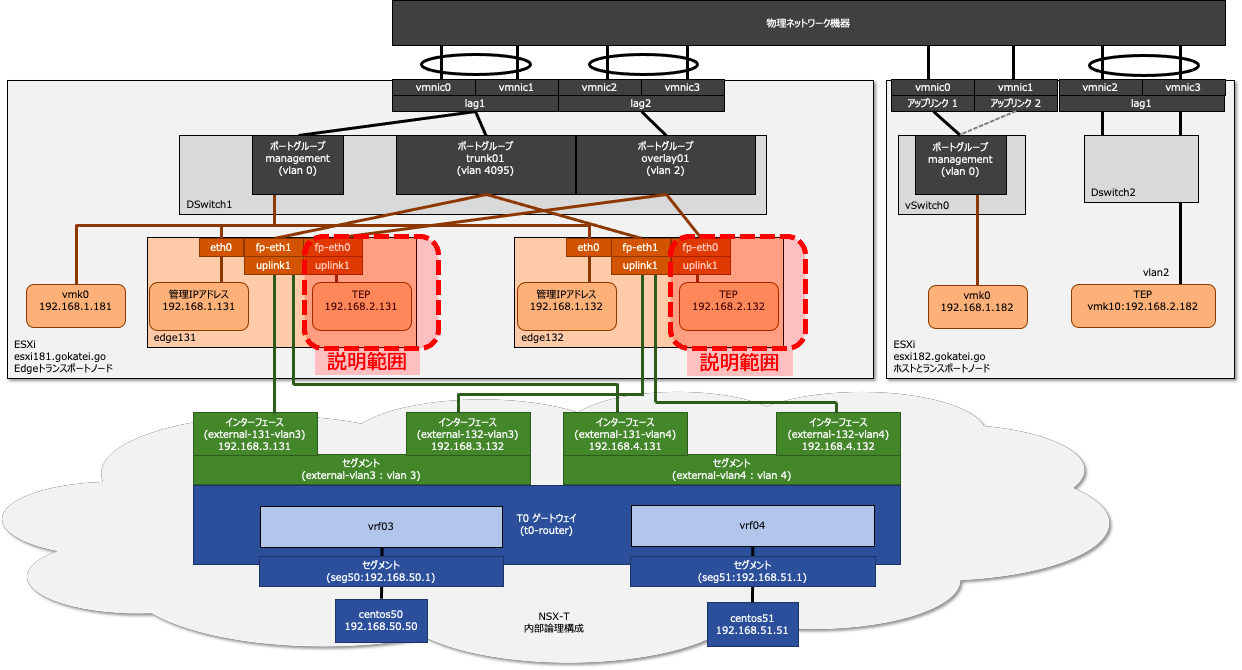
このページでは赤枠で囲まれた部分のホストトランスポートノードとNSX Edgeの負荷分散構成を説明します。
前提条件
ポートグループ
負荷分散と冗長化を実現のmLAGは設定済の状態で説明します。ESXi側のLAG設定は「分散仮想スイッチ(VDS)の冗長化設定とロードバランシングアルゴリズムまとめ」を参照ください。
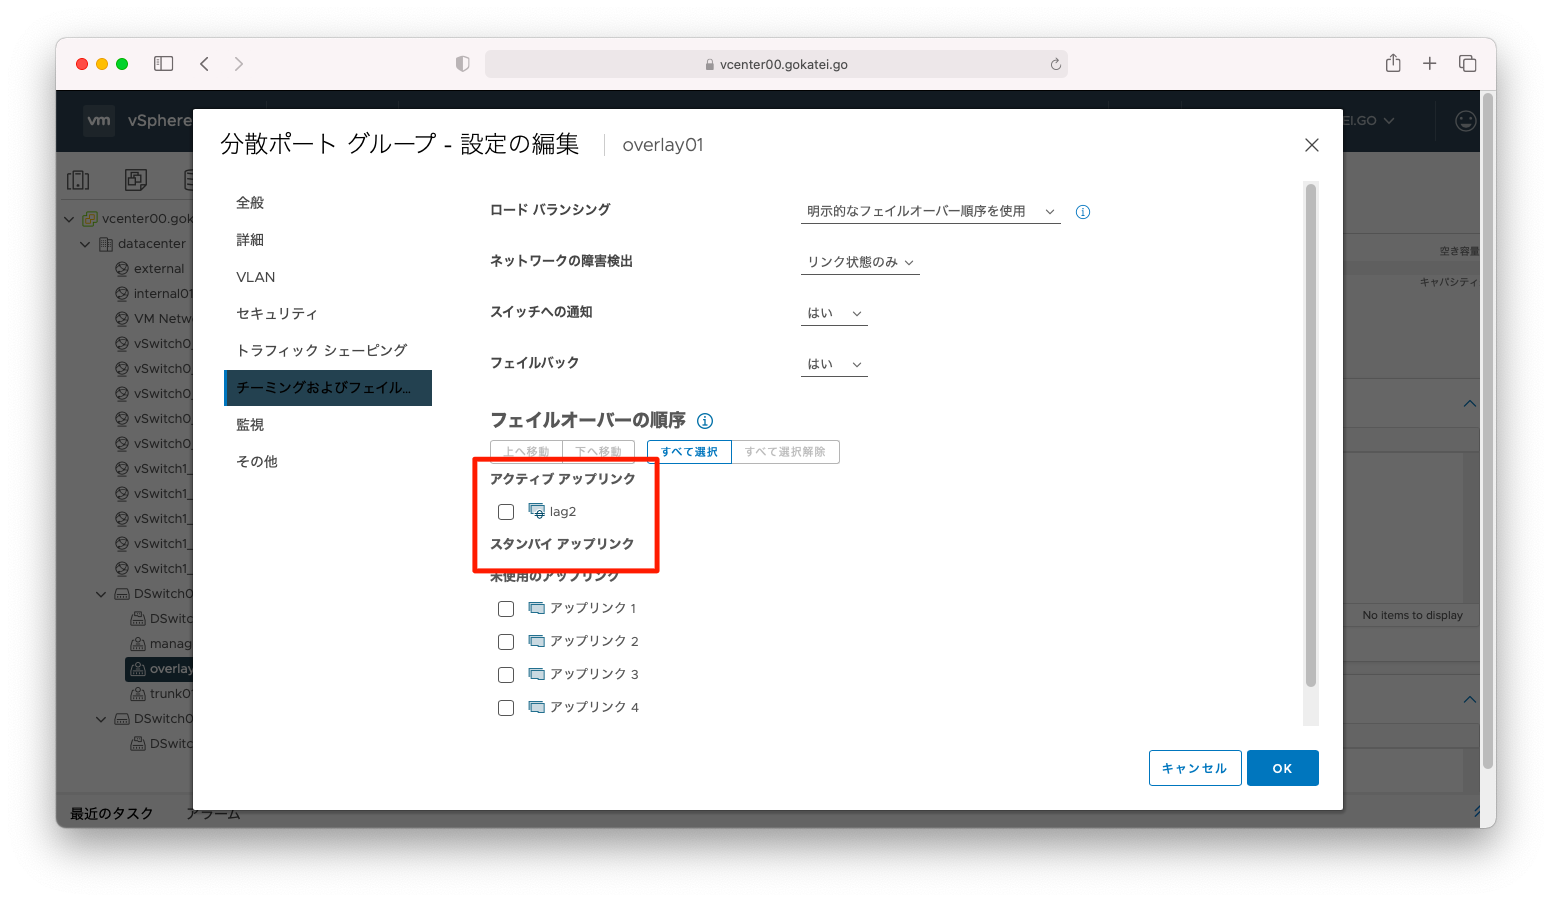
ポートグループoverlay01のアップリンクにLAG(LACP)を指定します。
オーバーレイトランスポートゾーン
ホストトランスポートノードとNSX Edge間でトンネルを確立するためのオーバーレイトランスポートゾーンは作成済みのものとします。

トランスポートゾーンの設定全文は以下の通りです。
トランスポートゾーン
administrator@ubuntu106:~$ curl --silent --request GET \
>   -u admin:P@ssw0rdP@ssw0rd \
>   --header "Content-Type:application/json" \
>   -k https://192.168.1.121/api/v1/transport-zones \
>   | jq ' .results[] | select ( .display_name == "tz-overlay-01" ) '
{
  "transport_type": "OVERLAY",
  "host_switch_name": "nsxDefaultHostSwitch",
  "host_switch_id": "70e7e8b1-78c6-4ee0-adba-3382bac3a264",
  "transport_zone_profile_ids": [
    {
      "resource_type": "BfdHealthMonitoringProfile",
      "profile_id": "52035bb3-ab02-4a08-9884-18631312e50a"
    }
  ],
  "host_switch_mode": "STANDARD",
  "nested_nsx": false,
  "is_default": false,
  "resource_type": "TransportZone",
  "id": "c1e592c1-4865-491e-a5e4-07a305151889",
  "display_name": "tz-overlay-01",
  "_create_user": "admin",
  "_create_time": 1620828599590,
  "_last_modified_user": "admin",
  "_last_modified_time": 1620828599590,
  "_system_owned": false,
  "_protection": "NOT_PROTECTED",
  "_revision": 0,
  "_schema": "/v1/schema/TransportZone"
}
ホストトランスポートノード側の設定
アップリンクプロファイル
アップリンクプロファイルは、アップリンクが1つのみの設定を作成します。冗長化および負荷分散はVDS(分散仮想スイッチ)のLACPによって実現されるため、NSX-T側の設定は非常に単純になります。
「NSX-T オーバーレイの負荷分散(mLAGなし multiple TEP)」で説明したようなTEPごとに負荷分散されるような設定は必要ありません。
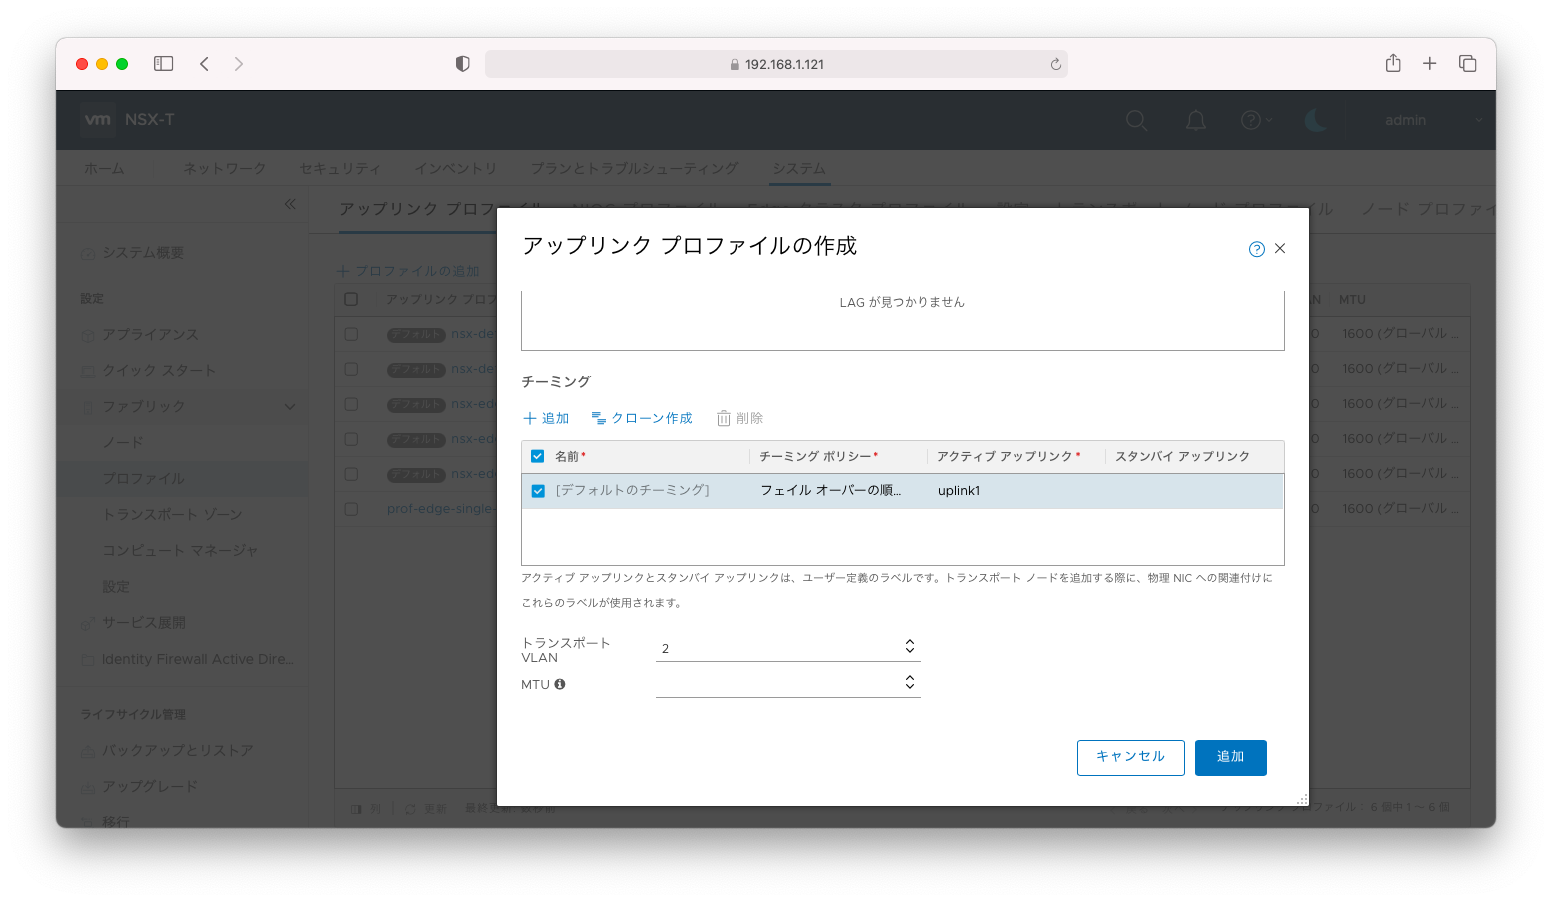
アップリンクプロファイルの設定全文は以下の通りです。
ESXi用 アップリンクプロファイル
administrator@ubuntu106:~$ curl --silent --request GET \
>   -u admin:P@ssw0rdP@ssw0rd \
>   --header "Content-Type:application/json" \
>   -k https://192.168.1.121/api/v1/host-switch-profiles \
>   | jq ' .results[] | select ( .display_name == "prof-host-single-vlan-0002" ) '
{
  "teaming": {
    "policy": "FAILOVER_ORDER",
    "active_list": [
      {
        "uplink_name": "uplink1",
        "uplink_type": "PNIC"
      }
    ]
  },
  "named_teamings": [],
  "transport_vlan": 2,
  "overlay_encap": "GENEVE",
  "resource_type": "UplinkHostSwitchProfile",
  "id": "b7ec8f38-54cb-49ab-8b69-e9bd4bdd46ab",
  "display_name": "prof-host-single-vlan-0002",
  "description": "",
  "tags": [],
  "_create_user": "admin",
  "_create_time": 1620798845872,
  "_last_modified_user": "admin",
  "_last_modified_time": 1620798845872,
  "_system_owned": false,
  "_protection": "NOT_PROTECTED",
  "_revision": 0
}
ノードスイッチの設定
ESXiに対してノードスイッチを設定します。
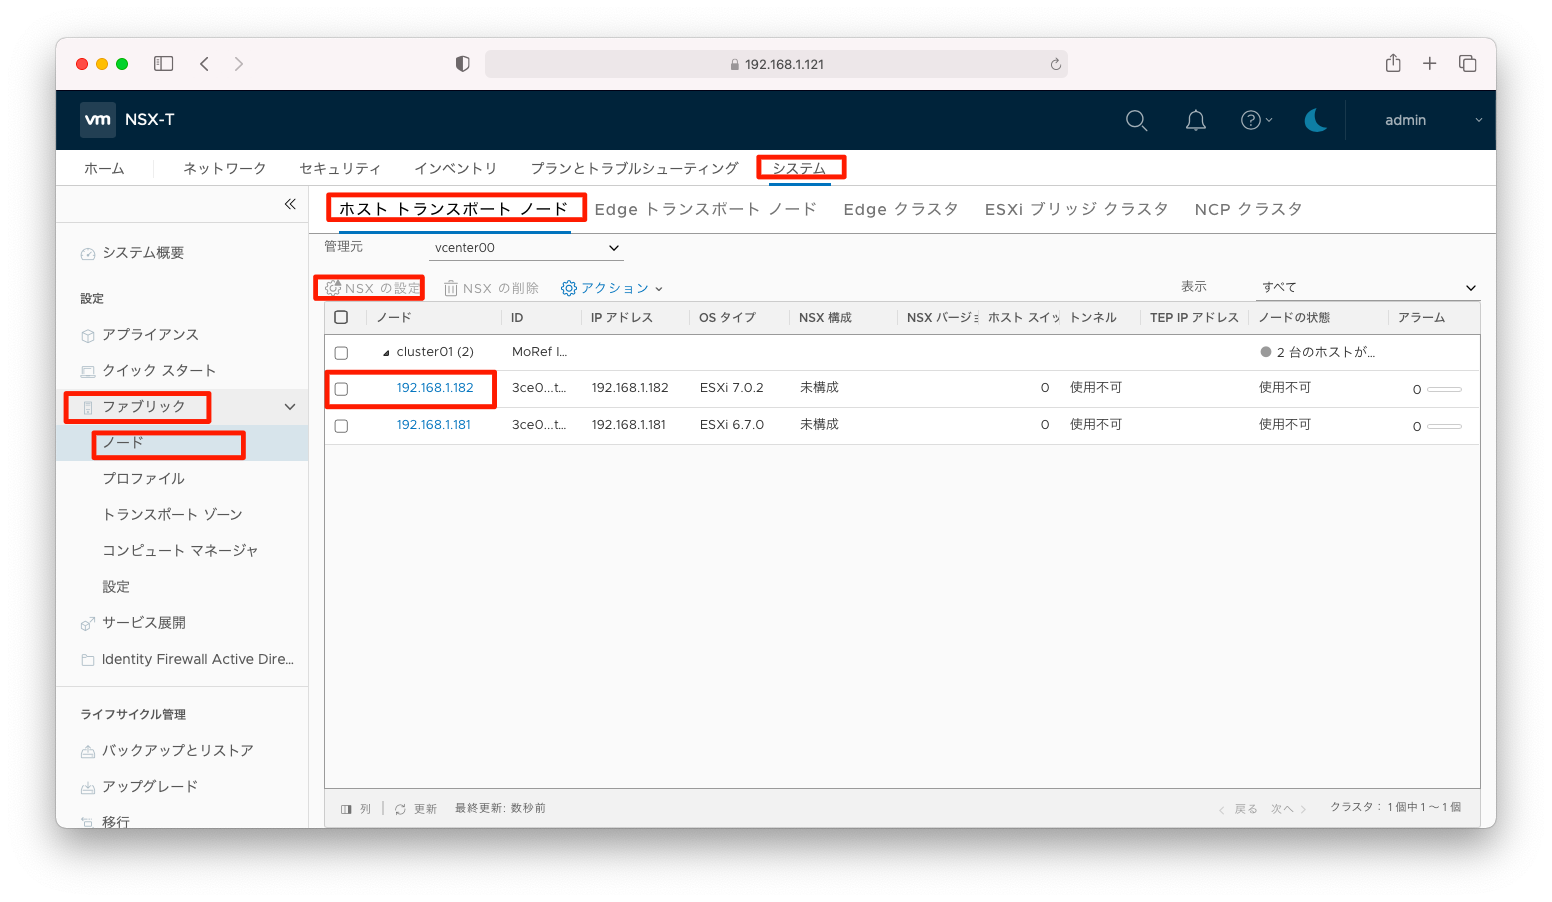
「NSX-T オーバーレイの負荷分散(mLAGなし multiple TEP)」で説明したような複数IPアドレス割り当てのような複雑な考慮は必要ありません。注意すべき点はアップリンクプロファイルとVDSのlagを紐づけることくらいです。
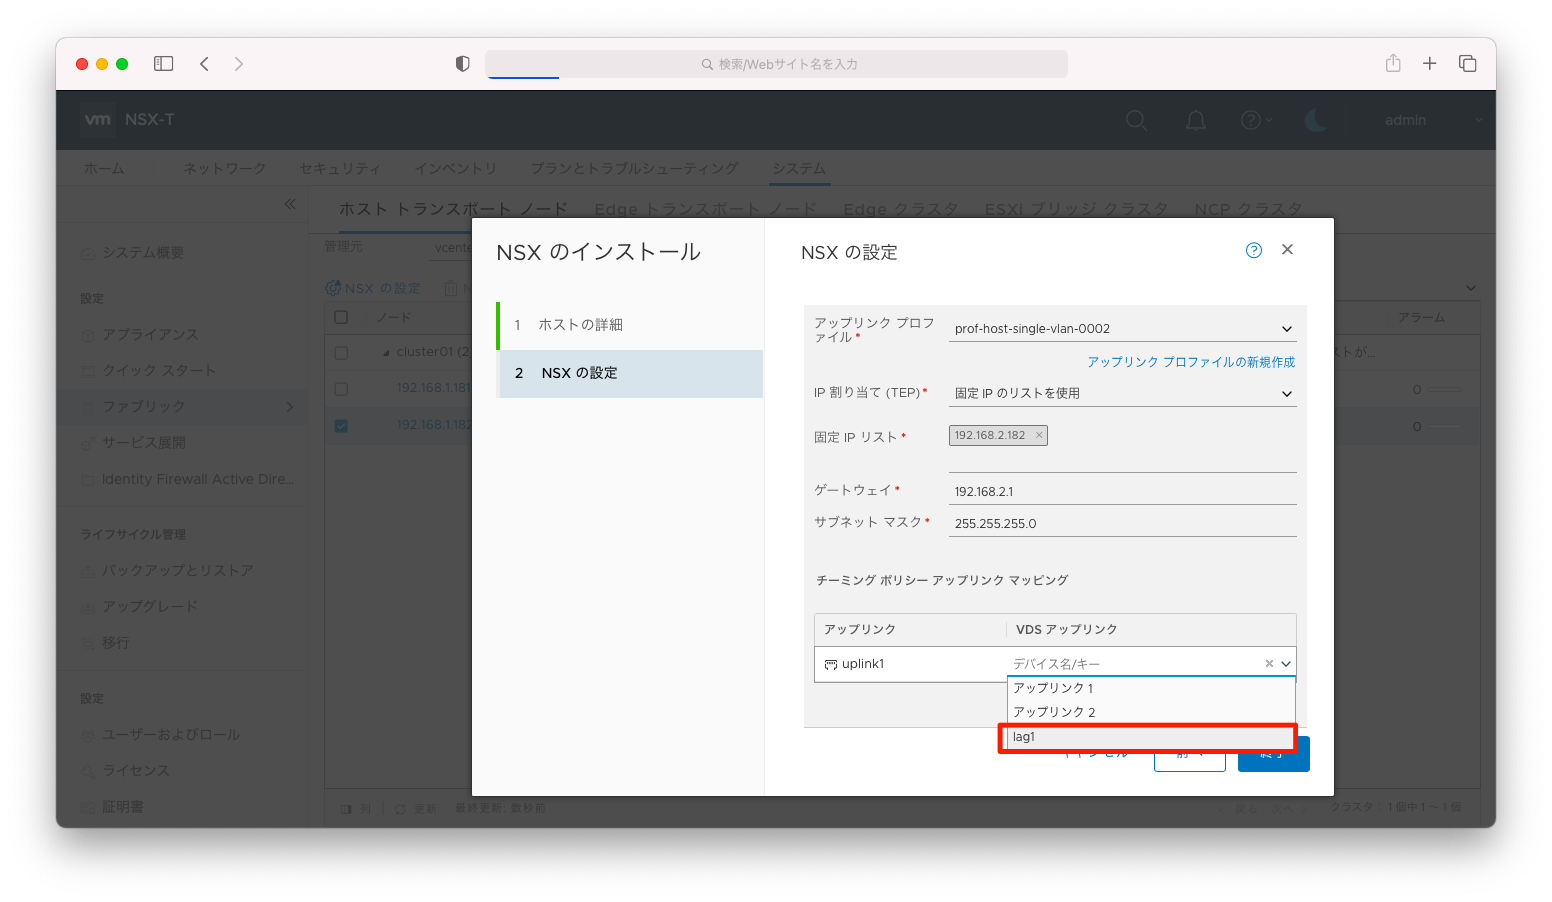
ノードスイッチの設定全文は以下の通りです。
ESXi ノードスイッチ
administrator@ubuntu106:~$ curl --silent --request GET \
>   -u admin:P@ssw0rdP@ssw0rd \
>   --header "Content-Type:application/json" \
>   -k https://192.168.1.121/api/v1/transport-nodes \
>   | jq ' .results[] | select ( .display_name == "192.168.1.182" ) '
{
  "node_id": "ed92bb57-ed30-4133-8404-123338164765",
  "host_switch_spec": {
    "host_switches": [
      {
        "host_switch_name": "DSwitch02",
        "host_switch_id": "50 33 a4 6b 8e dc a1 19-f3 fc 59 3f c7 d2 a9 62",
        "host_switch_type": "VDS",
        "host_switch_mode": "STANDARD",
        "host_switch_profile_ids": [
          {
            "key": "UplinkHostSwitchProfile",
            "value": "b7ec8f38-54cb-49ab-8b69-e9bd4bdd46ab"
          }
        ],
        "pnics": [],
        "uplinks": [
          {
            "vds_lag_name": "lag1",
            "uplink_name": "uplink1"
          }
        ],
        "is_migrate_pnics": false,
        "ip_assignment_spec": {
          "ip_list": [
            "192.168.2.182"
          ],
          "default_gateway": "192.168.2.1",
          "subnet_mask": "255.255.255.0",
          "resource_type": "StaticIpListSpec"
        },
        "cpu_config": [],
        "transport_zone_endpoints": [
          {
            "transport_zone_id": "c1e592c1-4865-491e-a5e4-07a305151889",
            "transport_zone_profile_ids": [
              {
                "resource_type": "BfdHealthMonitoringProfile",
                "profile_id": "52035bb3-ab02-4a08-9884-18631312e50a"
              }
            ]
          }
        ],
        "vmk_install_migration": [],
        "pnics_uninstall_migration": [],
        "vmk_uninstall_migration": [],
        "not_ready": false
      }
    ],
    "resource_type": "StandardHostSwitchSpec"
  },
  "transport_zone_endpoints": [],
  "maintenance_mode": "DISABLED",
  "node_deployment_info": {
    "os_type": "ESXI",
    "os_version": "",
    "managed_by_server": "",
    "discovered_node_id": "3ce03caf-22e3-4198-888d-8ccc6cd41fa4:host-14",
    "resource_type": "HostNode",
    "id": "ed92bb57-ed30-4133-8404-123338164765",
    "display_name": "192.168.1.182",
    "external_id": "ed92bb57-ed30-4133-8404-123338164765",
    "fqdn": "",
    "ip_addresses": [
      "192.168.1.182"
    ],
    "discovered_ip_addresses": [],
    "_create_user": "admin",
    "_create_time": 1620829810627,
    "_last_modified_user": "admin",
    "_last_modified_time": 1620829810627,
    "_protection": "NOT_PROTECTED",
    "_revision": 0
  },
  "is_overridden": false,
  "resource_type": "TransportNode",
  "id": "ed92bb57-ed30-4133-8404-123338164765",
  "display_name": "192.168.1.182",
  "description": "",
  "tags": [],
  "_create_user": "admin",
  "_create_time": 1620829814478,
  "_last_modified_user": "admin",
  "_last_modified_time": 1620829814478,
  "_system_owned": false,
  "_protection": "NOT_PROTECTED",
  "_revision": 0
}
Edgeトランスポートノード側の設定
アップリンクプロファイル
アップリンクプロファイルは、アップリンクが1つのみの設定を作成します。冗長化および負荷分散はVDS(分散仮想スイッチ)のLACPによって実現されるため、NSX-T側の設定は非常に単純になります。
「NSX-T オーバーレイの負荷分散(mLAGなし multiple TEP)」で説明したようなTEPごとに負荷分散されるような設定は必要ありません。
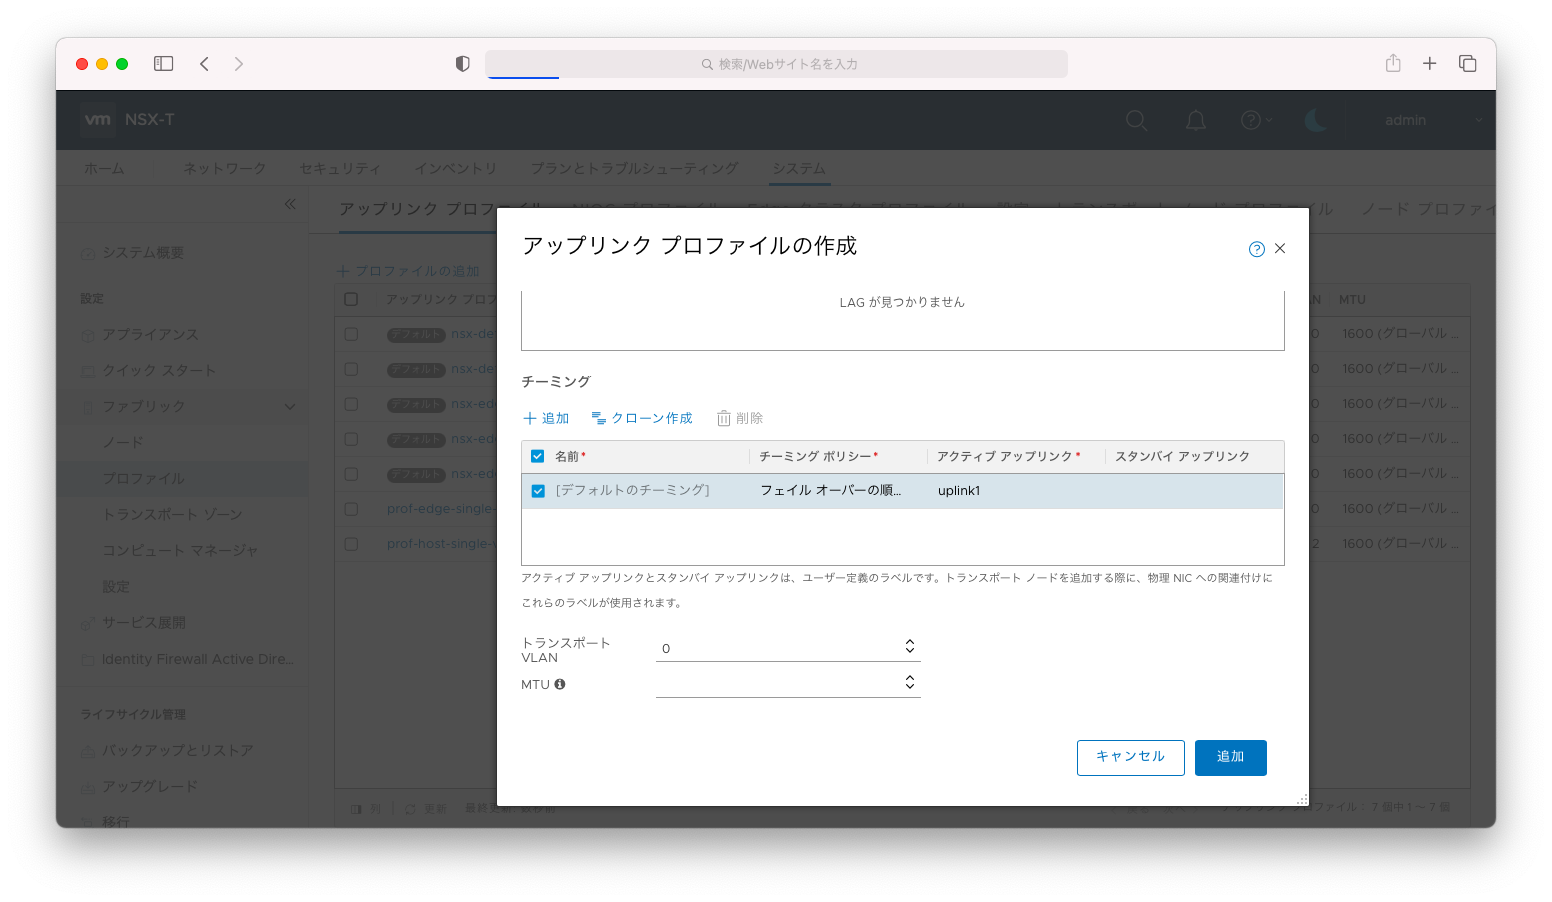
アップリンクプロファイルの設定全文は以下の通りです。
NSX Edge用 アップリンクプロファイル
administrator@ubuntu106:~$ curl --silent --request GET \
>  -u admin:P@ssw0rdP@ssw0rd \
>   --header "Content-Type:application/json" \
>   -k https://192.168.1.121/api/v1/host-switch-profiles \
>   | jq ' .results[] | select ( .display_name == "prof-edge-single-vlan-0000" ) '
{
  "teaming": {
    "policy": "FAILOVER_ORDER",
    "active_list": [
      {
        "uplink_name": "uplink1",
        "uplink_type": "PNIC"
      }
    ]
  },
  "named_teamings": [],
  "transport_vlan": 0,
  "overlay_encap": "GENEVE",
  "resource_type": "UplinkHostSwitchProfile",
  "id": "f18c19bc-42c1-4979-a83e-a9dfbf92b593",
  "display_name": "prof-edge-single-vlan-0000",
  "description": "",
  "tags": [],
  "_create_user": "admin",
  "_create_time": 1620830411668,
  "_last_modified_user": "admin",
  "_last_modified_time": 1620830411668,
  "_system_owned": false,
  "_protection": "NOT_PROTECTED",
  "_revision": 0
}
ノードスイッチの設定
ESXiに対してノードスイッチを設定します。
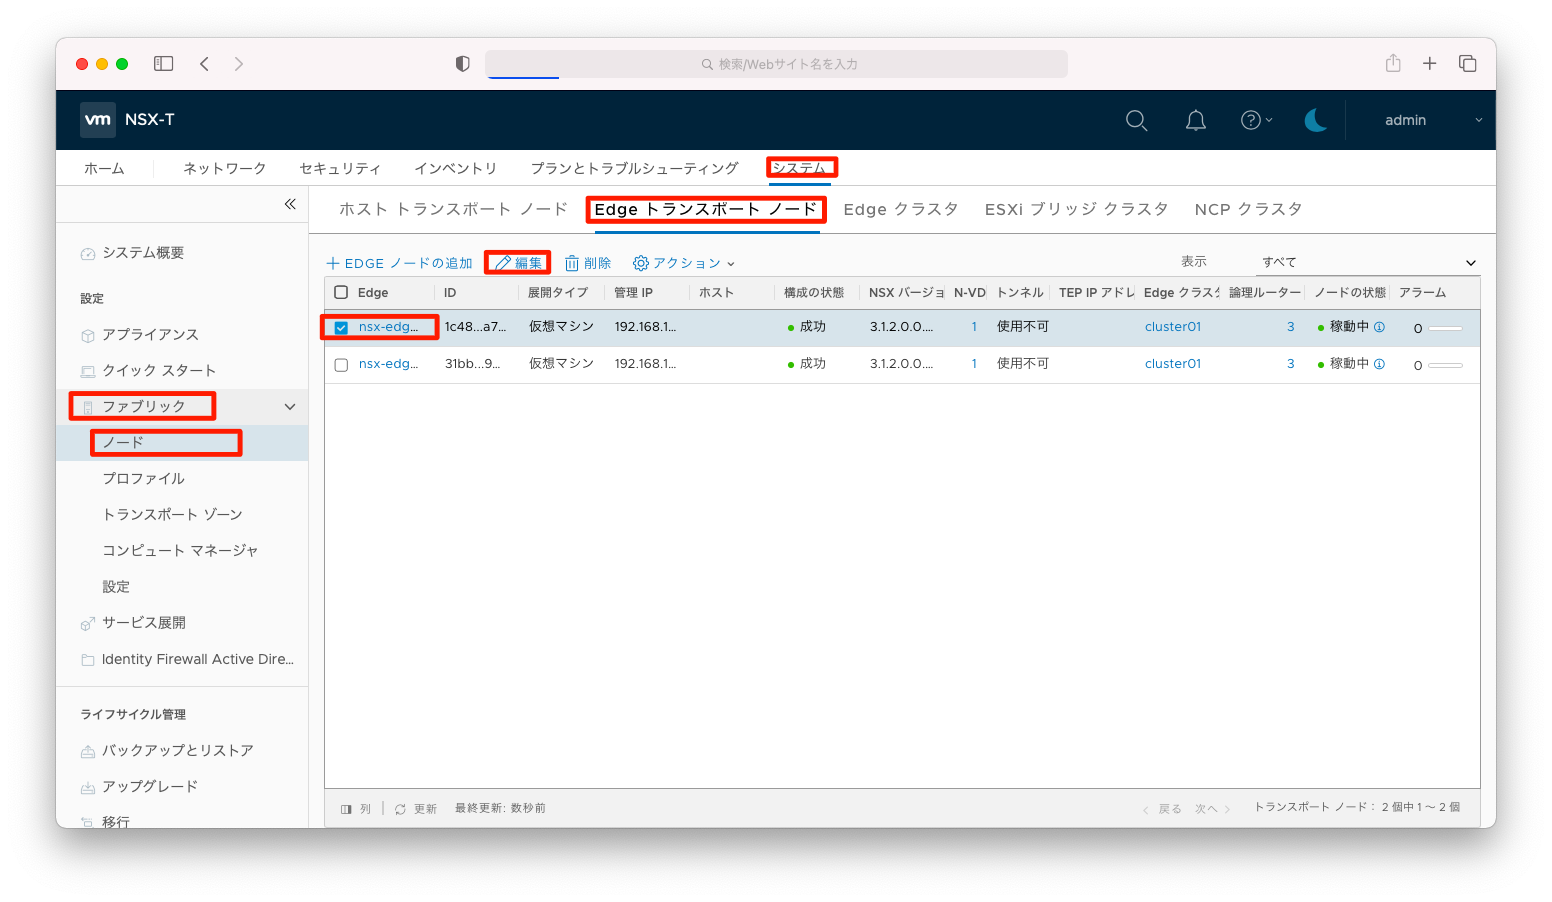
「NSX-T オーバーレイの負荷分散(mLAGなし multiple TEP)」で説明したような複数IPアドレス割り当てのような複雑な考慮は必要ありません。
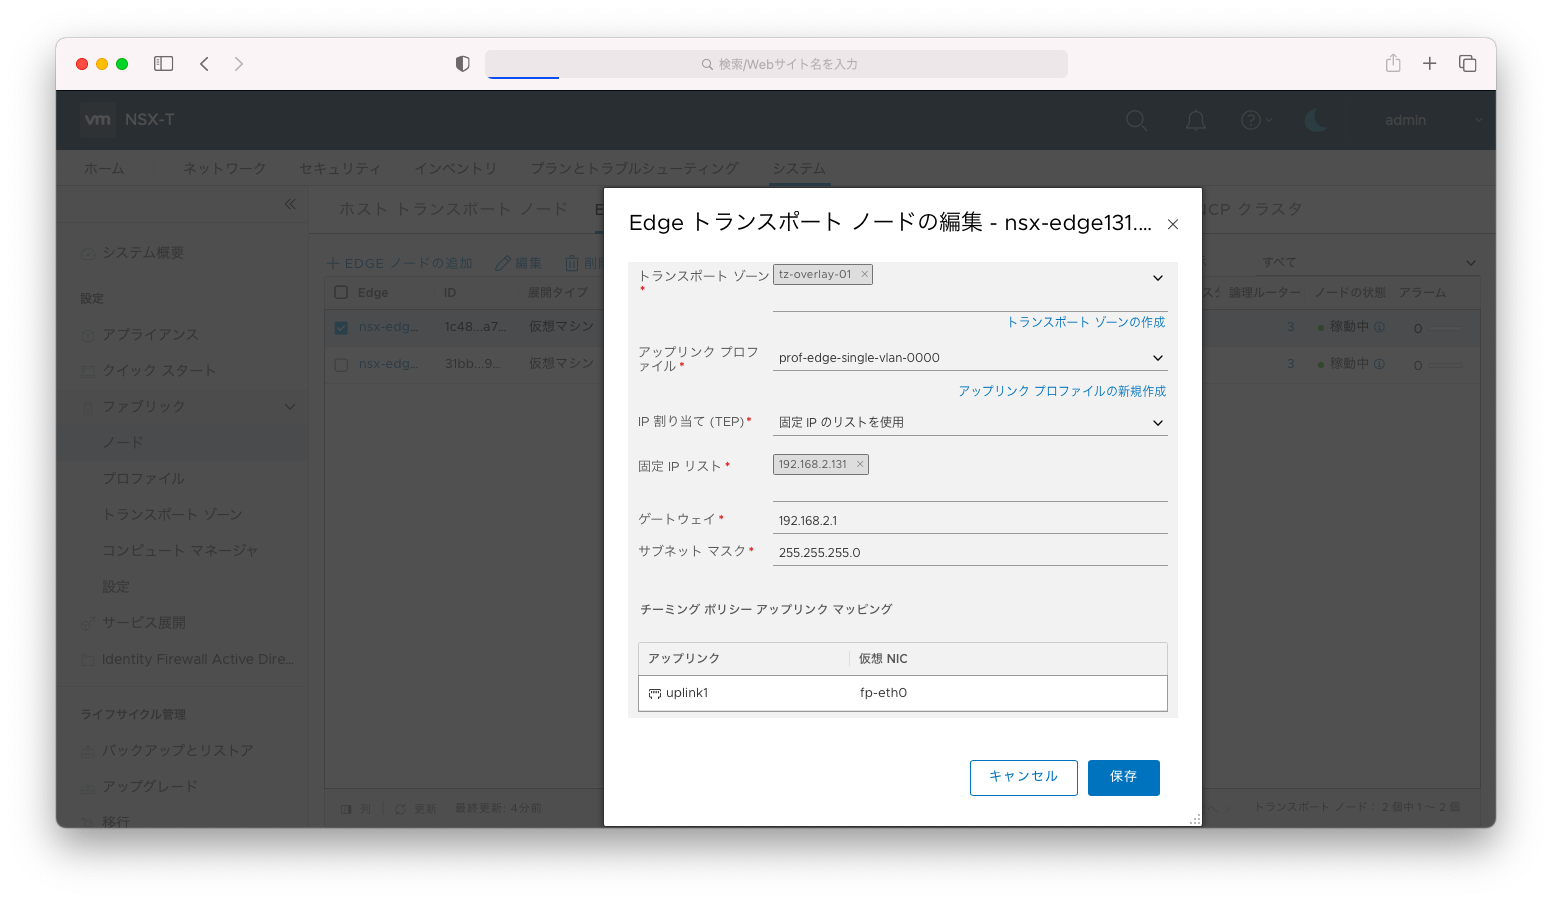
ノードスイッチの設定全文は以下の通りです。
NSX Edge ノードスイッチ
administrator@ubuntu106:~$ curl --silent --request GET \
>   -u admin:P@ssw0rdP@ssw0rd \
>   --header "Content-Type:application/json" \
>   -k https://192.168.1.121/api/v1/transport-nodes \
>   | jq ' .results[] | select ( .display_name == "nsx-edge131.gokatei.go" ) '
{
  "node_id": "1c485f98-b2d6-11eb-9437-005056b3a7a9",
  "host_switch_spec": {
    "host_switches": [
      {
        "host_switch_name": "nsxHostSwitchVlan",
        "host_switch_id": "4630b8f0-547f-4888-8246-8a63c4e40c7f",
        "host_switch_type": "NVDS",
        "host_switch_mode": "STANDARD",
        "host_switch_profile_ids": [
          {
            "key": "UplinkHostSwitchProfile",
            "value": "c8abbf8b-9796-4e3f-bab4-08e51bf7526c"
          },
          {
            "key": "LldpHostSwitchProfile",
            "value": "9e0b4d2d-d155-4b4b-8947-fbfe5b79f7cb"
          }
        ],
        "pnics": [
          {
            "device_name": "fp-eth1",
            "uplink_name": "uplink1"
          }
        ],
        "is_migrate_pnics": false,
        "ip_assignment_spec": {
          "resource_type": "AssignedByDhcp"
        },
        "cpu_config": [],
        "transport_zone_endpoints": [
          {
            "transport_zone_id": "f1fffe2f-9d35-4ee1-952a-31dab7cbaf10",
            "transport_zone_profile_ids": [
              {
                "resource_type": "BfdHealthMonitoringProfile",
                "profile_id": "52035bb3-ab02-4a08-9884-18631312e50a"
              }
            ]
          }
        ],
        "vmk_install_migration": [],
        "pnics_uninstall_migration": [],
        "vmk_uninstall_migration": [],
        "not_ready": false
      },
      {
        "host_switch_name": "nsxHostSwitchOverlay",
        "host_switch_id": "f0cf8ecf-5492-4254-b622-d37d06fb1a92",
        "host_switch_type": "NVDS",
        "host_switch_mode": "STANDARD",
        "host_switch_profile_ids": [
          {
            "key": "UplinkHostSwitchProfile",
            "value": "f18c19bc-42c1-4979-a83e-a9dfbf92b593"
          },
          {
            "key": "LldpHostSwitchProfile",
            "value": "9e0b4d2d-d155-4b4b-8947-fbfe5b79f7cb"
          }
        ],
        "pnics": [
          {
            "device_name": "fp-eth0",
            "uplink_name": "uplink1"
          }
        ],
        "is_migrate_pnics": false,
        "ip_assignment_spec": {
          "ip_list": [
            "192.168.2.131"
          ],
          "default_gateway": "192.168.2.1",
          "subnet_mask": "255.255.255.0",
          "resource_type": "StaticIpListSpec"
        },
        "cpu_config": [],
        "transport_zone_endpoints": [
          {
            "transport_zone_id": "c1e592c1-4865-491e-a5e4-07a305151889",
            "transport_zone_profile_ids": [
              {
                "resource_type": "BfdHealthMonitoringProfile",
                "profile_id": "52035bb3-ab02-4a08-9884-18631312e50a"
              }
            ]
          }
        ],
        "vmk_install_migration": [],
        "pnics_uninstall_migration": [],
        "vmk_uninstall_migration": [],
        "not_ready": false
      }
    ],
    "resource_type": "StandardHostSwitchSpec"
  },
  "transport_zone_endpoints": [],
  "maintenance_mode": "DISABLED",
  "node_deployment_info": {
    "deployment_type": "VIRTUAL_MACHINE",
    "node_settings": {
      "hostname": "nsx-edge131.gokatei.go",
      "search_domains": [
        "gokatei.go"
      ],
      "ntp_servers": [
        "192.168.1.221"
      ],
      "dns_servers": [
        "192.168.1.221",
        "192.168.1.1"
      ],
      "enable_ssh": true,
      "allow_ssh_root_login": false
    },
    "resource_type": "EdgeNode",
    "id": "1c485f98-b2d6-11eb-9437-005056b3a7a9",
    "display_name": "nsx-edge131.gokatei.go",
    "description": "",
    "external_id": "1c485f98-b2d6-11eb-9437-005056b3a7a9",
    "ip_addresses": [
      "192.168.1.131"
    ],
    "_create_user": "admin",
    "_create_time": 1620821829291,
    "_last_modified_user": "admin",
    "_last_modified_time": 1620830580907,
    "_system_owned": false,
    "_protection": "NOT_PROTECTED",
    "_revision": 2
  },
  "is_overridden": false,
  "failure_domain_id": "4fc1e3b0-1cd4-4339-86c8-f76baddbaafb",
  "resource_type": "TransportNode",
  "id": "1c485f98-b2d6-11eb-9437-005056b3a7a9",
  "display_name": "nsx-edge131.gokatei.go",
  "description": "",
  "tags": [],
  "_create_user": "admin",
  "_create_time": 1620821829581,
  "_last_modified_user": "admin",
  "_last_modified_time": 1620830580923,
  "_system_owned": false,
  "_protection": "NOT_PROTECTED",
  "_revision": 2
}
動作確認
セグメントと仮想マシンの作成
ホストトランスポートノードとNSX Edgeの間のトンネルを確立するには、NSX-Tでセグメントを作成し、そのセグメントに属す仮想マシンを起動しなければなりません。
まずは動作確認用のセグメントを作成します。
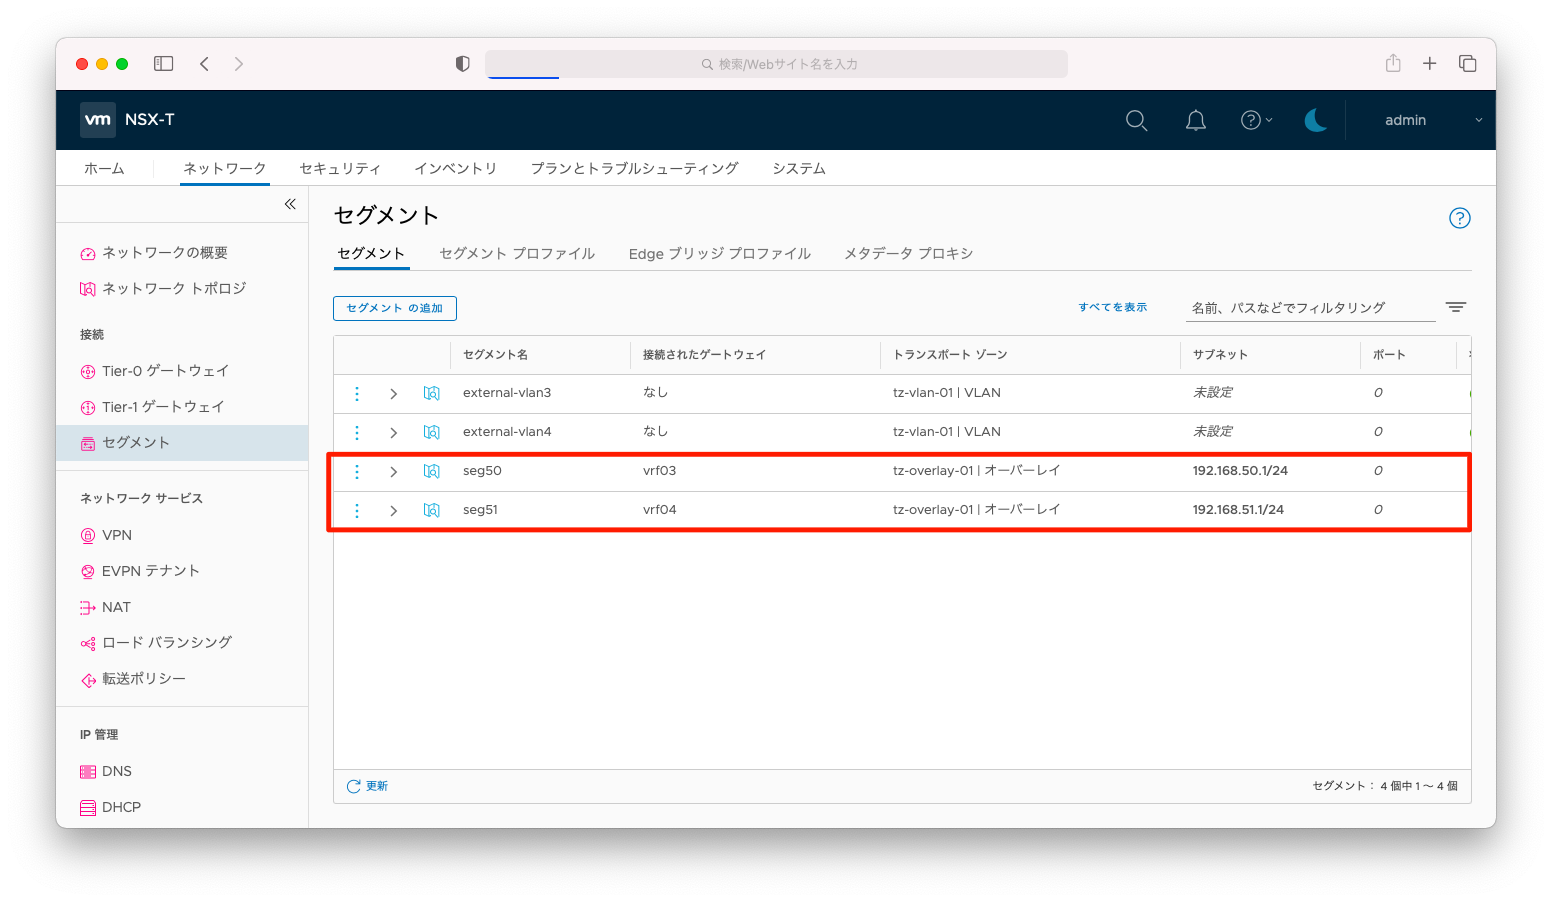
セグメントの設定全文は以下の通りです。
セグメント
administrator@ubuntu106:~$ curl --silent --request GET \
>   -u admin:P@ssw0rdP@ssw0rd \
>   --header "Content-Type:application/json" \
>   -k https://192.168.1.121/policy/api/v1/infra/segments \
>   | jq ' .results[] | select ( .display_name | startswith("seg") ) '
{
  "type": "ROUTED",
  "subnets": [
    {
      "gateway_address": "192.168.50.1/24",
      "network": "192.168.50.0/24"
    }
  ],
  "connectivity_path": "/infra/tier-0s/vrf03",
  "vlan_ids": [
    "0"
  ],
  "transport_zone_path": "/infra/sites/default/enforcement-points/default/transport-zones/c1e592c1-4865-491e-a5e4-07a305151889",
  "advanced_config": {
    "address_pool_paths": [],
    "hybrid": false,
    "inter_router": false,
    "local_egress": false,
    "urpf_mode": "STRICT",
    "connectivity": "ON"
  },
  "admin_state": "UP",
  "replication_mode": "MTEP",
  "resource_type": "Segment",
  "id": "seg50",
  "display_name": "seg50",
  "path": "/infra/segments/seg50",
  "relative_path": "seg50",
  "parent_path": "/infra",
  "unique_id": "88b4a36a-2998-4ec5-b682-ccd961a387e2",
  "marked_for_delete": false,
  "overridden": false,
  "_create_user": "admin",
  "_create_time": 1620831035823,
  "_last_modified_user": "admin",
  "_last_modified_time": 1620831077081,
  "_system_owned": false,
  "_protection": "NOT_PROTECTED",
  "_revision": 1
}
{
  "type": "ROUTED",
  "subnets": [
    {
      "gateway_address": "192.168.51.1/24",
      "network": "192.168.51.0/24"
    }
  ],
  "connectivity_path": "/infra/tier-0s/vrf04",
  "vlan_ids": [
    "0"
  ],
  "transport_zone_path": "/infra/sites/default/enforcement-points/default/transport-zones/c1e592c1-4865-491e-a5e4-07a305151889",
  "advanced_config": {
    "address_pool_paths": [],
    "hybrid": false,
    "inter_router": false,
    "local_egress": false,
    "urpf_mode": "STRICT",
    "connectivity": "ON"
  },
  "admin_state": "UP",
  "replication_mode": "MTEP",
  "resource_type": "Segment",
  "id": "seg51",
  "display_name": "seg51",
  "path": "/infra/segments/seg51",
  "relative_path": "seg51",
  "parent_path": "/infra",
  "unique_id": "7a986169-c464-48f7-8235-702fcd470dae",
  "marked_for_delete": false,
  "overridden": false,
  "_create_user": "admin",
  "_create_time": 1620831061560,
  "_last_modified_user": "admin",
  "_last_modified_time": 1620831061575,
  "_system_owned": false,
  "_protection": "NOT_PROTECTED",
  "_revision": 0
}
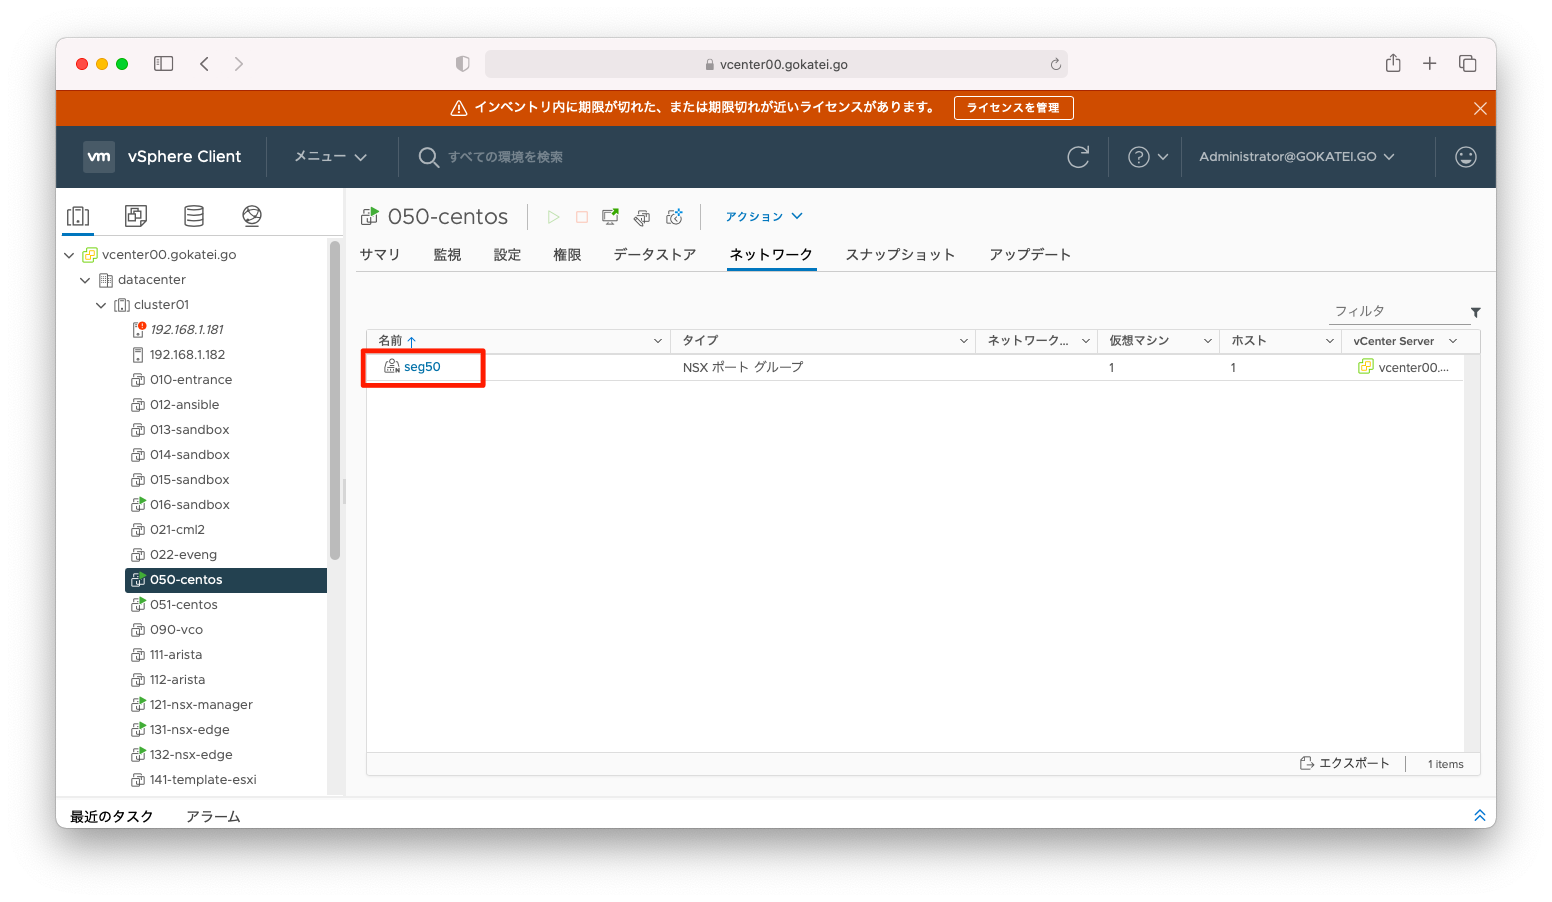
次に動作確認用の仮想マシンを作成し、これを起動します。
ルーティング
物理ネットワーク機器とNSX-Tの間でルーティングを設定し、仮想マシン間で疎通可能にします。設定方法は「NSX-T 3.1.2 最小限構成のインストール方法 (7/7)」などを参照ください。
NSX-T側にBGP neighborの設定を入れます。
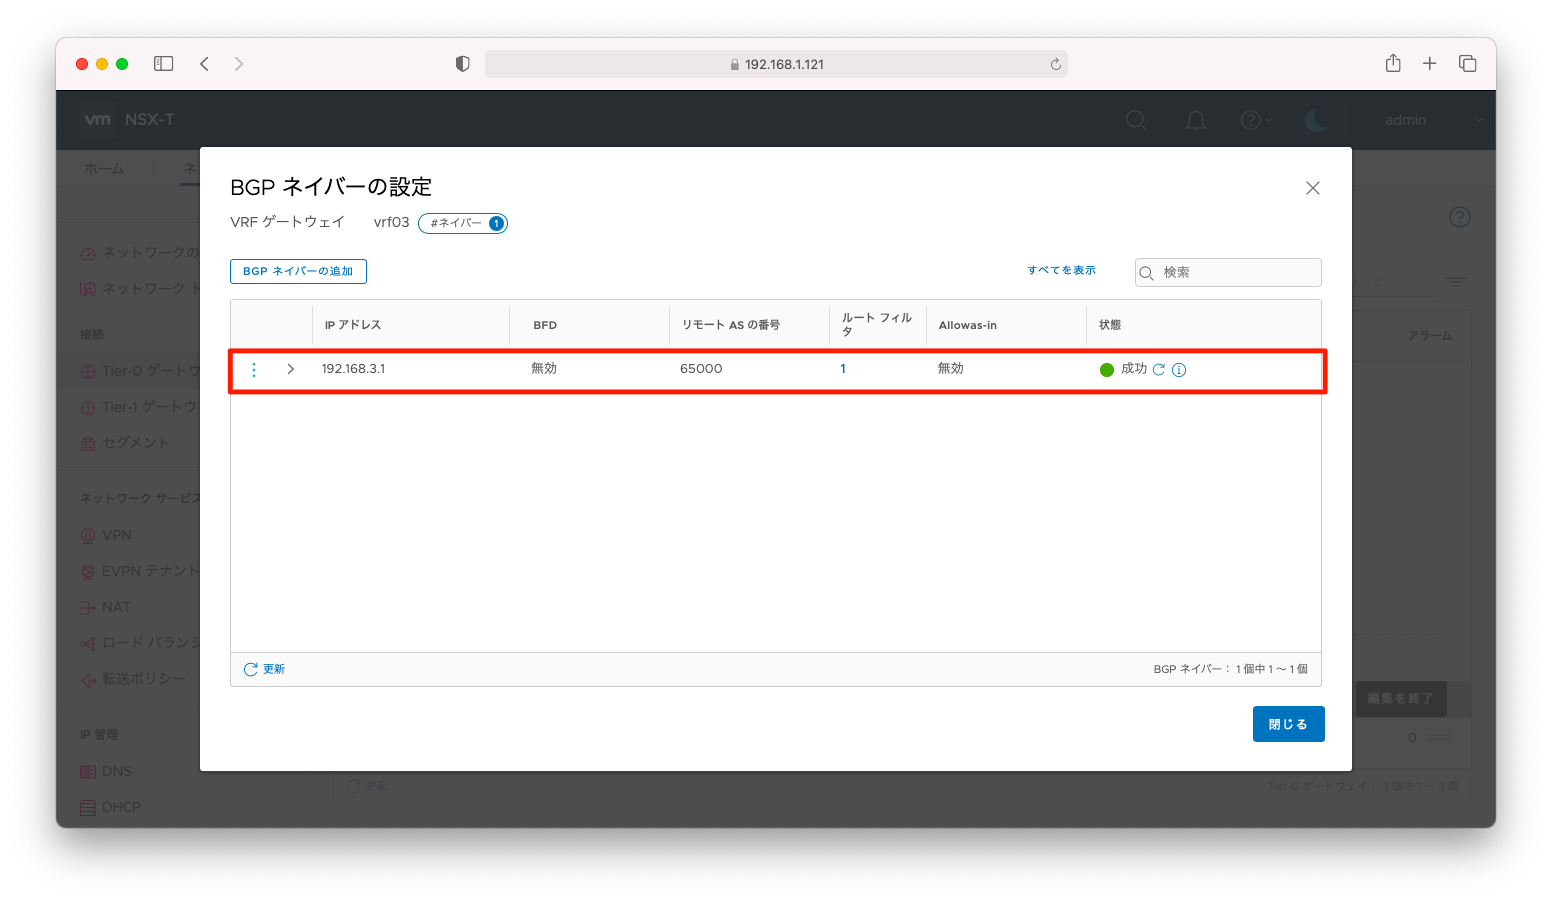
BGPの設定全文は以下の通りです。
BGP neighbor
administrator@ubuntu106:~$ curl --silent --request GET \
>   -u admin:P@ssw0rdP@ssw0rd \
>   --header "Content-Type:application/json" \
>   -k https://192.168.1.121/policy/api/v1/infra/tier-0s/vrf03/locale-services/default/bgp/neighbors
{
  "results" : [ {
    "source_addresses" : [ "192.168.3.131", "192.168.3.132" ],
    "neighbor_address" : "192.168.3.1",
    "remote_as_num" : "65000",
    "route_filtering" : [ {
      "enabled" : true,
      "address_family" : "IPV4"
    } ],
    "keep_alive_time" : 10,
    "hold_down_time" : 30,
    "bfd" : {
      "enabled" : false,
      "interval" : 500,
      "multiple" : 3
    },
    "allow_as_in" : false,
    "maximum_hop_limit" : 1,
    "resource_type" : "BgpNeighborConfig",
    "id" : "93d9e5b9-9b95-41f4-a390-13c70be9c098",
    "display_name" : "93d9e5b9-9b95-41f4-a390-13c70be9c098",
    "path" : "/infra/tier-0s/vrf03/locale-services/default/bgp/neighbors/93d9e5b9-9b95-41f4-a390-13c70be9c098",
    "relative_path" : "93d9e5b9-9b95-41f4-a390-13c70be9c098",
    "parent_path" : "/infra/tier-0s/vrf03/locale-services/default/bgp",
    "unique_id" : "87525fe3-3d90-4e36-a1c7-62bde95e5039",
    "marked_for_delete" : false,
    "overridden" : false,
    "_create_user" : "admin",
    "_create_time" : 1620831712303,
    "_last_modified_user" : "admin",
    "_last_modified_time" : 1620831712316,
    "_system_owned" : false,
    "_protection" : "NOT_PROTECTED",
    "_revision" : 0
  } ],
  "result_count" : 1,
  "sort_by" : "display_name",
  "sort_ascending" : true
}administrator@ubuntu106:~$
administrator@ubuntu106:~$
administrator@ubuntu106:~$
administrator@ubuntu106:~$ curl --silent --request GET \
>   -u admin:P@ssw0rdP@ssw0rd \
>   --header "Content-Type:application/json" \
>   -k https://192.168.1.121/policy/api/v1/infra/tier-0s/vrf04/locale-services/default/bgp/neighbors
{
  "results" : [ {
    "source_addresses" : [ "192.168.4.131", "192.168.4.132" ],
    "neighbor_address" : "192.168.4.1",
    "remote_as_num" : "65000",
    "route_filtering" : [ {
      "enabled" : true,
      "address_family" : "IPV4"
    } ],
    "keep_alive_time" : 10,
    "hold_down_time" : 30,
    "bfd" : {
      "enabled" : false,
      "interval" : 500,
      "multiple" : 3
    },
    "allow_as_in" : false,
    "maximum_hop_limit" : 1,
    "resource_type" : "BgpNeighborConfig",
    "id" : "e4a5d0d4-4231-4646-b287-b1ab63acc81a",
    "display_name" : "e4a5d0d4-4231-4646-b287-b1ab63acc81a",
    "path" : "/infra/tier-0s/vrf04/locale-services/default/bgp/neighbors/e4a5d0d4-4231-4646-b287-b1ab63acc81a",
    "relative_path" : "e4a5d0d4-4231-4646-b287-b1ab63acc81a",
    "parent_path" : "/infra/tier-0s/vrf04/locale-services/default/bgp",
    "unique_id" : "33f98e0f-09ea-43d9-84a0-de352969683d",
    "marked_for_delete" : false,
    "overridden" : false,
    "_create_user" : "admin",
    "_create_time" : 1620831860572,
    "_last_modified_user" : "admin",
    "_last_modified_time" : 1620831860583,
    "_system_owned" : false,
    "_protection" : "NOT_PROTECTED",
    "_revision" : 0
  } ],
  "result_count" : 1,
  "sort_by" : "display_name",
  "sort_ascending" : true
}
NSX-T側に再配送の設定を入れます。
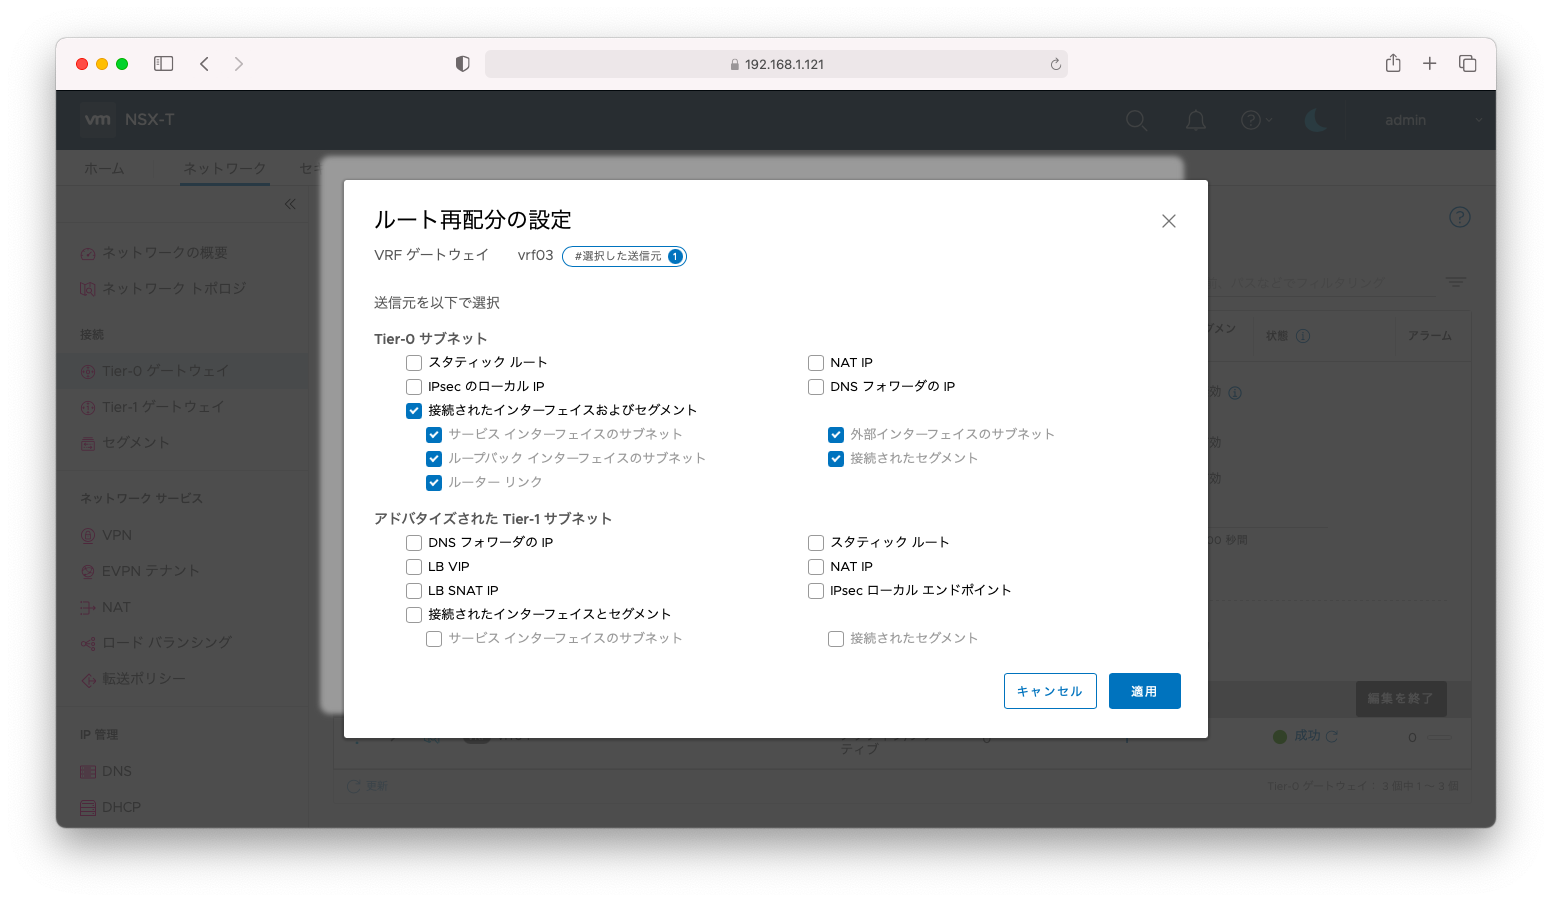
再配送の設定全文は以下の通りです。
再配送
administrator@ubuntu106:~$ curl --silent --request GET \
>   -u admin:P@ssw0rdP@ssw0rd \
>   --header "Content-Type:application/json" \
>   -k https://192.168.1.121/policy/api/v1/infra/tier-0s/vrf03/locale-services/default
{
  "route_redistribution_config" : {
    "bgp_enabled" : true,
    "ospf_enabled" : false,
    "redistribution_rules" : [ {
      "name" : "01",
      "route_redistribution_types" : [ "TIER0_CONNECTED" ],
      "destinations" : [ "BGP" ]
    } ]
  },
  "edge_cluster_path" : "/infra/sites/default/enforcement-points/default/edge-clusters/ab4c625e-eb65-4e67-aa50-36c0c6e46477",
  "bfd_profile_path" : "/infra/bfd-profiles/default",
  "resource_type" : "LocaleServices",
  "id" : "default",
  "display_name" : "default",
  "path" : "/infra/tier-0s/vrf03/locale-services/default",
  "relative_path" : "default",
  "parent_path" : "/infra/tier-0s/vrf03",
  "unique_id" : "6df35694-32eb-4bab-9173-5d6df3195a3a",
  "marked_for_delete" : false,
  "overridden" : false,
  "_create_user" : "admin",
  "_create_time" : 1620826210103,
  "_last_modified_user" : "admin",
  "_last_modified_time" : 1620831942503,
  "_system_owned" : false,
  "_protection" : "NOT_PROTECTED",
  "_revision" : 1
}administrator@ubuntu106:~$
administrator@ubuntu106:~$
administrator@ubuntu106:~$
administrator@ubuntu106:~$ curl --silent --request GET \
>   -u admin:P@ssw0rdP@ssw0rd \
>   --header "Content-Type:application/json" \
>   -k https://192.168.1.121/policy/api/v1/infra/tier-0s/vrf04/locale-services/default
{
  "route_redistribution_config" : {
    "bgp_enabled" : true,
    "ospf_enabled" : false,
    "redistribution_rules" : [ {
      "name" : "01",
      "route_redistribution_types" : [ "TIER0_CONNECTED" ],
      "destinations" : [ "BGP" ]
    } ]
  },
  "edge_cluster_path" : "/infra/sites/default/enforcement-points/default/edge-clusters/ab4c625e-eb65-4e67-aa50-36c0c6e46477",
  "bfd_profile_path" : "/infra/bfd-profiles/default",
  "resource_type" : "LocaleServices",
  "id" : "default",
  "display_name" : "default",
  "path" : "/infra/tier-0s/vrf04/locale-services/default",
  "relative_path" : "default",
  "parent_path" : "/infra/tier-0s/vrf04",
  "unique_id" : "394d5246-c4e1-46bd-ab84-fe6ff1c0e48d",
  "marked_for_delete" : false,
  "overridden" : false,
  "_create_user" : "admin",
  "_create_time" : 1620826224512,
  "_last_modified_user" : "admin",
  "_last_modified_time" : 1620831916114,
  "_system_owned" : false,
  "_protection" : "NOT_PROTECTED",
  "_revision" : 1
}
ネットワーク機器側の設定は以下の通りです。
router bgp 65000
  timers 10 30
  neighbor 192.168.3.132 remote-as 65000
  neighbor 192.168.3.131 remote-as 65000
  neighbor 192.168.4.131 remote-as 65000
  neighbor 192.168.4.132 remote-as 65000
  address-family ipv4 unicast
    originate-default
経路を互いに交換できていることを確認します。
nec-ix01(config)# show ip bgp summary
BGP router ID 192.168.4.1, local AS number 65000
1 BGP AS-PATH entries

Neighbor        V    AS    MsgRcvd MsgSent Up/DownTime   State
192.168.3.131   4    65000 17      15      0:02:16       ESTABLISHED
192.168.3.132   4    65000 20      18      0:02:49       ESTABLISHED
192.168.4.131   4    65000 10      8       0:01:04       ESTABLISHED
192.168.4.132   4    65000 10      8       0:01:00       ESTABLISHED

Total number of neighbors 4
nec-ix01(config)#

nec-ix01(config)# show ip route bgp
IP Routing Table - 2 entries, 9 hidden, 2037 frees
Entries: 0 Connected, 0 Static, 0 RIP, 0 OSPF, 2 BGP
Codes: C - Connected, S - Static, R - RIP, O - OSPF, IA - OSPF inter area
       N1 - OSPF NSSA external type 1, N2 - OSPF NSSA external type 2
       E1 - OSPF external type 1, E2 - OSPF external type 2, B - BGP
       * - Candidate default, s - Summary
Timers: Age
B    192.168.50.0/24 [200/0] via 192.168.3.131, GigaEthernet1.3, 0:00:16
B    192.168.51.0/24 [200/0] via 192.168.4.131, GigaEthernet1.4, 0:00:42
nec-ix01(config)#
トラフィック負荷分散の確認
異なるvrfに所属する仮想マシン(centos50とcentos51)間でトラフィックを流し、負荷分散されるかを確認します。
トラフィック発生方法は任意の方法で差し支えございません。ここではiperf3と呼ばれる負荷ツールを使用します。Redhat系OSにインストールする場合は以下コマンドを使います。
# dnf install iperf3
負荷分散しやすくなるように、仮想マシンに一定数のセカンダリIPv4アドレスを付与します。
[root@centso50 ~]# ip address
1: lo: <LOOPBACK,UP,LOWER_UP> mtu 65536 qdisc noqueue state UNKNOWN group default qlen 1000
    link/loopback 00:00:00:00:00:00 brd 00:00:00:00:00:00
    inet 127.0.0.1/8 scope host lo
       valid_lft forever preferred_lft forever
    inet6 ::1/128 scope host
       valid_lft forever preferred_lft forever
2: ens192: <BROADCAST,MULTICAST,UP,LOWER_UP> mtu 1500 qdisc fq_codel state UP group default qlen 1000
    link/ether 00:50:56:b3:30:c0 brd ff:ff:ff:ff:ff:ff
    inet 192.168.50.50/24 brd 192.168.50.255 scope global noprefixroute ens192
       valid_lft forever preferred_lft forever
    inet 192.168.50.51/24 brd 192.168.50.255 scope global secondary noprefixroute ens192
       valid_lft forever preferred_lft forever
    inet 192.168.50.52/24 brd 192.168.50.255 scope global secondary noprefixroute ens192
       valid_lft forever preferred_lft forever
    inet 192.168.50.53/24 brd 192.168.50.255 scope global secondary noprefixroute ens192
       valid_lft forever preferred_lft forever
    inet6 fe80::250:56ff:feb3:30c0/64 scope link
       valid_lft forever preferred_lft forever
[root@centso50 ~]#
一定数のセカンダリIPv4アドレス付与した仮想マシンで、iperf3のサーバを起動します。
[root@centso50 ~]# iperf3 -s
-----------------------------------------------------------
Server listening on 5201
-----------------------------------------------------------
もう1つの仮想マシンで、iperf3のクライアントを起動します。この時に指定するiperf3サーバのIPアドレスは複数を指定しましょう。単一IPアドレスでは十分負荷分散されません。
[root@centos51 ~]# iperf3 -c 192.168.50.50
Connecting to host 192.168.50.50, port 5201
[  5] local 192.168.51.51 port 43548 connected to 192.168.50.50 port 5201
[ ID] Interval           Transfer     Bitrate         Retr  Cwnd
[  5]   0.00-1.00   sec  12.2 MBytes   102 Mbits/sec    0    536 KBytes
[  5]   1.00-2.00   sec  11.0 MBytes  92.6 Mbits/sec    0   1.04 MBytes
[  5]   2.00-3.00   sec  10.0 MBytes  83.9 Mbits/sec    0   1.55 MBytes
[  5]   3.00-4.00   sec  11.2 MBytes  94.4 Mbits/sec    0   2.07 MBytes
[  5]   4.00-5.00   sec  10.0 MBytes  83.9 Mbits/sec    0   2.58 MBytes
[  5]   5.00-6.00   sec  10.0 MBytes  83.9 Mbits/sec    0   3.01 MBytes
[  5]   6.00-7.00   sec  10.0 MBytes  83.9 Mbits/sec    0   3.01 MBytes
[  5]   7.00-8.00   sec  10.0 MBytes  83.9 Mbits/sec    0   3.01 MBytes
[  5]   8.00-9.00   sec  11.2 MBytes  94.4 Mbits/sec    0   3.01 MBytes
[  5]   9.00-10.00  sec  10.0 MBytes  83.9 Mbits/sec    0   3.01 MBytes
- - - - - - - - - - - - - - - - - - - - - - - - -
[ ID] Interval           Transfer     Bitrate         Retr
[  5]   0.00-10.00  sec   106 MBytes  88.7 Mbits/sec    0             sender
[  5]   0.00-10.32  sec   106 MBytes  85.9 Mbits/sec                  receiver

iperf Done.
[root@centos51 ~]# iperf3 -c 192.168.50.51
Connecting to host 192.168.50.51, port 5201
[  5] local 192.168.51.51 port 58884 connected to 192.168.50.51 port 5201
[ ID] Interval           Transfer     Bitrate         Retr  Cwnd
[  5]   0.00-1.00   sec  12.2 MBytes   103 Mbits/sec    0    539 KBytes
[  5]   1.00-2.00   sec  11.0 MBytes  92.7 Mbits/sec    0   1.04 MBytes
[  5]   2.00-3.00   sec  10.0 MBytes  83.9 Mbits/sec    0   1.55 MBytes
[  5]   3.00-4.00   sec  10.0 MBytes  83.9 Mbits/sec    0   2.07 MBytes
[  5]   4.00-5.00   sec  11.2 MBytes  94.4 Mbits/sec    0   2.58 MBytes
[  5]   5.00-6.00   sec  10.0 MBytes  83.9 Mbits/sec    0   3.01 MBytes
[  5]   6.00-7.00   sec  10.0 MBytes  83.9 Mbits/sec    0   3.01 MBytes
[  5]   7.00-8.00   sec  10.0 MBytes  83.9 Mbits/sec    0   3.01 MBytes
[  5]   8.00-9.00   sec  11.2 MBytes  94.4 Mbits/sec    0   3.01 MBytes
[  5]   9.00-10.00  sec  10.0 MBytes  83.9 Mbits/sec    0   3.01 MBytes
- - - - - - - - - - - - - - - - - - - - - - - - -
[ ID] Interval           Transfer     Bitrate         Retr
[  5]   0.00-10.00  sec   106 MBytes  88.7 Mbits/sec    0             sender
[  5]   0.00-10.32  sec   106 MBytes  85.9 Mbits/sec                  receiver

iperf Done.
[root@centos51 ~]# iperf3 -c 192.168.50.51
Connecting to host 192.168.50.51, port 5201
[  5] local 192.168.51.51 port 58888 connected to 192.168.50.51 port 5201
[ ID] Interval           Transfer     Bitrate         Retr  Cwnd
[  5]   0.00-1.00   sec  13.4 MBytes   112 Mbits/sec    0    590 KBytes
[  5]   1.00-2.00   sec  9.99 MBytes  83.8 Mbits/sec    0   1.09 MBytes
[  5]   2.00-3.00   sec  10.0 MBytes  83.9 Mbits/sec    0   1.60 MBytes
[  5]   3.00-4.00   sec  10.0 MBytes  83.9 Mbits/sec    0   2.12 MBytes
[  5]   4.00-5.00   sec  11.2 MBytes  94.4 Mbits/sec    0   2.63 MBytes
[  5]   5.00-6.00   sec  10.0 MBytes  83.9 Mbits/sec    0   3.15 MBytes
[  5]   6.00-7.00   sec  10.0 MBytes  83.9 Mbits/sec    0   3.15 MBytes
[  5]   7.00-8.00   sec  10.0 MBytes  83.9 Mbits/sec    0   3.15 MBytes
[  5]   8.00-9.00   sec  11.2 MBytes  94.4 Mbits/sec    0   3.15 MBytes
[  5]   9.00-10.00  sec  10.0 MBytes  83.9 Mbits/sec    0   3.15 MBytes
- - - - - - - - - - - - - - - - - - - - - - - - -
[ ID] Interval           Transfer     Bitrate         Retr
[  5]   0.00-10.00  sec   106 MBytes  88.8 Mbits/sec    0             sender
[  5]   0.00-10.30  sec   105 MBytes  85.9 Mbits/sec                  receiver

iperf Done.
[root@centos51 ~]# iperf3 -c 192.168.50.52
Connecting to host 192.168.50.52, port 5201
[  5] local 192.168.51.51 port 37048 connected to 192.168.50.52 port 5201
[ ID] Interval           Transfer     Bitrate         Retr  Cwnd
[  5]   0.00-1.00   sec  13.3 MBytes   111 Mbits/sec    0    581 KBytes
[  5]   1.00-2.00   sec  9.99 MBytes  83.8 Mbits/sec    0   1.07 MBytes
[  5]   2.00-3.00   sec  10.0 MBytes  83.9 Mbits/sec    0   1.59 MBytes
[  5]   3.00-4.00   sec  10.0 MBytes  83.9 Mbits/sec    0   2.10 MBytes
[  5]   4.00-5.00   sec  11.2 MBytes  94.4 Mbits/sec    0   2.62 MBytes
[  5]   5.00-6.00   sec  10.0 MBytes  83.9 Mbits/sec    0   3.13 MBytes
[  5]   6.00-7.00   sec  10.0 MBytes  83.9 Mbits/sec    0   3.16 MBytes
[  5]   7.00-8.00   sec  10.0 MBytes  83.9 Mbits/sec    0   3.16 MBytes
[  5]   8.00-9.00   sec  11.2 MBytes  94.4 Mbits/sec    0   3.16 MBytes
[  5]   9.00-10.00  sec  10.0 MBytes  83.9 Mbits/sec    0   3.16 MBytes
- - - - - - - - - - - - - - - - - - - - - - - - -
[ ID] Interval           Transfer     Bitrate         Retr
[  5]   0.00-10.00  sec   106 MBytes  88.7 Mbits/sec    0             sender
[  5]   0.00-10.30  sec   106 MBytes  85.9 Mbits/sec                  receiver

iperf Done.
[root@centos51 ~]#
ESXiと物理ネットワーク機器の結線関係は以下の通りです。

トラフィックが負荷分散されているかを確認します。NSX Edgeと物理ルータ間はf0/1(vmnic0)とf0/2(vmnic1)で負荷分散されています。NSX Edgeのオーバーレイに関する処理はf0/3(vmnic2)とf0/4(vmnic3)で負荷分散されています。
ESXiのオーバーレイに関する処理はf0/7(vmnic2)とf0/8(vmnic3)で負荷分散されていません。これは機材不足のためであり実務では十分負荷分散されると考えられます。物理ネットワーク機器のロードバランシングアルゴリズムが送信元IP・宛先IPであり、かつ、NSX EdgeとESXiが1対1の通信になっているためです。実務では複数台のEdgeとESXiが存在することが多いと思いますので、今回の事象は気にする必要はないでしょう。
Switch#show interfaces summary

 *: interface is up
 IHQ: pkts in input hold queue     IQD: pkts dropped from input queue
 OHQ: pkts in output hold queue    OQD: pkts dropped from output queue
 RXBS: rx rate (bits/sec)          RXPS: rx rate (pkts/sec)
 TXBS: tx rate (bits/sec)          TXPS: tx rate (pkts/sec)
 TRTL: throttle count

  Interface                   IHQ       IQD       OHQ       OQD      RXBS      RXPS      TXBS      TXPS      TRTL
-----------------------------------------------------------------------------------------------------------------
* Vlan1                         1         0         0         0      1000         1      1000         1         0
* Vlan2                         0         0         0         0         0         0         0         0         0
* Vlan3                         0         0         0         0         0         0         0         0         0
* Vlan4                         0         0         0         0         0         0         0         0         0
* FastEthernet0/1               0         0         0         0   8462000      1013   5700000       681         0
* FastEthernet0/2               0         0         0         0   5584000       675   8463000      1014         0
* FastEthernet0/3               0         0         0         0   9960000      1124   5911000       683         0
* FastEthernet0/4               0         0         0         0   5031000       578   8937000      1016         0
* FastEthernet0/5               0         0         0         0     30000        16     42000        15         0
* FastEthernet0/6               0         0         0         0         0         0      1000         2         0
* FastEthernet0/7               0         0         0         0  14845000      1701      3000         4         0
* FastEthernet0/8               0         0         0         0         0         0  14965000      1705         0
  GigabitEthernet0/1            0         0         0         0         0         0         0         0         0

  Interface                   IHQ       IQD       OHQ       OQD      RXBS      RXPS      TXBS      TXPS      TRTL
-----------------------------------------------------------------------------------------------------------------
* GigabitEthernet0/2            0         0         0         0  14178000      1714  14082000      1713         0
* Port-channel1                 0         0         0         0  14057000      1699  14173000      1707         0
* Port-channel2                 0         0         0         0  15004000      1713  14865000      1709         0
* Port-channel4                 0         0         0         0  14845000      1701  14969000      1711         0
Switch#


