NSX-Tの負荷分散構成について考察します。(個人の見解としてはヴイエムウェア社のポジショントークと思っていますが)NSX-TはmLAG構成を非推奨としており、mLAGを使用しないで負荷分散を実現するには複雑な設定が必要です。入れ子となる負荷分散ポリシーを作成したり複数のIPアドレスを付与したりの操作が必要です。このページでは、NSX EdgeがNSX-T外のルータと接続する部分の冗長化設定を紹介します。
おそらくヴイエムウェア社は、CiscoやJuniperの既存ベンダーのシェアを奪いにいくため、彼らのテクノロジーを必要ないデザインパターンを推奨しているものと推測しています。ヴイエムウェア社の資料を見ると、単純なLayer3 Switchを前提とする設定例が多く、いわゆるmLAGが組めるネットワーク機器を前提とした設定例は少数派です。
「Physical Network Design Decisions」によると、「No EtherChannel (LAG/vPC) configuration for ESXi host uplinks」と書かれています。
構成図
「NSX-T オーバーレイの負荷分散(mLAGなし multiple TEP)」「NSX-T アップリンクの負荷分散(mLAGなし)」の併せて2記事で以下のような構成を組み上げます。
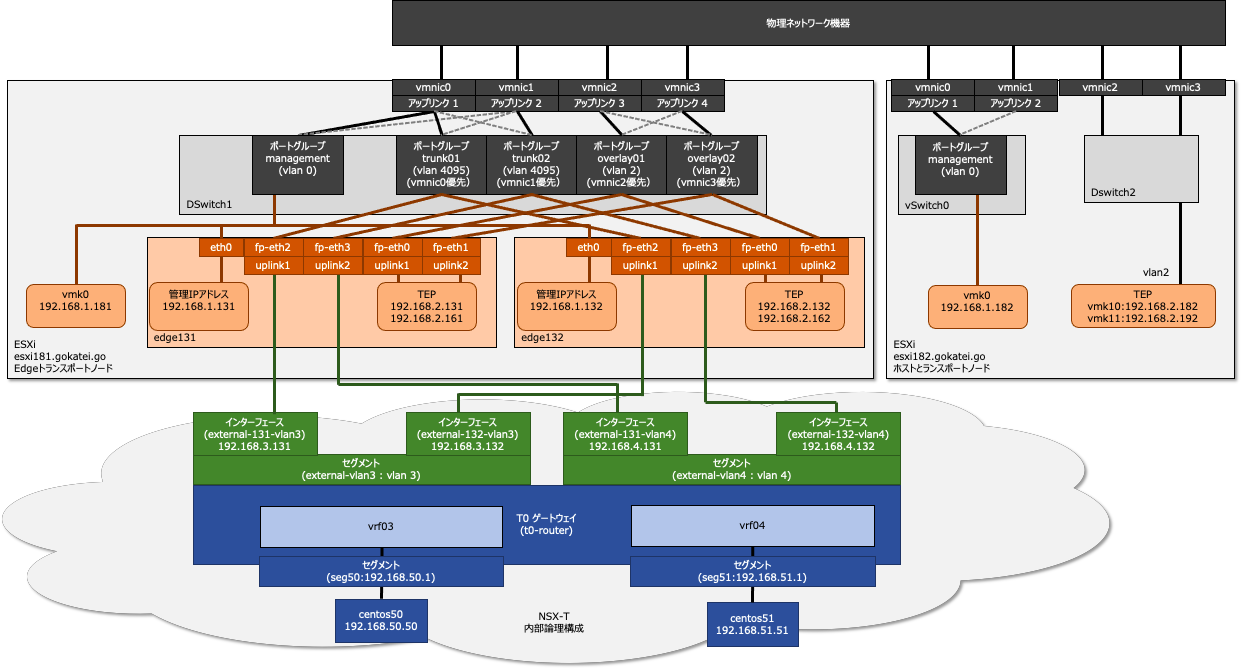
このページでは赤枠で囲まれた部分のNSX Edgeのアップリンクの負荷分散構成を説明します。
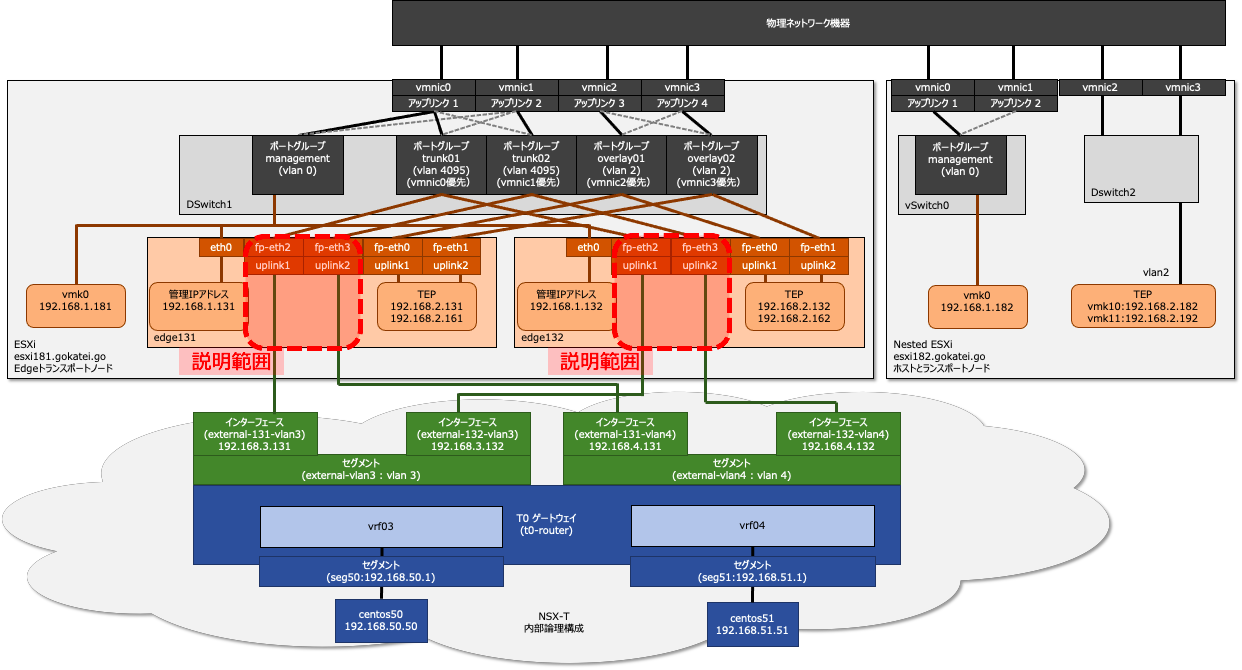
前提条件
ポートグループ
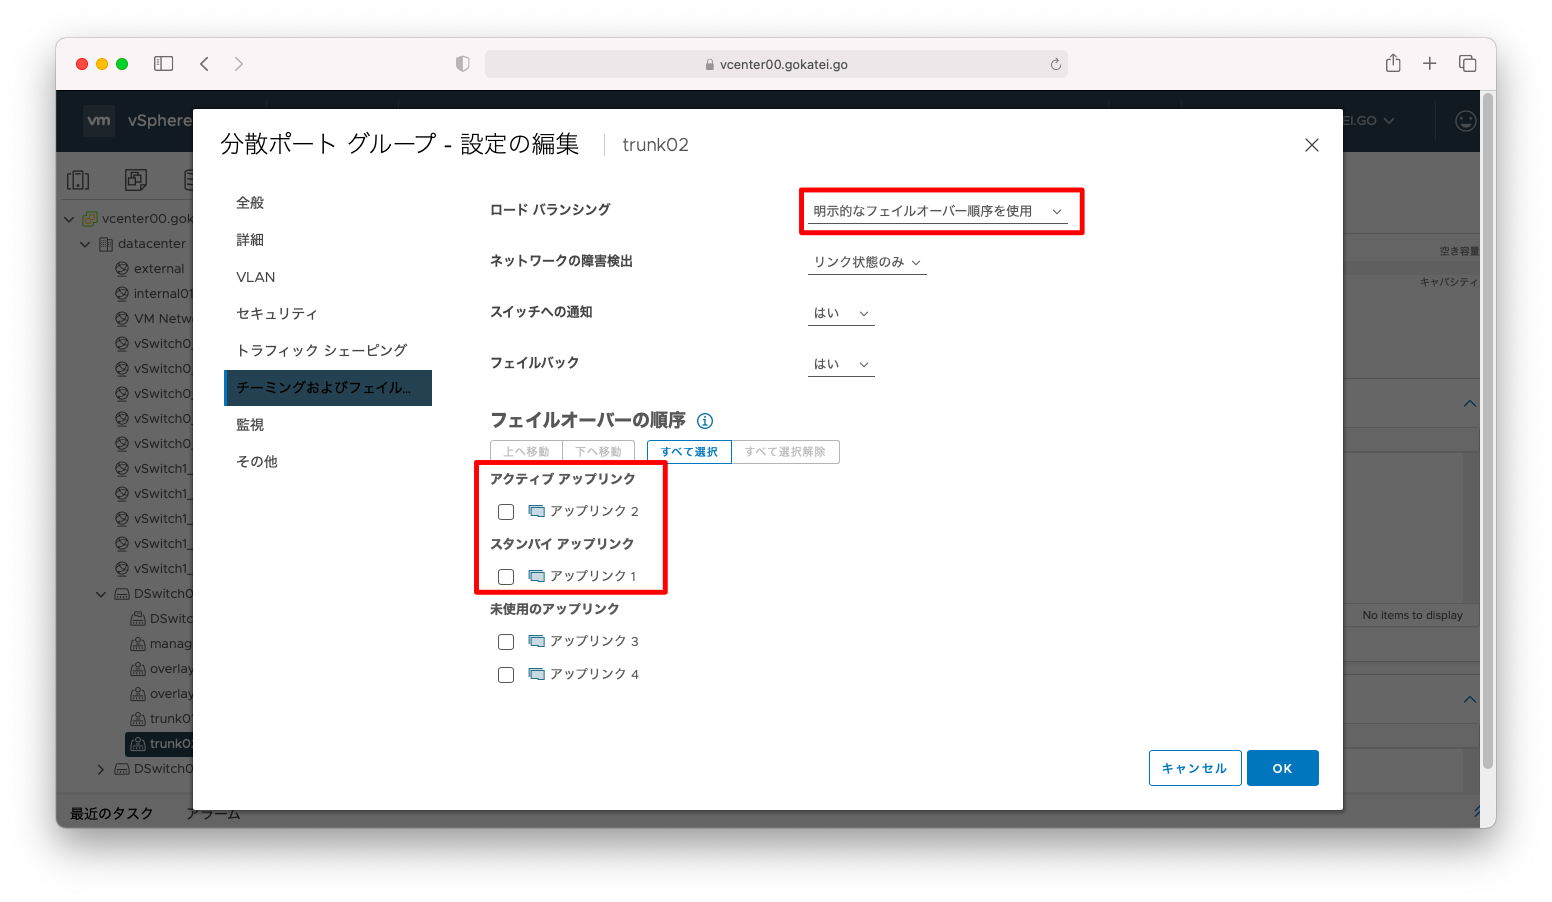
負荷分散と冗長化を実現するため、trunk01とtrunk02という名前で互いに入れ子構成となるポートグループを作成します。
trunk01は「アップリンク 1 (vmnic0)」を優先するように設定します。
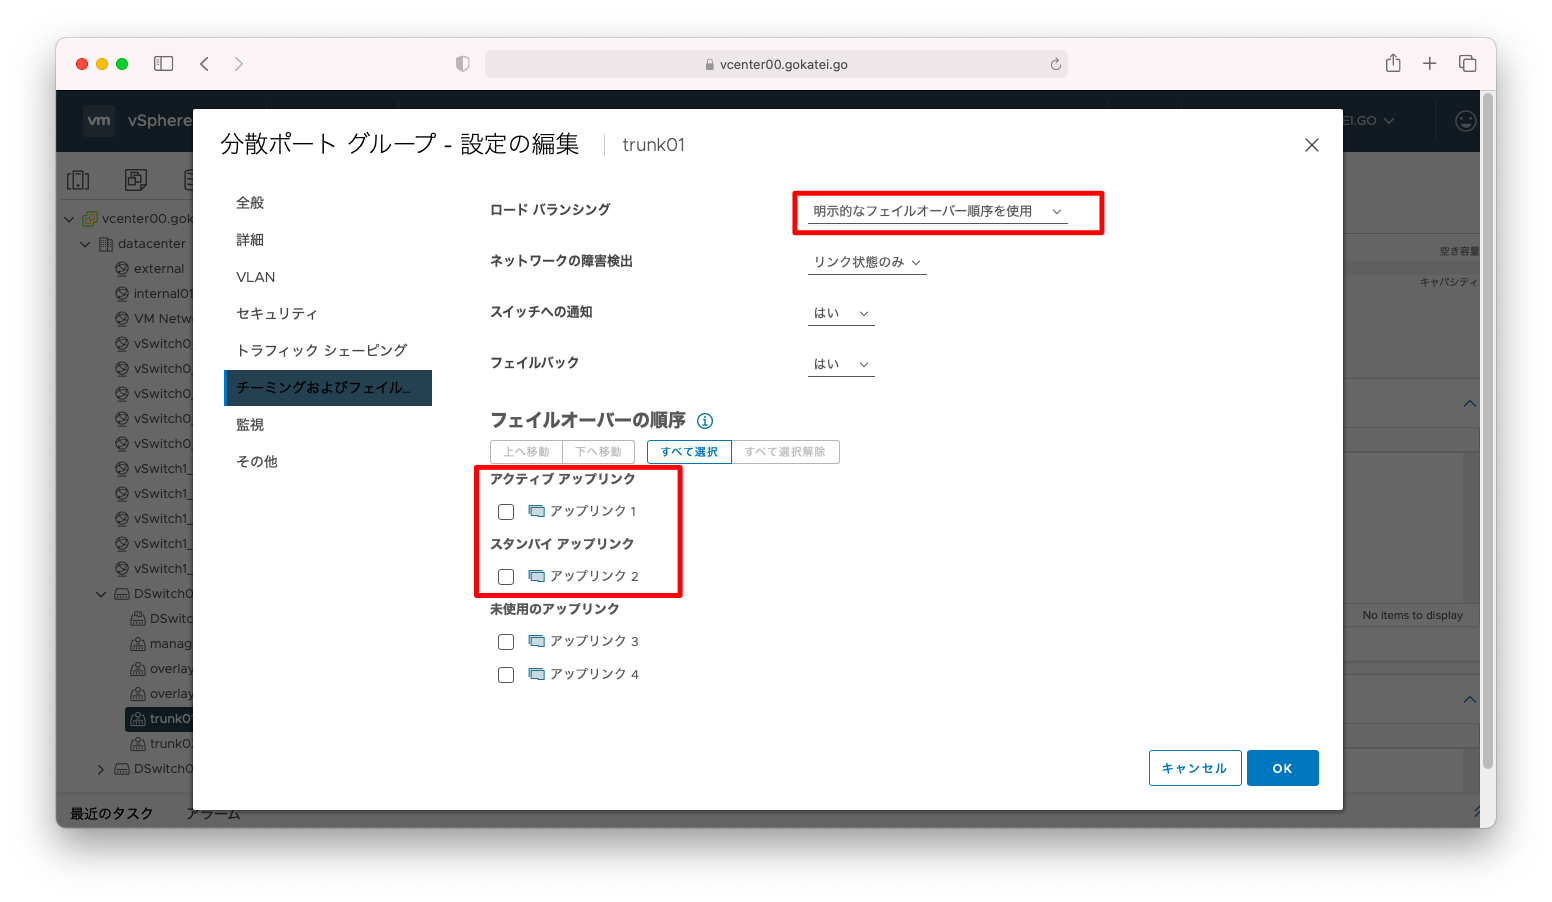
trunk02は「アップリンク 2 (vmnic1)」を優先するように設定します。
NSX EdgeのvNIC追加
このシナリオではNSX Edgeは5つのvNICを必要とします。デフォルトの状態ではvNICは4つなので、5つ目のNICを追加します。
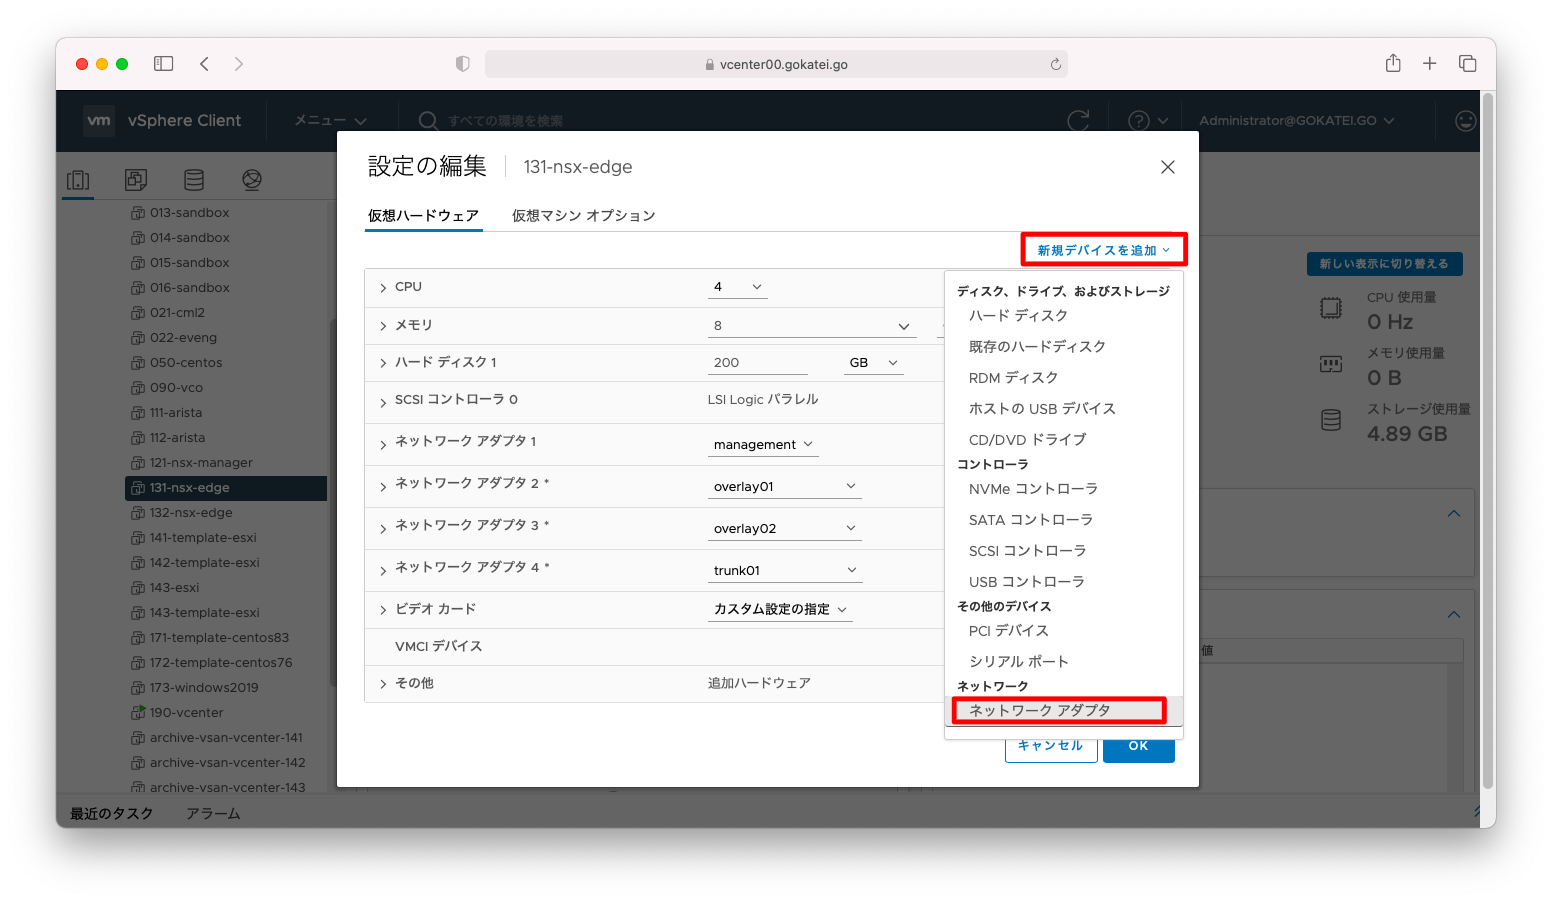
設定の反映には再起動が必要です。
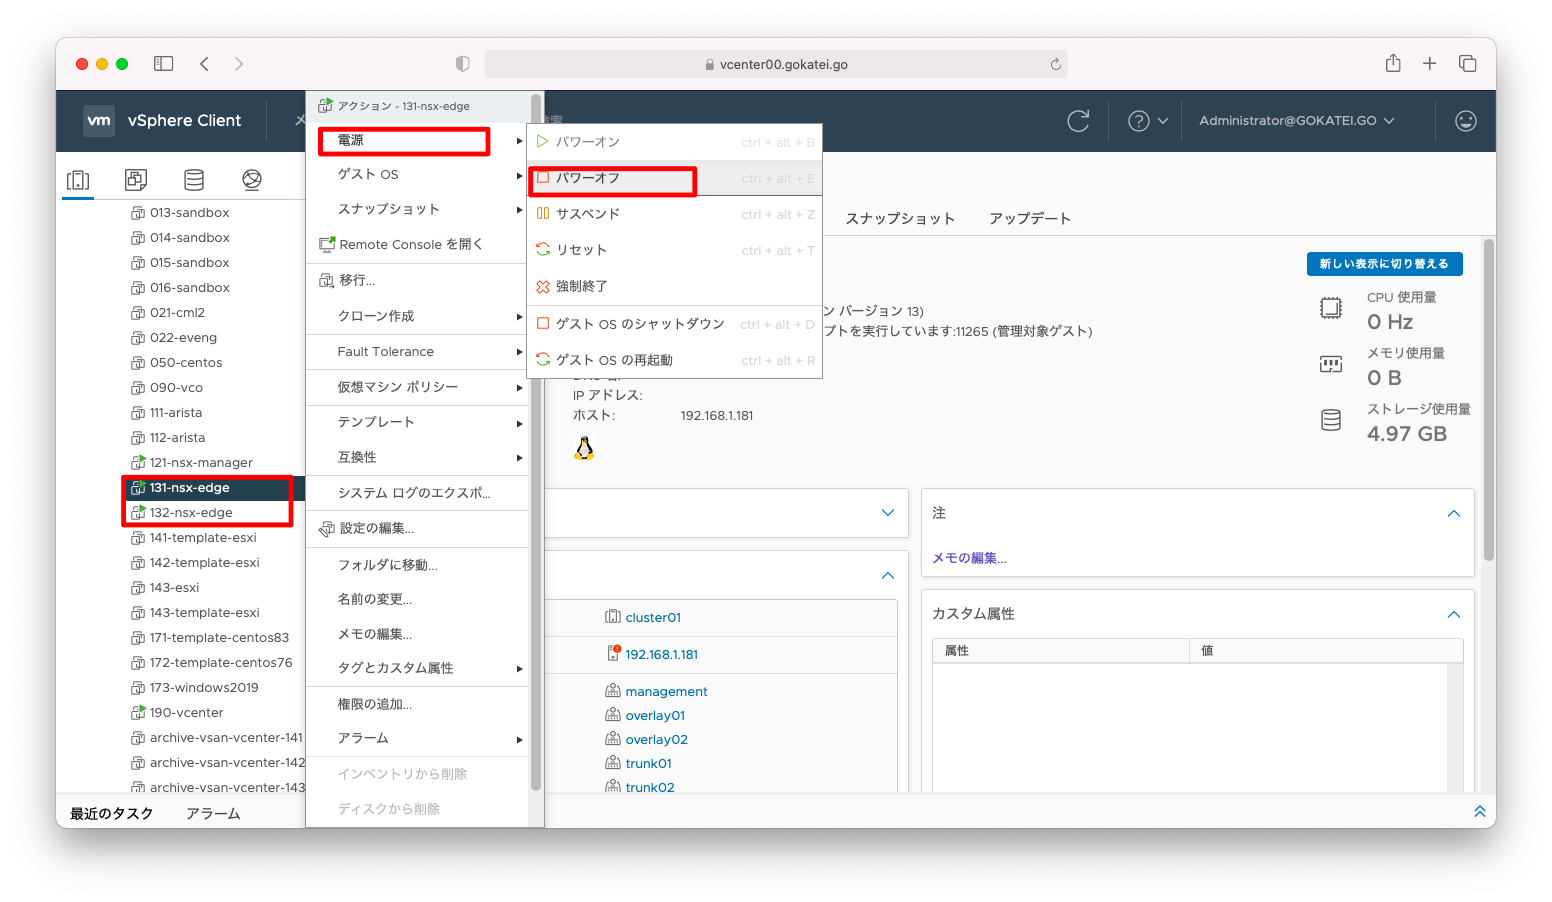
再起動後に、NSX Edgeにadminユーザでログインし、5つ目のvNIC「fp-eth3」を認識していることを確認します。
nsx-edge131> get interface
Tue May 11 2021 UTC 10:44:04.478
Interface: bond0
  Address: unknown
  MAC address: 46:63:18:9e:4a:3b
  MTU: 1500

 <omitted>


Interface: fp-eth3
  ID: 3
  Link status: up
  MAC address: 00:50:56:b3:85:4b
  MTU: 1500
  PCI: 0000:04:00:00
  Offload Capabilities: TX_VLAN_INSERT TX_UDP_CKSUM TX_TCP_CKSUM TX_TCP_TSO RX_VLAN_STRIP RX_IPV4_CKSUM RX_UDP_CKSUM RX_TCP_CKSUM RX_TCP_LRO
  Polling Status: active
  Driver: net_vmxnet3
  Rx queue: 2
  Tx queue: 2
  Socket: 0
  RX packets: 1651
  RX bytes: 117727
  RX errors: 0
  RX badcrc: unknown
  RX badlen: unknown
  RX misses: 0
  RX nombufs: 0
  RX pause xoff: unknown
  RX pause xon: unknown
  TX packets: 0
  TX bytes: 0
  TX errors: 0
  TX pause xoff: unknown
  TX pause xon: unknown
システム設定
アップリンクプロファイル
あるトラフィックvmnic0を優先させ、あるトラフィックをvmnic1を優先させます。互いに優先順位が入れ子になるようなアップリンクプロファイルを作成します。
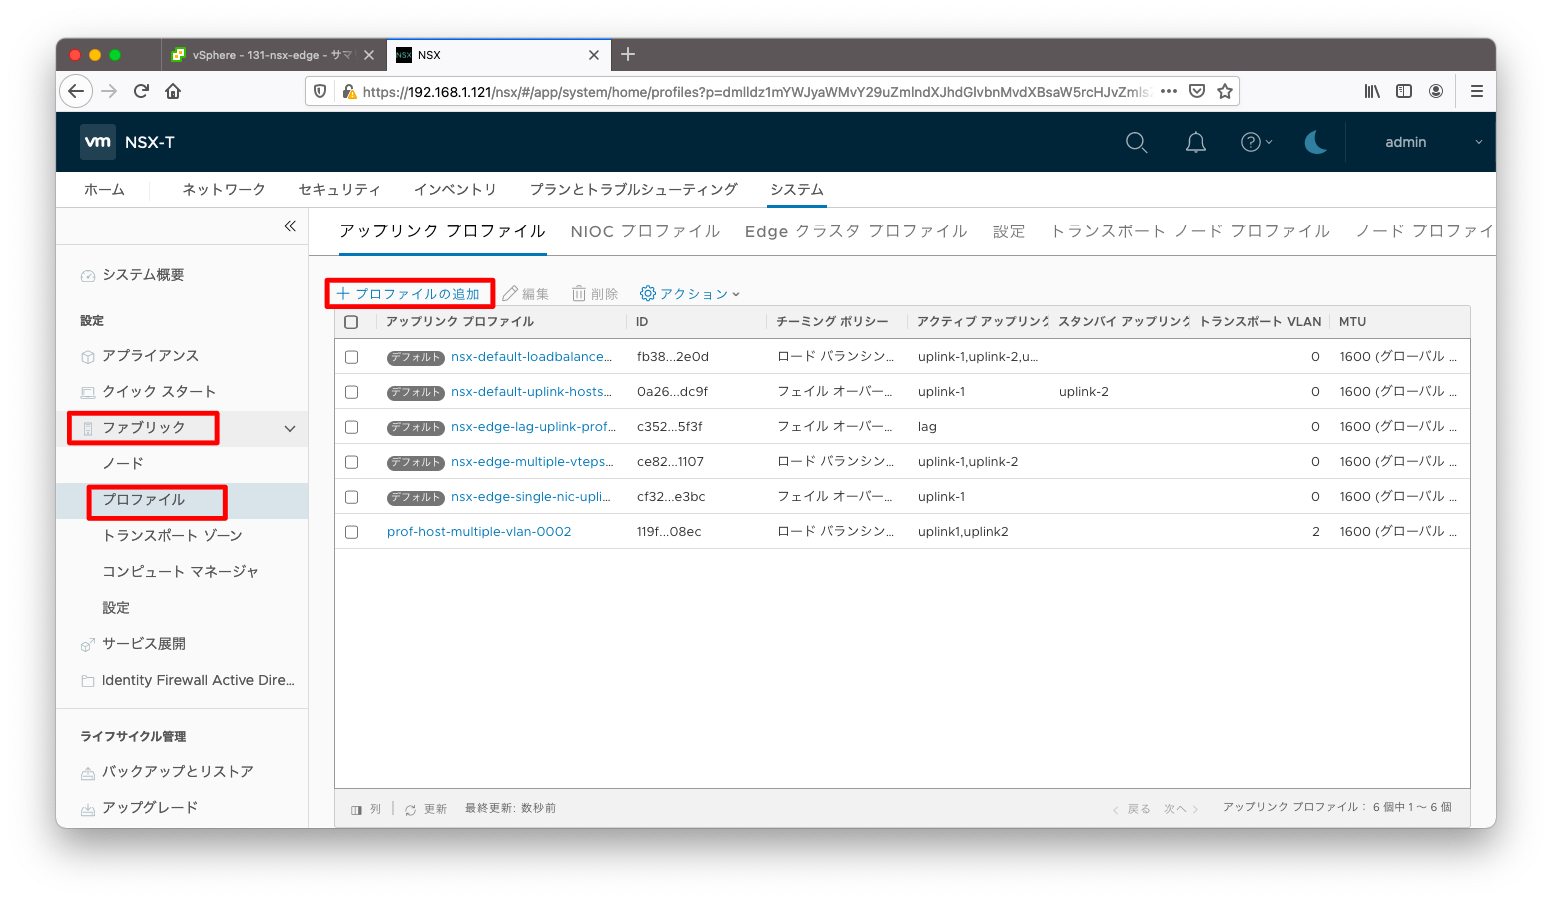
「プロファイルの追加」を押下します。
何か分かりやすい名前を入力します。
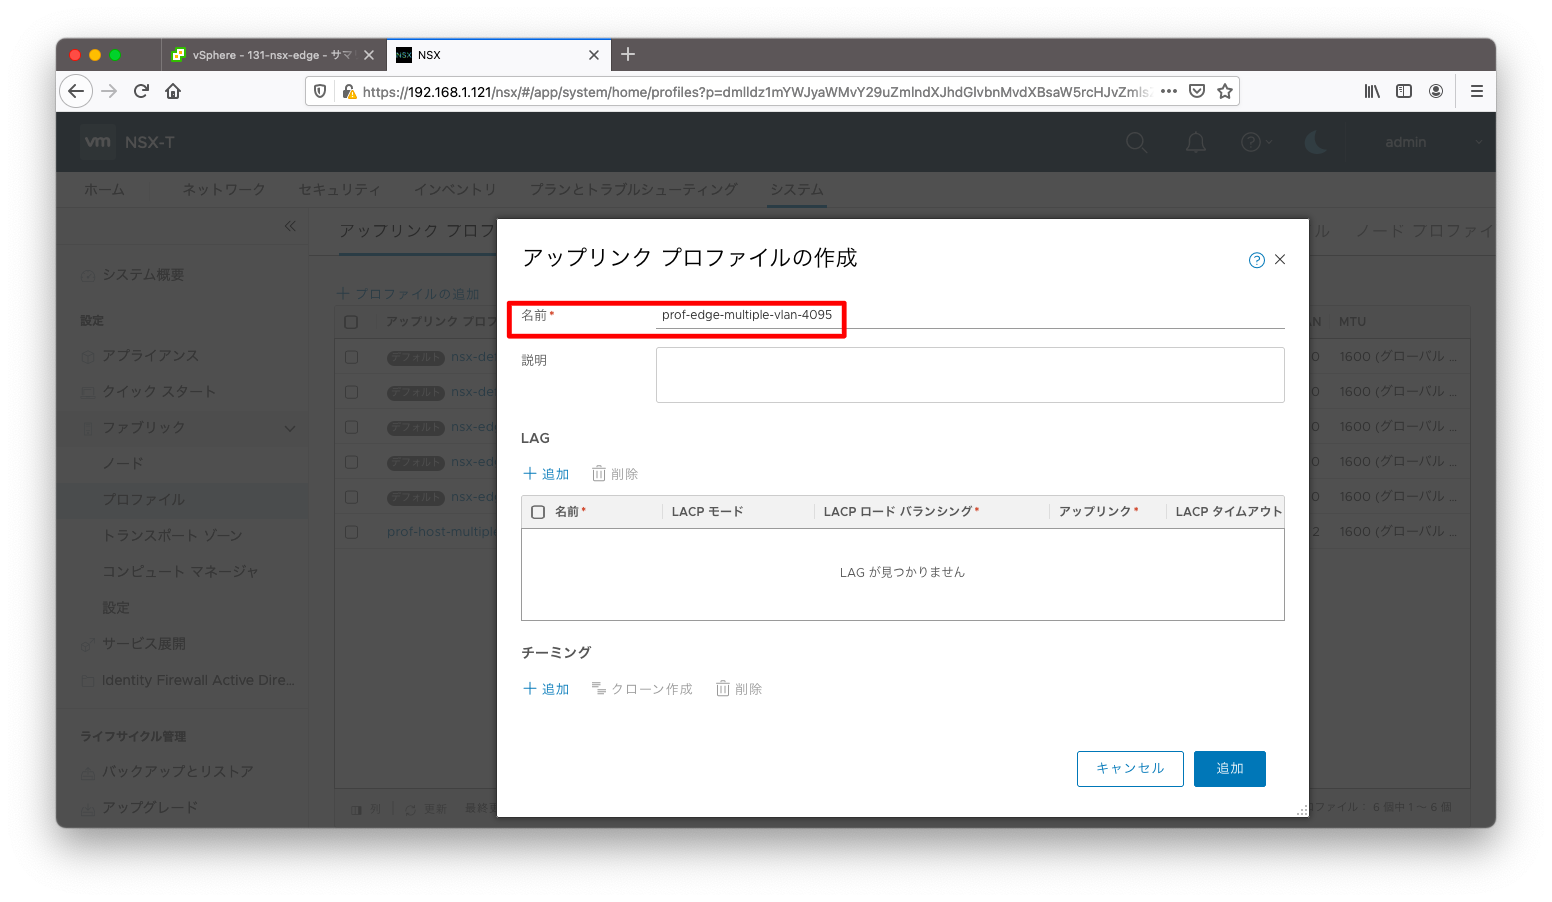
チーミングの設定で「追加」を2回押下し、入力欄を2つ増やします。
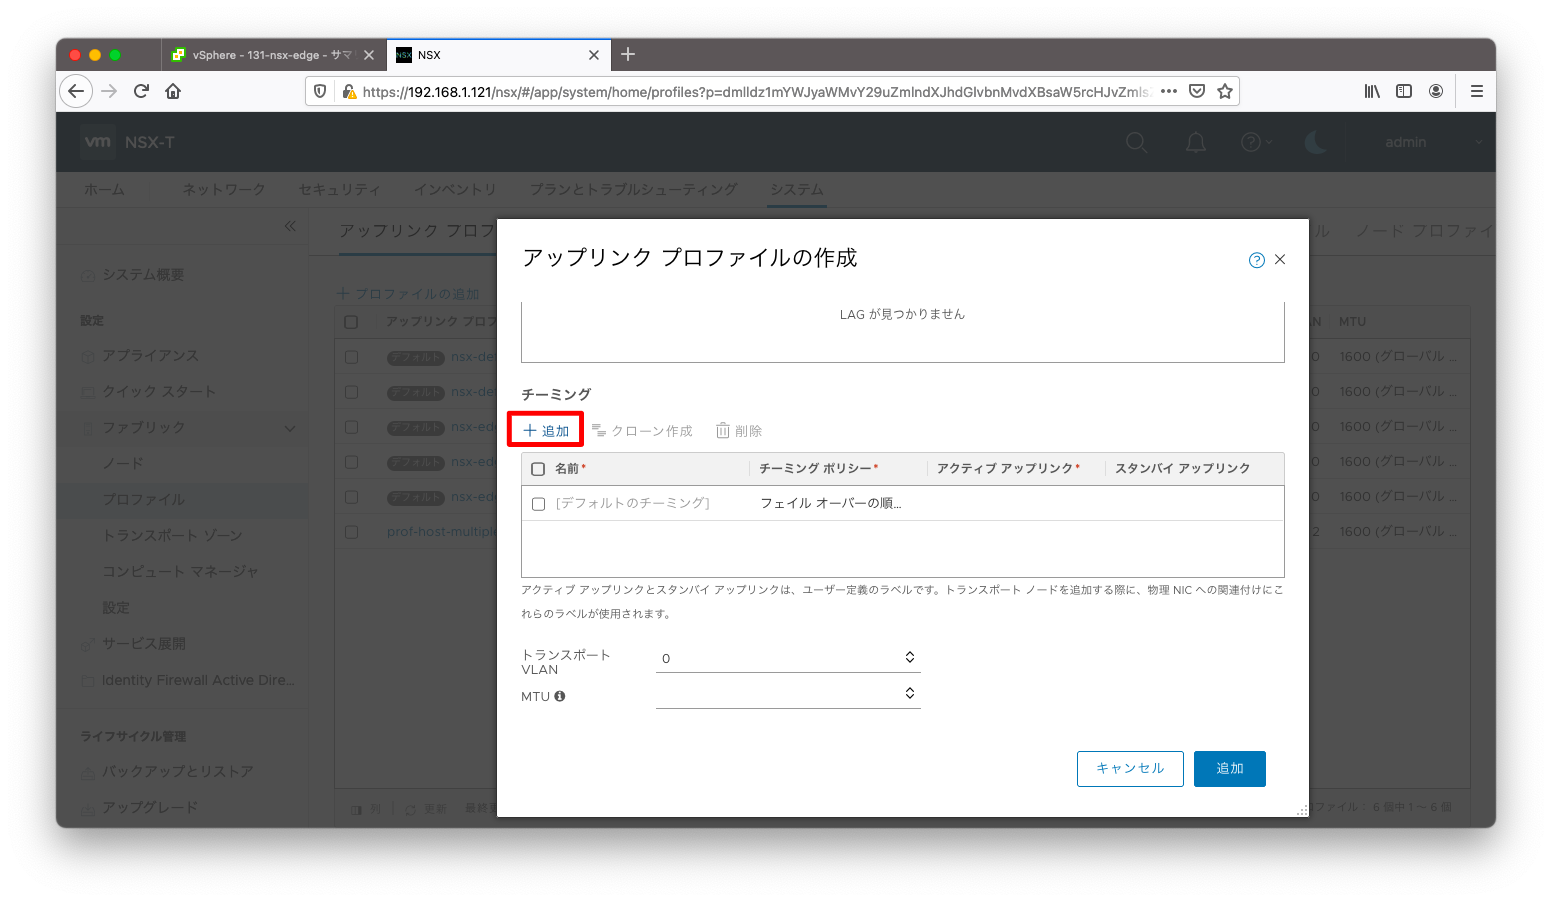
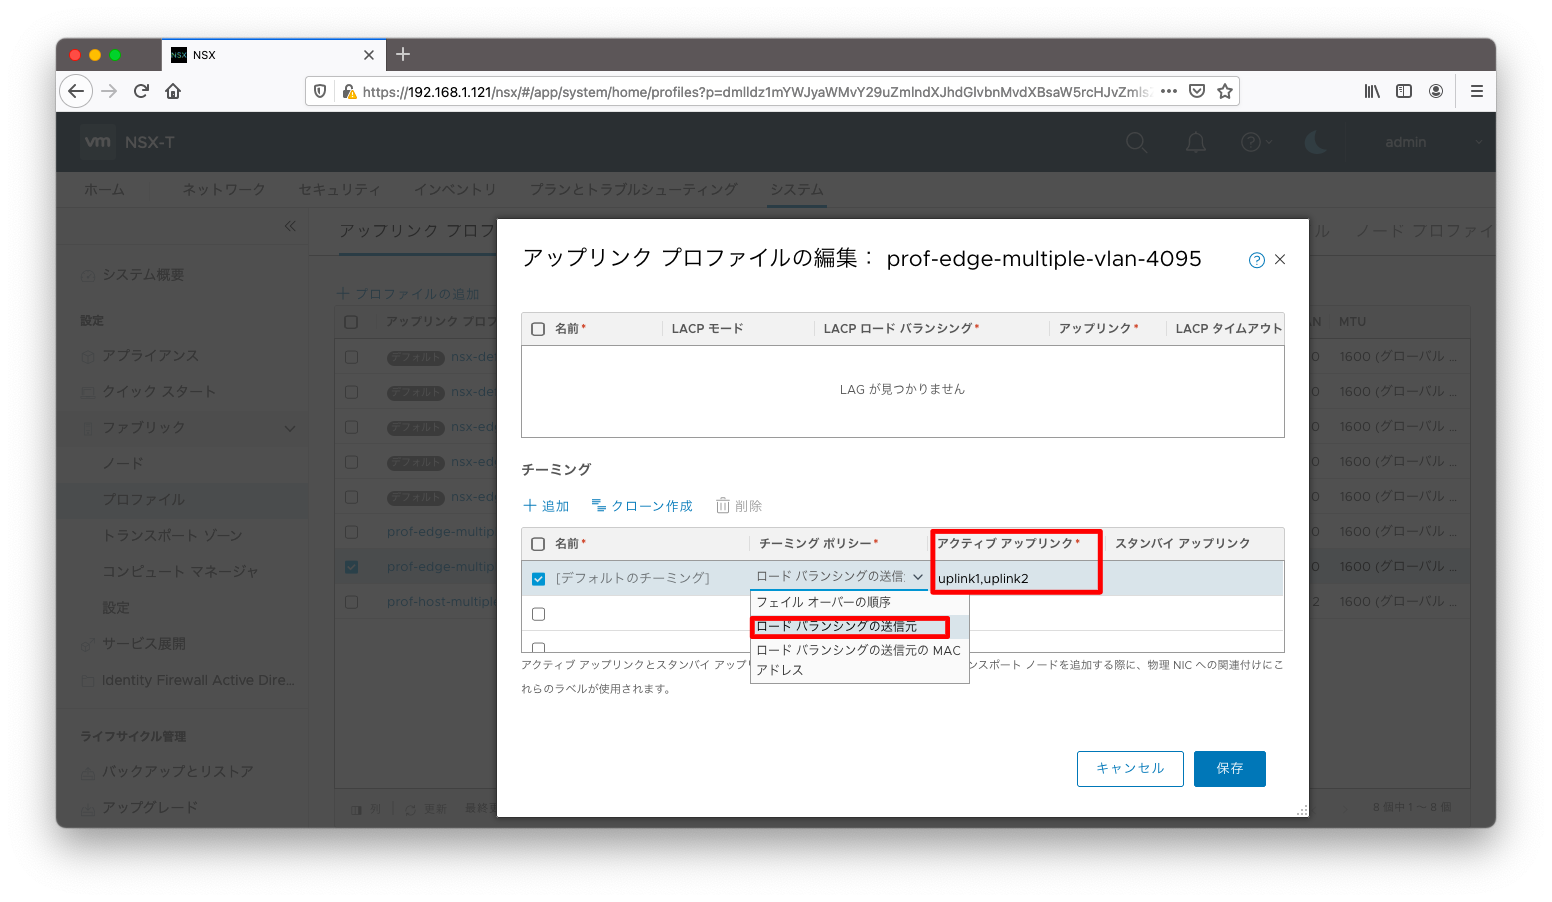
NSX Edgeに対して使用できるデフォルトのチーミングポリシーのロードバランシングアルゴリズムは「ロードバランシングの送信元」のみです。これ以外のロードバランシングアルゴリズムを選択すると、この後のノードスイッチの設定画面において、アップリンクプロファイル選択のプルダウンメニューに現れません。
「ロードバランシングの送信元」を選択した後に、「アクティブアップリンク」にカンマ区切りでアップリンク名を2つ入力します。
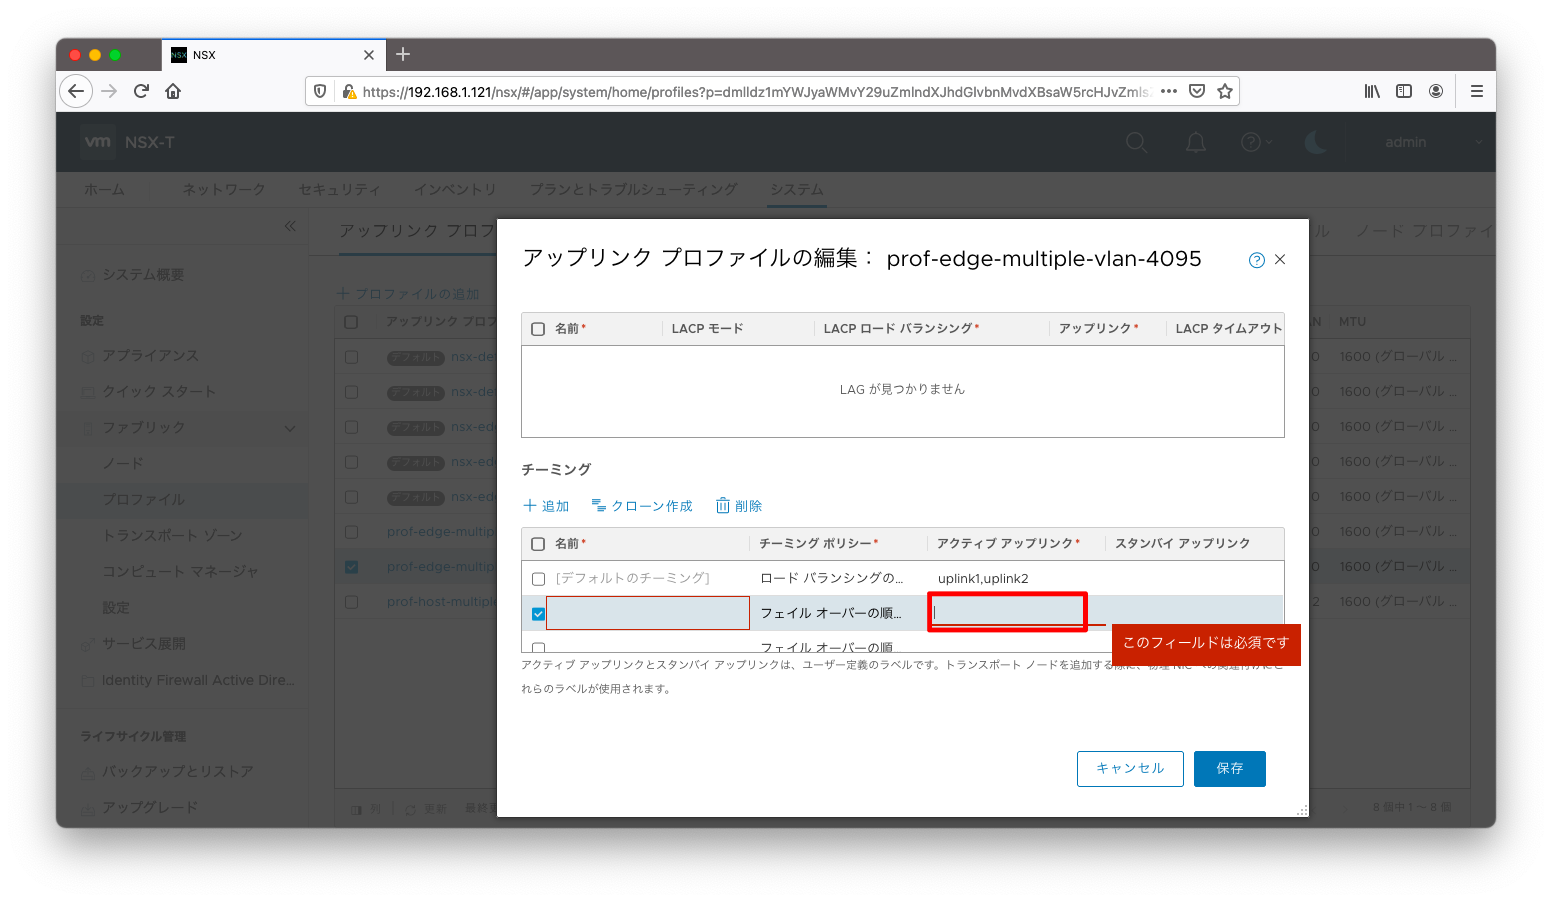
その後、デフォルトではないチーミング設定に名前を付けたいのですが、操作には若干のコツを必要とします。デフォルトではチーミングの「アクティブアップリンク」をクリックした後に、Shift+Tabを2回押下すると、チーミングの名前入力欄にカーソルが移動します。
デフォルトではないチーミング設定に、何か分かりやすい名前を入力します。
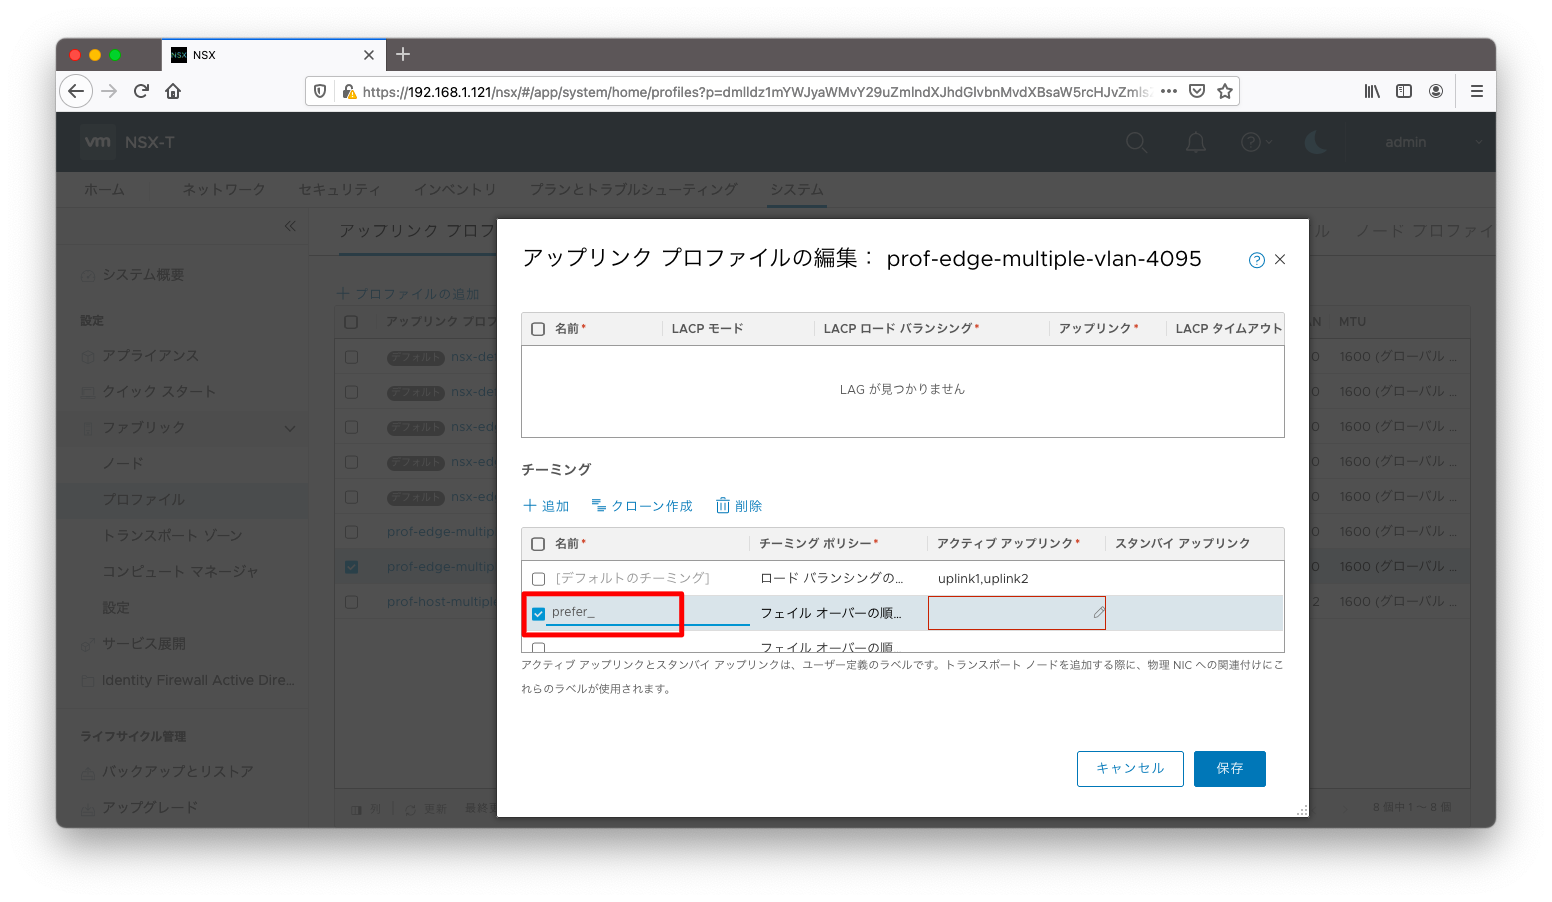
最終的にアクティブとなるアップリンクが互いに入れ子となるような設定を作成します。
NSX Edgeはスタンバイリンクをサポートしないため、デフォルトではないチーミングポリシーは「アクティブリンク」のみを入力するようにし「スタンバイリンク」は入力しないようにしてください。
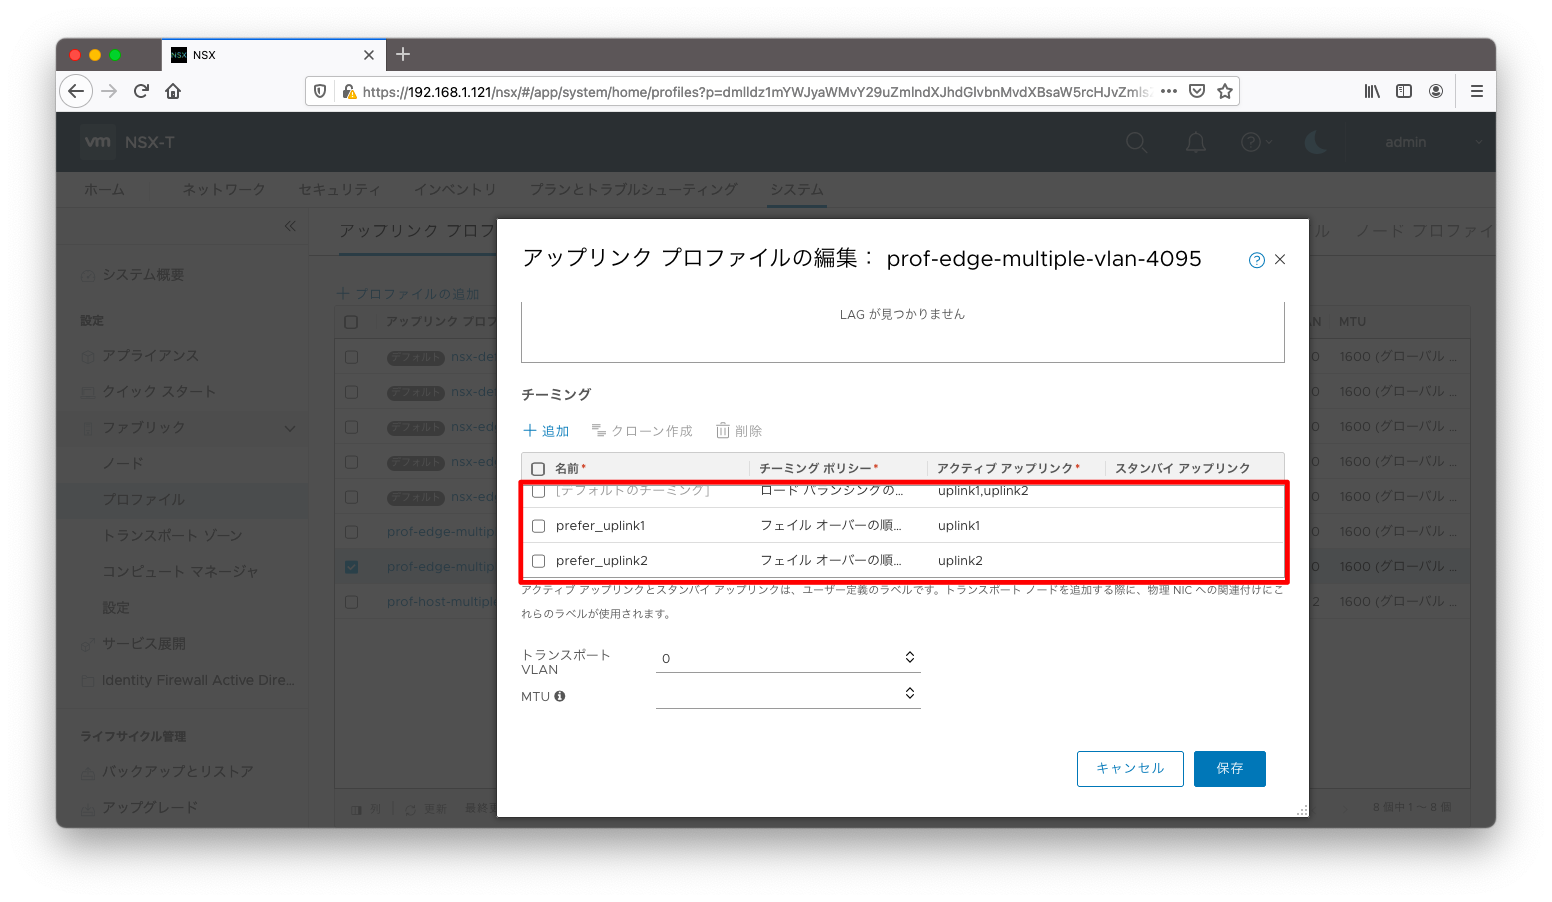
アップリンクプロファイルの設定全文は以下の通りです。
アップリンクプロファイル
administrator@ubuntu106:~$ curl --silent --request GET \
>   -u admin:P@ssw0rdP@ssw0rd \
>   --header "Content-Type:application/json" \
>   -k https://192.168.1.121/api/v1/host-switch-profiles \
>   | jq ' .results[] | select ( .display_name == "prof-edge-multiple-vlan-4095" ) '
{
  "teaming": {
    "policy": "LOADBALANCE_SRCID",
    "active_list": [
      {
        "uplink_name": "uplink1",
        "uplink_type": "PNIC"
      },
      {
        "uplink_name": "uplink2",
        "uplink_type": "PNIC"
      }
    ]
  },
  "named_teamings": [
    {
      "name": "prefer_uplink1",
      "policy": "FAILOVER_ORDER",
      "active_list": [
        {
          "uplink_name": "uplink1",
          "uplink_type": "PNIC"
        }
      ]
    },
    {
      "name": "prefer_uplink2",
      "policy": "FAILOVER_ORDER",
      "active_list": [
        {
          "uplink_name": "uplink2",
          "uplink_type": "PNIC"
        }
      ]
    }
  ],
  "transport_vlan": 0,
  "overlay_encap": "GENEVE",
  "resource_type": "UplinkHostSwitchProfile",
  "id": "b926c211-fc87-4b3b-a997-fe02e292578b",
  "display_name": "prof-edge-multiple-vlan-4095",
  "description": "",
  "tags": [],
  "_create_user": "admin",
  "_create_time": 1620728557780,
  "_last_modified_user": "admin",
  "_last_modified_time": 1620728640143,
  "_system_owned": false,
  "_protection": "NOT_PROTECTED",
  "_revision": 1
}
VLANトランスポートゾーン
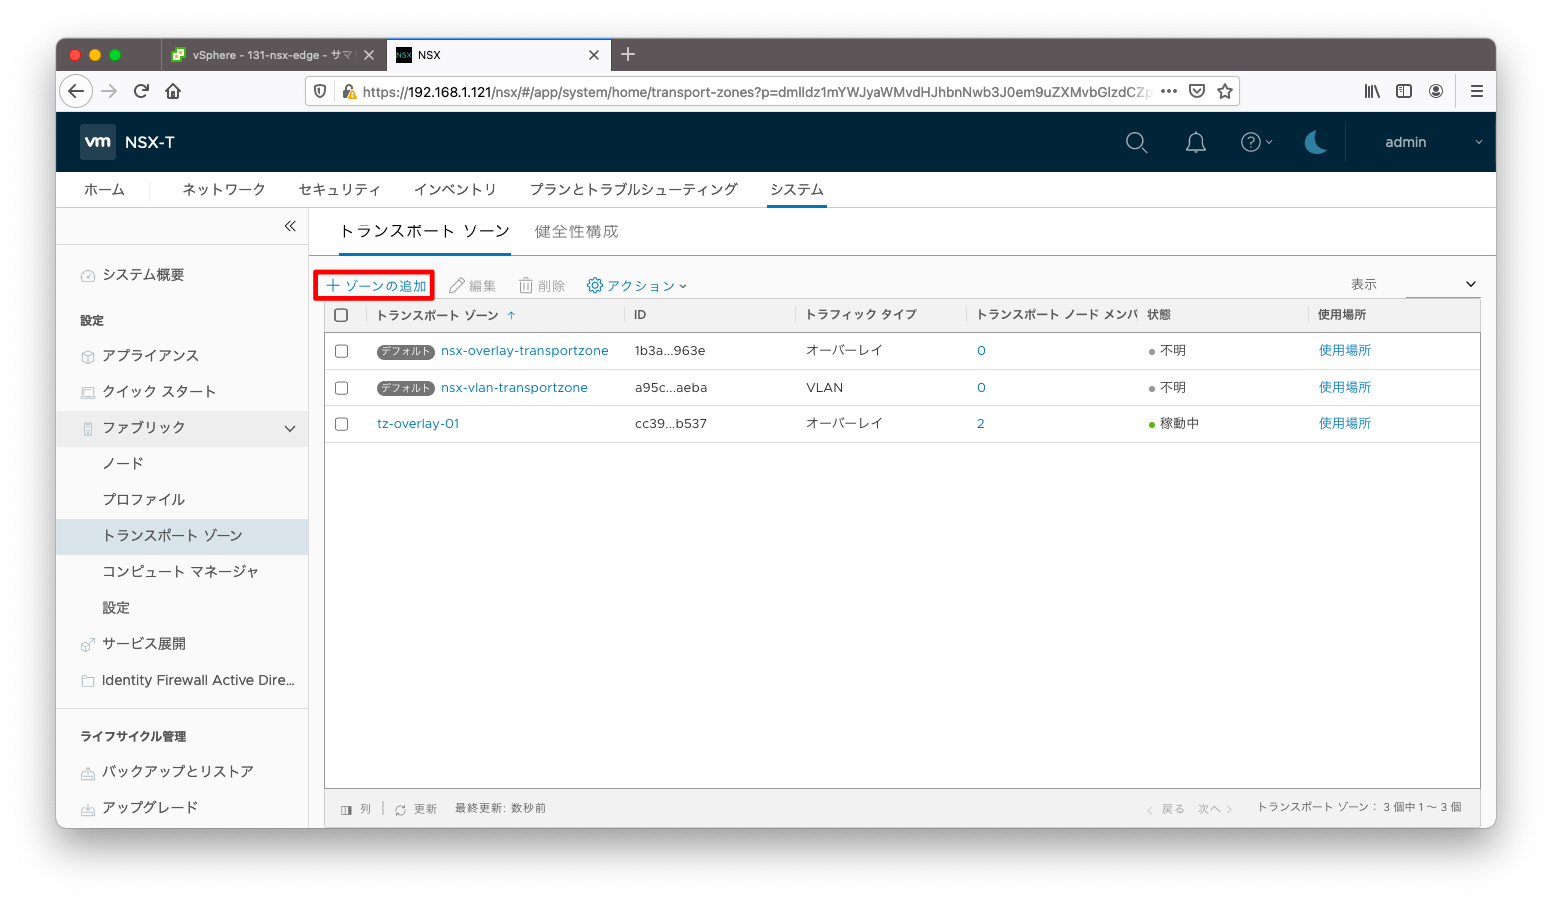
アップリンクプロファイルにてチーミングポリシーを複数設定する場合は、VLANトランスポートゾーンとチーミングポリシーの紐付けをすることによって、セグメントごとに異なるチーミングポリシーを設定することができます。
「ゾーンの追加」を押下します。
「アップリンクチーミングポリシー」欄に、さきほど設定したチーミングポリシー名を入力します。
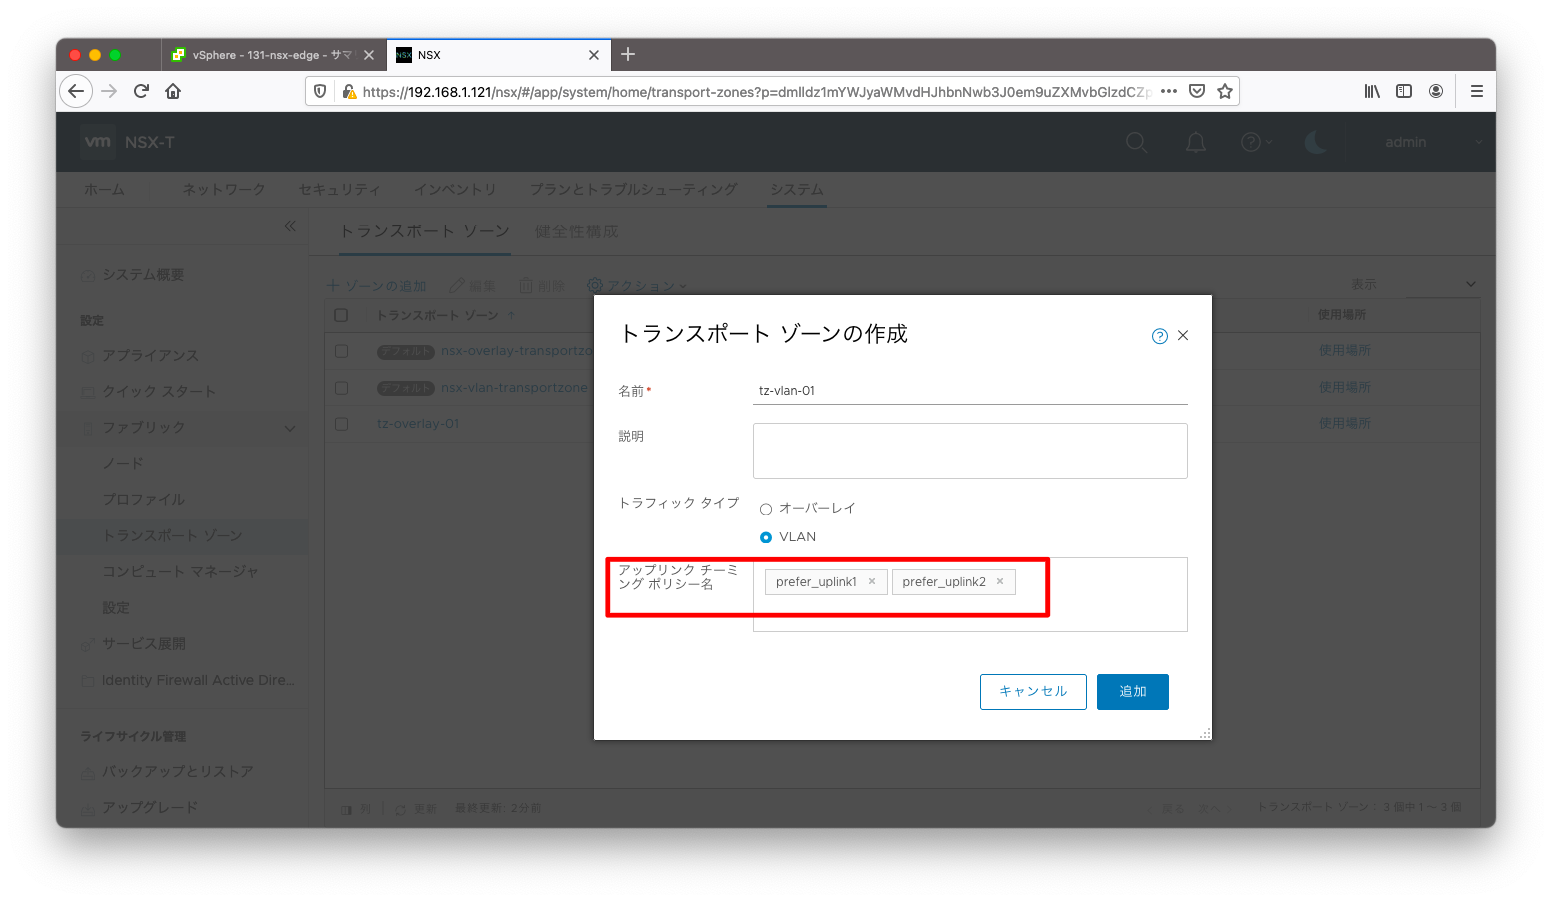
トランスポートゾーンの設定全文は以下の通りです。
トランスポートゾーン
administrator@ubuntu106:~$ curl --silent --request GET \
>   -u admin:P@ssw0rdP@ssw0rd \
>   --header "Content-Type:application/json" \
>   -k https://192.168.1.121/api/v1/transport-zones \
>   | jq ' .results[] | select ( .display_name == "tz-vlan-01" ) '
{
  "uplink_teaming_policy_names": [
    "prefer_uplink1",
    "prefer_uplink2"
  ],
  "transport_type": "VLAN",
  "host_switch_name": "nsxDefaultHostSwitch",
  "host_switch_id": "44d16d8a-be90-41c8-aee3-f21e725212ce",
  "transport_zone_profile_ids": [
    {
      "resource_type": "BfdHealthMonitoringProfile",
      "profile_id": "52035bb3-ab02-4a08-9884-18631312e50a"
    }
  ],
  "host_switch_mode": "STANDARD",
  "nested_nsx": false,
  "is_default": false,
  "resource_type": "TransportZone",
  "id": "b2777d91-22d0-4b58-b577-70f8e32ce991",
  "display_name": "tz-vlan-01",
  "_create_user": "admin",
  "_create_time": 1620728588057,
  "_last_modified_user": "admin",
  "_last_modified_time": 1620728588057,
  "_system_owned": false,
  "_protection": "NOT_PROTECTED",
  "_revision": 0,
  "_schema": "/v1/schema/TransportZone"
}
ノードスイッチの設定
NSX Edgeに対してノードスイッチを設定します。
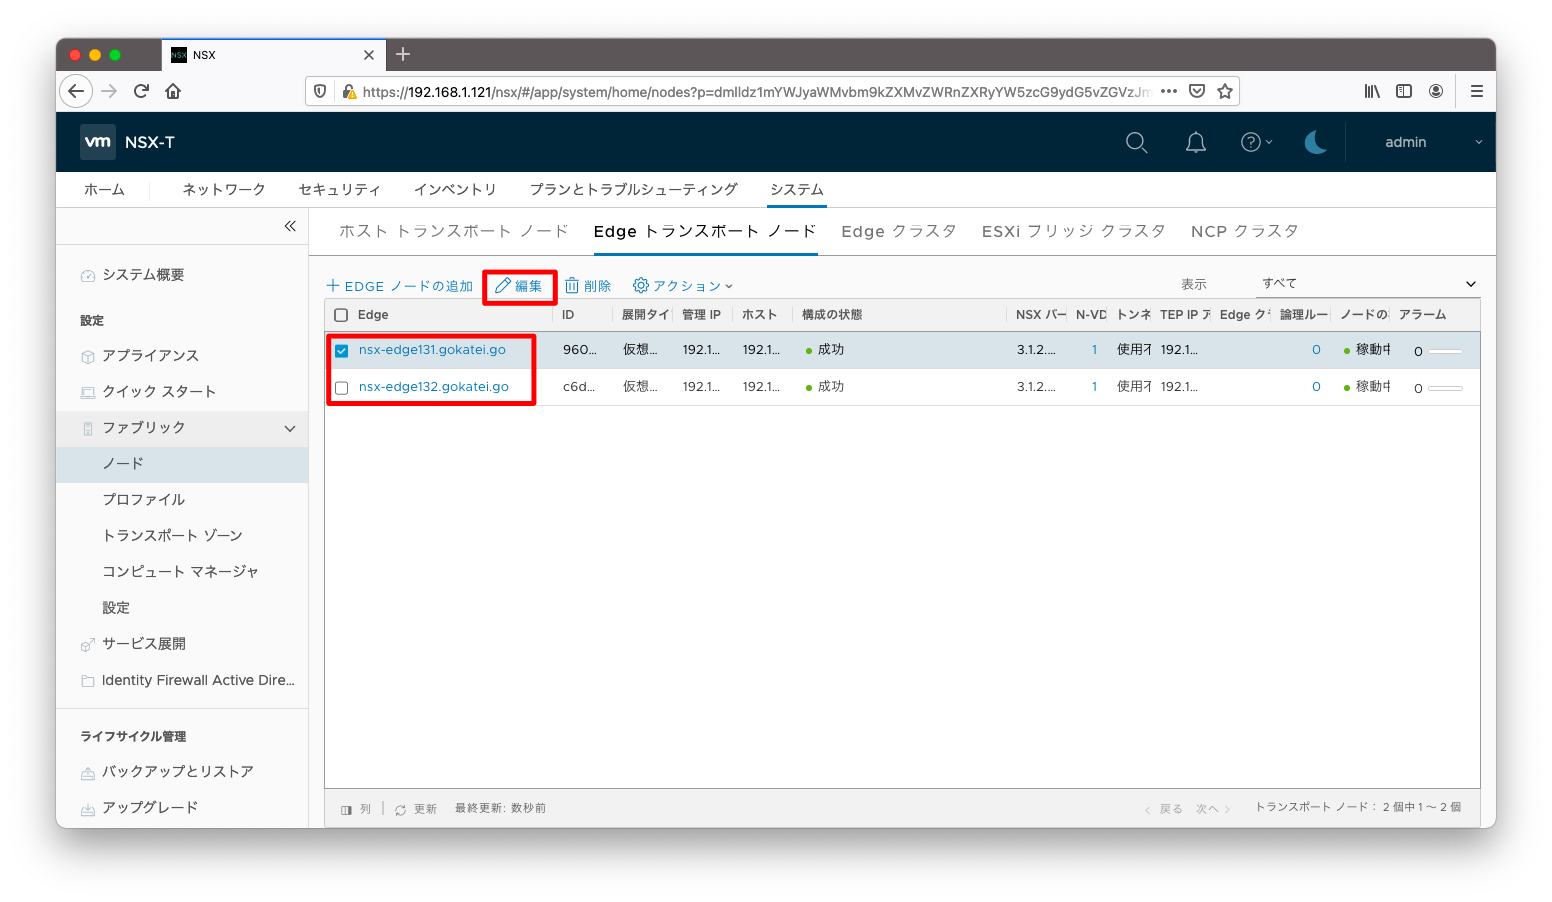
さきほどの操作で作成したアップリンクプロファイルとVLANトランスポートゾーンを適用します。
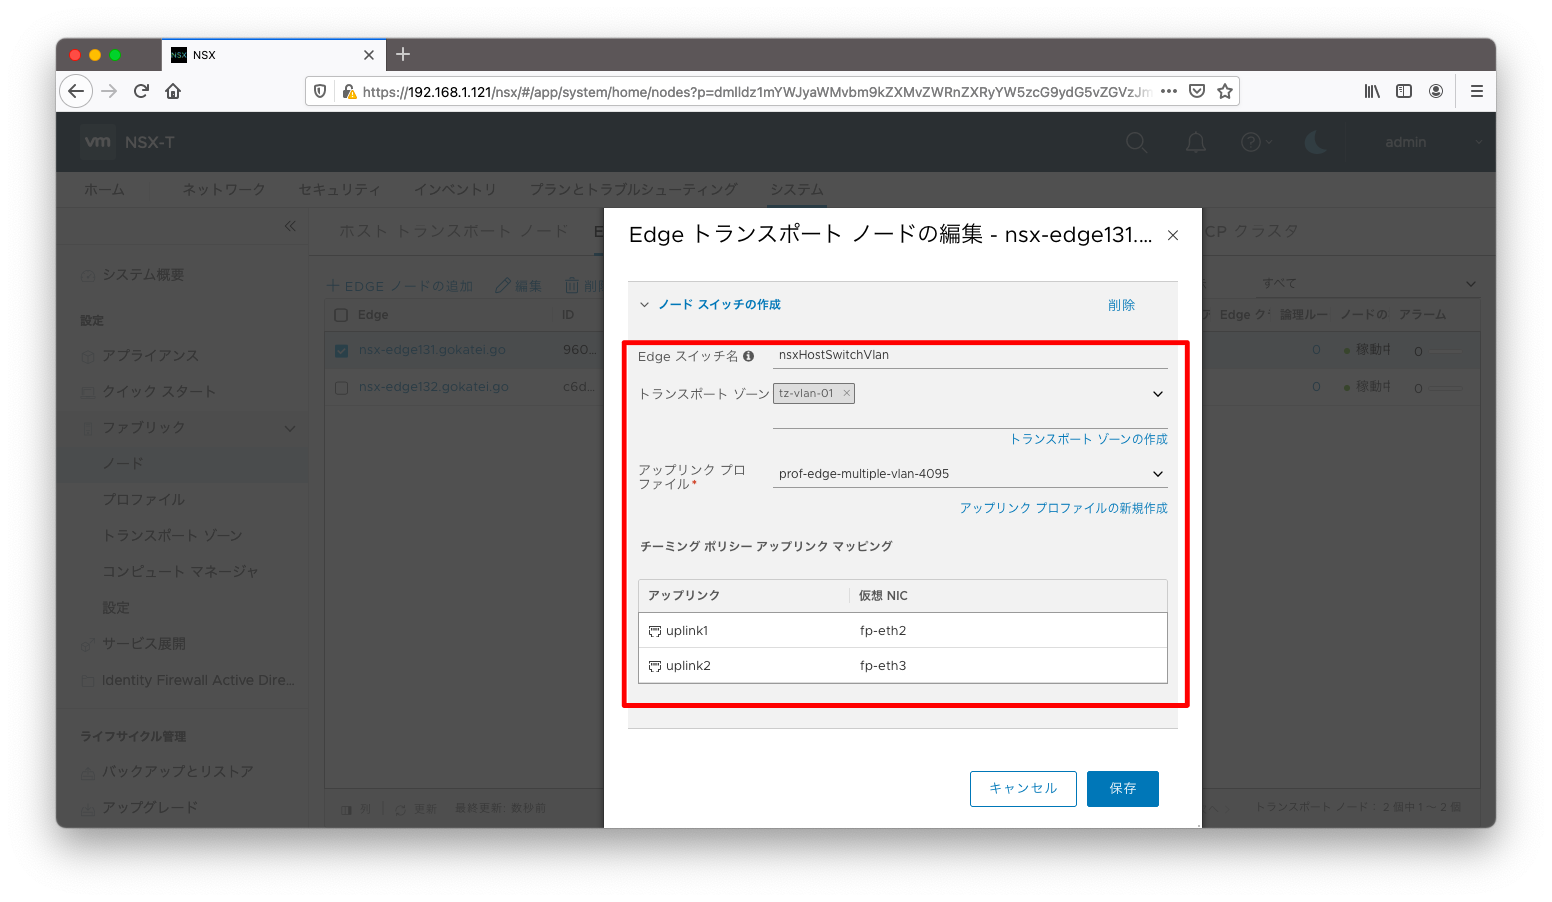
ノードスイッチの設定全文は以下の通りです。
ESXi ノードスイッチ
administrator@ubuntu106:~$ curl --silent --request GET \
>   -u admin:P@ssw0rdP@ssw0rd \
>   --header "Content-Type:application/json" \
>   -k https://192.168.1.121/api/v1/transport-nodes \
>   | jq ' .results[] | select ( .display_name == "nsx-edge132.gokatei.go" ) '
{
  "node_id": "941b7d14-b23d-11eb-9e93-005056b30c2f",
  "host_switch_spec": {
    "host_switches": [
      {
        "host_switch_name": "nsxHostSwitchVlan",
        "host_switch_id": "3b19cc75-0eed-4f6a-a2d9-3786977d0bc6",
        "host_switch_type": "NVDS",
        "host_switch_mode": "STANDARD",
        "host_switch_profile_ids": [
          {
            "key": "UplinkHostSwitchProfile",
            "value": "b926c211-fc87-4b3b-a997-fe02e292578b"
          },
          {
            "key": "LldpHostSwitchProfile",
            "value": "9e0b4d2d-d155-4b4b-8947-fbfe5b79f7cb"
          }
        ],
        "pnics": [
          {
            "device_name": "fp-eth2",
            "uplink_name": "uplink1"
          },
          {
            "device_name": "fp-eth3",
            "uplink_name": "uplink2"
          }
        ],
        "is_migrate_pnics": false,
        "ip_assignment_spec": {
          "resource_type": "AssignedByDhcp"
        },
        "cpu_config": [],
        "transport_zone_endpoints": [
          {
            "transport_zone_id": "b2777d91-22d0-4b58-b577-70f8e32ce991",
            "transport_zone_profile_ids": [
              {
                "resource_type": "BfdHealthMonitoringProfile",
                "profile_id": "52035bb3-ab02-4a08-9884-18631312e50a"
              }
            ]
          }
        ],
        "vmk_install_migration": [],
        "pnics_uninstall_migration": [],
        "vmk_uninstall_migration": [],
        "not_ready": false
      }
    ],
    "resource_type": "StandardHostSwitchSpec"
  },
  "transport_zone_endpoints": [],
  "maintenance_mode": "DISABLED",
  "node_deployment_info": {
    "deployment_type": "VIRTUAL_MACHINE",
    "node_settings": {
      "hostname": "nsx-edge132.gokatei.go",
      "search_domains": [
        "gokatei.go"
      ],
      "ntp_servers": [
        "192.168.1.221"
      ],
      "dns_servers": [
        "192.168.1.221",
        "192.168.1.1"
      ],
      "enable_ssh": true,
      "allow_ssh_root_login": false
    },
    "resource_type": "EdgeNode",
    "id": "941b7d14-b23d-11eb-9e93-005056b30c2f",
    "display_name": "nsx-edge132.gokatei.go",
    "description": "",
    "external_id": "941b7d14-b23d-11eb-9e93-005056b30c2f",
    "ip_addresses": [
      "192.168.1.132"
    ],
    "_create_user": "admin",
    "_create_time": 1620726316034,
    "_last_modified_user": "admin",
    "_last_modified_time": 1620728700813,
    "_system_owned": false,
    "_protection": "NOT_PROTECTED",
    "_revision": 1
  },
  "is_overridden": false,
  "failure_domain_id": "4fc1e3b0-1cd4-4339-86c8-f76baddbaafb",
  "resource_type": "TransportNode",
  "id": "941b7d14-b23d-11eb-9e93-005056b30c2f",
  "display_name": "nsx-edge132.gokatei.go",
  "description": "",
  "tags": [],
  "_create_user": "admin",
  "_create_time": 1620726316098,
  "_last_modified_user": "admin",
  "_last_modified_time": 1620728700866,
  "_system_owned": false,
  "_protection": "NOT_PROTECTED",
  "_revision": 1
}
Edgeクラスタ
以上の操作で作成されたNSX Edgeに対してクラスタを作成します。
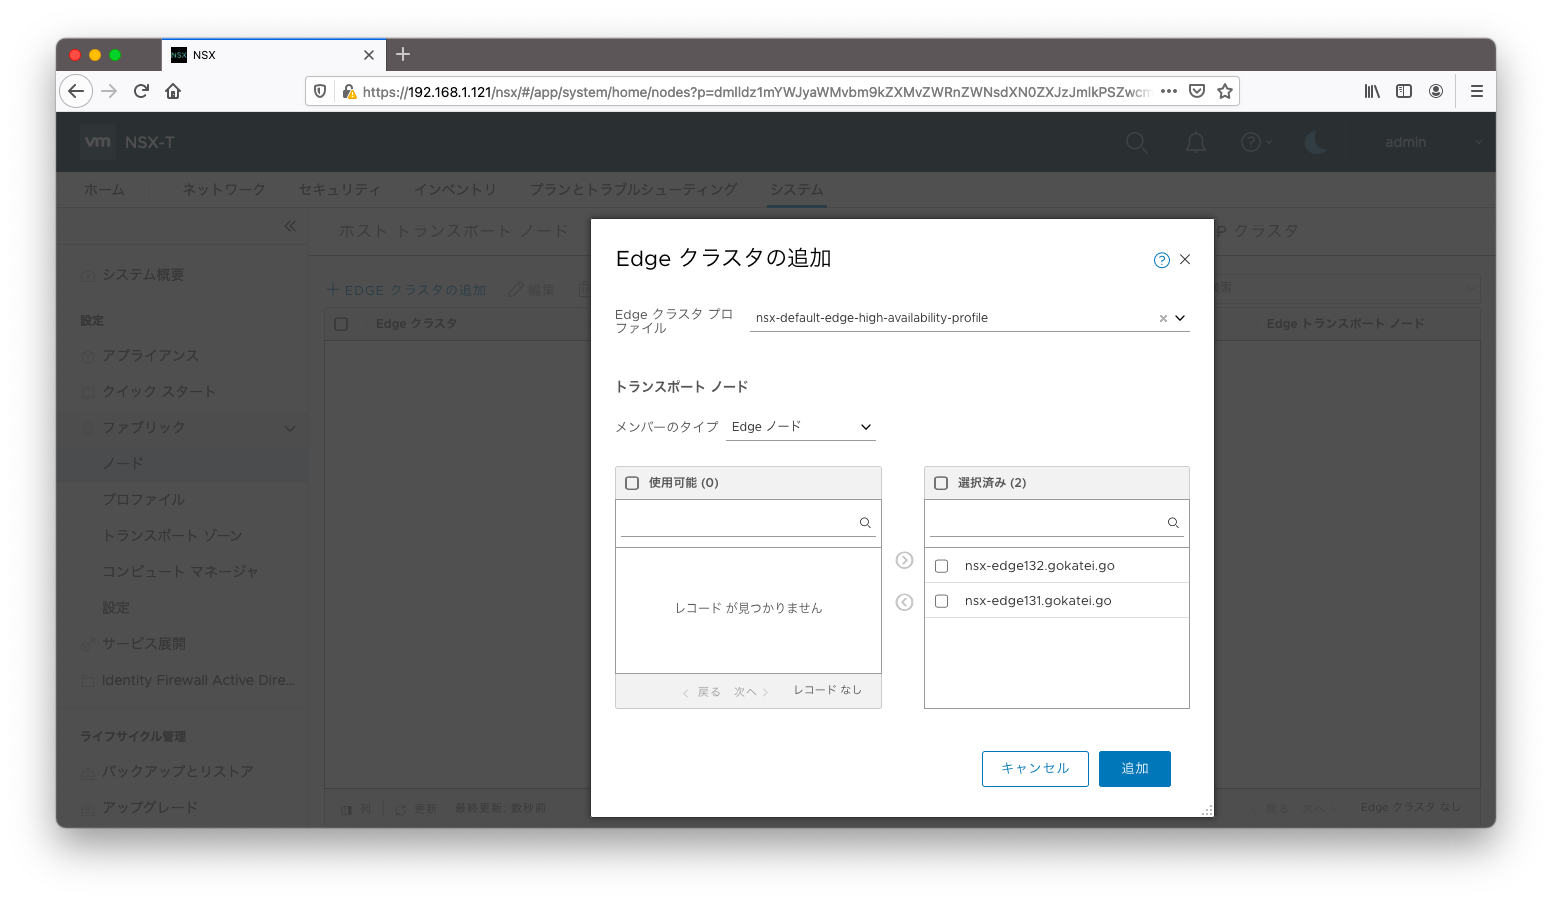
Edgeクラスタの設定全文は以下の通りです。
Edgeクラスタ
administrator@ubuntu106:~$ curl --silent --request GET \
>   -u admin:P@ssw0rdP@ssw0rd \
>   --header "Content-Type:application/json" \
>   -k https://192.168.1.121/api/v1/edge-clusters
{
  "results" : [ {
    "deployment_type" : "VIRTUAL_MACHINE",
    "members" : [ {
      "member_index" : 0,
      "transport_node_id" : "c6d37ca4-b0d3-11eb-9bf2-005056936e29"
    }, {
      "member_index" : 1,
      "transport_node_id" : "9603f1f8-b0d3-11eb-b054-00505693ac43"
    } ],
    "cluster_profile_bindings" : [ {
      "resource_type" : "EdgeHighAvailabilityProfile",
      "profile_id" : "91bcaa06-47a1-11e4-8316-17ffc770799b"
    } ],
    "member_node_type" : "EDGE_NODE",
    "allocation_rules" : [ ],
    "enable_inter_site_forwarding" : false,
    "resource_type" : "EdgeCluster",
    "id" : "7217afeb-3b5e-4fc1-b781-2b7650fe37b6",
    "display_name" : "cluster01",
    "description" : "",
    "tags" : [ ],
    "_create_user" : "admin",
    "_create_time" : 1620577610223,
    "_last_modified_user" : "admin",
    "_last_modified_time" : 1620577610223,
    "_system_owned" : false,
    "_protection" : "NOT_PROTECTED",
    "_revision" : 0
  } ],
  "result_count" : 1
}
ネットワーク設定
外部セグメント
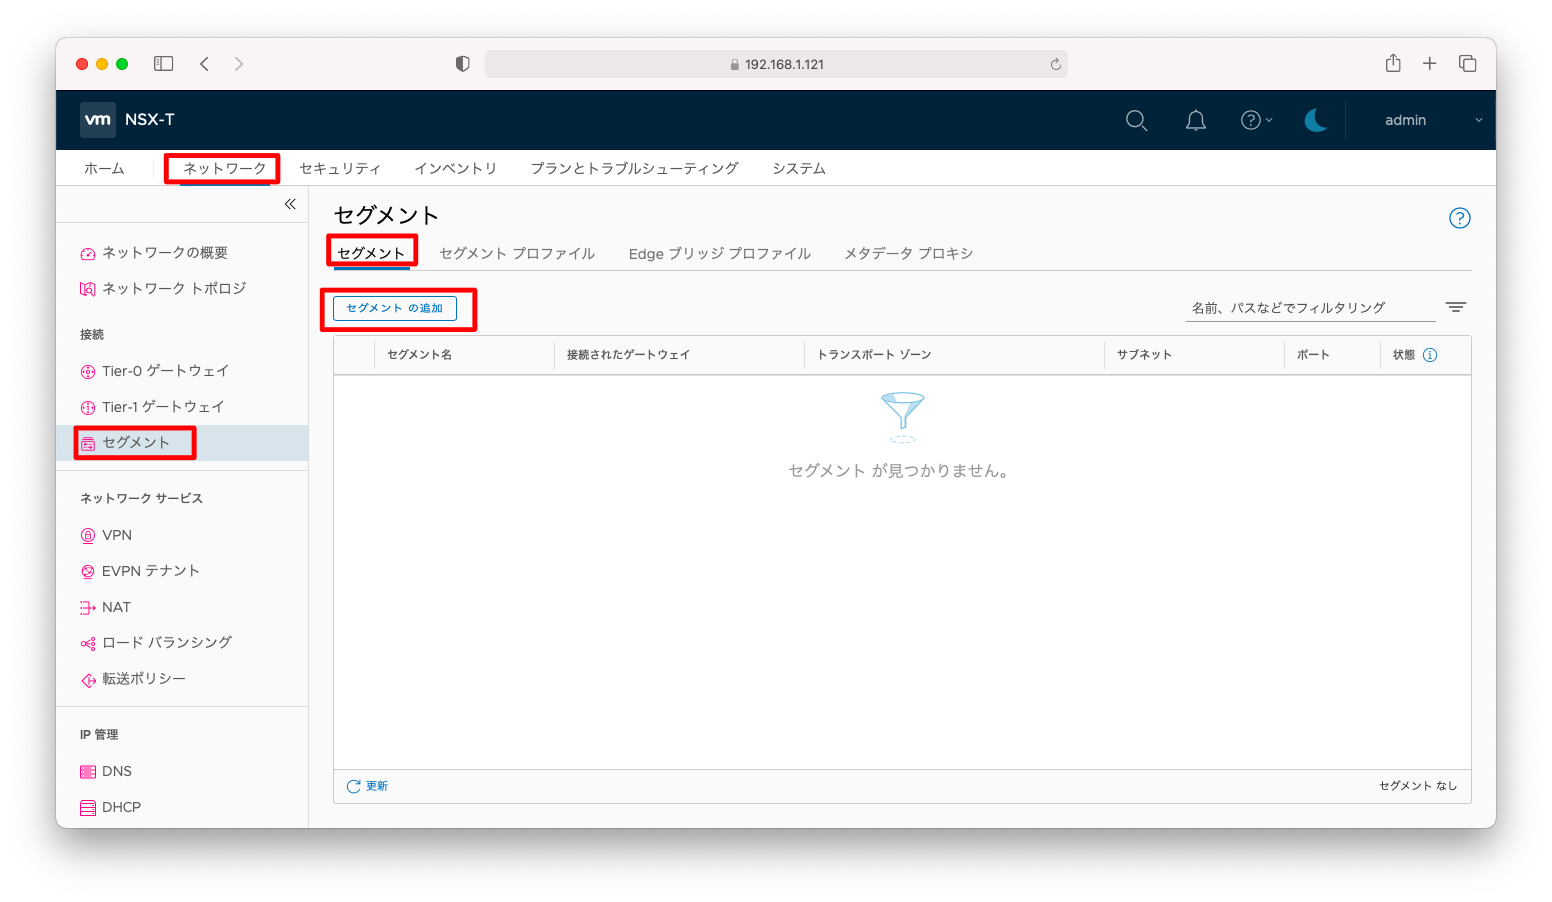
「ネットワーク」「セグメント」「セグメント」の順に押下して表示されるセグメント一覧の画面で、「セグメントの追加」を押下します。
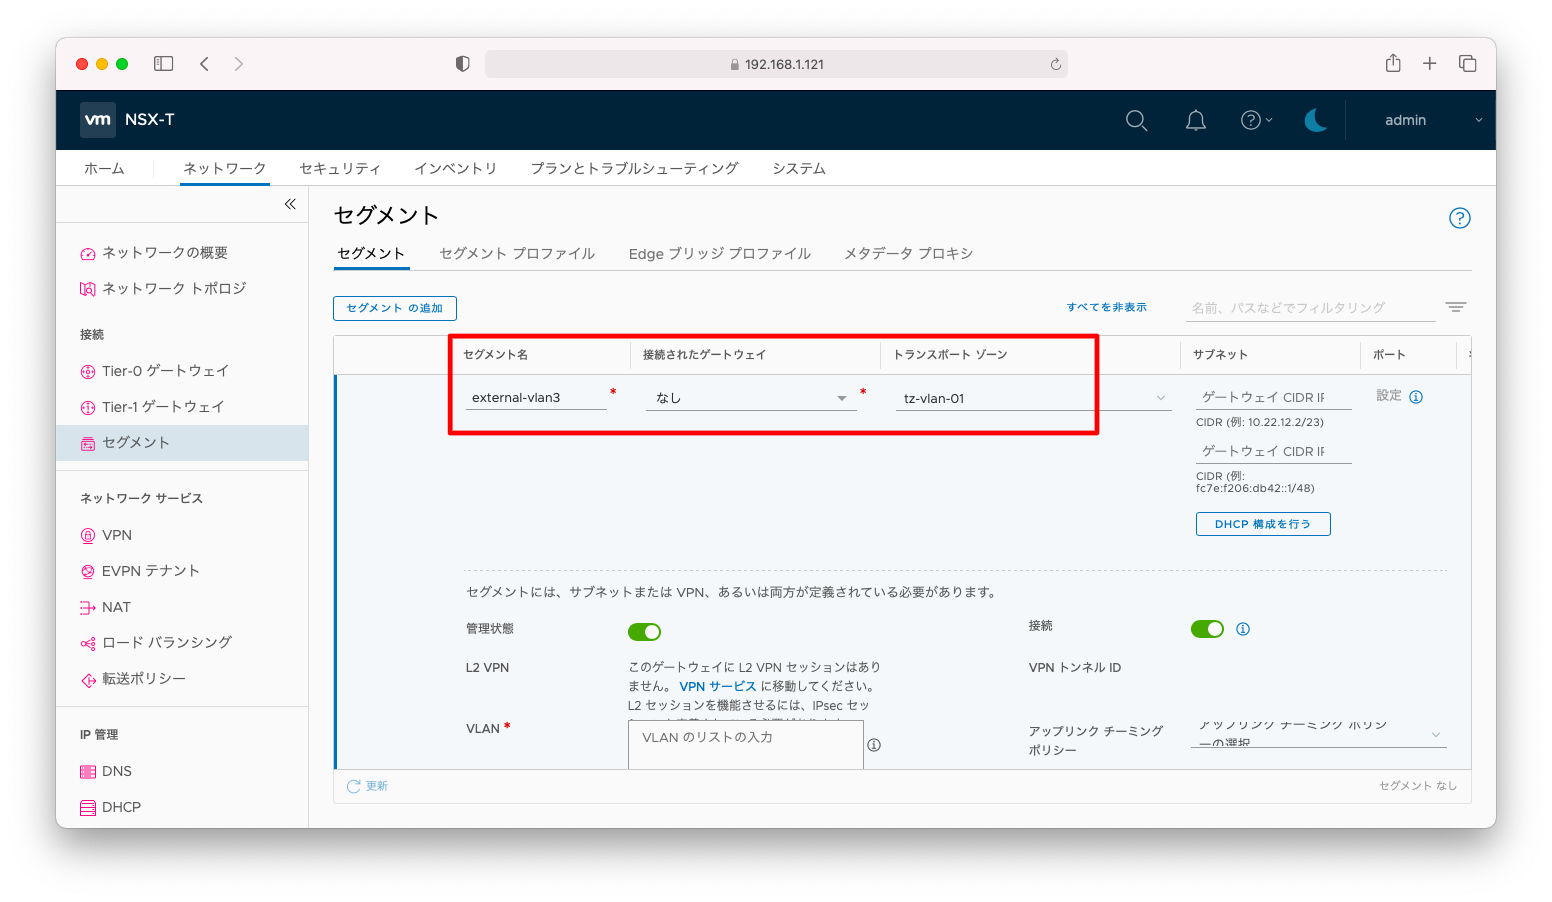
「セグメント名」や「トランスポートゾーン」を入力します。
「VLAN ID」と「アップリンクチーミングポリシー」を入力します。「アップリンクチーミングポリシー」にはVLANトランスポートゾーンに対して設定したチーミングポリシーを選択することが可能で、どのNICを優先させるかの指定が可能になります。
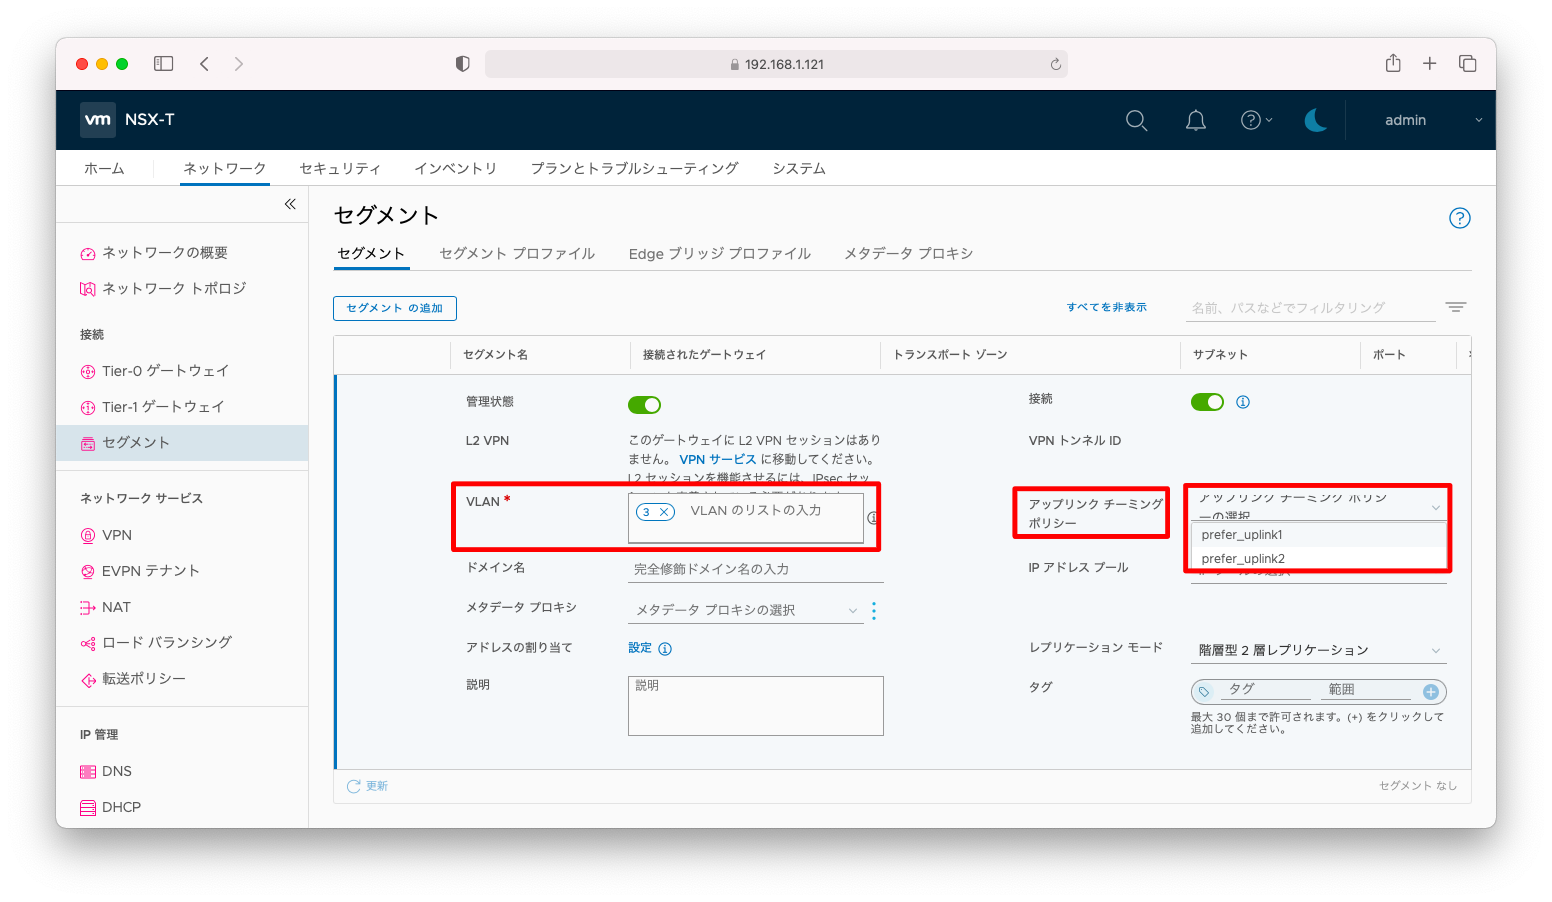
同様の設定を繰り替えし、「external-vlan3」「external-vlan4」の2つのセグメントを作成します。これら2つは互いに入れ子の設定になっており、「external-vlan3」は「vmnic2(uplink1)」を優先し、「external-vlan4」は「vmnic3(uplink2)」を優先します。
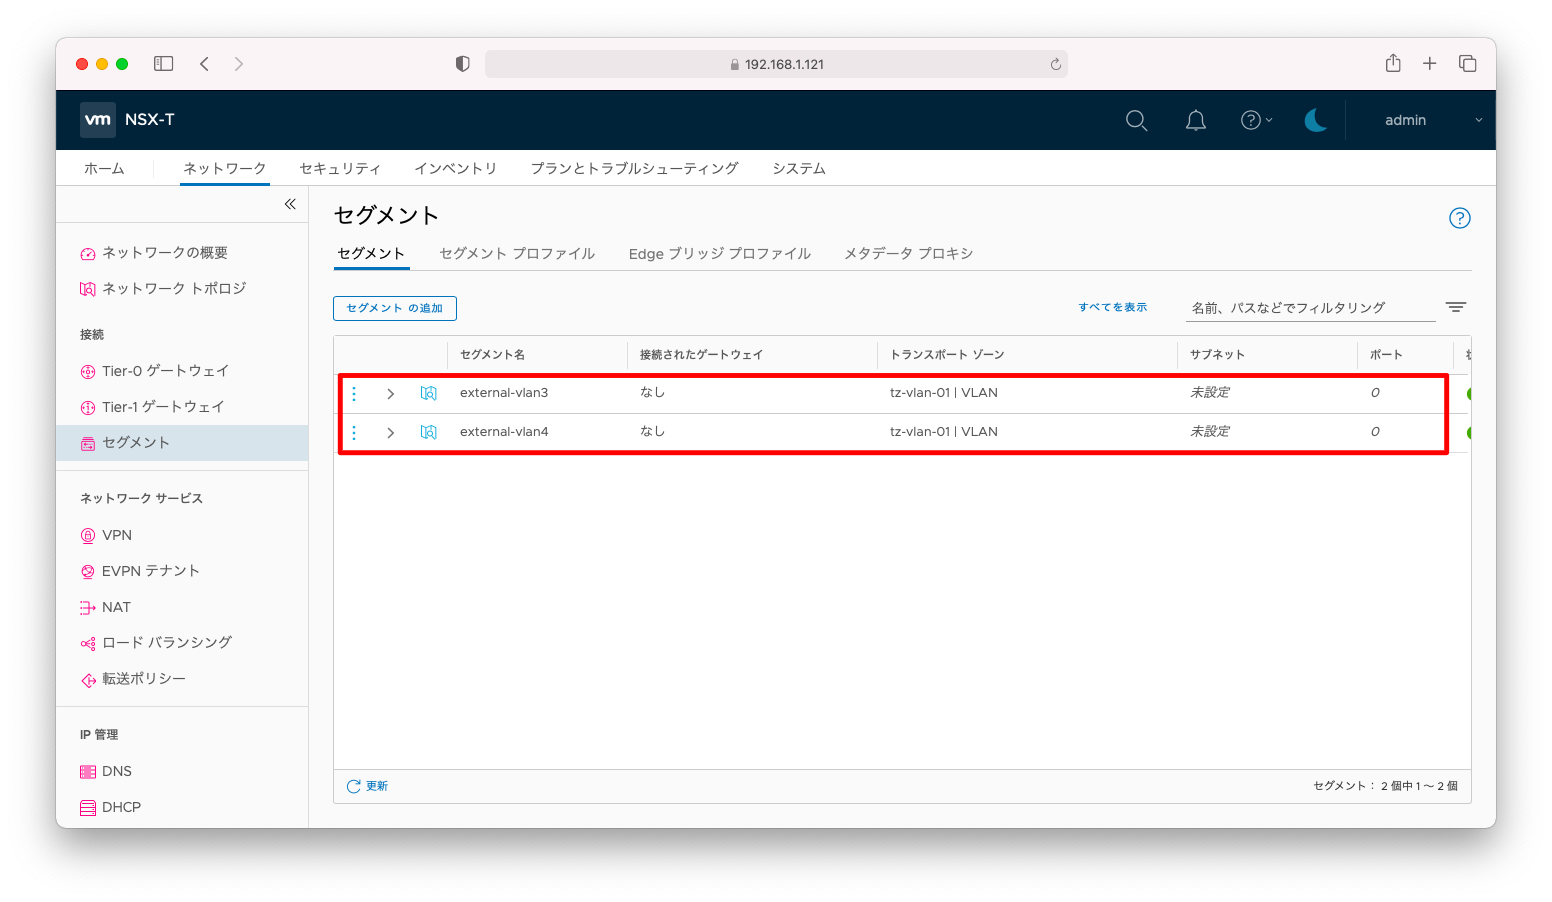
セグメントの設定全文は以下の通りです。
セグメント
administrator@ubuntu106:~$ curl --silent --request GET \
>   -u admin:P@ssw0rdP@ssw0rd \
>   --header "Content-Type:application/json" \
>   -k https://192.168.1.121/policy/api/v1/infra/segments
{
  "results" : [ {
    "type" : "DISCONNECTED",
    "vlan_ids" : [ "3" ],
    "transport_zone_path" : "/infra/sites/default/enforcement-points/default/transport-zones/b2777d91-22d0-4b58-b577-70f8e32ce991",
    "advanced_config" : {
      "address_pool_paths" : [ ],
      "hybrid" : false,
      "inter_router" : false,
      "local_egress" : false,
      "uplink_teaming_policy_name" : "prefer_uplink1",
      "urpf_mode" : "STRICT",
      "connectivity" : "ON"
    },
    "admin_state" : "UP",
    "replication_mode" : "MTEP",
    "resource_type" : "Segment",
    "id" : "external-vlan3",
    "display_name" : "external-vlan3",
    "path" : "/infra/segments/external-vlan3",
    "relative_path" : "external-vlan3",
    "parent_path" : "/infra",
    "unique_id" : "b0c1f3b5-9aad-42ce-82bb-e2d26dabbfc8",
    "marked_for_delete" : false,
    "overridden" : false,
    "_create_user" : "admin",
    "_create_time" : 1620729369704,
    "_last_modified_user" : "admin",
    "_last_modified_time" : 1620729369714,
    "_system_owned" : false,
    "_protection" : "NOT_PROTECTED",
    "_revision" : 0
  }, {
    "type" : "DISCONNECTED",
    "vlan_ids" : [ "4" ],
    "transport_zone_path" : "/infra/sites/default/enforcement-points/default/transport-zones/b2777d91-22d0-4b58-b577-70f8e32ce991",
    "advanced_config" : {
      "address_pool_paths" : [ ],
      "hybrid" : false,
      "inter_router" : false,
      "local_egress" : false,
      "uplink_teaming_policy_name" : "prefer_uplink2",
      "urpf_mode" : "STRICT",
      "connectivity" : "ON"
    },
    "admin_state" : "UP",
    "replication_mode" : "MTEP",
    "resource_type" : "Segment",
    "id" : "external-vlan4",
    "display_name" : "external-vlan4",
    "path" : "/infra/segments/external-vlan4",
    "relative_path" : "external-vlan4",
    "parent_path" : "/infra",
    "unique_id" : "17f75fdc-82e9-44fd-a303-b78fcceaa5ac",
    "marked_for_delete" : false,
    "overridden" : false,
    "_create_user" : "admin",
    "_create_time" : 1620729386845,
    "_last_modified_user" : "admin",
    "_last_modified_time" : 1620729386848,
    "_system_owned" : false,
    "_protection" : "NOT_PROTECTED",
    "_revision" : 0
  } ],
  "result_count" : 2,
  "sort_by" : "display_name",
  "sort_ascending" : true
}
T0ゲートウェイ
T0ゲートウェイとループバックインターフェースを作成します。設定方法の詳細は「NSX-T VRFの作成」を参照ください。
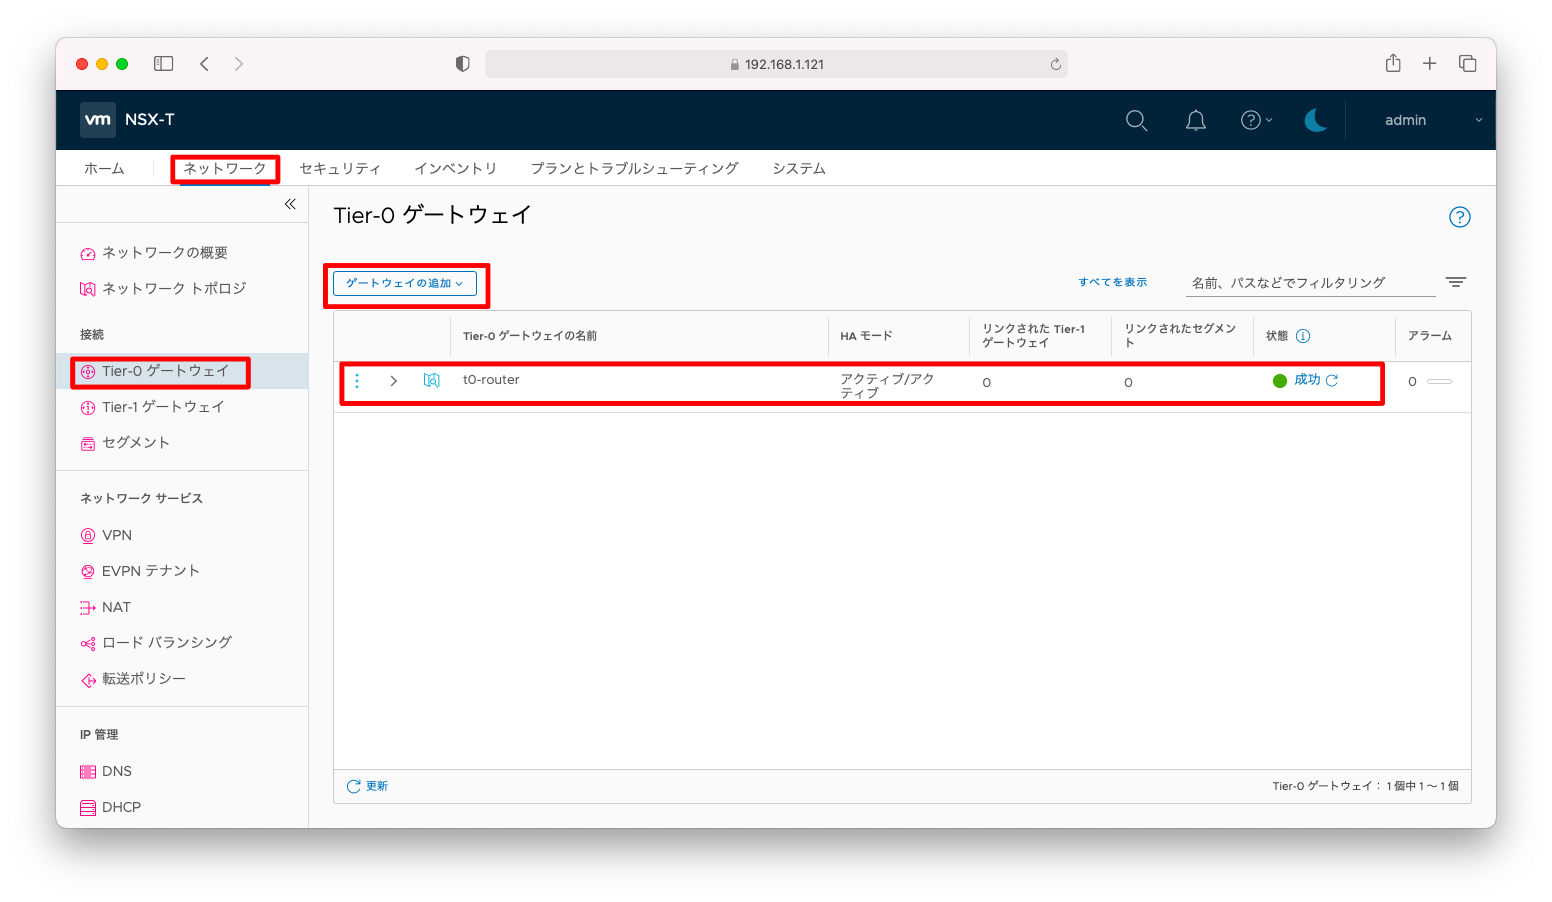
まず、以下スクリーンショットのようにT0ゲートウェイを作成します。
次に、BGPのルータIDとなるループバックアドレスを定義します。
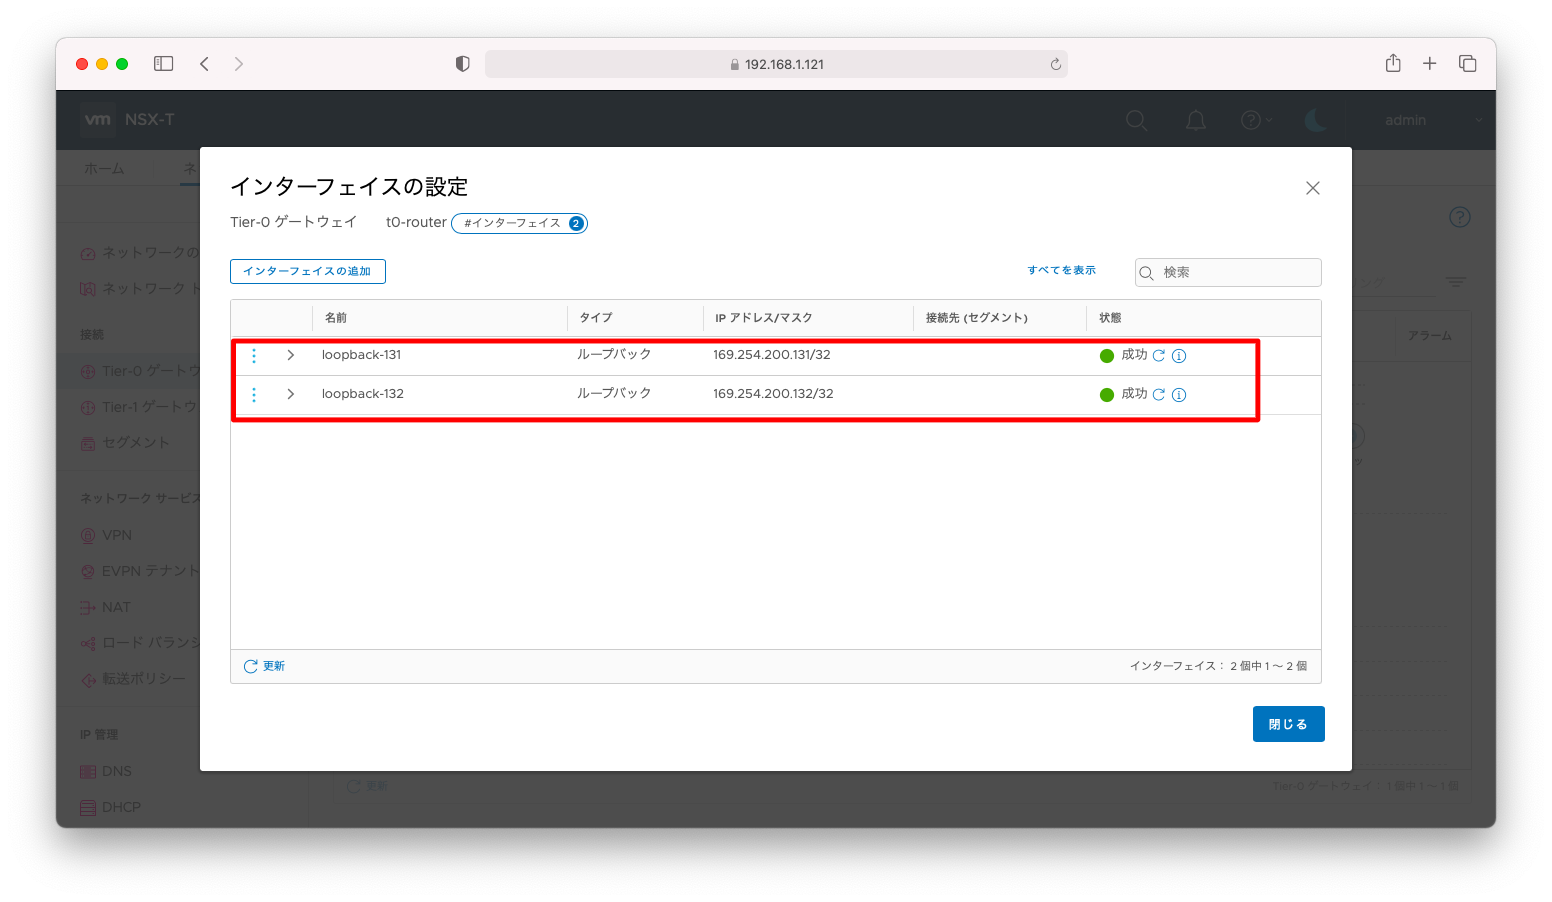
T0ゲートウェイの設定全文は以下の通りです。
T0ゲートウェイ
administrator@ubuntu106:~$ curl --silent --request GET \
>   -u admin:P@ssw0rdP@ssw0rd \
>   --header "Content-Type:application/json" \
>   -k https://192.168.1.121/policy/api/v1/infra/tier-0s/t0-router
{
  "transit_subnets" : [ "100.64.0.0/16" ],
  "internal_transit_subnets" : [ "169.254.0.0/24" ],
  "ha_mode" : "ACTIVE_ACTIVE",
  "failover_mode" : "NON_PREEMPTIVE",
  "ipv6_profile_paths" : [ "/infra/ipv6-ndra-profiles/default", "/infra/ipv6-dad-profiles/default" ],
  "force_whitelisting" : false,
  "default_rule_logging" : false,
  "disable_firewall" : false,
  "advanced_config" : {
    "forwarding_up_timer" : 0,
    "connectivity" : "ON"
  },
  "resource_type" : "Tier0",
  "id" : "t0-router",
  "display_name" : "t0-router",
  "path" : "/infra/tier-0s/t0-router",
  "relative_path" : "t0-router",
  "parent_path" : "/infra",
  "unique_id" : "882f011c-5971-4fe2-ae7e-58210ae453b3",
  "marked_for_delete" : false,
  "overridden" : false,
  "_create_user" : "admin",
  "_create_time" : 1620729962923,
  "_last_modified_user" : "admin",
  "_last_modified_time" : 1620729963088,
  "_system_owned" : false,
  "_protection" : "NOT_PROTECTED",
  "_revision" : 0
}
インターフェースの設定全文は以下の通りです。
インターフェース
administrator@ubuntu106:~$ curl --silent --request GET \
>   -u admin:P@ssw0rdP@ssw0rd \
>   --header "Content-Type:application/json" \
>   -k https://192.168.1.121/policy/api/v1/infra/tier-0s/t0-router/locale-services/default/interfaces
{
  "results" : [ {
    "urpf_mode" : "STRICT",
    "edge_path" : "/infra/sites/default/enforcement-points/default/edge-clusters/5f12b4c2-ce8a-4bfa-a74b-9cef494aeeca/edge-nodes/1",
    "type" : "LOOPBACK",
    "resource_type" : "Tier0Interface",
    "id" : "loopback-131",
    "display_name" : "loopback-131",
    "path" : "/infra/tier-0s/t0-router/locale-services/default/interfaces/loopback-131",
    "relative_path" : "loopback-131",
    "parent_path" : "/infra/tier-0s/t0-router/locale-services/default",
    "unique_id" : "93da9e82-d0be-4b17-a4a0-88436a93a474",
    "marked_for_delete" : false,
    "overridden" : false,
    "subnets" : [ {
      "ip_addresses" : [ "169.254.200.131" ],
      "prefix_len" : 32
    } ],
    "_create_user" : "admin",
    "_create_time" : 1620730024721,
    "_last_modified_user" : "admin",
    "_last_modified_time" : 1620730024727,
    "_system_owned" : false,
    "_protection" : "NOT_PROTECTED",
    "_revision" : 0
  }, {
    "urpf_mode" : "STRICT",
    "edge_path" : "/infra/sites/default/enforcement-points/default/edge-clusters/5f12b4c2-ce8a-4bfa-a74b-9cef494aeeca/edge-nodes/0",
    "type" : "LOOPBACK",
    "resource_type" : "Tier0Interface",
    "id" : "loopback-132",
    "display_name" : "loopback-132",
    "path" : "/infra/tier-0s/t0-router/locale-services/default/interfaces/loopback-132",
    "relative_path" : "loopback-132",
    "parent_path" : "/infra/tier-0s/t0-router/locale-services/default",
    "unique_id" : "b817558d-aa1a-43b9-93a2-995d5435da0d",
    "marked_for_delete" : false,
    "overridden" : false,
    "subnets" : [ {
      "ip_addresses" : [ "169.254.200.132" ],
      "prefix_len" : 32
    } ],
    "_create_user" : "admin",
    "_create_time" : 1620730048756,
    "_last_modified_user" : "admin",
    "_last_modified_time" : 1620730048759,
    "_system_owned" : false,
    "_protection" : "NOT_PROTECTED",
    "_revision" : 0
  } ],
  "result_count" : 2,
  "sort_by" : "display_name",
  "sort_ascending" : true
}
VRF
VRFと外部インターフェースを作成します。設定方法の詳細は「NSX-T VRFの作成」を参照ください。
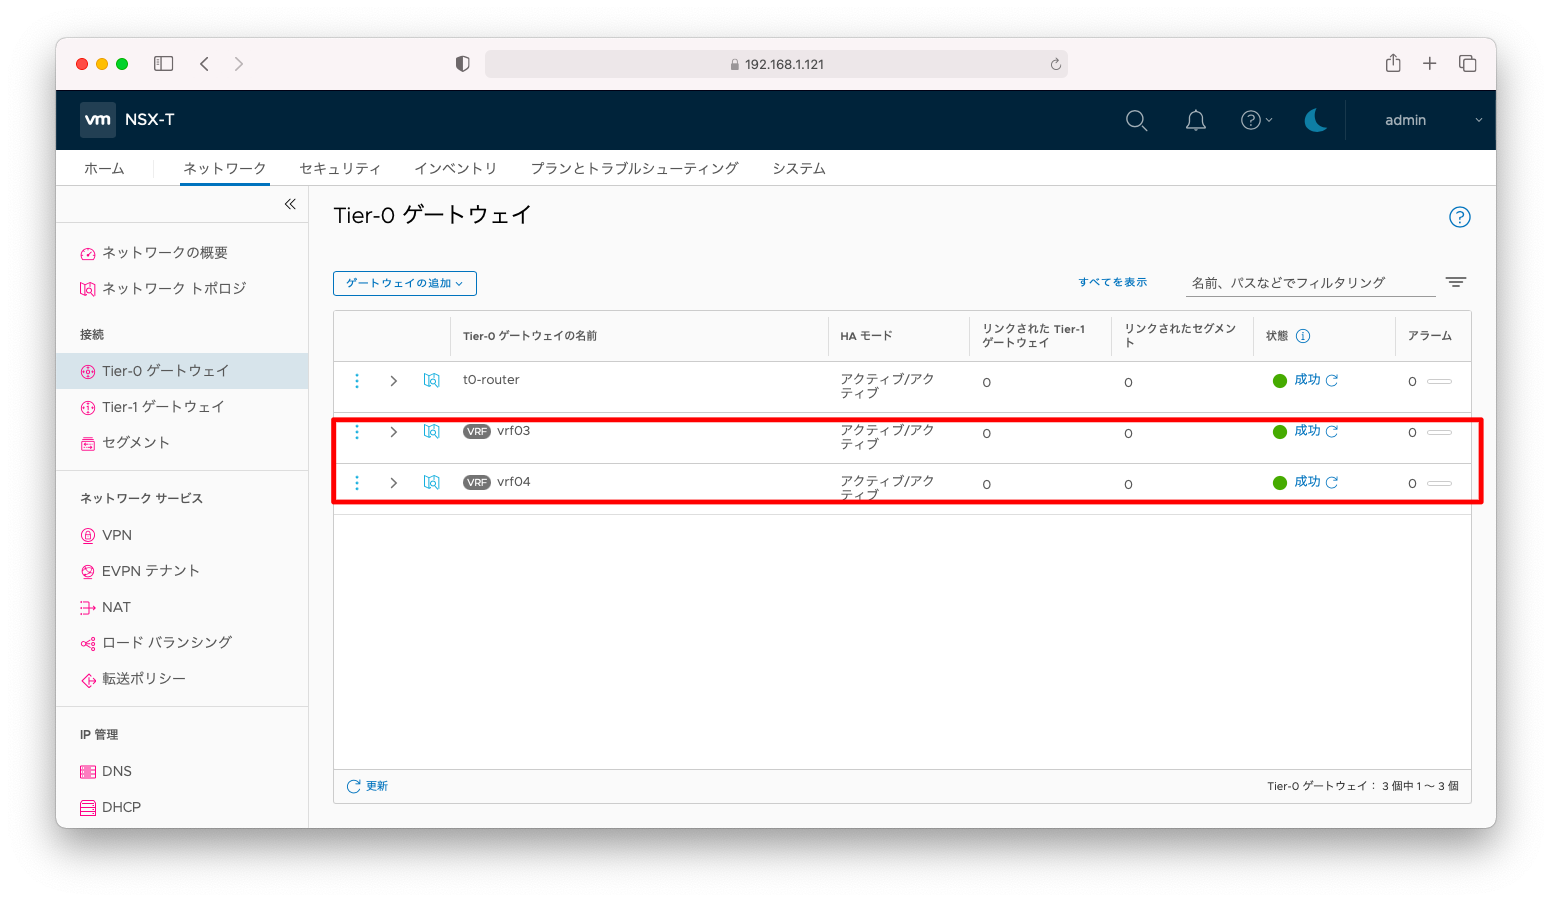
まず、以下スクリーンショットのようにVRFを作成します。
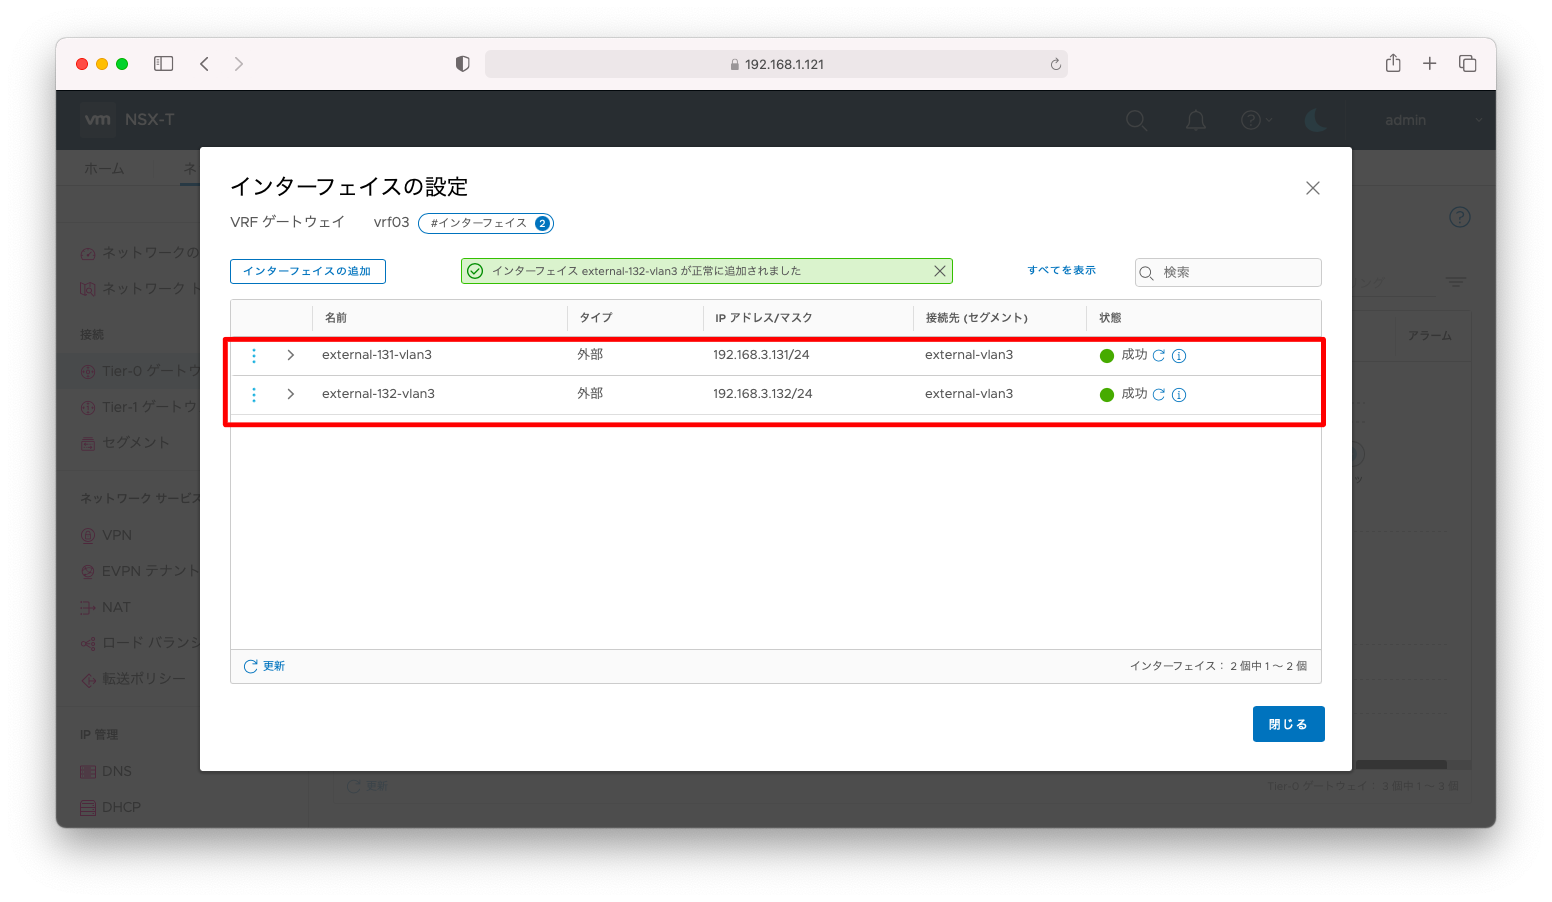
vrf03にvlan3に所属するインターフェースを作成します。
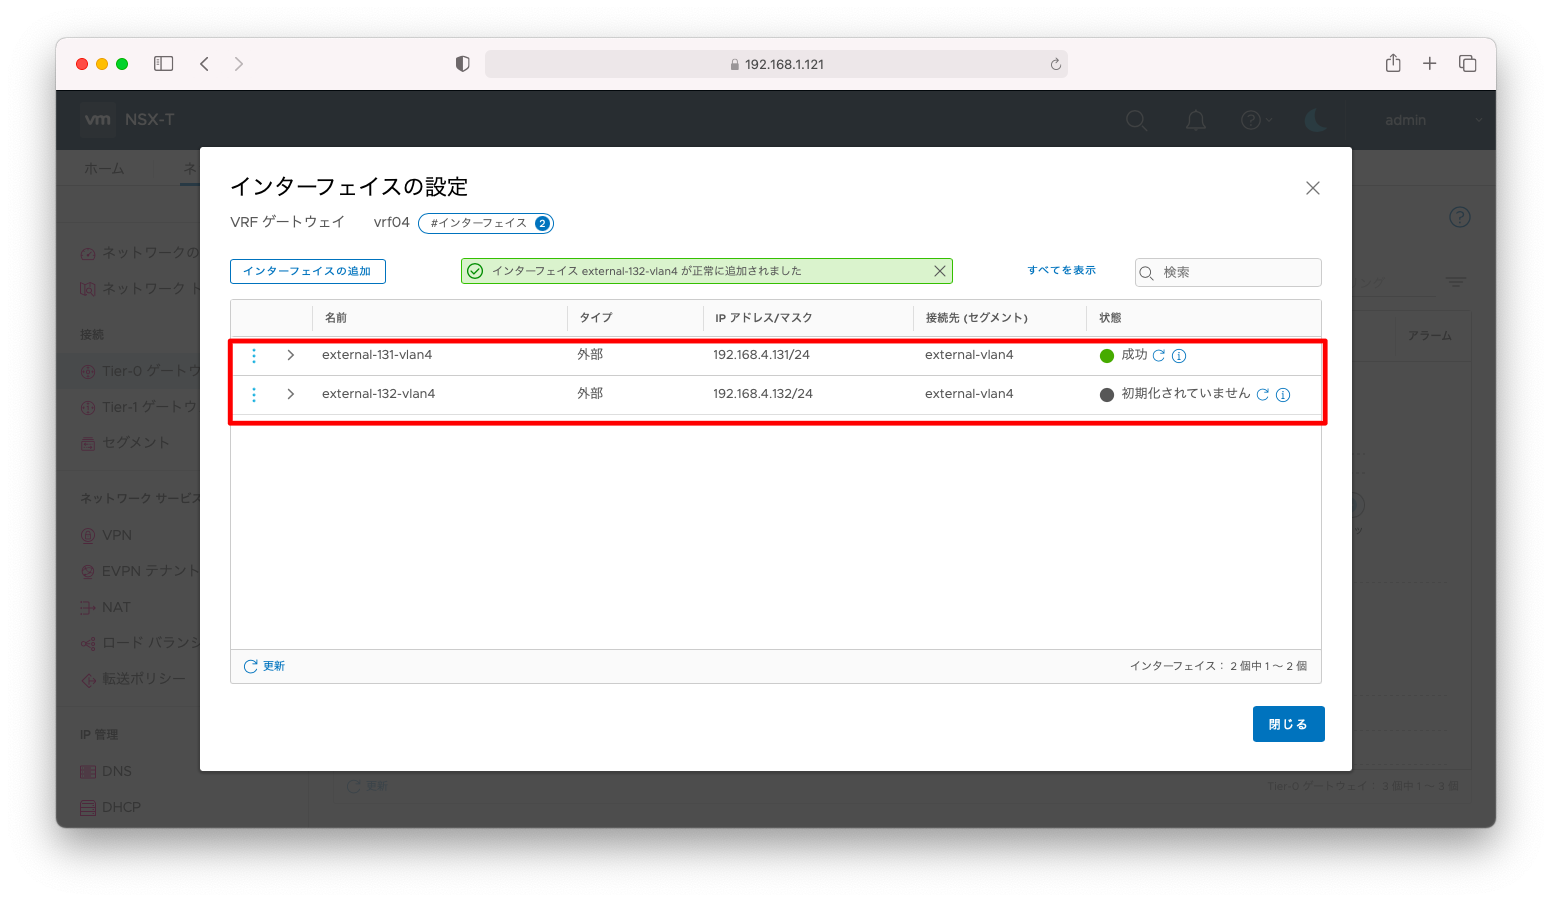
vrf04にvlan4に所属するインターフェースを作成します。
VRFの設定全文は以下の通りです。
VRF
administrator@ubuntu106:~$ curl --silent --request GET \
>   -u admin:P@ssw0rdP@ssw0rd \
>   --header "Content-Type:application/json" \
>   -k https://192.168.1.121/policy/api/v1/infra/tier-0s/vrf03
{
  "transit_subnets" : [ "100.64.0.0/16" ],
  "internal_transit_subnets" : [ "169.254.0.0/24" ],
  "ha_mode" : "ACTIVE_ACTIVE",
  "failover_mode" : "NON_PREEMPTIVE",
  "ipv6_profile_paths" : [ "/infra/ipv6-ndra-profiles/default", "/infra/ipv6-dad-profiles/default" ],
  "force_whitelisting" : false,
  "default_rule_logging" : false,
  "disable_firewall" : false,
  "vrf_config" : {
    "tier0_path" : "/infra/tier-0s/t0-router"
  },
  "advanced_config" : {
    "forwarding_up_timer" : 0,
    "connectivity" : "ON"
  },
  "resource_type" : "Tier0",
  "id" : "vrf03",
  "display_name" : "vrf03",
  "path" : "/infra/tier-0s/vrf03",
  "relative_path" : "vrf03",
  "parent_path" : "/infra",
  "unique_id" : "11c88926-2959-4ae0-89ab-2a60d3c9f95d",
  "marked_for_delete" : false,
  "overridden" : false,
  "_create_user" : "admin",
  "_create_time" : 1620738432066,
  "_last_modified_user" : "admin",
  "_last_modified_time" : 1620738432175,
  "_system_owned" : false,
  "_protection" : "NOT_PROTECTED",
  "_revision" : 0
}administrator@ubuntu106:~$
administrator@ubuntu106:~$
administrator@ubuntu106:~$
administrator@ubuntu106:~$
administrator@ubuntu106:~$ curl --silent --request GET \
>   -u admin:P@ssw0rdP@ssw0rd \
>   --header "Content-Type:application/json" \
>   -k https://192.168.1.121/policy/api/v1/infra/tier-0s/vrf04
{
  "transit_subnets" : [ "100.64.0.0/16" ],
  "internal_transit_subnets" : [ "169.254.0.0/24" ],
  "ha_mode" : "ACTIVE_ACTIVE",
  "failover_mode" : "NON_PREEMPTIVE",
  "ipv6_profile_paths" : [ "/infra/ipv6-ndra-profiles/default", "/infra/ipv6-dad-profiles/default" ],
  "force_whitelisting" : false,
  "default_rule_logging" : false,
  "disable_firewall" : false,
  "vrf_config" : {
    "tier0_path" : "/infra/tier-0s/t0-router"
  },
  "advanced_config" : {
    "forwarding_up_timer" : 0,
    "connectivity" : "ON"
  },
  "resource_type" : "Tier0",
  "id" : "vrf04",
  "display_name" : "vrf04",
  "path" : "/infra/tier-0s/vrf04",
  "relative_path" : "vrf04",
  "parent_path" : "/infra",
  "unique_id" : "6573a25f-742a-460e-adcf-8bee1a1c6c44",
  "marked_for_delete" : false,
  "overridden" : false,
  "_create_user" : "admin",
  "_create_time" : 1620738492387,
  "_last_modified_user" : "admin",
  "_last_modified_time" : 1620738492418,
  "_system_owned" : false,
  "_protection" : "NOT_PROTECTED",
  "_revision" : 0
}
インターフェースの設定全文は以下の通りです。
インターフェース
administrator@ubuntu106:~$ curl --silent --request GET \
>   -u admin:P@ssw0rdP@ssw0rd \
>   --header "Content-Type:application/json" \
>   -k https://192.168.1.121/policy/api/v1/infra/tier-0s/vrf03/locale-services/default/interfaces
{
  "results" : [ {
    "urpf_mode" : "STRICT",
    "edge_path" : "/infra/sites/default/enforcement-points/default/edge-clusters/5f12b4c2-ce8a-4bfa-a74b-9cef494aeeca/edge-nodes/1",
    "segment_path" : "/infra/segments/external-vlan3",
    "type" : "EXTERNAL",
    "resource_type" : "Tier0Interface",
    "id" : "external-131-vlan3",
    "display_name" : "external-131-vlan3",
    "path" : "/infra/tier-0s/vrf03/locale-services/default/interfaces/external-131-vlan3",
    "relative_path" : "external-131-vlan3",
    "parent_path" : "/infra/tier-0s/vrf03/locale-services/default",
    "unique_id" : "444cc3da-dfd8-43cb-a9b3-07916230a668",
    "marked_for_delete" : false,
    "overridden" : false,
    "subnets" : [ {
      "ip_addresses" : [ "192.168.3.131" ],
      "prefix_len" : 24
    } ],
    "_create_user" : "admin",
    "_create_time" : 1620738459266,
    "_last_modified_user" : "admin",
    "_last_modified_time" : 1620738459273,
    "_system_owned" : false,
    "_protection" : "NOT_PROTECTED",
    "_revision" : 0
  }, {
    "urpf_mode" : "STRICT",
    "edge_path" : "/infra/sites/default/enforcement-points/default/edge-clusters/5f12b4c2-ce8a-4bfa-a74b-9cef494aeeca/edge-nodes/0",
    "segment_path" : "/infra/segments/external-vlan3",
    "type" : "EXTERNAL",
    "resource_type" : "Tier0Interface",
    "id" : "external-132-vlan3",
    "display_name" : "external-132-vlan3",
    "path" : "/infra/tier-0s/vrf03/locale-services/default/interfaces/external-132-vlan3",
    "relative_path" : "external-132-vlan3",
    "parent_path" : "/infra/tier-0s/vrf03/locale-services/default",
    "unique_id" : "81bc08cc-9712-4e3c-8dca-41ca768bbf91",
    "marked_for_delete" : false,
    "overridden" : false,
    "subnets" : [ {
      "ip_addresses" : [ "192.168.3.132" ],
      "prefix_len" : 24
    } ],
    "_create_user" : "admin",
    "_create_time" : 1620738476686,
    "_last_modified_user" : "admin",
    "_last_modified_time" : 1620738476700,
    "_system_owned" : false,
    "_protection" : "NOT_PROTECTED",
    "_revision" : 0
  } ],
  "result_count" : 2,
  "sort_by" : "display_name",
  "sort_ascending" : true
}administrator@ubuntu106:~$
administrator@ubuntu106:~$
administrator@ubuntu106:~$
administrator@ubuntu106:~$
administrator@ubuntu106:~$ curl --silent --request GET \
>   -u admin:P@ssw0rdP@ssw0rd \
>   --header "Content-Type:application/json" \
>   -k https://192.168.1.121/policy/api/v1/infra/tier-0s/vrf04/locale-services/default/interfaces
{
  "results" : [ {
    "urpf_mode" : "STRICT",
    "edge_path" : "/infra/sites/default/enforcement-points/default/edge-clusters/5f12b4c2-ce8a-4bfa-a74b-9cef494aeeca/edge-nodes/1",
    "segment_path" : "/infra/segments/external-vlan4",
    "type" : "EXTERNAL",
    "resource_type" : "Tier0Interface",
    "id" : "external-131-vlan4",
    "display_name" : "external-131-vlan4",
    "path" : "/infra/tier-0s/vrf04/locale-services/default/interfaces/external-131-vlan4",
    "relative_path" : "external-131-vlan4",
    "parent_path" : "/infra/tier-0s/vrf04/locale-services/default",
    "unique_id" : "241aa54e-d640-468d-a5c8-29f0b73b4a12",
    "marked_for_delete" : false,
    "overridden" : false,
    "subnets" : [ {
      "ip_addresses" : [ "192.168.4.131" ],
      "prefix_len" : 24
    } ],
    "_create_user" : "admin",
    "_create_time" : 1620738523387,
    "_last_modified_user" : "admin",
    "_last_modified_time" : 1620738523393,
    "_system_owned" : false,
    "_protection" : "NOT_PROTECTED",
    "_revision" : 0
  }, {
    "urpf_mode" : "STRICT",
    "edge_path" : "/infra/sites/default/enforcement-points/default/edge-clusters/5f12b4c2-ce8a-4bfa-a74b-9cef494aeeca/edge-nodes/0",
    "segment_path" : "/infra/segments/external-vlan4",
    "type" : "EXTERNAL",
    "resource_type" : "Tier0Interface",
    "id" : "external-132-vlan4",
    "display_name" : "external-132-vlan4",
    "path" : "/infra/tier-0s/vrf04/locale-services/default/interfaces/external-132-vlan4",
    "relative_path" : "external-132-vlan4",
    "parent_path" : "/infra/tier-0s/vrf04/locale-services/default",
    "unique_id" : "698ea6d3-7a56-463e-860a-122888345b5f",
    "marked_for_delete" : false,
    "overridden" : false,
    "subnets" : [ {
      "ip_addresses" : [ "192.168.4.132" ],
      "prefix_len" : 24
    } ],
    "_create_user" : "admin",
    "_create_time" : 1620738539180,
    "_last_modified_user" : "admin",
    "_last_modified_time" : 1620739202227,
    "_system_owned" : false,
    "_protection" : "NOT_PROTECTED",
    "_revision" : 1
  } ],
  "result_count" : 2,
  "sort_by" : "display_name",
  "sort_ascending" : true
}
動作確認
正常系
ESXiと物理ネットワーク機器の結線関係は以下の通りです。

vlan3はf0/1(vmnic0)へトラフィックが転送され、vlan4はf0/2(vmnic1)へトラフィックが転送されています。vlan単位の負荷分散を実現できていることが確認できます。
Switch#show arp vlan 3
Protocol  Address          Age (min)  Hardware Addr   Type   Interface
Internet  192.168.3.10            -   c472.9559.9041  ARPA   Vlan3
Internet  192.168.3.131           0   0050.56b3.5ffb  ARPA   Vlan3
Internet  192.168.3.132           0   0050.56b3.c3f7  ARPA   Vlan3
Switch#show arp vlan 4
Protocol  Address          Age (min)  Hardware Addr   Type   Interface
Internet  192.168.4.10            -   c472.9559.9042  ARPA   Vlan4
Internet  192.168.4.131           0   0050.56b3.854b  ARPA   Vlan4
Internet  192.168.4.132           0   0050.56b3.83bb  ARPA   Vlan4
Switch#
Switch#
Switch#show mac address-table vlan 3 | exclude All
          Mac Address Table
-------------------------------------------

Vlan    Mac Address       Type        Ports
----    -----------       --------    -----
   3    0050.56b3.5ffb    DYNAMIC     Fa0/1
   3    0050.56b3.c3f7    DYNAMIC     Fa0/1
   3    0060.b9e1.03f0    DYNAMIC     Gi0/2
Total Mac Addresses for this criterion: 23

Switch#
Switch#
Switch#show mac address-table vlan 4 | exclude All
          Mac Address Table
-------------------------------------------

Vlan    Mac Address       Type        Ports
----    -----------       --------    -----
   4    0050.56b3.83bb    DYNAMIC     Fa0/2
   4    0050.56b3.854b    DYNAMIC     Fa0/2
Total Mac Addresses for this criterion: 22

Switch#
異常系
障害発生時に切り替わりが発生することを確認します。vlan3が接続されたf0/1(vmnic0)をダウンさせます。
Switch#configure terminal
Enter configuration commands, one per line.  End with CNTL/Z.
Switch(config)#inter
Switch(config)#interface FastEthernet 0/1
Switch(config-if)#shutdown
Switch(config-if)#
May  8 02:55:00.515: %LINK-5-CHANGED: Interface FastEthernet0/1, changed state to administratively down
May  8 02:55:01.522: %LINEPROTO-5-UPDOWN: Line protocol on Interface FastEthernet0/1, changed state to down
Switch(config-if)#
障害発生後も疎通可能であることを確認します。
Switch(config-if)#do ping 192.168.3.131
Type escape sequence to abort.
Sending 5, 100-byte ICMP Echos to 192.168.3.131, timeout is 2 seconds:
!!!!!
Success rate is 100 percent (5/5), round-trip min/avg/max = 1/2/8 ms
Switch(config-if)#
Switch(config-if)#
Switch(config-if)#do ping 192.168.3.132
Type escape sequence to abort.
Sending 5, 100-byte ICMP Echos to 192.168.3.132, timeout is 2 seconds:
!!!!!
Success rate is 100 percent (5/5), round-trip min/avg/max = 1/2/8 ms
Switch(config-if)#
補足説明
BGPの有効化
NSX Edgeにオーバーレイトランスポートゾーンを設定するまえにBGP neighborを設定することもできますが、設定しても異常終了していしまいます。
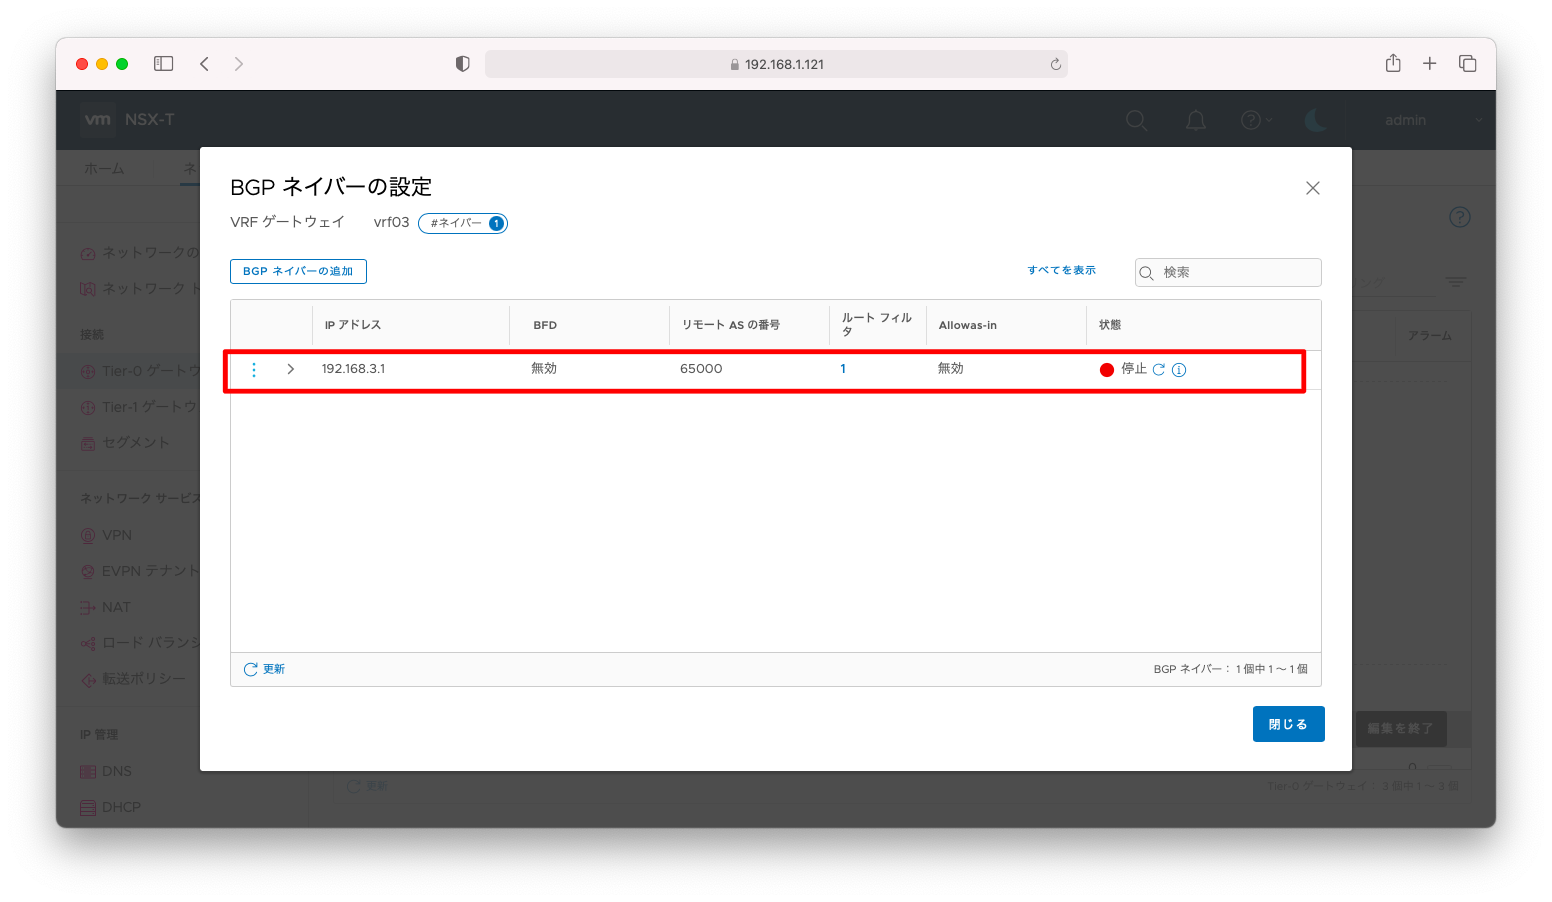
アラートを見ると以下のようなログがあがります。
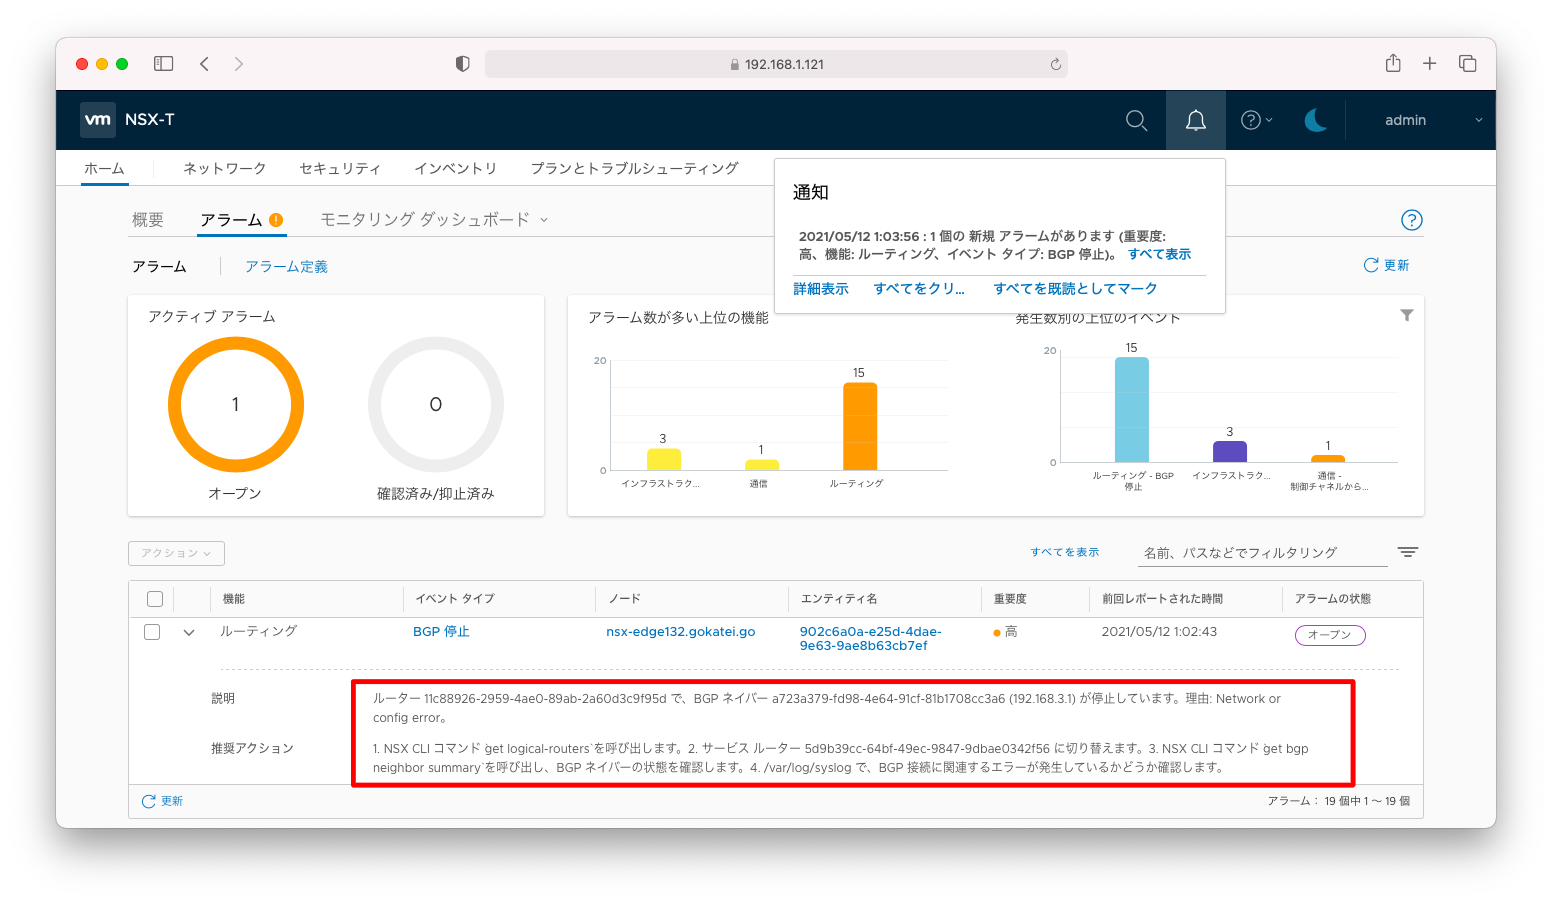
このシナリオの時点ではBGPを有効にすることはできませんが、後続の「NSX-T オーバーレイの負荷分散(mLAGなし multiple TEP)」を完了した時点で、問題なくBGP neighborを確立できます。


