NEC IX ルータを用いて、AzureとVPN(IPsec IKEv2)接続をする方法を説明します。MicrosoftがVPN接続をテストしサポートされる機器一覧は「検証済デバイス」として紹介されています。残念ならば、NEC IXのようなworld wideで見ればマイナーな機器はサポート対象外になりますが、IPsecもBGPも汎用的な規格ですので、自己責任(サポート対象外を理解した上)で対応するならば十分接続する事ができます。
動作確認環境
以下の構成で動作確認を行います。
+----------------+
|  Debian 10.11  |
|    linux004    |
+-------+--------+
   eth0 | .4
        |
        | 172.16.1.0/24
        | (VnetNec/Subnet01)
        |
        | .1
+-------+--------+
|     Azure      |
|                |
+-------+--------+
        |
        |
        | 172.16.0.0/29
        | (VnetNec/GatewaySubnet)
        |
        |
+-------+--------+
|     Azure      |
|                |
+-------+--------+
        | 20.210.237.6 / 40.115.212.91
        |
        |
  (実インターネット)
        |
        |
        |
   g0.0 | 203.165.204.94
+-------+--------+
|   NEC IX 2015  |
|     Router     |
+-------+--------+
   g1.0 | .1
        |
        | 192.168.2.0/24
        |
最終的な設定の全文は以下の通りです
static routeの場合
Azure側の設定
Microsoft Azureは以下のような操作方法があります。
- GUI操作(ポータル)
- azコマンド
- PowerShell
- ARM template
このサイトでは紙面の都合上「azコマンド」の操作のみを紹介します。それ以外の操作方法は公式ドキュメント「VPN Gateway のドキュメント」の「サイト対サイト接続」を参照ください。
リソースグループ
リソースグループを作成します。
az group create --name ResourceGroupNec --location japaneast
仮想ネットワーク
1つの仮想ネットワーク内に3つのサブネットを作成します。なお、仮想ネットワークからゲートウェイへ接続されるサブネット名は任意の名前を設定できず、必ず「GatewaySubnet」という名前にする必要があります。
az network vnet create \
    -g ResourceGroupNec \
    -n VnetNec \
    --address-prefix 172.16.0.0/16 \
    --subnet-name Subnet01 \
    --subnet-prefix 172.16.1.0/24

az network vnet subnet create \
    -g ResourceGroupNec \
    -n Subnet02 \
    --vnet-name VnetNec \
    --address-prefixes 172.16.2.0/24

az network vnet subnet create \
    -g ResourceGroupNec \
    -n GatewaySubnet \
    --vnet-name VnetNec \
    --address-prefixes 172.16.0.0/29
パブリックIPアドレス
パブリックIPアドレスを作成します。パブリックIPアドレスは「Basic」「Standard」の2種類のSKUがあります。以下コマンドで作成されるのはBasicです。Basicは廉価なサービスで使用開始されるまでパブリックIPアドレスが割り当てられません。言い換えれば、下記コマンド実行時点ではパブリックIPアドレスは割り当てられていません。
az network public-ip create \
  -g ResourceGroupNec \
  -n VpnGwPublicIp
仮想ネットワークゲートウェイ
仮想ネットワークゲートウェイを作成します。–no-waitはコマンドの実行完了を待たず、バックグラウンドで処理を継続する指定です。
az network vnet-gateway create \
  --name VnetGw \
  --public-ip-address VpnGwPublicIp \
  --resource-group ResourceGroupNec \
  --vnet VnetNec \
  --gateway-type Vpn \
  --vpn-type RouteBased \
  --sku VpnGw1 \
  --no-wait
仮想ネットワークゲートウェイの作成には45分程度の時間を要す事もあります。作成完了かどうかは以下のshowコマンドでprovisioningStateを見ましょう。”Updating”が”Succeeded”に変わるまで待ちます。
az network vnet-gateway show \
  --name VnetGw \
  --resource-group ResourceGroupNec \
  --query "provisioningState"
GUIで表示する場合は以下のようになります。「更新中」の文字が消えるまで待ちます。

ローカルゲートウェイ
ローカルゲートウェイを作成します。ローカルゲートウェイはオンプレミス側の仕様を定義する設定項目です。
gateway-ip-addressはオンプレミス側のパブリックIPアドレスを指定します。仮にNAT環境でIPsecを確立する機器にプライベートIPアドレスが割り当てられているとしても、IPsecを確立する機器がインターネットに接続される場合に使用するパブリックIPアドレスをgateway-ip-addressに指定します。
クラウドとオンプレミスの間をstatic routeでルーティングする場合は、local-address-prefixesはオンプレミス側のサブネットをスペース区切りで指定します。
az network local-gateway create \
 --gateway-ip-address 203.165.204.94 \
 --name Site01 \
 --resource-group ResourceGroupNec \
 --local-address-prefixes 192.168.1.0/24 192.168.2.0/24
接続
「接続」を作成します。「接続」とは仮想ネットワークゲートウェイとローカルゲートウェイを紐づける設定です。
az network vpn-connection create \
  --name VnetToSite01  \
  --resource-group ResourceGroupNec  \
  --vnet-gateway1 VnetGw  \
  --shared-key P@ssw0rd1234 \
  --local-gateway2 Site01
オンプレミス側の設定
接続前の状況確認
以下のようなshowコマンドでIPsecを確立したかどうかを確認できます。今のところオンプレミス側にIPsecの設定をしていませんので、connectionStatusはNotConnectedと表示されます。
$ az network vpn-connection show \
  --name VnetToSite01 \
  --resource-group ResourceGroupNec
{
  "authorizationKey": null,
  "connectionMode": "Default",
  "connectionProtocol": "IKEv2",
  "connectionStatus": "NotConnected",
  "connectionType": "IPsec",

  <omitted>
サンプル設定のダウンロード
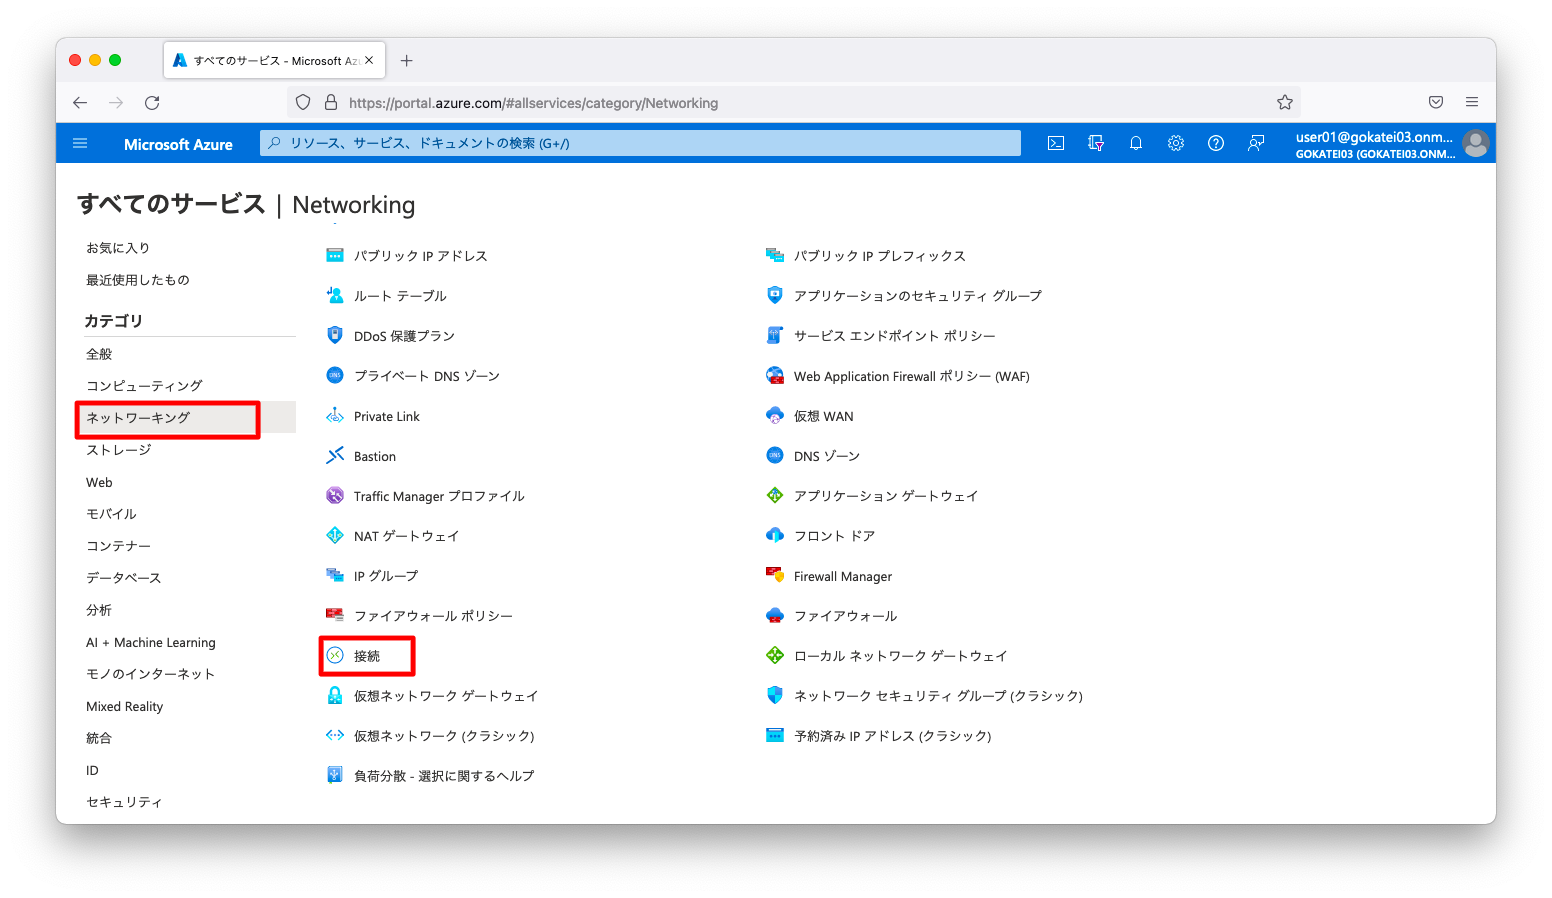
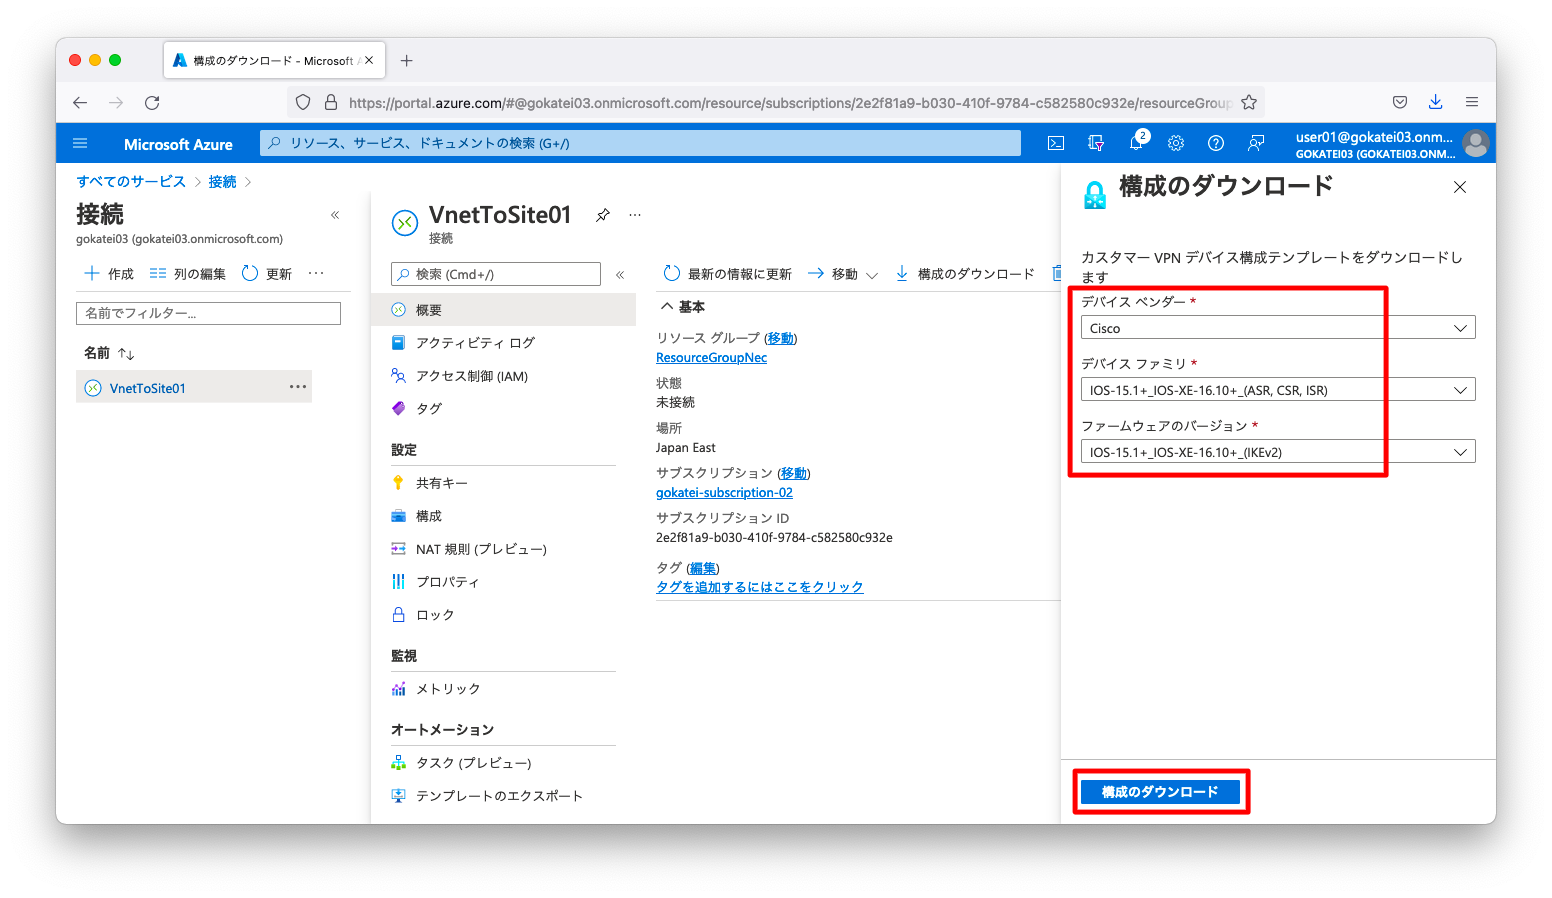
Azureのトップページから「ネットワーキング」「接続」の順に押下し、「接続」のページを開きます。
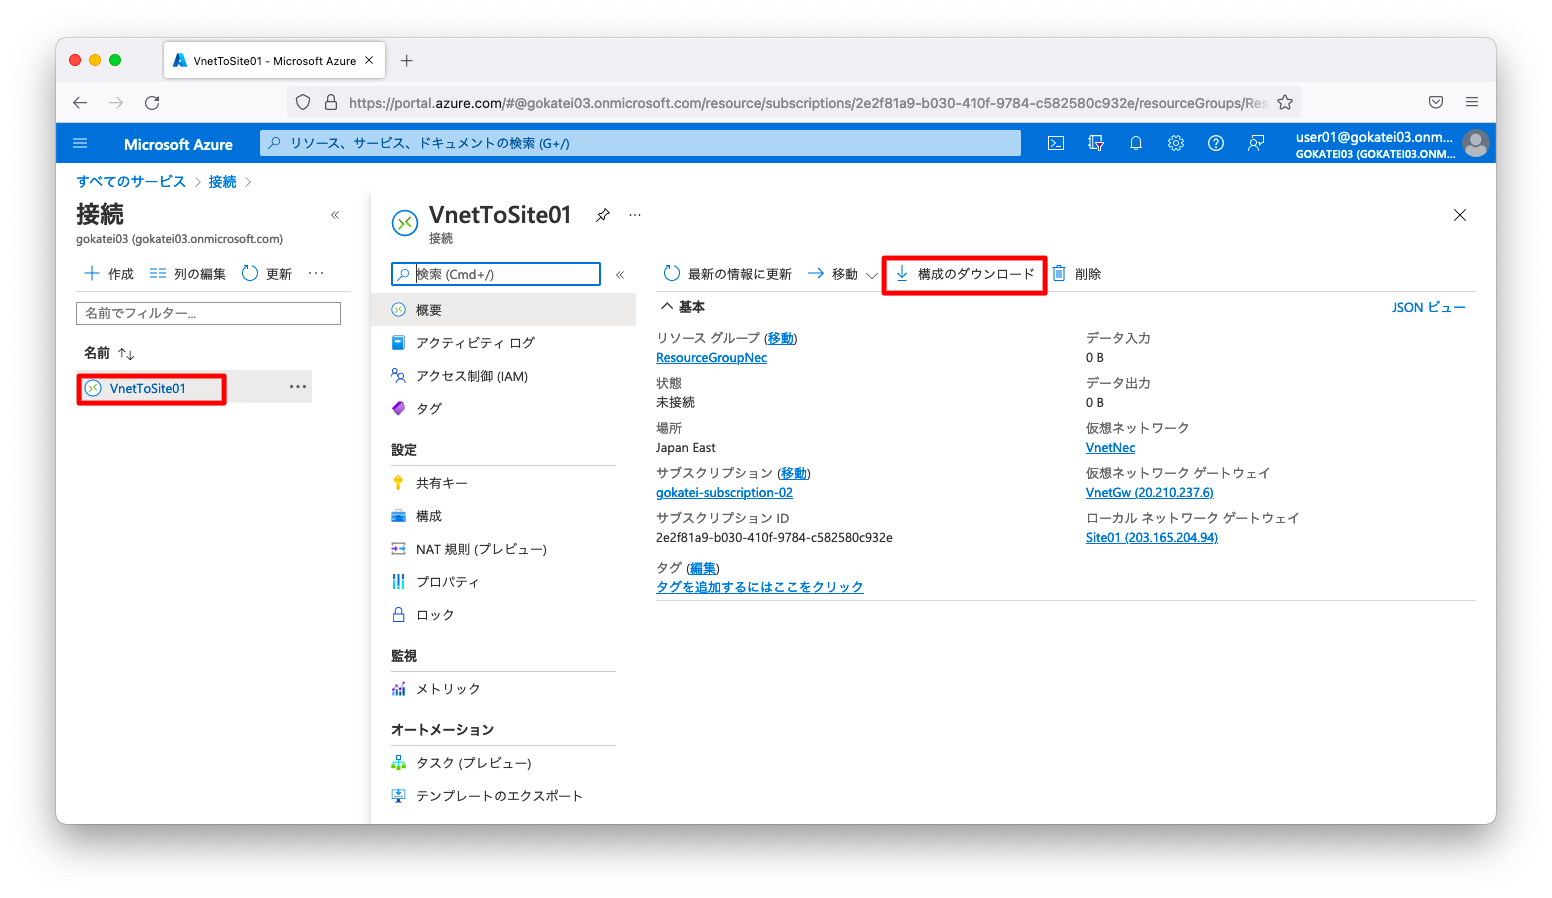
「接続名(VnetToSite01)」「構成のダウンロード」の順に押下します。
NEC IXのサンプル設定は提供されていませんので、実装する方の一番手馴れていそうなサンプルの設定を選びます。「デバイスベンダー」「デバイス ファミリ」「ファームウェアのバージョン」を選び、「構成のダウンロード」を押下します。
ファイルをダウンロードすると、以下のようなテキストファイルのサンプル設定を入手できます。
[サンプル設定 : Cisco IOS XE]
! Microsoft Corporation
! ------------------------------------------------------------------------------
! Sample VPN tunnel configuration template for Cisco IOS-based devices [IOS 15.1 or beyond / IOS-XE 16.10 or beyond]
!
! ##############################################################################
! !!! Search for "REPLACE" to find the values that require special
! !!! considerations
! !!!
! !!! (1) ACL/access-list rule numbers
! !!! (2) Tunnel interface number
! !!! (3) Tunnel interface IP address
! !!! (4) BGP routes to advertise (if BGP is enabled)
! !!! (5) BGP peer IP address on the device - loopback interface number
! ##############################################################################


  <omitted>
サンプル設定の解読
Azureが生成するサンプルを見ると、オンプレミス側に投入しなければならないパラメタが書かれています。
[サンプル設定 : Cisco IOS XE]
! [1] Network parameters
!
!   > Connection name:       VnetToSite01
!   > VPN Gateway name:      98f6006d-02c2-4165-9de6-633a246d7831
!   > Public IP addresses:
!     + Public IP 1:         20.210.237.6
!   > Virtual network address space:
!     + CIDR:172.16.0.0/16, prefix:172.16.0.0, netmask:255.255.0.0, wildcard:0.0.255.255
!   > Local network gateway: Site01
!   > On-premises VPN IP:    203.165.204.94
!   > On-premises address prefixes:
!     + CIDR:192.168.1.0/24, prefix:192.168.1.0, netmask:255.255.255.0, wildcard:0.0.0.255
!     + CIDR:192.168.2.0/24, prefix:192.168.2.0, netmask:255.255.255.0, wildcard:0.0.0.255
!
! [2] IPsec/IKE parameters
!
!   > IKE version:             IKEv2
!     + Encryption algorithm:  aes-cbc-256
!     + Integrityalgorithm:    sha1
!     + Diffie-Hellman group:  2
!     + SA lifetime (seconds): 3600
!     + Pre-shared key:        P@ssw0rd1234
!     + UsePolicyBasedTS:      False
!
!   > IPsec
!     + Encryption algorithm:  esp-aes 256
!     + Integrity algorithm:   esp-sha256-hmac
!     + PFS Group:             None
!     + SA lifetime (seconds): 3600
!     + SA lifetime (KB):      102400000
もし、パラメタだけを見て理解が難しいようならば、必要に応じてサンプルのconfigも眺めてみましょう。
[サンプル設定 : Cisco IOS XE]
crypto ikev2 proposal Azure-Ikev2-Proposal
  encryption aes-cbc-256
  integrity sha1
  group 2
  exit

crypto ikev2 policy Azure-Ikev2-Policy
  proposal Azure-Ikev2-Proposal
  match address local 203.165.204.94
  exit

crypto ikev2 keyring VnetToSite01-keyring
  peer 20.210.237.6
    address 20.210.237.6
    pre-shared-key P@ssw0rd1234
    exit
  exit

  <omitted>
NEC IXのIPsecの設定
NEC IX側に事前共有鍵を定義します。
[実設定 : NEC IX]
ikev2 authentication psk id ipv4 20.210.237.6 key char P@ssw0rd1234
IKEおよびIPsec(IKE child-sa)のパラメタを定義します。
[実設定 : NEC IX]
ikev2 default-profile
  sa-proposal enc aes-cbc-256
  sa-proposal integrity sha1
  sa-proposal dh 1024-bit
  child-proposal enc aes-cbc-256
  child-proposal integrity sha2-256
  child-lifetime 3600
インターフェースの設定例は以下の通りです。
[実設定 : NEC IX]
interface Tunnel0.0
  tunnel mode ipsec-ikev2
  ip address 169.254.0.1/30
  ip tcp adjust-mss auto
  ikev2 connect-type auto
  ikev2 ipsec pre-fragment
  ikev2 peer 20.210.237.6 authentication psk id ipv4 20.210.237.6
  no shutdown
IPsec確立の確認
NEC IXにてIKE saとIKE child-saが確立された事を確認します。
[実設定 : NEC IX]
Router(config)# show ikev2 sa
IKEv2 SA - 1 created
Interface Tunnel0.0
  SPI (I)0xdc52c2eda4f1e907  (R)0x5b4768f53c24879d
    Remain lifetime[sec] : 85553
    Serial : 1
    Direction : initiator
    Local Addr : 203.165.204.94:500

  <omitted>

Router(config)# show ikev2 child-sa
Child SA - 1 connected
Interface Tunnel0.0
  IKE Peer ID : IPV4-ADDR 20.210.237.6
    IKE SPI (I)0xdc52c2eda4f1e907  (R)0x5b4768f53c24879d
    IKE SA serial : 1
    Child SA
      Protocol : ESP
      Local Addr : 203.165.204.94
      Peer Addr  : 20.210.237.6
      Enc alg  : AES-CBC-256
      Hash alg : HMAC-SHA2-256-128
      Remain lifetime[sec] : 2737
      Anti-replay : on
      Direction is outbound
azコマンドなどを用いて、Azure側から見てもIPsecが確立された事を確認します。connectionStatusはConnectedと表示されます。
$ az network vpn-connection show \
  --name VnetToSite01 \
  --resource-group ResourceGroupNec
{
  "authorizationKey": null,
  "connectionMode": "Default",
  "connectionProtocol": "IKEv2",
  "connectionStatus": "Connected",
  "connectionType": "IPsec",
  "dpdTimeoutSeconds": 0,

  <omitted>
NEC IXのルーティングの設定
NEC IXにstatic routeの設定を入れます。
[実設定 : NEC IX]
ip route 172.16.0.0/16 Tunnel0.0
疎通確認
仮想マシン作成
疎通確認用に仮想マシンを作成します。作成例は以下の通りです。
az vm create \
    --resource-group ResourceGroupNec \
    --name linux004 \
    --image Debian \
    --admin-username azureuser \
    --ssh-key-values ~/.ssh/authorized_keys \
    --vnet-name VnetNec \
    --subnet Subnet01
実行時のログは以下の通りです。仮想マシンに割り当てられたプライベートIPアドレスは疎通確認で使用しますのでメモに控えましょう。
$ az vm create \
    --resource-group ResourceGroupNec \
    --name linux004 \
    --image Debian \
    --admin-username azureuser \
    --ssh-key-values ~/.ssh/authorized_keys \
    --vnet-name VnetNec \
    --subnet Subnet01
It is recommended to use parameter "--public-ip-sku Standard" to create new VM with Standard public IP. Please note that the default public IP used for VM creation will be changed from Basic to Standard in the future.
{
  "fqdns": "",
  "id": "/subscriptions/2e2f81a9-b030-410f-9784-c582580c932e/resourceGroups/ResourceGroupNec/providers/Microsoft.Compute/virtualMachines/linux004",
  "location": "japaneast",
  "macAddress": "00-22-48-E7-34-5F",
  "powerState": "VM running",
  "privateIpAddress": "172.16.1.4",
  "publicIpAddress": "40.115.208.2",
  "resourceGroup": "ResourceGroupNec",
  "zones": ""
}
ping疎通確認
NEC IXからAzureへの疎通を確認します。この時、送信元IPアドレスはLANに付与されたものを指定するように注意しましょう。なぜならば、送信元を明示指定しない場合は169.254.0.1から送信される事になり、このIPアドレスはAzureには広報されないからです。
Router(config)# ping 172.16.1.4 source 192.168.2.1 count 3
PING 192.168.2.1 > 172.16.1.4 56 data bytes
64 bytes from 172.16.1.4: icmp_seq=0 ttl=64 time=14.331 ms
64 bytes from 172.16.1.4: icmp_seq=1 ttl=64 time=23.453 ms
64 bytes from 172.16.1.4: icmp_seq=2 ttl=64 time=15.668 ms

--- 172.16.1.4 ping statistics ---
3 packets transmitted, 3 packets received, 0% packet loss
round-trip (ms)  min/avg/max = 14.331/17.817/23.453
BGPの場合
Azure側の設定
削除
static routeの動作確認で使用した「接続」「ローカルゲートウェイ」「仮想ネットワークゲートウェイ」を一度削除します。
az network vpn-connection delete \
  --name VnetToSite01 \
  --resource-group ResourceGroupNec

az network local-gateway delete \
 --name Site01 \
 --resource-group ResourceGroupNec

az network vnet-gateway delete \
  --name VnetGw \
  --resource-group ResourceGroupNec
仮想ネットワークゲートウェイの再作成
仮想ネットワークゲートウェイを作成します。前述のstatic routeの場合と異なり、Azure側のAS番号を指定します。
なお、Azureとオンプレミスの間をiBGPで接続するのはvalidation errorとなり、eBGPしか許容されません。Azureとオンプレミスは異なるAS番号を指定して下さい。
az network vnet-gateway create \
  --name VnetGw \
  --public-ip-address VpnGwPublicIp \
  --resource-group ResourceGroupNec \
  --vnet VnetNec \
  --gateway-type Vpn \
  --vpn-type RouteBased \
  --sku VpnGw1 \
  --asn 65010 \
  --no-wait
ローカルゲートウェイの再作成
ローカルゲートウェイを作成します。オンプレミス側のAS番号とBGP neighborの送信元IPアドレスを指定します。
なお、Azureとオンプレミスの間をiBGPで接続するのはvalidation errorとなり、eBGPしか許容されません。Azureとオンプレミスは異なるAS番号を指定して下さい。
az network local-gateway create \
 --gateway-ip-address 203.165.204.94 \
 --name Site01 \
 --resource-group ResourceGroupNec \
 --asn 65050 \
 --bgp-peering-address 10.2.2.2
接続の再作成
「接続」を作成します。前述のstatic routeの場合と異なり、–enable-bgpオプションを付与してBGPを有効にしてください。
az network vpn-connection create \
  --name VnetToSite01  \
  --resource-group ResourceGroupNec  \
  --vnet-gateway1 VnetGw  \
  --shared-key P@ssw0rd1234 \
  --local-gateway2 Site01 \
  --enable-bgp
オンプレミス側の設定
サンプル設定のダウンロード
先程の同様の操作でサンプル設定をダウンロードします。
NEC IXのBGPの設定
IPsecに関する設定を投入します。パブリックIPアドレスのSKUがBasicの場合は、仮想ネットワークの再作成によってIPアドレスが再割り当てされます。新規に割り当てられたIPアドレスで設定を再作成します。
[実設定 : NEC IX]
ikev2 authentication psk id ipv4 40.115.212.91 key char P@ssw0rd1234
!
ikev2 default-profile
  sa-proposal enc aes-cbc-256
  sa-proposal integrity sha1
  sa-proposal dh 1024-bit
  child-proposal enc aes-cbc-256
  child-proposal integrity sha2-256
  child-lifetime 3600
!
interface Tunnel0.0
  tunnel mode ipsec-ikev2
  ip address 169.254.0.1/30
  ip tcp adjust-mss auto
  ikev2 connect-type auto
  ikev2 ipsec pre-fragment
  ikev2 peer 40.115.212.91 authentication psk id ipv4 40.115.212.91
  no shutdown
IPsec確立の確認
NEC IXにてIKE saとIKE child-saが確立された事を確認します。
[実設定 : NEC IX]
Router(config)# show ikev2 sa
IKEv2 SA - 1 created
Interface Tunnel0.0
  SPI (I)0x91acc8af8dd985f6  (R)0x56f8b92f3a7e1b9e
    Remain lifetime[sec] : 85146
    Serial : 97
    Direction : initiator
    Local Addr : 203.165.204.94:500

  <omitted>

Router(config)# show ikev2 child-sa
Child SA - 1 connected
Interface Tunnel0.0
  IKE Peer ID : IPV4-ADDR 20.210.237.6
    Statistics
      Outbound
        71 packets, 4448 octets
        0 cipher failure, 0 out of memory, 0 ts unacceptable
        0 misc error
      Inbound
        160 packets, 8990 octets
        0 invalid sa, 0 replay detected, 0 integrity failure
        0 cipher failure, 0 packet truncated, 0 invalid padding
        0 unknown protocol, 0 out of memory, 0 ts unacceptable
        0 misc error

  <omitted>
NEC IXのルーティングの設定
前述のstatic routeを削除します。
no ip route 172.16.0.0/16 Tunnel0.0
BGPに関する設定を投入します。
router bgp 65050
  neighbor 172.16.0.6 remote-as 65010
  neighbor 172.16.0.6 update-source Loopback0.0
  address-family ipv4 unicast
    network 192.168.2.0/24
!
ip route 172.16.0.6/32 Tunnel0.0
!
interface Loopback0.0
  ip address 10.2.2.2/32
BGP neighbor確立の確認
NEC IXにてBGP neighborが確立された事を確認します。
Router(config)# show ip bgp summary
BGP router ID 10.2.2.2, local AS number 65050
2 BGP AS-PATH entries

Neighbor        V    AS    MsgRcvd MsgSent Up/DownTime   State
172.16.0.6      4    65010 25      21      0:18:54       ESTABLISHED

Total number of neighbors 1
想定通りのprefixをAzureから受け取っている事を確認します。
Router(config)# show ip bgp neighbors 172.16.0.6 routes
BGP table version is 2, local router ID is 10.2.2.2
Local AS number 65050
Status codes: s - suppressed, * - valid, h - history
              > - best, i - internal
Origin codes: i - IGP, e - EGP, ? - incomplete

   Network            Next Hop            Metric     LocPrf  Path
*> 172.16.0.0/16      172.16.0.6                             65010 i

Total number of prefixes 1
想定通りのprefixをAzureへadvertiseしている事を確認します。
Router(config)# show ip bgp neighbors 172.16.0.6 advertised-routes
BGP table version is 2, local router ID is 10.2.2.2
Local AS number 65050
Status codes: s - suppressed, * - valid, h - history
              > - best, i - internal
Origin codes: i - IGP, e - EGP, ? - incomplete

   Network            Next Hop            Metric     LocPrf  Path
*> 192.168.2.0/24     10.2.2.2                 1             i

Total number of prefixes 1
疎通確認
前述のstatic route動作確認時に作成した仮想マシンを利用して疎通確認をします。NEC IXからAzureへのpingを確認します。
Router(config)# ping 172.16.1.4 source 192.168.2.1 count 3
PING 192.168.2.1 > 172.16.1.4 56 data bytes
64 bytes from 172.16.1.4: icmp_seq=0 ttl=64 time=23.733 ms
64 bytes from 172.16.1.4: icmp_seq=1 ttl=64 time=19.333 ms
64 bytes from 172.16.1.4: icmp_seq=2 ttl=64 time=19.378 ms

--- 172.16.1.4 ping statistics ---
3 packets transmitted, 3 packets received, 0% packet loss
round-trip (ms)  min/avg/max = 19.333/20.814/23.733