
ESXi, vCenterのNTP, snmp, syslogなどの管理設定をまとめます。
前提条件
ntpd, syslogd, snmptrapdサーバなどが構築されている前提で動作確認をします。これらサーバ構築方法はディストリビューション毎に異なりますが、一例としてCentOS8.3で動作確認する場合のメモを以下に記します。
ファイアウォール無効化
firewalldやSELinuxなどセキュリティ機能に適切な設定を入れるか無効化するかのいずれかの対応をします。
近年ではコンテナのセキュリティを担保する手段としてSELinuxが再注目されつつあります。盲目的にSELinuxを無効にするのが望ましくない要件も多くなりつつあることに注意ください。
systemctl disable firewalld.service --now
ntpd
NTPデーモンとしてchronyをインストールします。
yum install chrony
chrony.confを編集し接続を許可するIPアドレスを定義します。
# vi /etc/chrony.conf

 <omitted>

# Allow NTP client access from local network.
#allow 192.168.0.0/16
allow 192.168.0.0/16
chronydを起動します。
systemctl enable chronyd --now
rsyslogd
rsyslogdをインストールします。
dnf install rsyslog
udp syslogによる接続を受け付けるには、imudpと呼ばれるモジュールに関する設定2行について、コメントアウトを削除します。
# vi /etc/rsyslog.conf

 <omitted>

module(load="imudp") # needs to be done just once
input(type="imudp" port="514")
rsyslogdを再起動して設定を反映させます。以上の設定により、/var/log/messagesにsyslogが記録されるようになります。
systemctl restart rsyslog.service
snmpd snmptrapd
snmpgetをするコマンドラインツールと、snmptrapを受信するデーモンをインストールします。
dnf install net-snmp net-snmp-utils
やや乱暴な設定ですが、全てのsnmptrapの受信を許可するには「/etc/snmp/snmptrapd.conf」に「disableauthorization yes」を加筆します。
# vi /etc/snmp/snmptrapd.conf

# Example configuration file for snmptrapd
#
# No traps are handled by default, you must edit this file!
#
# authCommunity   log,execute,net public
# traphandle SNMPv2-MIB::coldStart    /usr/bin/bin/my_great_script cold
disableauthorization yes
snmptrapdを再起動し、設定を反映します。以上の設定により、/var/log/messagesにsnmptrapが記録されるようになります。
systemctl restart snmptrapd.service
動作確認のため、自身にsnmptrapを送信します。
snmptrap -v 2c -c public localhost '' .1.3.6.1.4.1.8072.100 .1.3.6.1.4.1.8072.100.1 s "hoge"
snmptrapが記録されている事を確認します。
[root@centos50 ~]# snmptrap -v 2c -c public localhost '' .1.3.6.1.4.1.8072.100 .1.3.6.1.4.1.8072.100.1 s "hoge"
[root@centos50 ~]# tail /var/log/messages
Apr 30 12:24:58 centos50 rsyslogd[1195]: imjournal: No statefile exists, /var/lib/rsyslog/imjournal.state will be created (ignore if this is first run): No such file or directory [v8.1911.0-6.el8 try https://www.rsyslog.com/e/2040 ]
Apr 30 12:24:58 centos50 rsyslogd[1195]: imjournal: journal files changed, reloading...  [v8.1911.0-6.el8 try https://www.rsyslog.com/e/0 ]
Apr 30 12:25:17 centos50 systemd[1]: Started /usr/bin/systemctl start man-db-cache-update.
Apr 30 12:25:17 centos50 systemd[1]: Starting man-db-cache-update.service...
Apr 30 12:25:17 centos50 systemd[1]: Reloading.
Apr 30 12:25:18 centos50 systemd[1]: Started man-db-cache-update.service.
Apr 30 12:25:35 centos50 systemd[1]: Starting Simple Network Management Protocol (SNMP) Trap Daemon....
Apr 30 12:25:35 centos50 snmptrapd[3069]: NET-SNMP version 5.8
Apr 30 12:25:35 centos50 systemd[1]: Started Simple Network Management Protocol (SNMP) Trap Daemon..
Apr 30 12:25:40 centos50 snmptrapd[3069]: 2021-04-30 12:25:40 localhost [UDP: [127.0.0.1]:52718->[127.0.0.1]:162]:#012DISMAN-EVENT-MIB::sysUpTimeInstance = Timeticks: (17930) 0:02:59.30#011SNMPv2-MIB::snmpTrapOID.0 = OID: NET-SNMP-MIB::netSnmp.100#011NET-SNMP-MIB::netSnmp.100.1 = STRING: "hoge"
ESXi
sshd
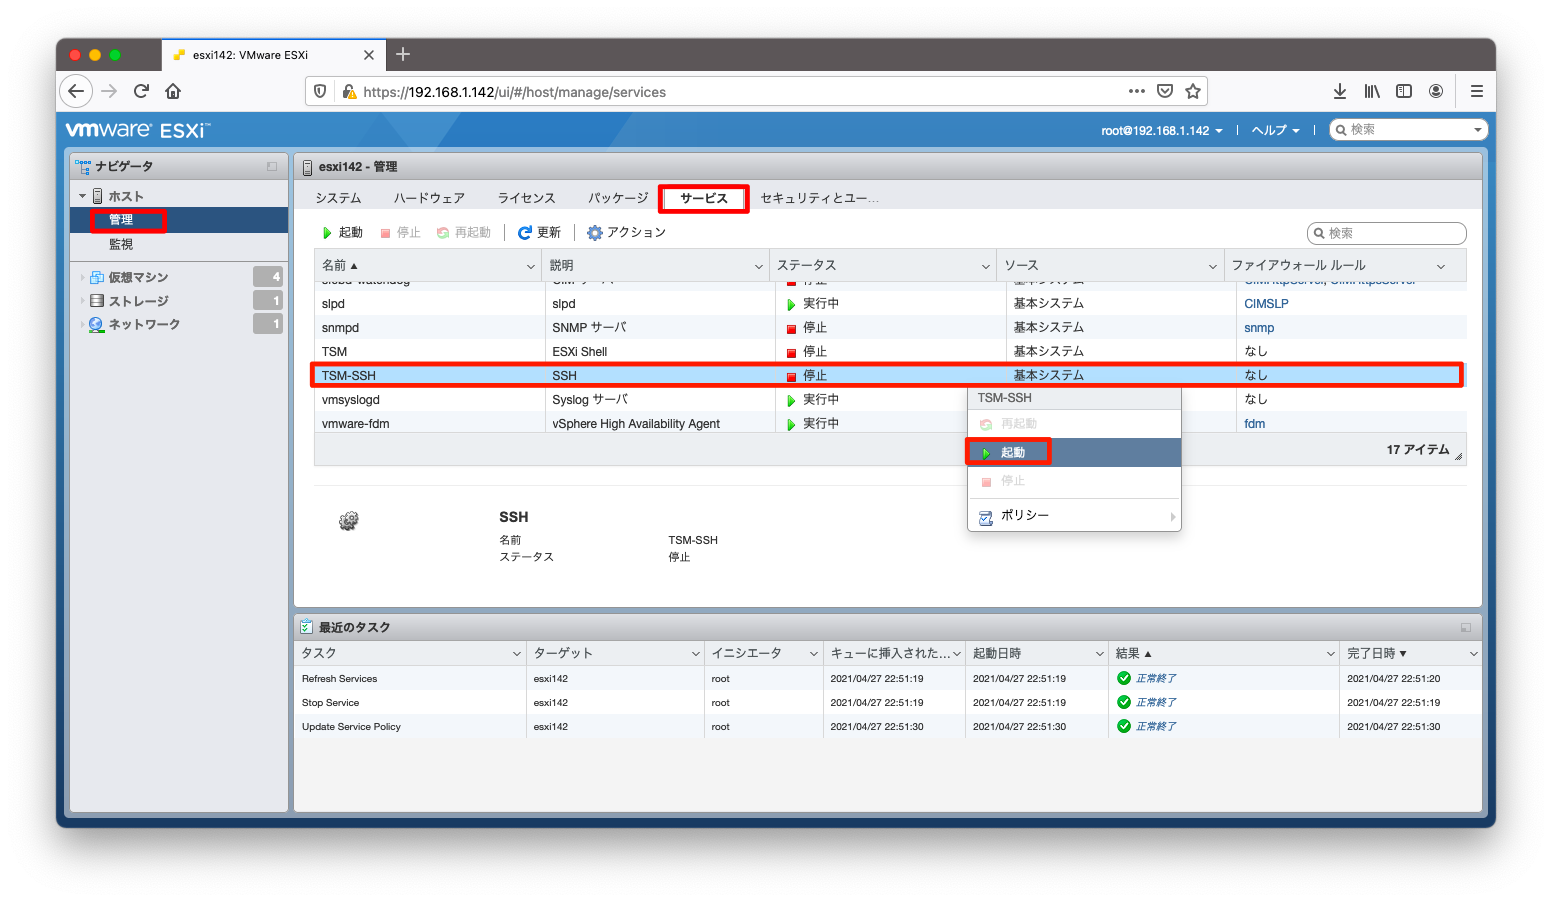
ESXiを操作するにはsshログイン後のコマンドライン操作が必要になることもあります。sshログインが可能になるように設定します。
ESXiの管理画面にて、「管理」「サービス」の順に押下します。「TSM-SSH」の右クリックメニューで「起動」を選びます。
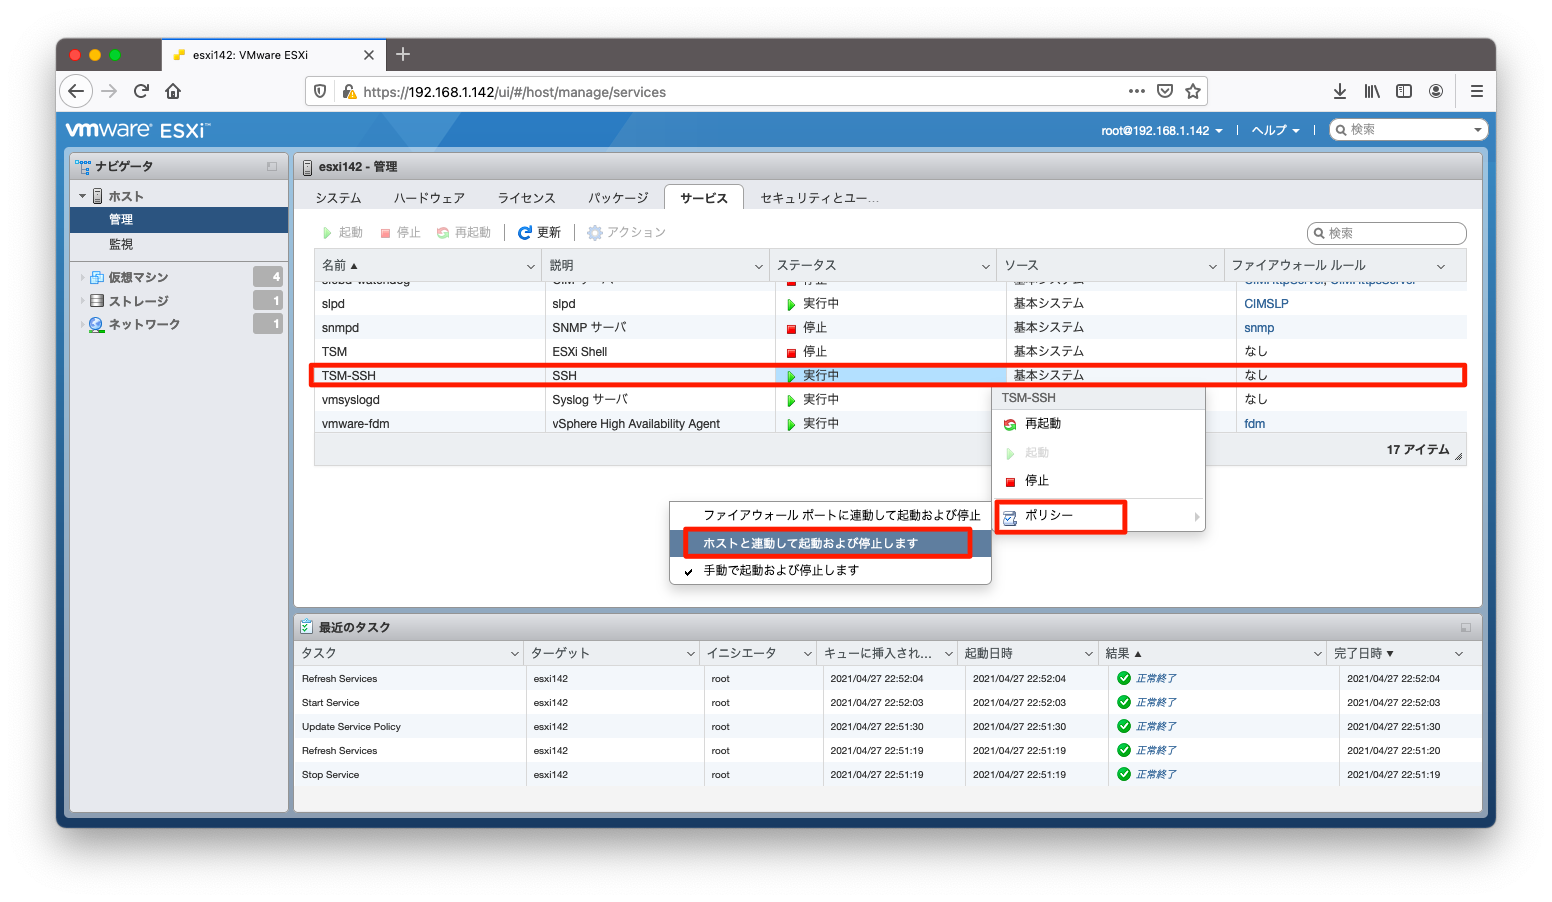
ESXiの再起動後もsshdが自動起動するように設定したいならば、「TSM-SSH」の右クリックメニューで「ポリシー」「ホストと連動して起動および停止します」を選びます。
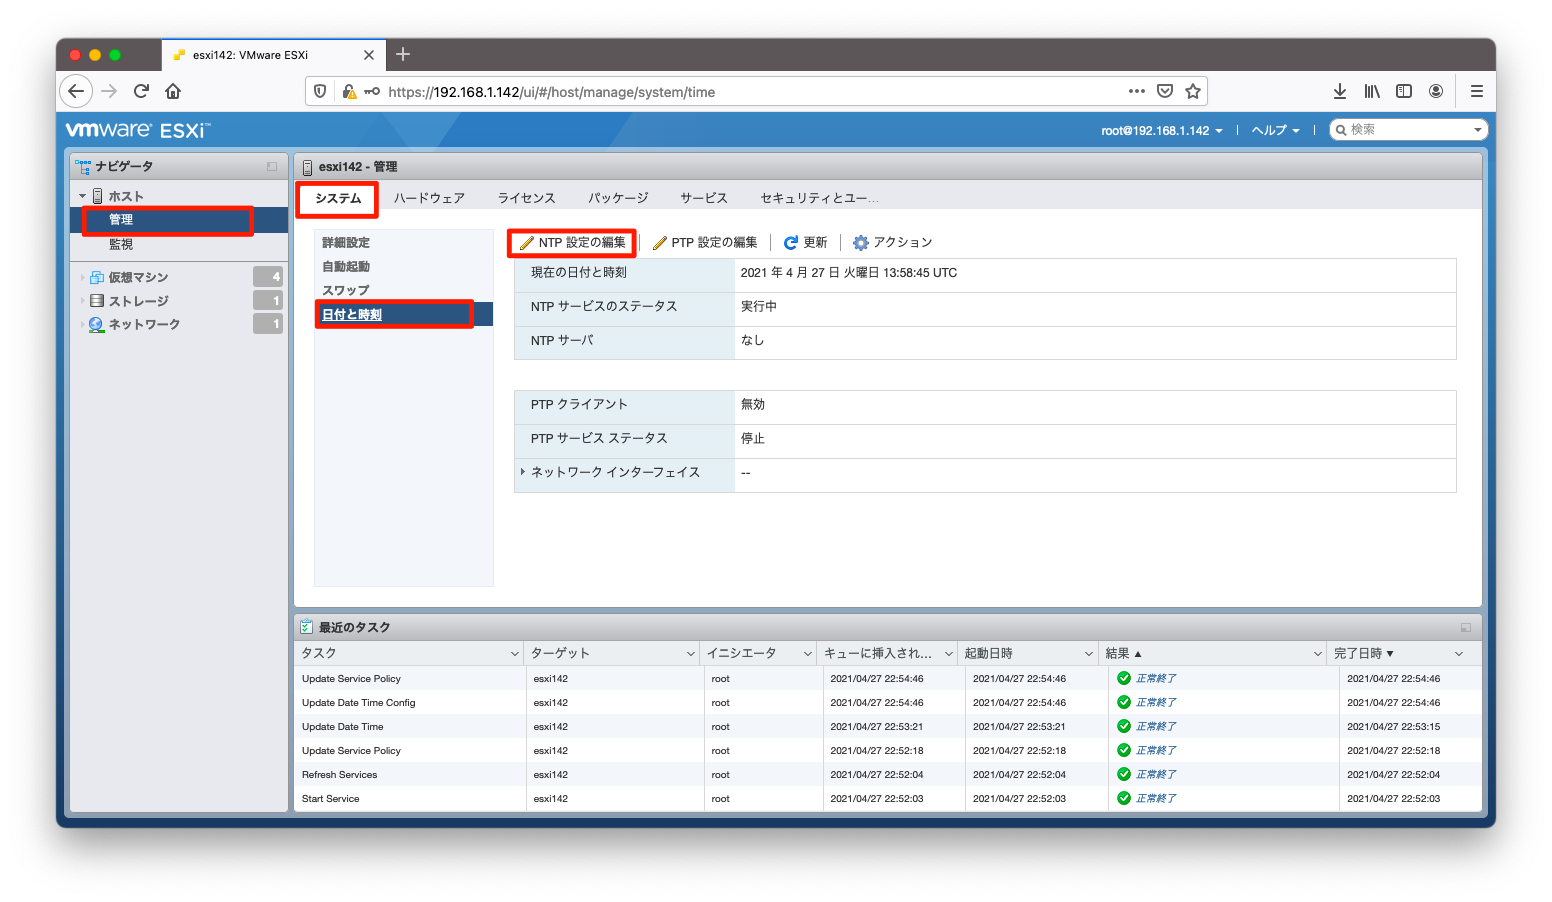
ntpd
ntpを設定するには、「管理」「システム」「日付と時刻」「NTP 設定の編集」の順に押下します。
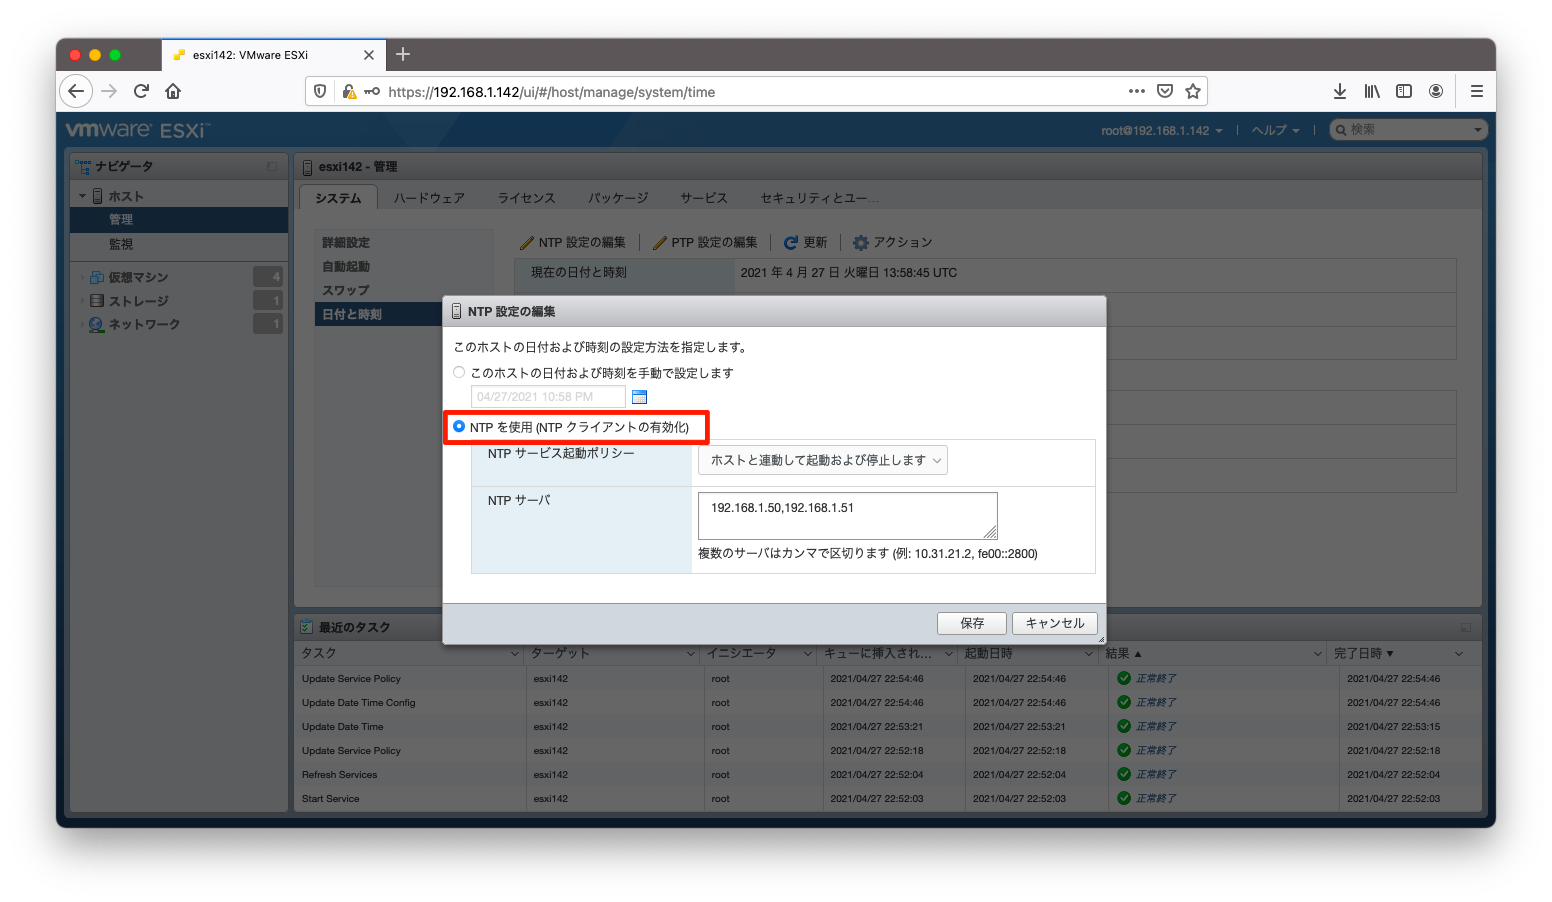
「NTPを使用(NTPクライアントの有効化)」を選択します。NTPサーバが複数ある環境では、NTPサーバをカンマ区切りで指定します。
snmpd
ESXiがsnmpgetに応答したりsnmptrapを送信したりするようにするには、ESXiへsshログインしコマンドライン操作が必要です。
以下操作でsnmpgetなどに応答するコミュニティ名を定義します。
esxcli system snmp set --communities public
以下操作でsnmpdを起動します。自動起動はデフォルトで有効になっていますので、次回のESXi再起動後もsnmpdは自動的に起動します。
esxcli system snmp set --enable true
そのほか、contactなどsnmpとして指定するパラメタがある場合はヘルプを見つつ、操作方法を調べます。ヘルプの表示方法は以下の通りです。
[root@esxi142:~] esxcli system snmp set --help
Usage: esxcli system snmp set [cmd options]

Description:
  set                   This command allows the user to set up ESX SNMP agent.

Cmd options:
  -a|--authentication=<str>
                        Set default authentication protocol. Supported values:
                            SHA1: SHA1 auth protocol used for authentication.
                            none: No authentication.
                            reset: Resets the param value to default.
  -c|--communities=<str>
                        Set up to ten communities each no more than 64 characters. Format is: community1[,community2,...] (this overwrites previous settings). Use value 'reset' to set the paramter value
                        to default.
  -e|--enable=<bool>    Start or stop SNMP service. Values: [yes|no, true|false, 0|1].
  -E|--engineid=<str>   Set SNMPv3 engine id. Must be at least 10 to 32 hexadecimal characters. 0x or 0X is stripped if found as well as colons (:)
  -y|--hwsrc=<str>      Where to source hardware events from, IPMI sensors or CIM Indications. One of:
                            indications: source hardware events from CIM Indications.
                            sensors: source hardware events from IPMI sensors.

 <omitted>
以下操作でsnmpの設定を確認できます。
[root@esxi142:~] esxcli system snmp get
   Authentication:
   Communities: public
   Enable: true
   Engineid: 80001ADC052286044511619532315
   Hwsrc: indications
   Largestorage: true
   Loglevel: warning
   Notraps:
   Port: 161
   Privacy:
   Remoteusers:
   Syscontact:
   Syslocation:
   Targets:
   Users:
   V3targets:
もし特定のサーバからのsnmpgetしか応答しないようにする必要があるならば、ESXiのファイアウォール機能を利用しましょう。ファイアウォールはGUIからも操作可能ですが、esxcliを使って操作する場合は以下のようになります。
esxcli network firewall ruleset set --ruleset-id=snmp --allowed-all=false
esxcli network firewall ruleset allowedip add --ruleset-id=snmp --ip-address=192.168.1.50
esxcli network firewall ruleset allowedip add --ruleset-id=snmp --ip-address=192.168.1.51
ファイアウォールの設定確認は以下の通りです。
[root@esxi142:~] esxcli network firewall ruleset allowedip list --ruleset-id=snmp
Ruleset  Allowed IP Addresses
-------  --------------------
snmp     192.168.1.50, 192.168.1.51
[root@esxi142:~]
何か適当なサーバからESXiがsnmpgetに応答する事を確認します。
[root@centos50 ~]# snmpwalk -v 2c -c public 192.168.1.141 IF-MIB::ifName
IF-MIB::ifName.1 = STRING: vmnic0
IF-MIB::ifName.2 = STRING: vmnic1
IF-MIB::ifName.3 = STRING: vSwitch0
IF-MIB::ifName.4 = STRING: vmk0
snmptrapd
snmptrapを送信するには、以下のようなコマンドを使用します。宛先を複数指定する場合はカンマ区切りで指定します。
なお、snmptrapの宛先ポートを省略するとudp161になってしまうので(これを仕様と主張するのはムリがあるよ!ヴイエムウェアさん!)、ポート番号は明示指定しましょう。
esxcli system snmp set --targets=192.168.1.50@162/public,192.168.1.51@162/public
以下操作でsnmptrapの設定を確認できます。
[root@esxi142:~] esxcli system snmp get
   Authentication:
   Communities: public
   Enable: true
   Engineid: 80001ADC052286044511619532315
   Hwsrc: indications
   Largestorage: true
   Loglevel: warning
   Notraps:
   Port: 161
   Privacy:
   Remoteusers:
   Syscontact:
   Syslocation:
   Targets: 192.168.1.50@162 public, 192.168.1.51@162 public
   Users:
   V3targets:
以下操作で、テスト用のsnmptrapを送信することができます。
[root@esxi142:~] esxcli system snmp test
   Comments: There are 2 targets configured, send warmStart requested, test completed normally.
[root@esxi142:~]
snmptrapdを構築したサーバで、確かにsnmptrapを受信したことを確認します。
[root@centos50 ~]# tail /var/log/messages
Apr 27 23:20:37 centos50 snmptrapd[11865]: 2021-04-27 23:20:37 NET-SNMP version 5.8 Stopped.
Apr 27 23:20:37 centos50 snmptrapd[11865]: Stopping snmptrapd
Apr 27 23:20:37 centos50 systemd[1]: Stopped Simple Network Management Protocol (SNMP) Trap Daemon..
Apr 27 23:20:37 centos50 systemd[1]: Starting Simple Network Management Protocol (SNMP) Trap Daemon....
Apr 27 23:20:37 centos50 snmptrapd[12411]: NET-SNMP version 5.8
Apr 27 23:20:37 centos50 systemd[1]: Started Simple Network Management Protocol (SNMP) Trap Daemon..
Apr 27 23:21:37 centos50 systemd[1]: Reloading.
Apr 27 23:21:37 centos50 systemd[1]: Stopping firewalld - dynamic firewall daemon...
Apr 27 23:21:38 centos50 systemd[1]: Stopped firewalld - dynamic firewall daemon.
Apr 27 23:21:51 centos50 snmptrapd[12411]: 2021-04-27 23:21:51 192.168.1.142(via UDP: [192.168.1.142]:59325->[192.168.1.50]:162) TRAP, SNMP v1, community public#012#011SNMPv2-MIB::snmpTraps Warm Start Trap (0) Uptime: 0:03:24.00
syslog
以下操作でsyslogの送付先を定義できます。複数のsyslogサーバへログを送付する場合は、カンマで区切ります。
esxcli system syslog config set --loghost=192.168.1.50,192.168.1.51
設定反映のためには、syslogの再起動が必要です。
esxcli system syslog reload
設定確認は以下の操作です。
[root@esxi142:~] esxcli system syslog config get
   Check Certificate Revocation: false
   Default Network Retry Timeout: 180
   Dropped Log File Rotation Size: 100
   Dropped Log File Rotations: 10
   Enforce SSLCertificates: true
   Local Log Output: /scratch/log
   Local Log Output Is Configured: false
   Local Log Output Is Persistent: true
   Local Logging Default Rotation Size: 1024
   Local Logging Default Rotations: 8
   Log Level: error
   Log To Unique Subdirectory: false
   Message Queue Drop Mark: 90
   Remote Host: udp://192.168.1.50,udp://192.168.1.51
   Remote Host Maximum Message Length: 1024
   Strict X509Compliance: false
syslog送付可能になるファイアウォールルールは、デフォルト設定では無効になっており、syslogの宛先を指定しただけではsyslogは送付されません。
ファイアウォールルールを許可する操作は以下の通りです。
esxcli network firewall ruleset set --ruleset-id=syslog --enabled=true
以下の操作でファイアウォールルールを確認できます。
[root@esxi142:~] esxcli network firewall ruleset list --ruleset-id=syslog
Name    Enabled
------  -------
syslog     true
syslogdが構築されたサーバで、ログを受信できていることを確認します。
[root@centos50 ~]# tail /var/log/messages
Apr 27 14:31:10 esxi142 osfsd: 266655  UNKNOWN VmklinkMPI-LIB : Matching request found for 0x1c2a,
Apr 27 14:31:10 esxi142 osfsd: 266655  UNKNOWN VmklinkMPI-LIB : Send got req = F407FB40F0 (ID: 1c2a)
Apr 27 14:31:10 esxi142 osfsd: 266655  UNKNOWN VmklinkMPI-LIB : Vmklink send sent total: 202 bytes of 202 needed
Apr 27 14:31:10 esxi142 osfsd: 266655  UNKNOWN VmklinkMPI-LIB : Sent request ID 1c2a size 181
Apr 27 14:31:10 esxi142 osfsd: 266655  UNKNOWN VmklinkMPI-LIB : { : ID: 0x1c2a, bufLen: 181 }
Apr 27 14:31:10 esxi142 osfsd: 266655  INFO OSFSVmklinkResourceAvailableCBHandler:518:resource available callback received
Apr 27 14:31:10 esxi142 Hostd: info hostd[264009] [Originator@6876 sub=Libs opID=sps-Main-490484-690-53-5c-5651 user=vpxuser:GOKATEI1.GO\vpxd-extension-d357b957-69f8-4aa6-b7af-6ed2c64de98a] (403)
Apr 27 14:31:10 esxi142 Hostd: info hostd[264009] [Originator@6876 sub=Libs opID=sps-Main-490484-690-53-5c-5651 user=vpxuser:GOKATEI1.GO\vpxd-extension-d357b957-69f8-4aa6-b7af-6ed2c64de98a] New error before the previous is handled
Apr 27 14:31:10 esxi142 Hostd: info hostd[264009] [Originator@6876 sub=Vimsvc.TaskManager opID=sps-Main-490484-690-53-5c-5651 user=vpxuser:GOKATEI1.GO\vpxd-extension-d357b957-69f8-4aa6-b7af-6ed2c64de98a] Task Completed : haTask--vim.vslm.host.CatalogSyncManager.queryCatalogChange-1631753624 Status success
Apr 27 14:31:10 esxi142 Vpxa: info vpxa[264373] [Originator@6876 sub=vpxLro opID=sps-Main-490484-690-53-5c] [VpxLRO] -- FINISH task-281
vCenter
ssh
vCenterの操作の一部はコマンドライン操作を必要とすることもあります。
sshによるログインを許可するかどうかはvCenterのインストール時に指定できますが、この指定はインストール後も変更可能です。
「vCenter管理(tcp5480でアクセスする画面)」にて、「アクセス」「編集」の順に押下します。
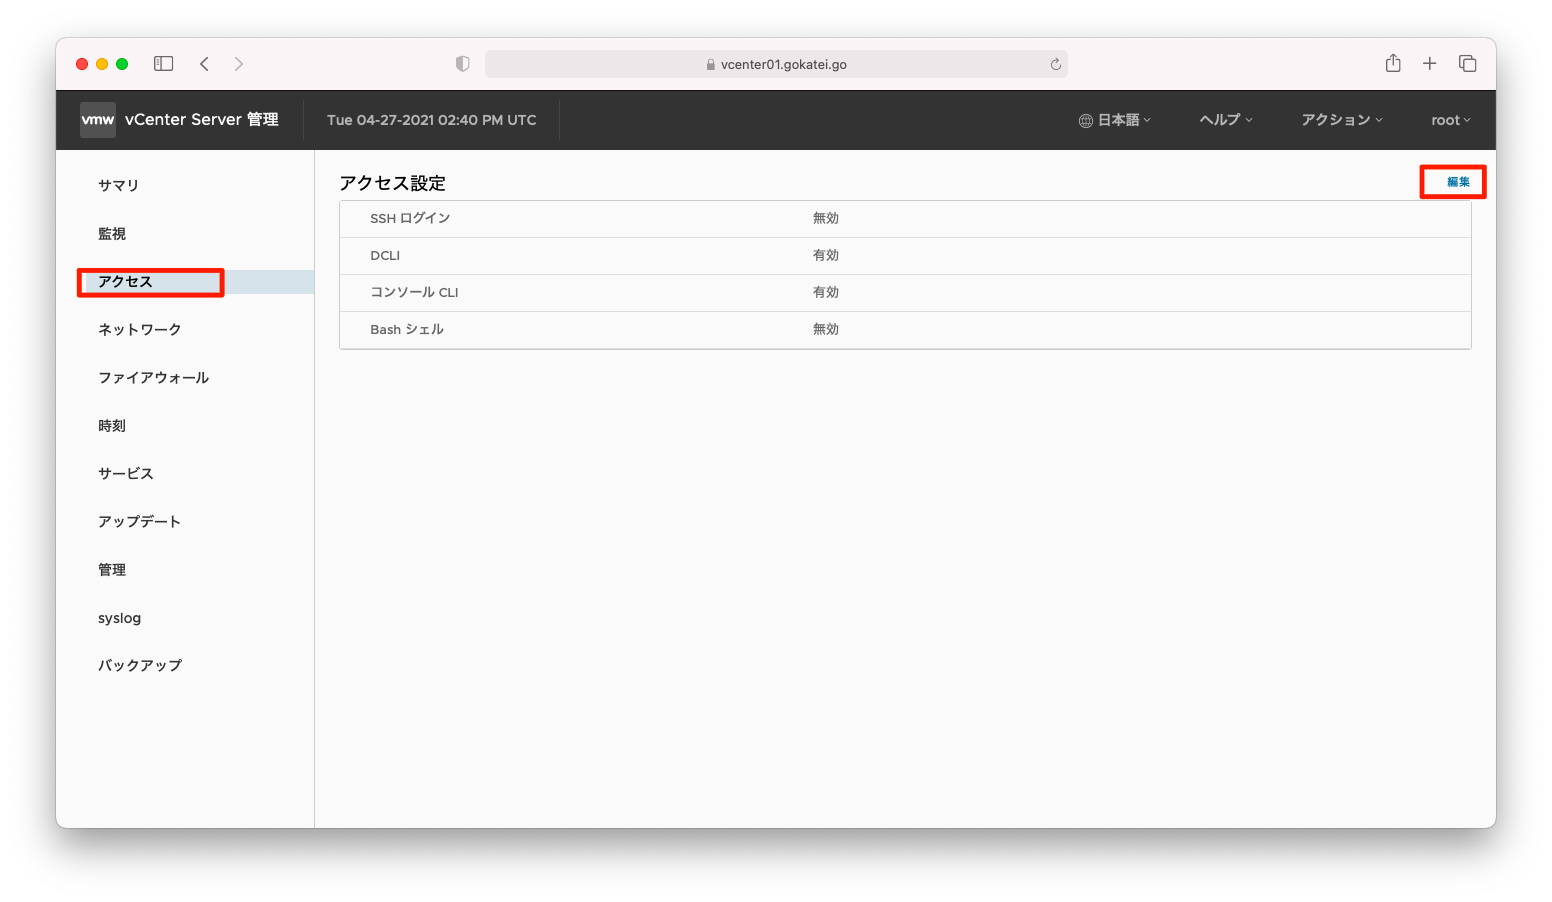
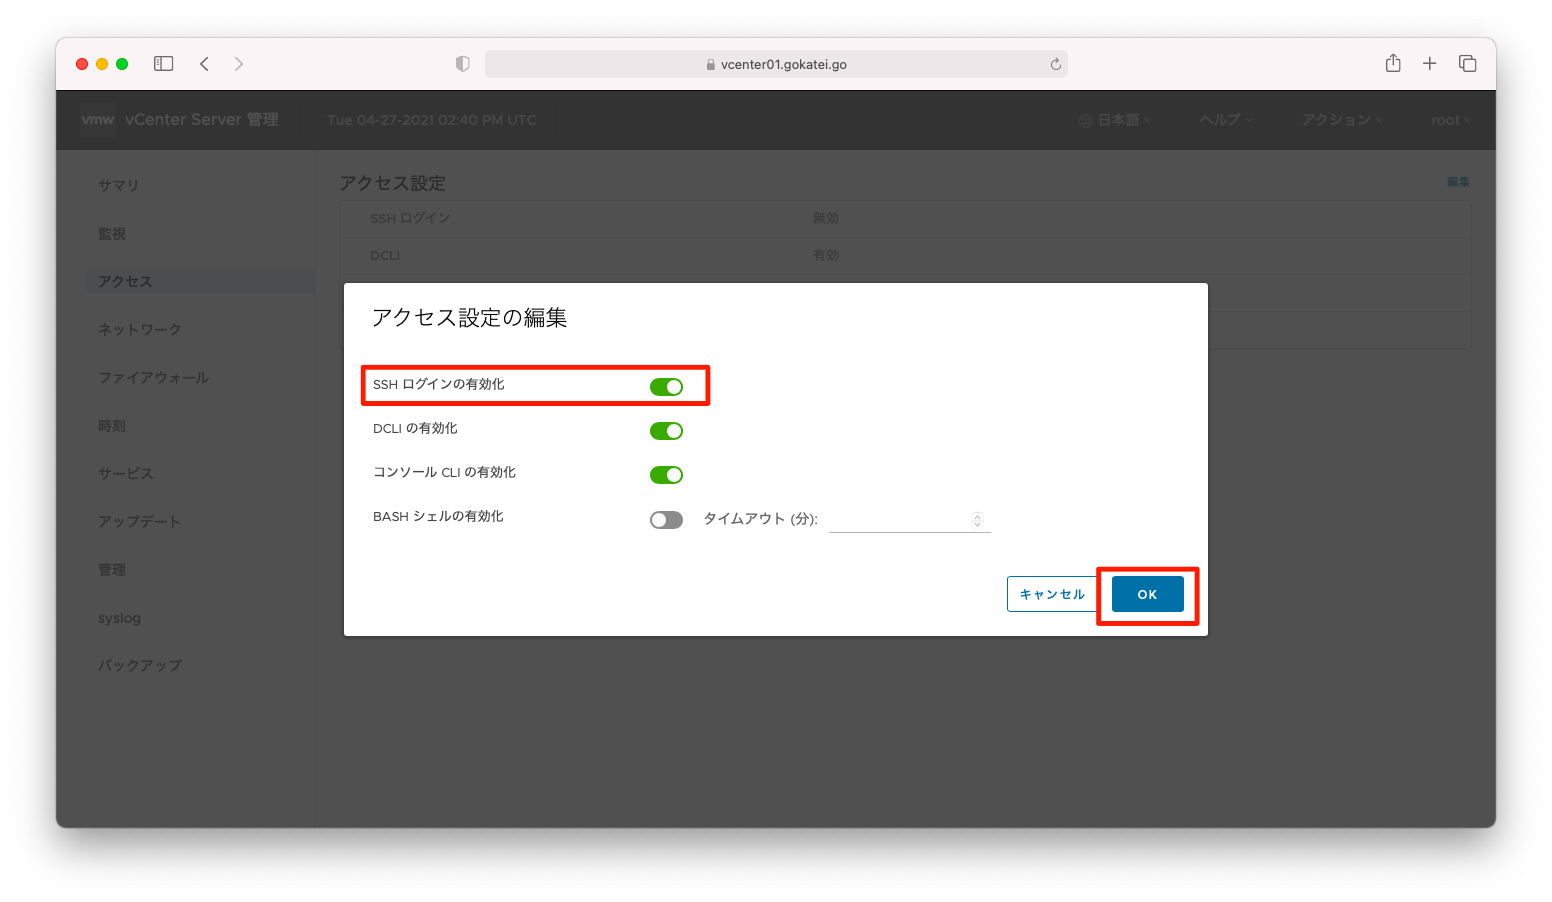
「SSHログインの有効化」を「有効」に変更し、「OK」を押下します。
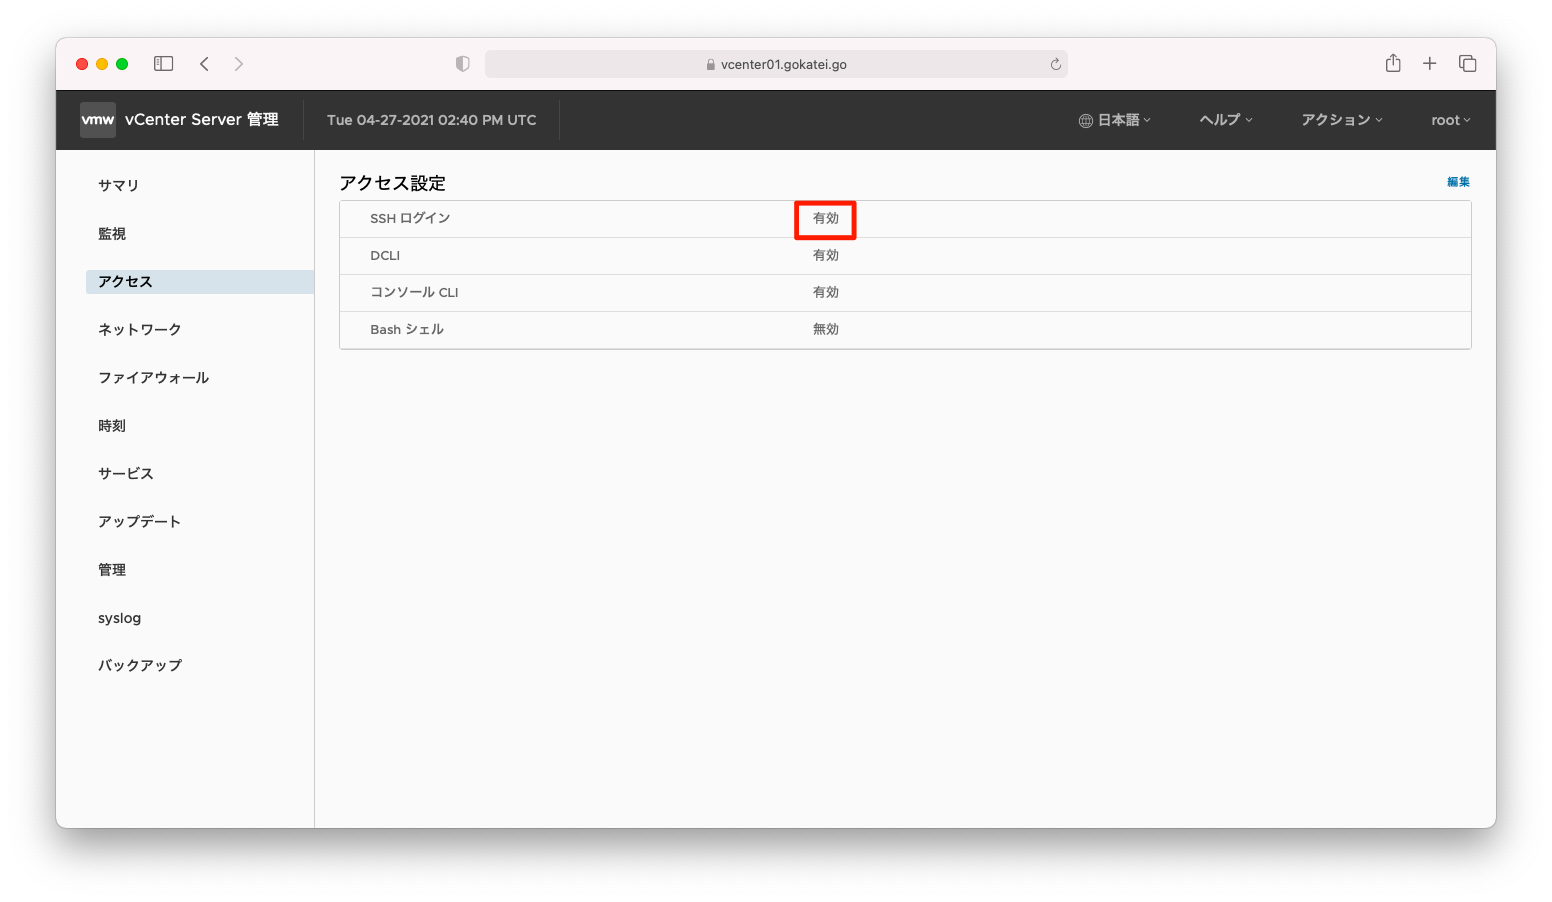
「SSHログイン」が「有効」に変わったことを確認します。
ntpサーバ
NTPサーバはvCenterのインストール時に指定できますが、この指定はインストール後も変更可能です。
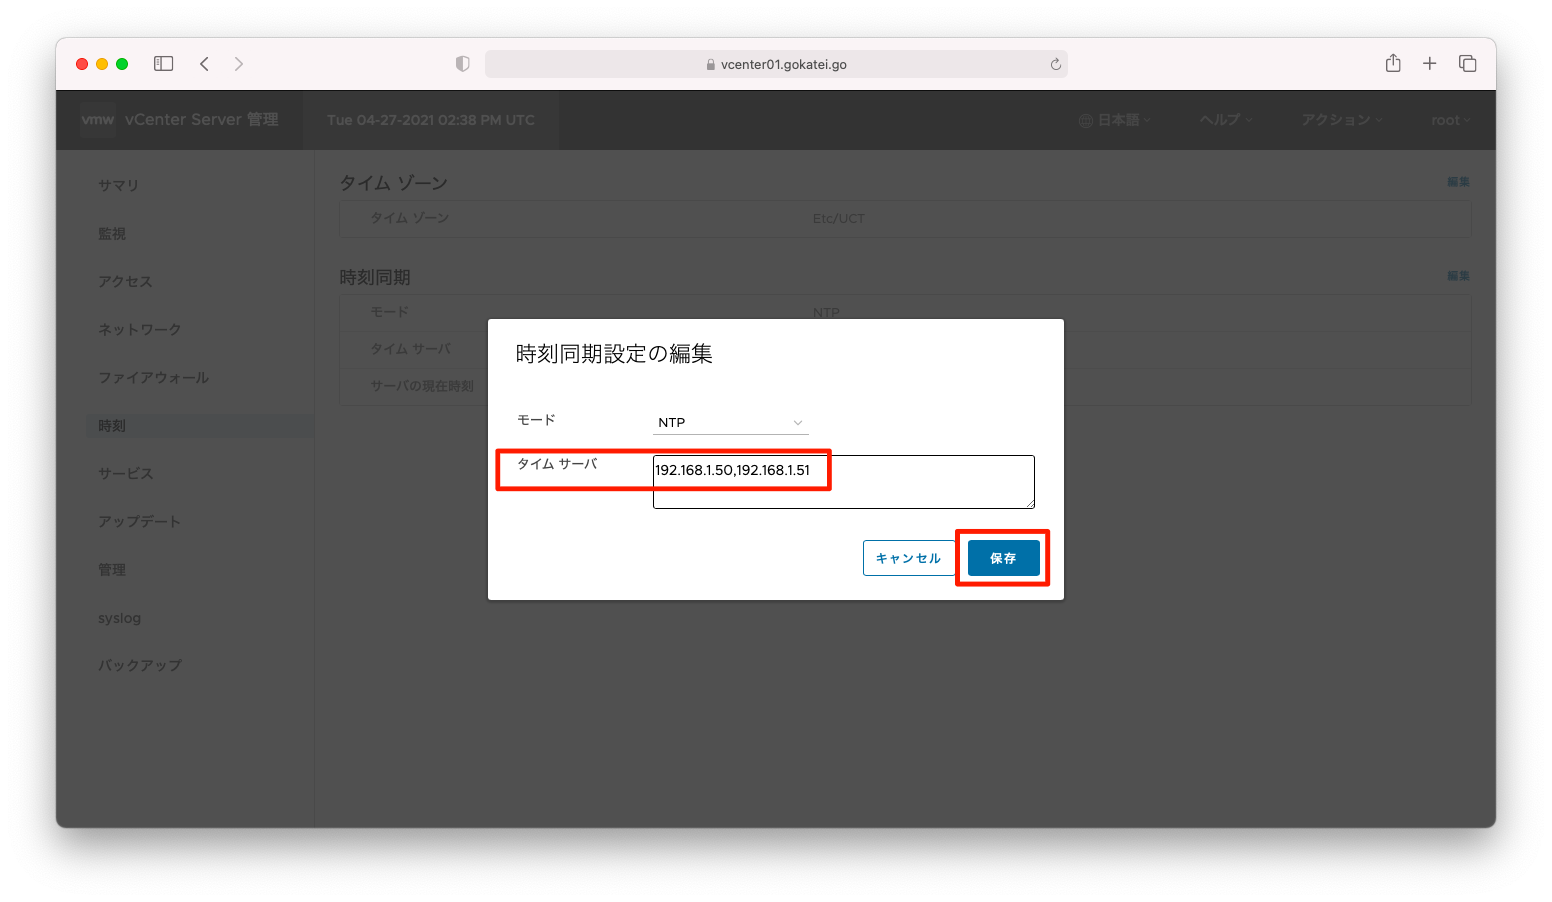
「vCenter管理(tcp5480でアクセスする画面)」にて、「時刻」「(時刻同期)編集」の順に押下します。
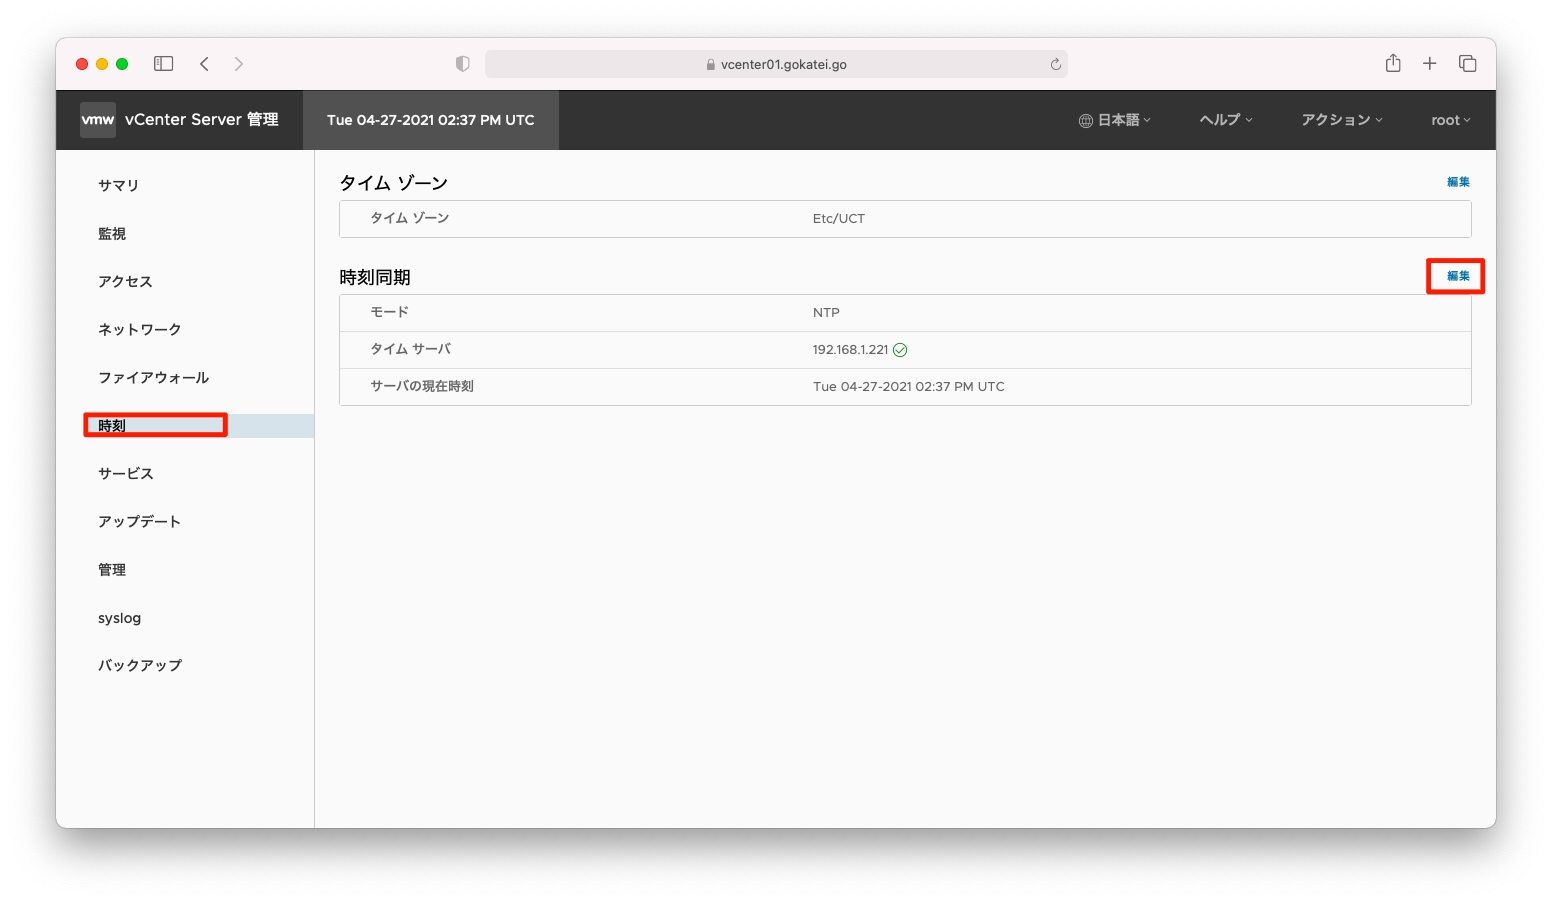
NTPサーバを指定し「保存」を押下します。複数のNTPサーバを指定する場合は、カンマ区切りで指定します。
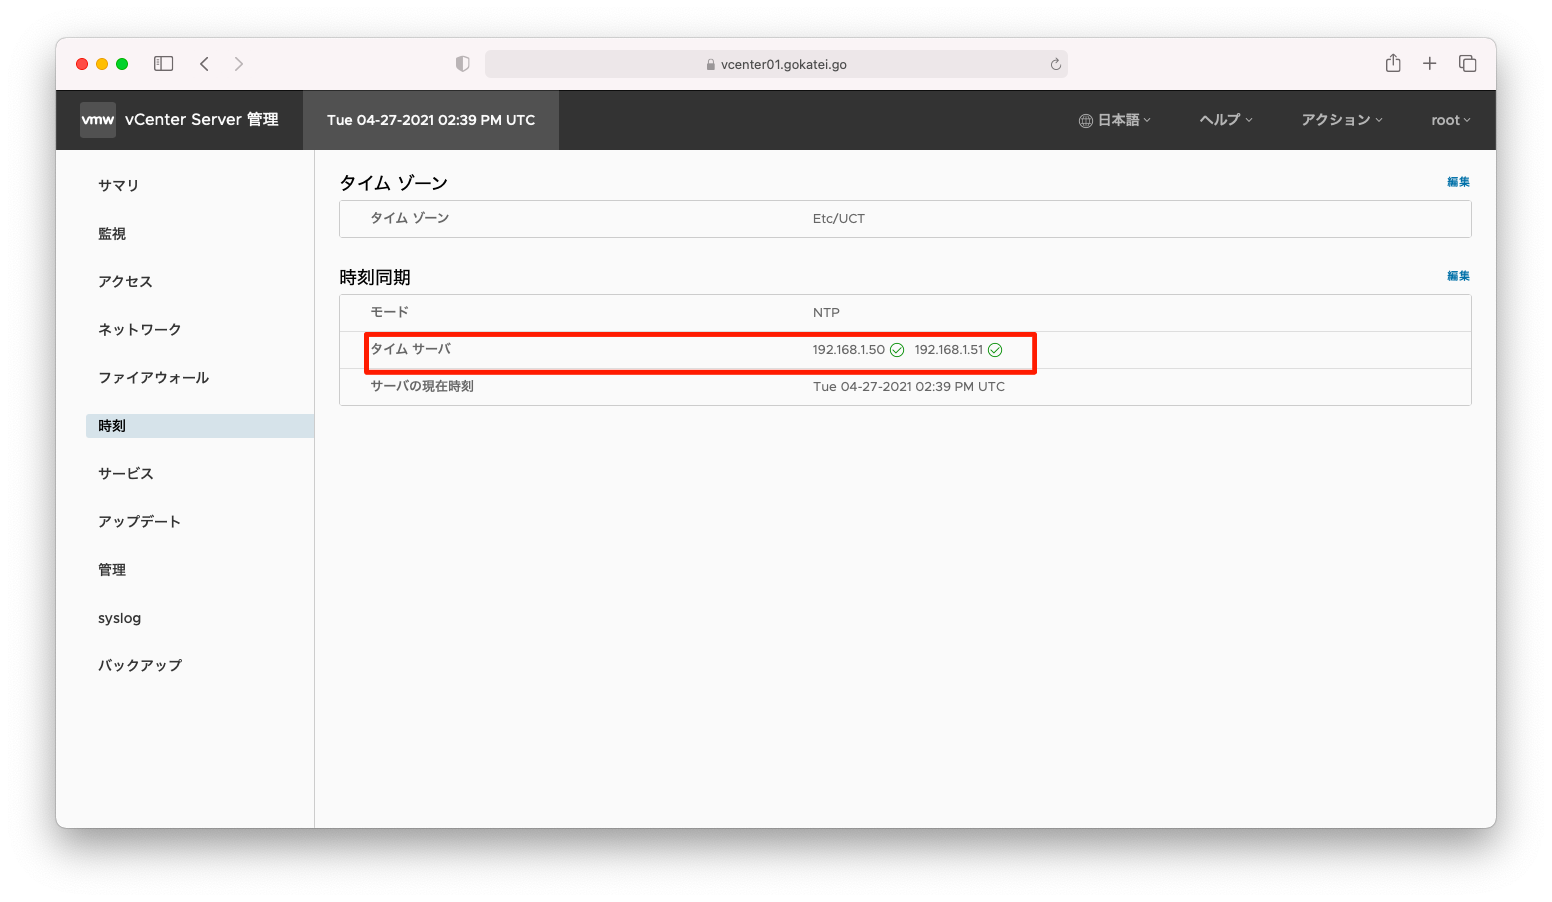
NTPサーバの設定が反映されたことを確認します。
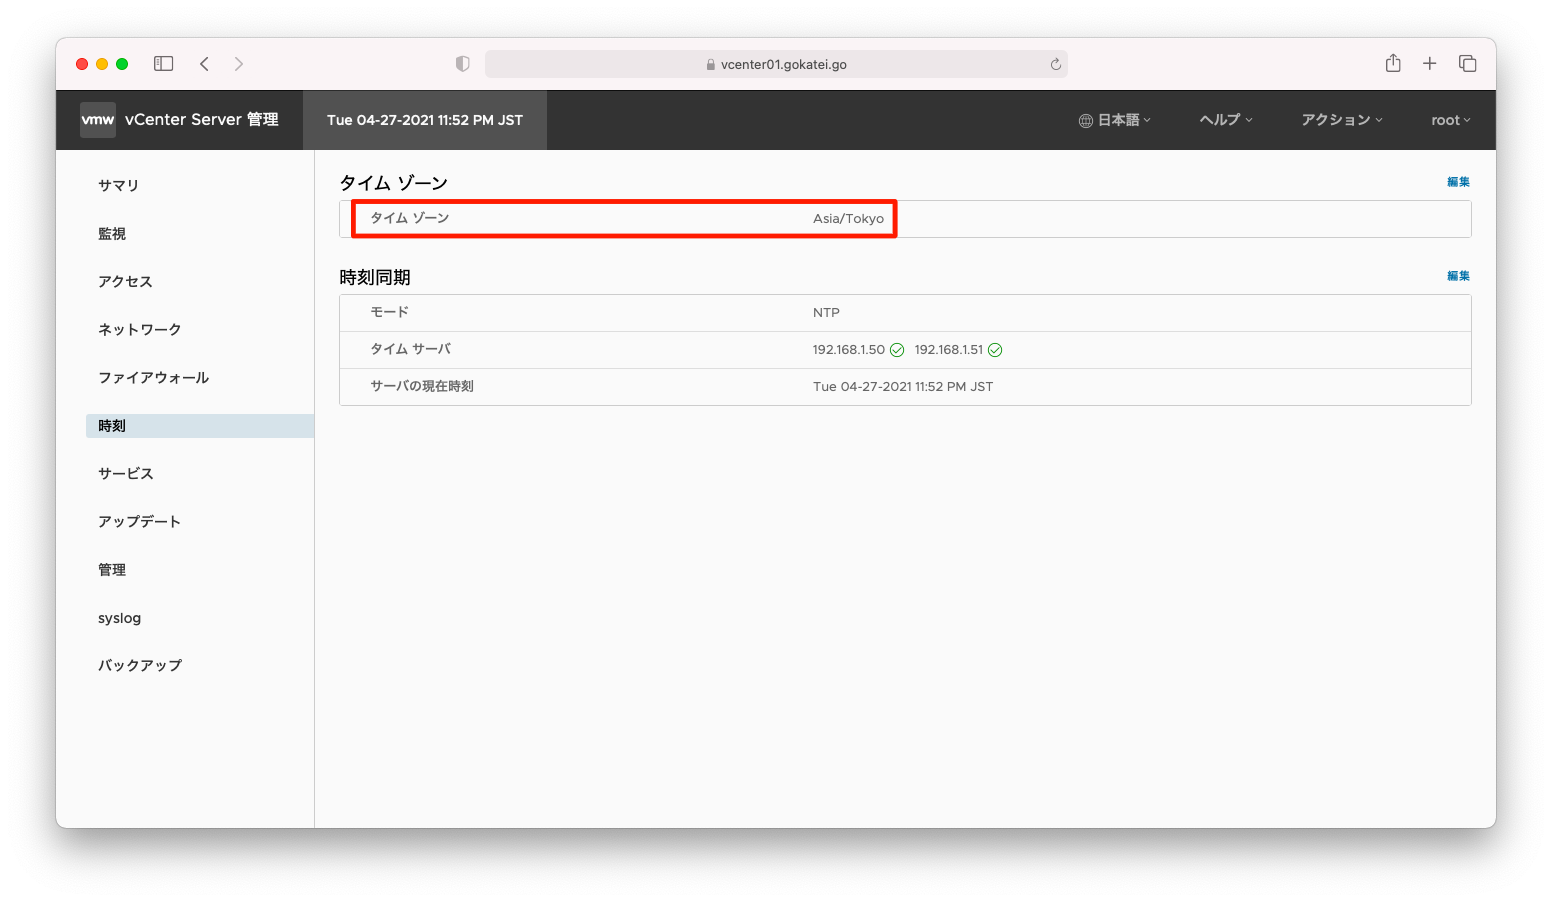
タイムゾーン
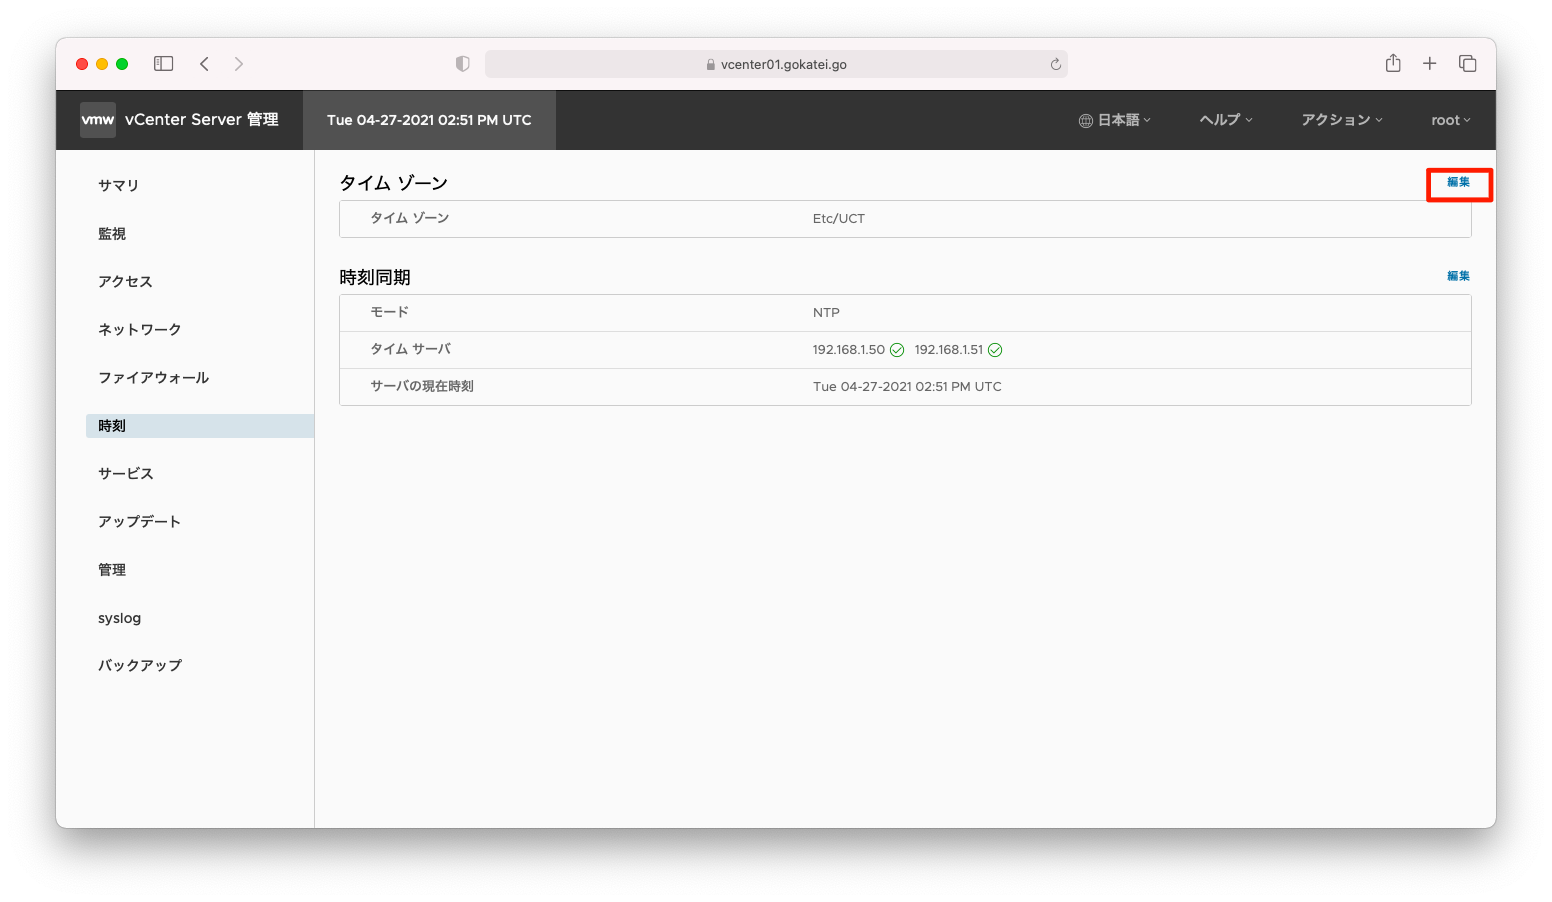
「vCenter管理(tcp5480でアクセスする画面)」にて、「時刻」「(タイムゾーン)編集」の順に押下します。
タイムゾーンを指定し「保存」を押下します。
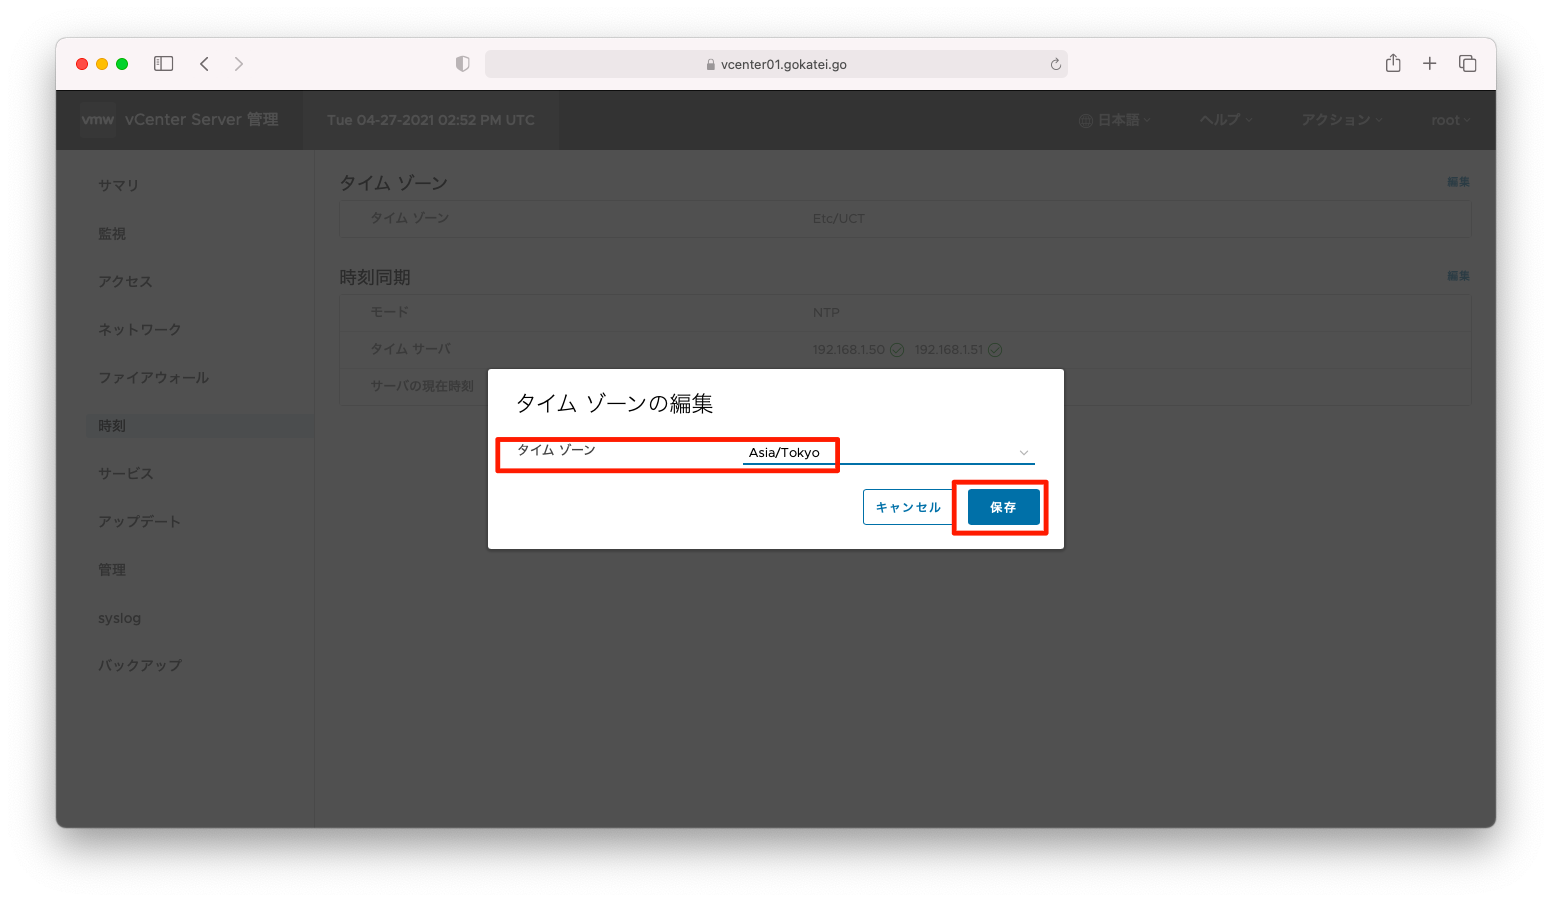
タイムゾーンの設定が反映されたことを確認します。
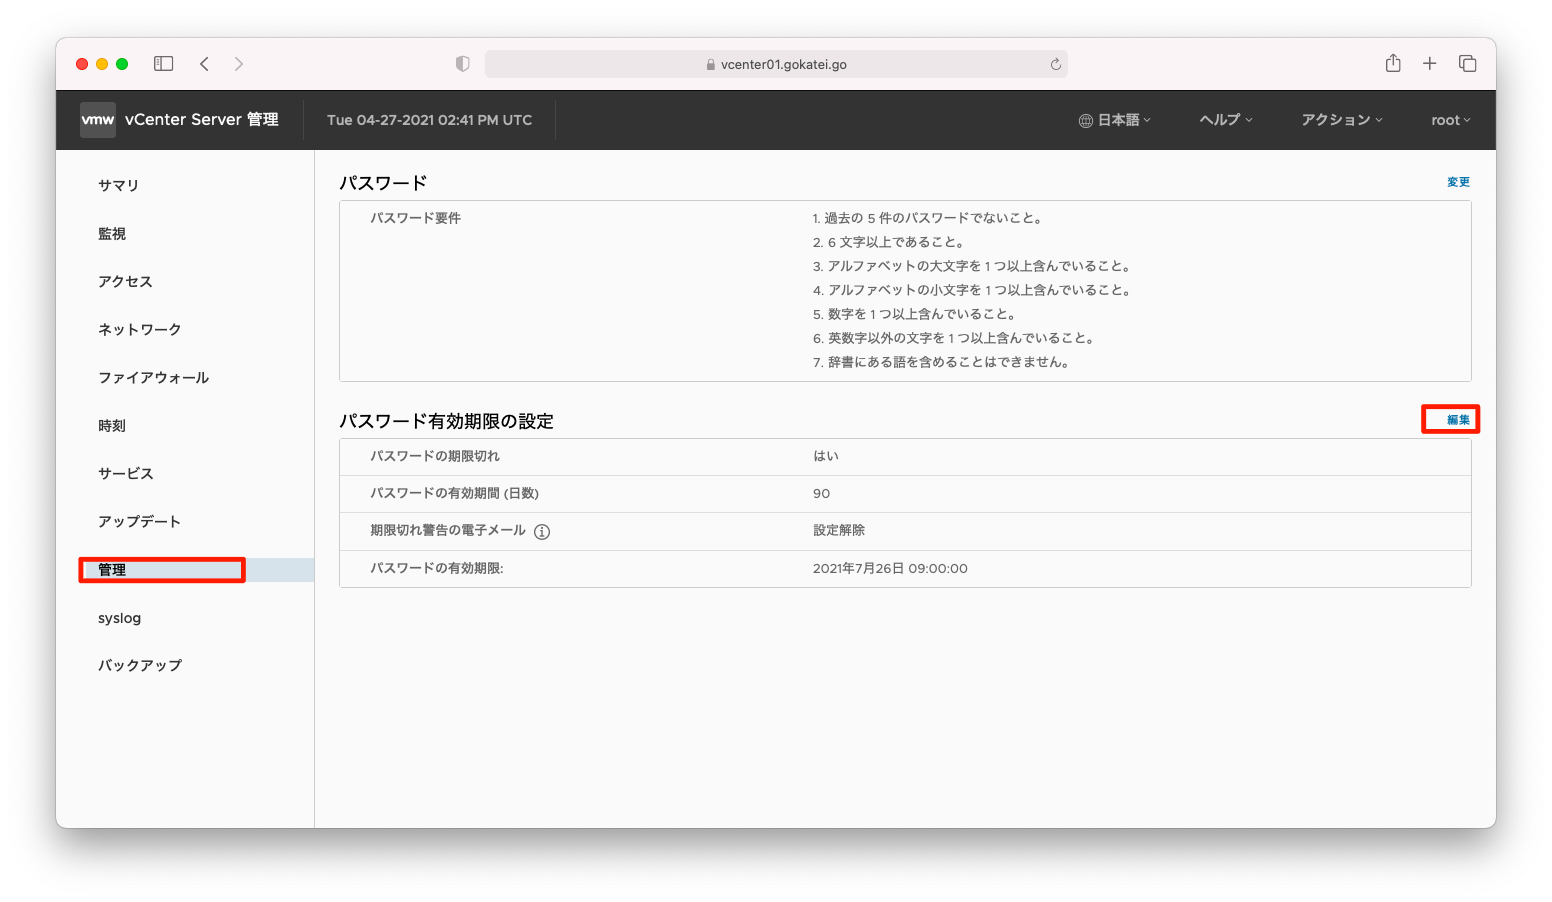
パスワード期限
vCenterのパスワードは、デフォルト設定では90日で期限切れを迎えます。例えば自動化の要件など、場合によってはこの挙動が不都合になるかもしれません。
パスワード更新期限を変更するには、「vCenter管理(tcp5480でアクセスする画面)」にて、「管理」「(パスワード有効期限の設定)編集」の順に押下します。
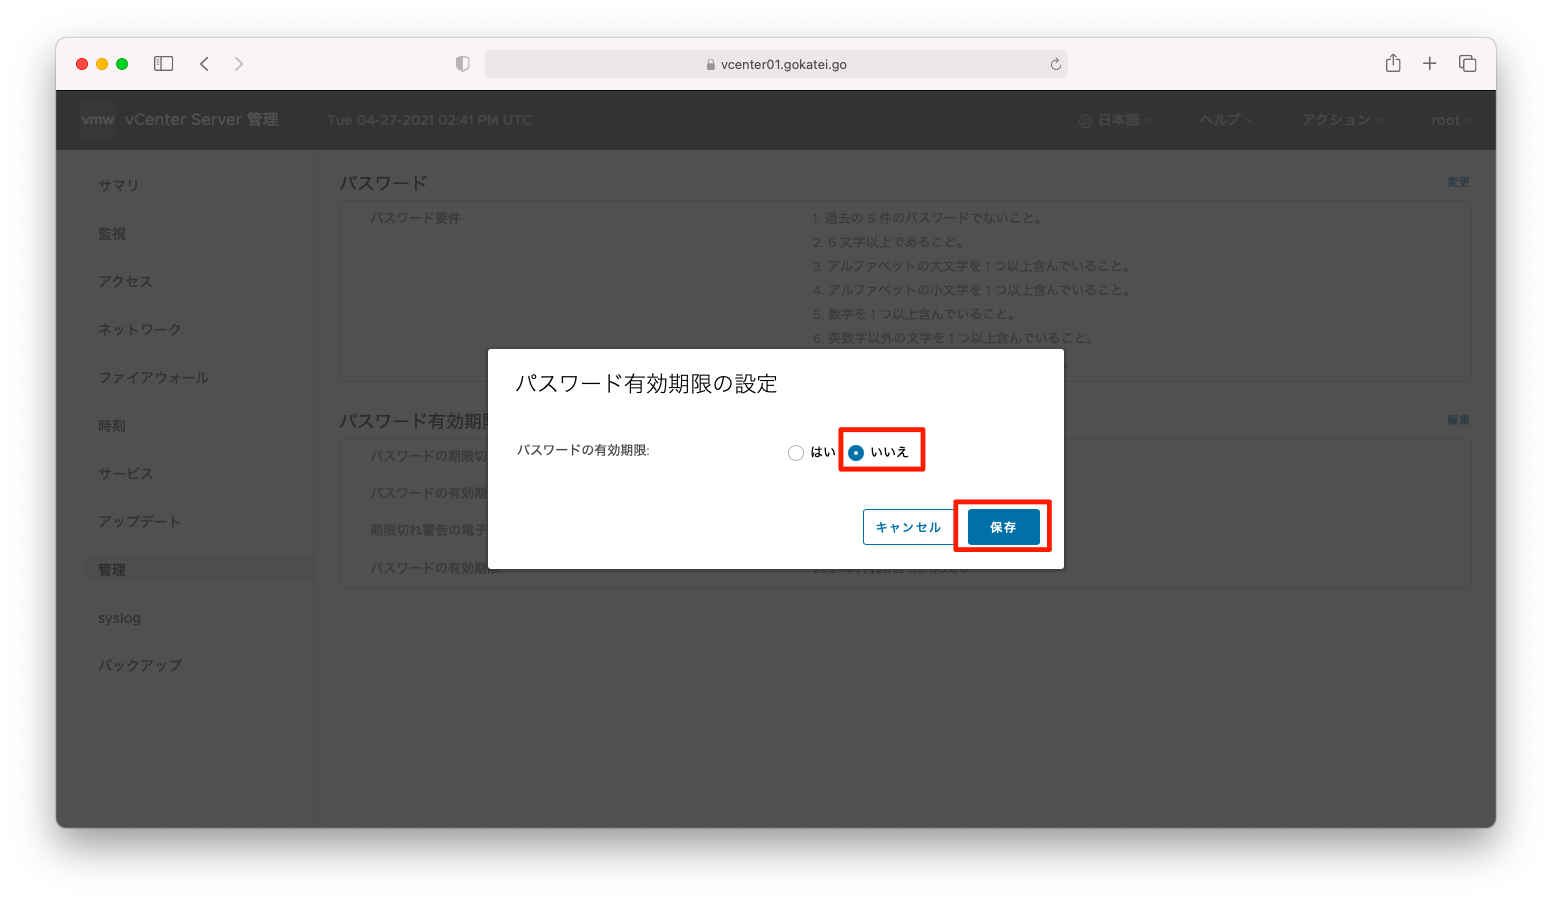
「パスワードの有効期限」を「いいえ」に変更し、「保存」を押下します。
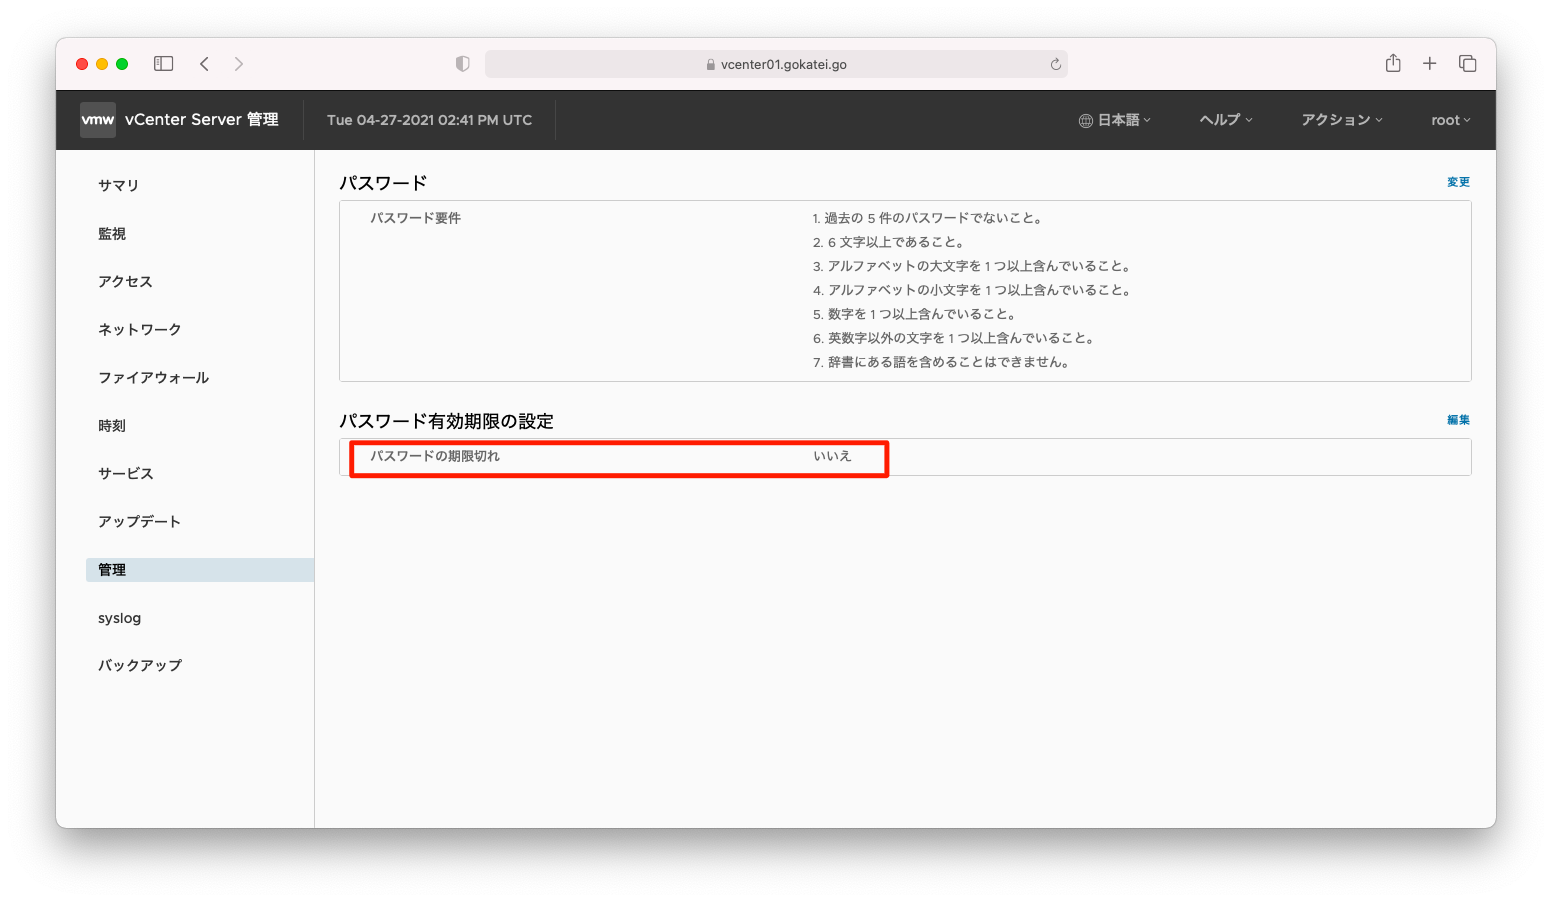
「パスワードの有効期限」が「いいえ」に変わったことを確認します。
syslog
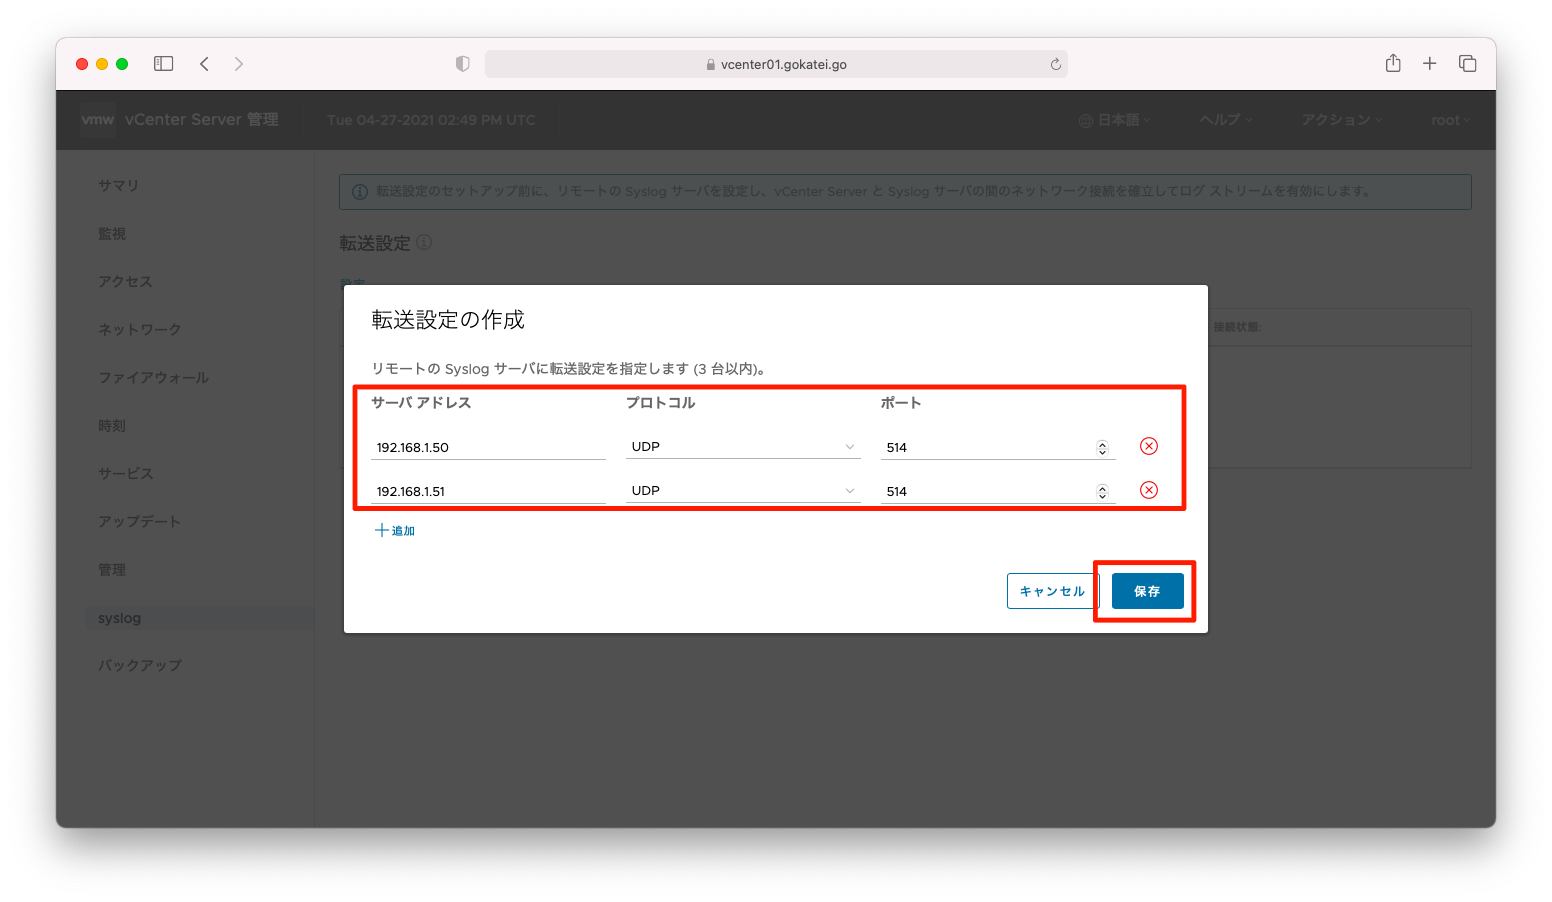
syslogサーバを指定するには、「vCenter管理(tcp5480でアクセスする画面)」にて、「syslog」「設定」の順に押下します。

syslogサーバを指定し「保存」を押下します。
この設定でも十分ですが、vCenterで記載されているログはデフォルト設定のタイムゾーンのままです。前述のタイムゾーンの設定が反映されるのは、vCenterのOS再起動などの操作が必要になります。もし、OS再起動が難しいようならば、syslogdのみの再起動も可能です。
syslogサーバにログが転送されているかどうかを確認します。ログは確かに転送されていますが、記載されているログはデフォルト設定のタイムゾーンのままのようです。
vCenterにsshでログインし、systemctlコマンドなどを用いてsyslogを再起動すればタイムゾーンの設定が反映されます。操作例は以下の通りです。
[root@centos50 ~]# ssh 192.168.1.191 -l root
The authenticity of host '192.168.1.191 (192.168.1.191)' can't be established.
ECDSA key fingerprint is SHA256:mrHh7NcsK9VSbBhR7SHtSL9u2RuA2js2lw/TcgG3g0U.
Are you sure you want to continue connecting (yes/no/[fingerprint])? yes
Warning: Permanently added '192.168.1.191' (ECDSA) to the list of known hosts.

VMware vCenter Server 7.0.2.00000

Type: vCenter Server with an embedded Platform Services Controller

root@192.168.1.191's password:
Last login: Tue Apr 27 20:09:25 2021 from 192.168.1.102
Connected to service

    * List APIs: "help api list"
    * List Plugins: "help pi list"
    * Launch BASH: "shell"

Command> shell
Shell access is granted to root
root@vcenter01 [ ~ ]# systemctl restart syslog.service
root@vcenter01 [ ~ ]#
確かに、syslogサーバにvCenterのログが転送されていることを確認します。
[root@centos50 ~]# tail /var/log/messages
Apr 27 23:55:57 vcenter01 observability-main [2021-04-28T02:55:57,154] INFO008151[Thread-149] - com.vmware.stellar.scheduler.PeriodicScheduler.schedulePlugin(PeriodicScheduler.java:149) - Plugin period value: 5 Projected period value: 5.0
Apr 27 23:55:57 vcenter01 observability-main [2021-04-28T02:55:57,154] INFO008151[Thread-149] - com.vmware.stellar.scheduler.PeriodicScheduler.run(PeriodicScheduler.java:107) - Executor is in progress: false Eligible for offload: false
Apr 27 23:55:57 vcenter01 observability-main [2021-04-28T02:55:57,154] INFO008151[Thread-149] - com.vmware.stellar.scheduler.PeriodicScheduler.schedulePlugin(PeriodicScheduler.java:149) - Plugin period value: 5 Projected period value: 5.0
Apr 27 23:55:57 vcenter01 observability-main [2021-04-28T02:55:57,154] INFO008151[pool-3-thread-4] - com.vmware.observability.system.uptimeCollectorPlugin.execute(uptimeCollectorPlugin.java:89) - Invoking Execute
Apr 27 23:55:58 vcenter01 ui-access 127.0.0.1 192.168.1.103 - - [28/Apr/2021:02:55:49 +1200] "GET /ui/usersession/sessionPing HTTP/1.1" 200 - 200004 70009081 http-nio-5090-exec-23 0 53F7E41F660E9DB3BA0CD064662F59FD -
Apr 27 23:55:58 vcenter01 ui-access 127.0.0.1 192.168.1.102 - - [28/Apr/2021:02:55:53 +1200] "GET /ui/usersession/sessionPing HTTP/1.1" 200 - 200003 70009082 http-nio-5090-exec-31 1 F7F7DB8AD8A3AA6875AEAC78F90932BC -
snmpd
vCenterでsnmpdを起動し、snmpgetなどに応答する状態にすることはできません。公式ドキュメント「vCenter Server での SNMP トラップの使用
」で、「vCenter Server の SNMP エージェントはトラップ エミッタとしてのみ機能し、GET、GETBULK、および GETNEXT 要求の受信などその他の SNMP 操作はサポートされていません。」と明記されています。
snmptrapd
snmptrapを有効にするには、vCenterへsshログインし、shellモードへ移行します。その後、以下のような操作をします。snmptrapの送付先が複数ある場合は、カンマで区切って指定します。
vicfg-snmp --targets=192.168.1.50@162/public,192.168.1.51@162/public
vicfg-snmp --enable
Contactなど、上記以外の設定が必要となる場合は、ヘルプを参照しつつ設定します。ヘルプの表示方法は以下の通りです。
root@vcenter01 [ ~ ]#  vicfg-snmp --help
Usage: vicfg-snmp [options]

Options:
  -h, --help            show this help message and exit
  -c COMMUNITIES, --communities=COMMUNITIES
                        Specifies communities, separated by commas. The
                        settings specified using this option overwrite any
                        previous settings. The settings specified using this
                        flag overwrite any previous settings.
  -D, --disable         Stops the SNMP service on the host.
  -e, --enable          Starts the SNMP service on the host.
  -p PORT, --port=PORT  Sets the port used by the SNMP agent. The default is
                        UDP 161. This is the port that the SNMP service uses
                        to listen on for polling requests, such as GET
                        requests. You can also configure the port that the
                        SNMP agent sends data to on the target system using
                        the --targets option. That port is UDP 162 by default
設定確認は以下の通りです。
root@vcenter01 [ ~ ]# vicfg-snmp --show
Current SNMP agent setting
Enabled                 : true
UDP port                : 161
V1/V2c Communities      :
V2c Notification targets : 192.168.1.50@162 public 192.168.1.51@162 public
Notification filter oids:
V3 Notification targets :
V3 Users                :
Contact                 :
Location                :
Engine ID               : 80001f888063451440672a886000000000
Auth Protocol           : usmNoAuthProtocol
Priv Protocol           : usmNoPrivProtocol
Log level               : warning
Process ID              : 5825
Large Storage Support   : False
Simple Application Names: True
INFO: listing complete.
テスト用snmptrapの送付もできます。
root@vcenter01 [ ~ ]# vicfg-snmp --test
message                      : A warmStart notification was sent to 2 targets.
success                      : True
root@vcenter01 [ ~ ]#
snmptrapdサーバにsnmptrapが届いているかどうかを確認します。
[root@centos50 ~]# tail /var/log/messages
Apr 27 23:57:23 vcenter01 applmgmt-audit 2021-04-27T14:57:23.908: INFO Authorization request by user: root for service_id: com.vmware.appliance.logging.forwarding, operation_id: set
Apr 27 23:57:23 vcenter01 applmgmt 2021-04-27T14:57:23.908 [2145]DEBUG:vmware.vherd.base.authorization_local:Verify privileges user (root) privilege ['ModifyConfiguration']
Apr 27 23:57:23 vcenter01 applmgmt-audit 2021-04-27T14:57:23.908: INFO AuthorizationResponse = { authorized=True, method=LOCAL }
Apr 27 23:57:23 vcenter01 applmgmt 2021-04-27T14:57:23.908 [2145]DEBUG:root:Validated user privileges in localstore or SSO
Apr 27 23:57:23 vcenter01 applmgmt-audit 2021-04-27T14:57:23.908: INFO Authorization Result: User=root, priv=ModifyConfiguration, authorized=True
Apr 27 23:57:23 vcenter01 applmgmt 2021-04-27T14:57:23.908 [2145]DEBUG:vmware.appliance.update.update_state:In State._get using state file /etc/applmgmt/appliance/software_update_state.conf
Apr 28 00:11:29 centos50 kernel: device ens192 entered promiscuous mode
Apr 28 00:19:50 centos50 snmptrapd[12411]: 2021-04-28 00:19:50 vcenter01.gokatei.go.168.192.in-addr.arpa [UDP: [192.168.1.191]:49388->[192.168.1.50]:162]:#012DISMAN-EVENT-MIB::sysUpTimeInstance = Timeticks: (34) 0:00:00.34#011SNMPv2-MIB::snmpTrapOID.0 = OID: SNMPv2-MIB::coldStart#011SNMPv2-MIB::snmpTrapEnterprise.0 = OID: SNMPv2-SMI::enterprises.6876.4.6876
Apr 28 00:20:02 centos50 snmptrapd[12411]: 2021-04-28 00:20:02 vcenter01.gokatei.go.168.192.in-addr.arpa [UDP: [192.168.1.191]:49388->[192.168.1.50]:162]:#012DISMAN-EVENT-MIB::sysUpTimeInstance = Timeticks: (1212) 0:00:12.12#011SNMPv2-MIB::snmpTrapOID.0 = OID: SNMPv2-MIB::warmStart#011SNMPv2-MIB::snmpTrapEnterprise.0 = OID: SNMPv2-SMI::enterprises.6876.4.6876
Apr 28 00:20:13 centos50 kernel: device ens192 left promiscuous mode